• Skip to primary navigation
  • Skip to main content
  • Skip to primary sidebar
  • Home
  • About
    • About I Sugar Coat It
    • Features & Press
    • Copyright
    • Disclosure
    • Privacy Policy
  • Recipes
  • How-To
  • Contact
  • sous vide sista

I Sugar Coat It

Home

All Posts

White Chocolate Coconut Mousse Funfetti Cake. Layers of funfetti cake and clouds of white chocolate mousse molded into a fun little cake to welcome spring!

March 2017 By i sugar coat it! 14 Comments

White Chocolate Coconut Mousse Funfetti Cake

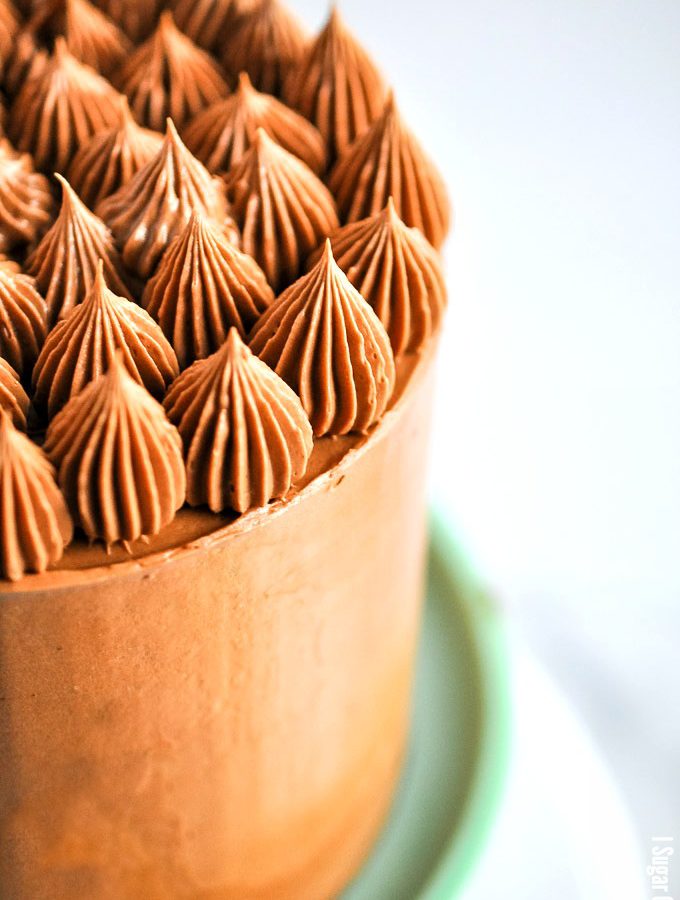
Layers of funfetti-filled cake and clouds of white chocolate mousse molded into a fun little cake to welcome spring! 

White Chocolate Coconut Mousse Funfetti Cake. Layers of funfetti cake and clouds of white chocolate mousse molded into a fun little cake to welcome spring!

It's SPRING, ya'll and I'm celebrating with White Chocolate Coconut Mousse Funfetti Cake! If you're as excited, I have a slice with your name (and likely my teeth marks) all over it. No need to thank me, a true friend is one who shares equally in your calorie intake. Or, so the saying goes... 😉

I am beyond giddy at the thought of shedding my long undies, puffy coat and even puffier boots. Ok, it is still cold and stark AF, but that's all about to change and change, my friends, is exciting!

White Chocolate Coconut Mousse Funfetti Cake. Layers of funfetti cake and clouds of white chocolate mousse molded into a fun little cake to welcome spring!This mound of joy is as colourful in taste, as it is in looks. An edible confetti-filled, coconut cake soaked with pineapple simple syrup and sandwiched between clouds of white chocolate coconut mousse. The flavour of this White Chocolate Coconut Mousse Funfetti Cake is reminiscent of one of my favourite tropical cocktails, Pina Colada, like here and here.

The mousse is rather simple to make and holds its shape well without being dry and stiff. It's a two-ingredient recipe based on one I found on Kraft. I used coconut cream in place of the dairy whipping cream, so that I could further play up the coconut flavour, but also for the dairy-sensitive among us.

This cake was made with kids in mind (a friend's little girl), but you can easily make it very adult by adding a little coconut rum or pineapple liqueur to the simple syrup and give the cake layers a generous soaking.

White Chocolate Coconut Mousse Funfetti Cake. Layers of funfetti cake and clouds of white chocolate mousse molded into a fun little cake to welcome spring!The finish on this White Chocolate Coconut Mousse Funfetti Cake is the same technique I used here. I realize that this isn't something everyone has the tools for, or the interest in trying. Instead, you can choose to colour the entire batch one colour, or cover the entire mound in any combination of sprinkles of your choosing. Whatever works best for you!

You will notice in my process shots below, cake layers in three sizes, while the finished cake only has two. Well, I misjudged the depth of the mold and cut the layers too thick, so it could only accommodate two. 🙁 No waste here, I made some mini trifles with the leftovers that I'll share soon.

The edible confetti laden cake delivers a party in each slice, making it a fun addition to any celebration. It could easily be made into any number of characters - I see a bunny version in our very near future! Yes?

White Chocolate Coconut Mousse Funfetti Cake. Layers of funfetti cake and clouds of white chocolate mousse molded into a fun little cake to welcome spring!
Print Recipe
4.60 from 5 votes

White Chocolate Coconut Mousse Funfetti Cake

White Chocolate Coconut Mousse Funfetti Cake. Layers of funfetti cake and clouds of white chocolate mousse molded into a fun little cake to welcome spring!
Prep Time20 minutes mins
Cook Time35 minutes mins
Total Time55 minutes mins
Course: Dessert
Cuisine: Cake
Servings: 6
Author: i sugar coat it!

Ingredients

For the mousse:

  • 340 grams white chocolate
  • 706 grams coconut cream 3 cups

For the simple syrup:

  • 200 grams granulated sugar
  • 200 grams water
  • 5 grams pineapple extract or pineapple liqueur

For the coconut cake:

  • 90 grams egg whites 3 large eggs
  • 160 grams coconut milk ⅔ cup
  • 1 vanilla bean, scraped I use Rodelle
  • 200 grams cake flour 2 cups
  • 9.5 grams baking powder 2 ½ + ⅛ teaspoons,
  • 200 grams granulated sugar 1 cup
  • 2.5 grams salt ½ teaspoon
  • 113 grams unsalted butter 1 stick
  • 96 grams confetti sprinkles ½ cup
  • rainbow sprinkles as much, or as little as you like

Instructions

Make the cakes:

  • Preheat oven to 350º. Prepare pans with cake release (or your preferred method) and place on a baking sheet pan.
  • Add the egg whites, 3 tablespoons of the milk and the scraped vanilla beans in a bowl and use a hand whisk to just combined.
  • In the bowl of a stand mixer, sift together the flour and baking powder. Add the sugar and salt and mix on low speed for 30 seconds using the paddle attachment.
  • Add the remaining milk and butter and mix on low speed to moisten the dry ingredients. Increase the speed to medium and continue to mix for 1.5 minutes, stopping to scrape down the sides when needed.
  • Reduce the speed to medium ­low and add the egg white mixture to the batter in two parts. Beat for 30 seconds after each addition to incorporate fully. Scrape the sides of the bowl, as needed. Fold in the confetti.
    White Chocolate Coconut Mousse Funfetti Cake. Layers of funfetti cake and clouds of white chocolate mousse molded into a fun little cake to welcome spring!
  • Distribute the batter evenly among the the three size pans, then use an offset spatula to spread and smooth the batter. Place on a baking tray and set the tray on the middle rack of your oven.
    White Chocolate Coconut Mousse Funfetti Cake. Layers of funfetti cake and clouds of white chocolate mousse molded into a fun little cake to welcome spring!
  • Bake for 25-­30 minutes. Test for doneness with a cake tester or toothpick.
  • Remove from the oven and and allow to cool for 10 minutes on a wire rack. After 10 minutes, turn the cakes out on to the wire rack to cool completely.
  • Once completely cool, level and trim cake, if needed. Then cut a quarter-inch layer of each round. Soak with simple syrup, if needed.
    White Chocolate Coconut Mousse Funfetti Cake. Layers of funfetti cake and clouds of white chocolate mousse molded into a fun little cake to welcome spring!

Make the mousse:

  • Place the chocolate and ½ cup of cream in a large heatproof bowl and heat over a double boiler, or in a microwave, stirring until the chocolate is completely melted. 
  • Place the remaining cream in the bowl of a stand mixer and whip to soft, stable peaks.
  • Use a handheld whisk to fold in half the whipped cream into the chocolate mixture until combined. Fold in the remainder of the whipping cream in the same manner, until fully incorporated. use immediately, or keep chilled until ready to use.
    White Chocolate Coconut Mousse Funfetti Cake. Layers of funfetti cake and clouds of white chocolate mousse molded into a fun little cake to welcome spring!

Assemble the cake:

  • Pipe some mousse to the bottom of the mold (this will become the top of the cake). Pull some of the mousse up along the sides of the mold and place the smallest cake layer over the mousse. Pusk and jiggle lightly so that it settles into the mousse.
    White Chocolate Coconut Mousse Funfetti Cake. Layers of funfetti cake and clouds of white chocolate mousse molded into a fun little cake to welcome spring!
  • Pipe some more mousse over the cake layer, then repeat with the next size cake layer. Top with more mousse and if the mold can accommodate another layer, add it and top with mousse. Use a spatula to smooth and finish up the bottom. Chill for at least four hours, preferably overnight. 
    White Chocolate Coconut Mousse Funfetti Cake. Layers of funfetti cake and clouds of white chocolate mousse molded into a fun little cake to welcome spring!
  • Remove from the fridge/freezer and turn onto a plate or cake board before peeling off the mold. 
    White Chocolate Coconut Mousse Funfetti Cake. Layers of funfetti cake and clouds of white chocolate mousse molded into a fun little cake to welcome spring!
  • Use any remaining to correct any area damages during unmolding. Finish the cake with a light airbrush of cocoa butter and chocolate mixture, or cover with sprinkles, chocolate curls, anything your heart desires. Decorate the base by piping some of the remaining mousse with a # tip.
    White Chocolate Coconut Mousse Funfetti Cake. Layers of funfetti cake and clouds of white chocolate mousse molded into a fun little cake to welcome spring!

Make the simple syrup:

  • Add the sugar and water to a small saucepan and bring to a boil, stirring occasionally until the sugar is completely dissolved.
  • Remove from heat and allow to cool. Stir in the pineapple extract. 
  • Use a pasty brush or squeeze bottle to soak the cake layers.

Notes

The Silikomart mold is from Golda's Kitchen, which is local to me. It is available in 7" and 4.5" sizes. I've also included an Amazon link below.
Mousse may be refrigerated in an airtight container for up to four days.
If you do not have pans in these various sizes, you may bake the cake in the larger size pan, cut into three layers (tort) and use pastry rings, or a DIY cake board or parchment template to make the various sizes. 
If you do not own a dome mold, tort and fill the cake and manually carve the cake into the desired shape.
Cake recipe adapted from Rose's Heavenly Cakes.


Baileys Caramelized Chocolate Pots de Creme. A smooth, rich, delectable custard with buttery, toasty Dulcey blond chocolate and creamy Baileys Irish Cream.

March 2017 By i sugar coat it! 39 Comments

Baileys Caramelized Chocolate Pots de Creme

A smooth, rich, delectable custard with buttery, toasty Dulcey blond chocolate and creamy Baileys Irish Cream. 

Baileys Caramelized Chocolate Pots de Creme. A smooth, rich, delectable custard with buttery, toasty Dulcey blond chocolate and creamy Baileys Irish Cream.
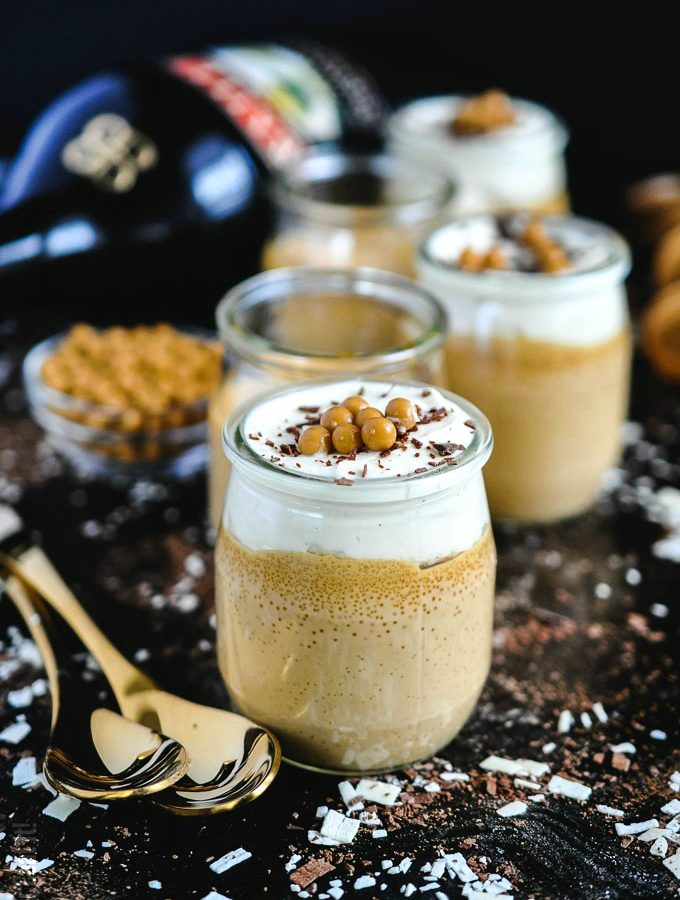
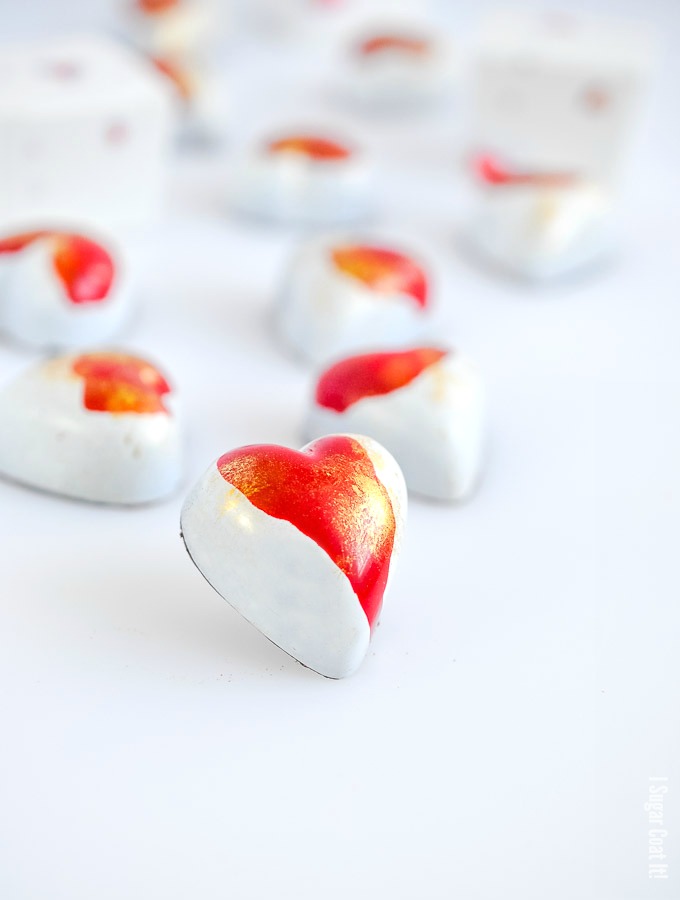
If you're not into green beer and the like, these Baileys Caramelized Chocolate Pots de Creme just might be the thing for you. With only four ingredients, they are bound to release your inner kitchen leprechaun.

I've taken one of my favourite liqueurs and paired it with my love of Valrhona's dulcey caramelized white chocolate for an irresistibly decadent treat. It's one of the simpler desserts on my blog and I'm pretty much head-over-heels in love with it.

That wasn't always the case, however. I experimented with gianduja and cherry baileys, but my taste testers felt the baileys overpowered the hazelnut flavour. To be completely honest, the cherry-flavour baileys hasn't quite grown on me. The original and the salted caramel varieties, however, are alright with me. But, I digress... just a little.

Baileys Caramelized Chocolate Pots de Creme. A smooth, rich, delectable custard with buttery, toasty Dulcey blond chocolate and creamy Baileys Irish Cream.I attempted a few more flavour combinations that aren't worth mentioning. I do plan to revisit the hazelnut cherry combo - I think it has the potential to be spectacular! Until then, let's get back to these Baileys Caramelized Chocolate Pots de Creme.

The custard is great on its own, but the addition of a little crunchy contrast mixed in, topped with clouds of whipped coconut cream brought it to dreamy status. Better still, presenting them in these little jars as after dinner take home treats.

Baileys Caramelized Chocolate Pots de Creme. A smooth, rich, delectable custard with buttery, toasty Dulcey blond chocolate and creamy Baileys Irish Cream.

I am all about the 3Rs - reduce, reuse, recycle - have been since my high school environmental science days. Now, enter a colleague/friend at work with an obsession for Riviera yogurt and the resulting jar collection. She gave me a bunch and I've collected a few of my own, since she passed on her yogurt obsession to me.

The yogurt comes in cute, little, four-pack glass jars, called petit pot. Could there be a more perfect vessel for my  Baileys Caramelized Chocolate Pots de Creme?  You can even purchase lids for them in an array of colours!

I'd say we can definitely put a lid on it. 🙂

Baileys Caramelized Chocolate Pots de Creme. A smooth, rich, delectable custard with buttery, toasty Dulcey blond chocolate and creamy Baileys Irish Cream.
Print Recipe
5 from 10 votes

Baileys Caramelized Chocolate Pots de Creme

Baileys Caramelized Chocolate Pots de Creme. A smooth, rich, delectable custard with buttery, toasty Dulcey blond chocolate and creamy Baileys Irish Cream.
Prep Time5 minutes mins
Cook Time12 minutes mins
Total Time17 minutes mins
Course: Dessert
Cuisine: Custard
Servings: 6
Author: i sugar coat it!

Ingredients

For the pots de creme:

  • 2 eggs room temperature
  • 230 grams full fat coconut milk (liquid removed or 35% whipping cream)
  • 175 grams Baileys Irish Cream original
  • 125 grams Dulcey chocolate

For the whipped cream:

  • 1 can organic, full fat coconut milk (or 35% whipping cream)
  • superfine or confectioner's sugar (to taste)
  • 1 Rodelle vanilla bean (scraped)
  • 1 packet Whip-It Stabilizer (optional)

Garnish:

  • dark chocolate shavings
  • Dulcey chocolate crunchy pearls

Instructions

Make the custard:

  • Preheat the oven to 300ºF.
  • Set 6 small oven-safe jars on a baking sheet. Set aside.
  • Crack the eggs into a medium bowl and beat lightly with a spatula, just to break up the yolks. Set aside.
  • Warm the cream, Baileys and chocolate over low heat, without bringing it to a boil. Stir to ensure the chocolate is completely melted.
  • Remove from the heat and slowly pour the Baileys mixture into the eggs, while stirring with a spatula.
  • When the mixture is fully incorporated, distribute evenly among the jars.
  • Place the baking sheet with the jars on the middle rack of the oven for 10-12 minutes (depending on your oven). Remove while still jello-like consistency, so as not to overcook.
  • Allow to cool at room temperature, then refrigerate overnight.

Make the topping:

  • Chill the coconut milk overnight. This will allow the milk solids and liquids to separate. DO NOT shake the can when you remove it from the fridge.
    Open the can, drain off the liquids and scoop the solids only into the bowl of a stand mixer. If using the whip-it stabilizer, add now.
  • Whip on high until soft peaks form. Add the sugar and vanilla extract and whip for a couple seconds to incorporate. Use a sieve to add the corn starch. Continue to whip until full, creamy, firm peaks form.
  • Keep chilled until ready to use. When ready, spoon or pipe whipped cream atop the chilled pos de creme.

Notes

  1. To prevent scrambled eggs, introduce the hot mixture slowly. This is what is called tempering the eggs.
  2. If you do not own small jars, you may use oven-safe teacups, small bowls, or ramekins.
  3. For best results when whipping cream, ensure the cream, bowl and whisk are well chilled. 
A delightful Coconut Matcha Ganache Tart with layers of silky green tea coconut ganache, raspberries and toasted coconut in a homemade sweet pastry.

March 2017 By i sugar coat it! 40 Comments

Coconut Matcha Ganache Tart

A delightful Coconut Matcha Ganache Tart with layers of silky green tea coconut ganache, raspberries and toasted coconut in a homemade sweet pastry.

A delightful Coconut Matcha Ganache Tart with layers of silky green tea coconut ganache, raspberries and toasted coconut in a homemade sweet pastry.
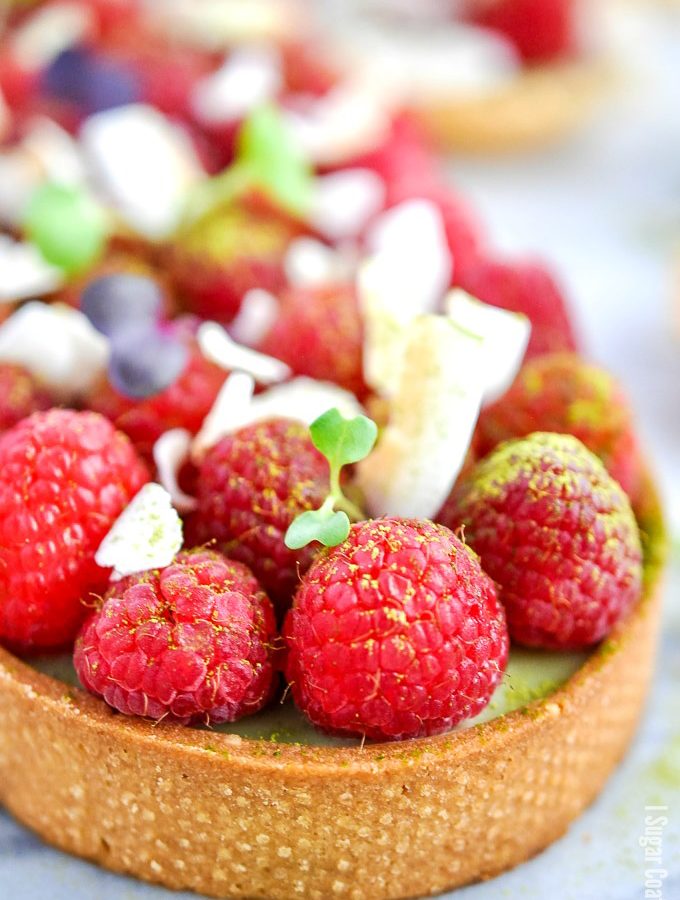
Who's ready to cheer up their winter-weary tastebuds? This Coconut Matcha Ganache Tart will certainly infuse these dog days of winter (is that even a term?) with some much needed colour and flavour. I am so ready for spring! Aren't you? In fact, I wouldn't mind just jumping straight on over to summer. Can you please help me make that happen?

I took this Coconut Matcha Ganache Tart into work on V-day, not because I celebrate the day, but I made one more than I needed. I tend to do that a lot - make more than I need - which is really strange for someone who is not a fan of leftovers. I think I do it because I am rather clumsy - having extra on hand provides peace of mind. I gots issues...I know.
A delightful Coconut Matcha Ganache Tart with layers of silky green tea coconut ganache, raspberries and toasted coconut in a homemade sweet pastry.OK, on to this Coconut Matcha Ganache Tart! Before matcha became trendy, I was drinking it to stay up to finish papers and study. I've also been using it in recipes here on my blog, dating back to my early blogging years, with this being one of my favourite.

[Tweet "Cheer up those winter-weary tastebuds with this delightful Coconut Matcha Ganache Tart!"]

The taste is unlike any other; earthy, rich, smooth with a slightly sweet aftertaste. And it boasts some pretty impressive health benefits - antioxidants, cancer fighter, fat burner. Of course, I make no claim that the health benefits still stand when it is whipped into ganache. The taste however, remains just as impressive.

I keep two types of matcha on hand - ceremonial grade for my tea fix and culinary grade for, well all things culinary. Here's an article to help you determine the difference.

A delightful Coconut Matcha Ganache Tart with layers of silky green tea coconut ganache, raspberries and toasted coconut in a homemade sweet pastry.

This Coconut Matcha Ganache Tart is a wonderful balance of contrasting flavours and textures - sweet, tart, creamy and crunch. The pate sucree is a basic recipe I  have used on the blog a number of times. Before filling it with all the matcha berry yumminess, you'll want to use one of these tips for keeping your crust crisp!

I-Sugar-Coat-It-Blog-Signature-Green


A delightful Coconut Matcha Ganache Tart with layers of silky green tea coconut ganache, raspberries and toasted coconut in a homemade sweet pastry.
Print Recipe
4.82 from 11 votes

Coconut Matcha Ganache Tart

A delightful Coconut Matcha Ganache Tart with layers of silky green tea coconut ganache, raspberries and toasted coconut in a homemade sweet pastry.
Prep Time45 minutes mins
Cook Time30 minutes mins
Total Time1 hour hr 15 minutes mins
Course: Dessert
Servings: 10
Author: i sugar coat it!

Ingredients

For the Pâte Sucrée:

  • 150 grams sugar
  • 227 grams butter soft, but cool
  • 4 grams salt
  • 1 Rodelle vanilla bean scraped
  • 50 grams egg 1
  • 60 millilitres milk
  • 437.5 grams pastry flour

For the Ganache:

  • 300 grams white chocolate 35% like Valrhona
  • 10 grams invert sugar
  • 125 grams coconut puree or full fat coconut milk
  • 7 grams matcha or half for a milder taste

For the compote:

  • 190 grams raspberries
  • 48 grams granulated sugar
  • 2 grams fresh lemon juice

For the toppings:

  • fresh organic raspberries
  • toasted coconut chips
  • matcha
  • assortment of micro greens, optional

Instructions

Make the Pâte Sucrée:

  • Cream butter then add sugar, salt and vanilla until light and fluffy.
  • Add egg until fully incorporated. Scrape down sides, if needed.
  • Sift together flour and add to butter mixture.
  • Add milk and blend until smooth.
  • Work dough on a floured table. Chill until needed - about 1-2 hours.
  • Roll out chilled dough to about ¼ inch. Use the tart ring to cut out the base and a pizza cutter to cut strips for the sides. Press evenly into tart rings and place on a baking sheet lined with a silicone mat.
  • Use a fork to punch holes in the bottom of the shell.
  • Place in the refrigerator to chill for an additional hour.
  • Preheat oven to 350ºF.
  • Bake until golden brown, about 15 - 20 minutes depending on your oven.
  • Remove from oven and brush with a thin layer of white chocolate and allow to cool. 

Make the ganache:

  • Melt the chocolate in a bowl over simmering water, or in a microwave. Set aside.
  • Add the invert sugar and puree (or coconut milk) to a small saucepan and bring to a boil over medium heat.
  • Remove from heat and add to melted chocolate, while stirring with a whisk until smooth.
  • Stir in the matcha until well combined.

Make the compote:

  • In a medium saucepan, combine raspberries, sugar and juice and bring to a boil over medium heat.
  • Reduce heat to low and allow the mixture to simmer, stirring frequently.
  • When the sugar is dissolved and the mixture has thickened (about 7 minutes), transfer to a bowl and allow to cool.

Notes

  1. If your edges are uneven, use a microplane to shave away and smooth the edges.
  2. The compote can be stored in an airtight container for up to a week in the fridge.


This post contains affiliate links. Each purchase you make using these links may result in a small commission for my blog, without additional cost to you. Thank you for your support in making I Sugar Coat It a little sweeter!

A delightful Coconut Matcha Ganache Tart with layers of silky green tea coconut ganache, raspberries and toasted coconut in a homemade sweet pastry.
Cara Cara Coconut Matcha Cake boasts eight layers of coconut and matcha cake filled with cara cara orange curd, fresh berries and silky citrus buttercream!

February 2017 By i sugar coat it! 16 Comments

Cara Cara Coconut Matcha Cake + Video

Cara Cara Coconut Matcha Cake boasts eight layers of coconut and matcha cake filled with Cara Cara orange curd, fresh berries and silky citrus buttercream!

Cara Cara Coconut Matcha Cake boasts eight layers of coconut and matcha cake filled with cara cara orange curd, fresh berries and silky citrus buttercream!In the mood for a little cake disaster? This Cara Cara Coconut Matcha Cake is exactly that! Sure it looks pretty decent all put together and perched on its black throne; an impressive comeback after its massive fall from grace.

Apart from Bundts, pretty much every cake I've made to date has had at least four layers, usually six. When I was thinking up this number, I envisioned eight layers - two coconut, one matcha, two coconut, one matcha, two coconut - filled with citrus curd, fresh berries and buttercream. Easy, right...

All seemed to be going according to plan - the cakes baked up lovely, the curd was just right, the buttercream was deliciously silky - until it wasn't.

Cara Cara Coconut Matcha Cake boasts eight layers of coconut and matcha cake filled with cara cara orange curd, fresh berries and silky citrus buttercream!I blame it on my preoccupation with filming. It had been a while since I made a cake building video, like this, so I thought I would try to capture the construction of these eight layers. It's not a huge undertaking, I just set my phone up on a bowl, or something sturdy, press start and let it run, then edit right on my decvice. I know, real professional.

If you know me just a little, you know I am a germaphobe - the incessant hand-washing, take a blow-out mattress to a five-star hotel type - yeah, I'm in treatment. Anyhoo, the phone kept slipping and each time I had to touch it, I would of course wash my hands/change my gloves. Now the sensible thing would have been to stop recording and just finish off the damn cake. In case you didn't know, my middle name is stubborn. So there's that!

Somewhere in between washing my hands with every slip of the phone, I not only screwed up the placement of the matcha layers (they ended up sandwiched together, instead of between the coconut layers), but I forgot to place a cake board and straw at the halfway point to support the cake. Of course, this wasn't apparent until I was crumb-coating the cake the the bottom layers began to split and cave in.

Cara Cara Coconut Matcha Cake boasts eight layers of coconut and matcha cake filled with cara cara orange curd, fresh berries and silky citrus buttercream!My heart sank, just as the cake began to lean in slow motion. Without thinking, I laid the cake on its side, pulled out a sheet of plastic wrap and wrapped the cake. I then stood it up, a straw down the middle, plastic wrapped the top and stuck it in the fridge so that the buttercream would firm up and help with stability. I also used the cardboard from a cake box to build a tube around the cake for further support while it chilled.

In my panic, I hadn't realize I knocked over my phone and the remaining buttercream. OOOOYYY! After whipping up another batch of buttercream, I removed the mini leaning tower of pisa from the fridge with bated breath. With the help of the straw and makeshift cake corset, things were looking up. PHEW!!

From the outside it looks good, but if you look closely, you will notice that the cake layers at the bottom have been flattened and most of the filling squeezed out. It's stands eight layers tall, but it's quite a small cake - I used five-inch pans. Drama aside, forgetting to add the support meant that I could cut a full eight-layer slice, as opposed to the four layers I would have gotten with a well supported cake.

A silver lining, I suppose. Here's a little video (sans drama). What's been YOUR worst cake mishap?


Cara Cara Coconut Matcha Cake boasts eight layers of coconut and matcha cake filled with cara cara orange curd, fresh berries and silky citrus buttercream!
Print Recipe
5 from 4 votes

Cara Cara Coconut Matcha Cake

Cara Cara Coconut Matcha Cake boasts eight layers of coconut and matcha cake filled with cara cara orange curd, fresh berries and silky citrus buttercream!
Prep Time30 minutes mins
Cook Time35 minutes mins
Total Time1 hour hr 5 minutes mins
Servings: 8
Author: jacquee | i sugar coat it

Ingredients

Equipment:

  • Three 5 x 2 inch round cake pans
  • Cake strips
  • Candy thermometer
  • Scale
  • Stand mixer

For the curd:

  • make a double batch of cara cara curd (see link below)

For the buttercream:

  • make a batch of swiss meringue buttercream (see link below)

For the coconut cake (adapted from the book Rose's Heavenly Cakes):

  • 90 grams egg whites (3 large eggs)
  • 160 grams coconut milk (⅔ cup)
  • 1 vanilla bean, scraped I use Rodelle
  • 200 grams cake flour (2 cups)
  • 9.5 grams baking powder (2 ½ + ⅛ teaspoons)
  • 200 grams granulated sugar (1 cup)
  • 2.5 grams salt (½ teaspoon)
  • 113 grams unsalted butter 1 stick
  • 40 grams shredded coconut multicoloured

For the Matcha cake:

  • use the same recipe as for the coconut cake, but replace 20 grams of the flour with culinary matcha.

Instructions

Make the curd:

  • Make a double batch of this recipe

Make the buttercream:

  • Make a batch of this recipe and replace the gianduja with cara cara curd

Make the cakes:

  • Preheat oven to 350º. Prepare pans with cake release (or your preferred method) and place on a baking sheet pan.
  • Add the egg whites, 3 tablespoons of the milk and the scraped vanilla beans in a bowl and use a hand to whisk until just combined.
  • In the bowl of a stand mixer, sift together the flour and baking powder. Add the sugar and salt and mix on low speed for 30 seconds using the paddle attachment.
  • Add the remaining milk and butter and mix on low speed to moisten the dry ingredients. Increase the speed to medium and continue to mix for 1 ½ minutes, stopping to scrape down the sides when needed.
  • Reduce the speed to medium-low and add the egg white mixture to the batter in two parts. Beat for 30 seconds after each addition to incorporate fully. Scrape the sides of the bowl, as needed. Fold in the shredded coconut.
  • Distribute the batter evenly among the the three pans, then use an offset spatula to spread and smooth the batter.
  • Bake for 25-30 minutes. Test for doneness with a cake tester or toothpick.
  • Remove from the oven and and allow to cool for 10 minutes on a wire rack. After 10 minutes, turn the cakes out on to the wire rack to cool completely.

Assemble the cake:

  • Spread a little buttercream onto a cake board and centre the first layer on the board. Pipe a border of buttercream around the cake and fill with curd and berries. Top with another layer of cake. Repeat for two more layers, then insert 2-3 sturdy straws into the cake and top with a cake board. Prepare the other four layers, as with the first four. 
  • Cover with buttercream, adding random splotches of the coloured buttercream and smoothing it onto the cake. Add some random sprinkles and gold flakes for fun. Top with piped buttercream rosettes, candied orange slices and fresh blinged-out berries.
Cara Cara Coconut Matcha Cake boasts eight layers of coconut and matcha cake filled with cara cara orange curd, fresh berries and silky citrus buttercream!


This post contains affiliate links. Each purchase you make using these links may result in a small commission for my blog, without additional cost to you. Thank you for your support in making I Sugar Coat It a little sweeter!

Raspberry Cassis Chocolate Cake is my favourite one-bowl chocolate cake, topped with raspberry cassis ganache and clouds of whipped coconut cream.

February 2017 By i sugar coat it! 48 Comments

Raspberry Cassis Chocolate Cake

Raspberry Cassis Chocolate Cake is my favourite one-bowl chocolate cake, topped with  raspberry cassis ganache and clouds of whipped coconut cream.

Raspberry Cassis Chocolate Cake is my favourite one-bowl chocolate cake, topped with raspberry cassis ganache and clouds of whipped coconut cream.
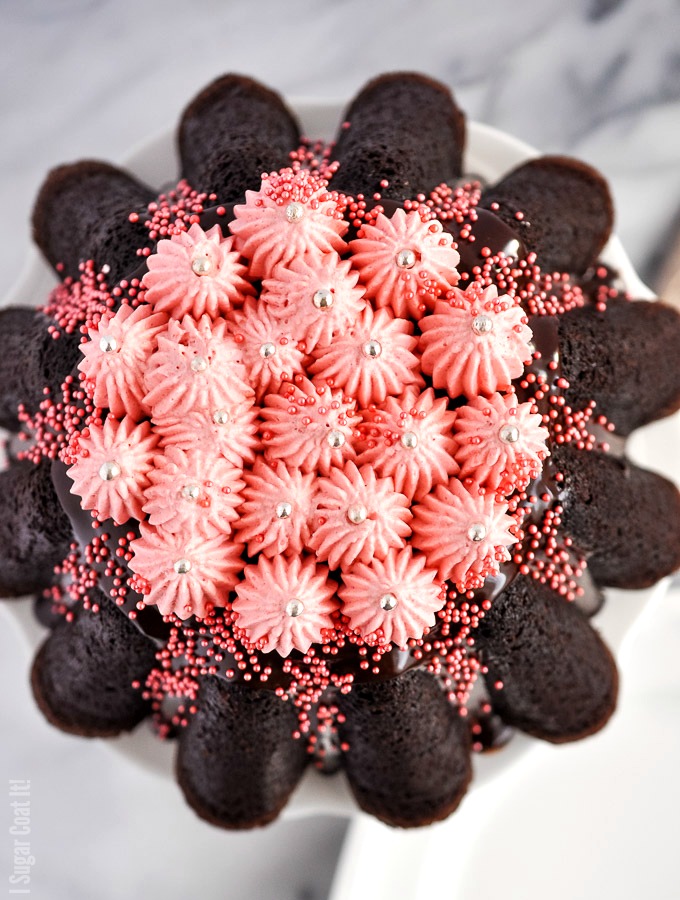
This Raspberry Cassis Chocolate Cake is a reminder of my ability to move at the speed of sloth, when it comes to blogging. Sigh. Back in the day I used to post 2-3 times a week, while working full-time and taking classes!! That probably explains my current burn out.

I generally don't compare myself to others, it's just not healthy and I guarantee you that the glimpses that you are provided of people's lives on social media and the like ain't necessarily their full 'reality'.

Still, every once in a while, I see a fellow blogger that handles a full-time career, babies and blogging like a boss. I ask myself, why can't I slay it like she/he does? Then I catch myself and quickly move on to worrying about comparing myself today with the me of yesterday.

Raspberry Cassis Chocolate Cake is my favourite one-bowl chocolate cake, topped with raspberry cassis ganache and clouds of whipped coconut cream.I have a ton of content, but I just can't seem to sit still long enough to pull the posts together. Not for lack of trying - you should see my drafts - easily over a hundred from as far back as 2013, like this. I keep dreaming up stuff, making and photographing them, then I either forget, lose interest, or become too busy.

Any other bloggers suffer the same affliction? If you do, I encourage you to take a moment to remind yourself that you are doing your best at that moment. We're talking about food after all, we are not saving lives here, so go easy on yourself. Sometimes easier said than done...I know!

Ok, now that I've gotten that off my chest, let me indulge you in a little sweet talk. I made this Raspberry Cassis Chocolate Cake back in November for a little get-together that ended up going sideways. So, I took it into work, which turned out to be perfect timing, as we happened to be celebrating November birthdays that day.

Raspberry Cassis Chocolate Cake is my favourite one-bowl chocolate cake, topped with raspberry cassis ganache and clouds of whipped coconut cream.This has been my go-to chocolate cake recipe for a few years - it's adapted from one we made in culinary school. Apart from its great taste and texture, I love that it's a one-bowl affair and mixers need not apply. What makes it even more special is Rodelle Organic Baking Cocoa and Reserve Pure Vanilla Extract.

It's a simple recipe that can be made in very little time. I wasn't in the mood for buttercream, so I decided to bake it in a brioche pan to add a little visual interest. I initially planned to top it with fresh fruit and chocolate drizzle, but didn't want things to get soggy in transit. I opted, instead, for liqueur-spiked ganache drips and coconut raspberry clouds.

[Tweet "One-bowl chocolate cake topped with spiked ganache and coconut raspberry clouds!"]

Raspberry Cassis Chocolate Cake is my favourite one-bowl chocolate cake, topped with raspberry cassis ganache and clouds of whipped coconut cream.A couple years back in class, we made a fancy mousse dessert with raspberry and cassis and I really liked the way the flavours paired. Keeping things simple, I decided to flavour whipped coconut cream with a little freeze-dried raspberry powder and cassis liqueur. Similar results, but a fraction of the work and time.

It whipped up beautifully and when piped onto the cake with the French tip, turned this otherwise simple cake into something close spectacular! 🙂 The recipe is below - try it for your next gathering!

I-Sugar-Coat-It-Blog-Signature-Green


Raspberry Cassis Chocolate Cake is my favourite one-bowl chocolate cake, topped with raspberry cassis ganache and clouds of whipped coconut cream.
Print Recipe
5 from 6 votes

Raspberry Cassis Chocolate Cake

Raspberry Cassis Chocolate Cake is my favourite one-bowl chocolate cake, topped with raspberry cassis ganache and clouds of whipped coconut cream.
Prep Time15 minutes mins
Cook Time40 minutes mins
Total Time55 minutes mins
Course: Dessert
Servings: 10
Author: jacquee | i sugar coat it

Ingredients

For the cake:

  • 360 grams granulated sugar
  • 100 grams bread flour
  • 100 grams cake/pastry flour
  • 73 grams Rodelle Baking Cocoa
  • 7 grams baking powder
  • 6 grams baking soda
  • 2.5 grams salt
  • 2 eggs
  • 185 ml coconut milk
  • 93 ml coconut oil
  • 8 grams Rodelle Reserve Vanilla
  • 188 ml freshly brewed coffee or espresso warm

For the ganache:

  • 90 grams dark chocolate
  • 116 grams cream (coconut or cow's)
  • 14 grams glucose (optional)
  • 1 teaspoon creme de cassis liqueur

For the coconut whipped cream:

  • 1 small can coconut cream or milk (or 50/50)
  • 13 grams freeze dried raspberry powder
  • 4 grams super fine sugar (adjust to taste)
  • 1 packet whipped cream stabilizer (optional)

Instructions

Make the cake:

  • Preheat oven to 350ºF.
  • Grease the brioche tin and place on a cookie sheet. Set aside.
  • Place a large bowl on your scale and add each of the dry ingredients, taring the scale after each addition. Make a well in the centre.
  • Lightly whisk together the wet ingredients, except the coffee, in a measuring cup and add to the dry ingredients. Stir the batter vigorously with a whisk. It will be thick.
  • Add the warm coffee and continue to stir with the whisk until fully combined.
  • Pour the batter into prepared cake pan. 
  • Bake for 35-40 minutes on the cookie sheet on the middle rack of the oven. Rotate cookie sheet halfway through baking.
  • Remove from oven and allow to cool in pan for ten minutes before turning them out onto a cooling rack. Allow to cool completely.

Make the ganache:

  • Melt chocolate in a bowl placed over a pot of simmering water, or melt in the microwave.
  • Add glucose and cream to a small saucepan and bring to a boil.
  • Using a whisk, stir the melted chocolate. while pouring the hot cream over the chocolate. Stir, do not whisk, until the mixture is smooth. Add the liqueur and continue to stir until fully incorporated and smooth. Cover and allow to cool at room temperature.

Make the coconut whipped cream:

  • Chill the coconut milk or cream in the refrigerator overnight. Chill a bowl and whisk in the freezer for 5-10 minutes. 
  • If using the milk, be sure to drain off excess liquids when you open the can. Add to the chilled bowl, along with the stabilizer (if using) and sugar. Whisk to just combine. Sift in the raspberry powder and whisk to stiff peaks.

Assemble the cake:

  • Pour the ganache over the cake and use a spoon or spatula to spread it to the edged so that it drips down the sides.
  • Fit a piping bag with a large French tip and fill with the whipped cream. Pipe dollops over the ganache to cover the top of the cake. Embellish with micro sprinkles. Enjoy!

Notes

For best results, when whipping cream ensure the bowl and whisk are chilled.
If you find coconut cream too rich, do a mixture of coconut cream and coconut milk. Or, if you do not have an intolerance, use 35% whipping cream.
 
Raspberry Cassis Chocolate Cake is my favourite one-bowl chocolate cake, topped with raspberry cassis ganache and clouds of whipped coconut cream.
Hazelnut Gianduja Cherry Cake with six decadent layers of morello cherry chocolate cake and hazelnut gianduja swiss meringue buttercream.

February 2017 By i sugar coat it! 30 Comments

Hazelnut Gianduja Cherry Cake + Video

Hazelnut Gianduja Cherry Cake with six decadent layers of morello cherry chocolate cake and hazelnut gianduja swiss meringue buttercream.

Hazelnut Gianduja Cherry Cake with six decadent layers of morello cherry chocolate cake and hazelnut gianduja swiss meringue buttercream.I made this Hazelnut Gianduja Cherry Cake for the Dude's birthday back in December. I know what you're thinking... 'she's a real catch that J'! Oh wait, did I mention that I mixed up the date? Ok, I forgot! In my defence, his wasn't the only birthday I messed up. There are just too many people close to me with Christmas (or too close to xmas) birthdays.

Lame, I know.

Hazelnut Gianduja Cherry Cake with six decadent layers of morello cherry chocolate cake and hazelnut gianduja swiss meringue buttercream.The thing is, he doesn't have much of a sweet tooth, but I INSISTED we have cake, complete with candles, champagne and extra buttercream. He would have been more than pleased with a simple 'happy birthday, babe!' on the correct date, but my conscience needed to be eased, sooo... CAKE!

His preference is salty snacks, so I dreamed up a cake topped with chocolate-dipped potato chips, or popcorn dripping with salted caramel piled atop. You know, like the over-the-top cake I made for my birthday.

That's really not his scene, though.

Hazelnut Gianduja Cherry Cake with six decadent layers of morello cherry chocolate cake and hazelnut gianduja swiss meringue buttercream.Morello Cherries (not those red impostors)

After mulling it over, a simple design, incorporating a few flavours he likes was the way to go. Black Forest Cake immediately came to mind. However, there would be no unnaturally red cherry impostors. He doesn't mind them, but I detest them.

Normally, I stay away from fruits soaked in syrup in a jar, but last year I snagged a couple jars of Griottines on vacation. Cherries soaked in Kirsch, you say, what's so special? Cointreau! These cherries were soaked in Cointreau! I'm converted!

The first thing I did was pair them with homemade Gianduja to create bonbons and felt the pairing would translate splendidly in cake form. So, this Hazelnut Gianduja Cherry Cake was born.

Hazelnut Gianduja Cherry Cake with six decadent layers of morello cherry chocolate cake and hazelnut gianduja swiss meringue buttercream.

Speaking of Gianduja...

I've shared a number of recipes on here with gianduja and I am usually asked the following: 'What's that?' followed by 'Isn't that just that popular hazelnut chocolate spread?' Yes and no... As it was so perfectly put in this Saveur article, 'Nutella wishes it could taste this good.'

Gianduja (pronounced zhahn-DOO-yuh) is a fine blend of hazelnut paste and chocolate, usually dark or milk, containing at least 30% hazelnuts (the other popular spread contains something like 15%). Gianduja is said to have been invented in Turin and has been around since the 18th century.

For me, good quality gianduja has a perfect balance of hazelnut to chocolate ratio. It is not overly sweet and melts smoothly and delicately on the palate. You can buy it in blocks from chocolate brands like Callebaut or Valrhona.

I learned to make it back in school and not just with hazelnuts. Unfortunately, without the right equipment, it's difficult to achieve that silky texture you get from the commercially made product, at home. Nevertheless, it is out of this world DEEEELICIOOUS!

If you search through my blog, you won't find a single recipe using that popular hazelnut spread. As much as I've tried to like it, I can't seem to. I think it is a texture thing, but I also find the taste a little off-putting. I realize I might be in the minority, but that's never kept me quiet.

So, short answer - In my humble opinion, that popular spread is a far less impressive version of the Gianduja I've come to know and love. But everybody has their likes and dislikes and you may not have access to Gianduja, so feel free to whip up a batch of this buttercream with it, peanut butter, cookie butter or any of your favourite spreads.

Here's a video of me putting the cake together. You'll see my design indecision on full display. Enjoy!

Print Recipe
5 from 15 votes

Hazelnut Gianduja Cherry Cake

Hazelnut Gianduja Cherry Cake with six decadent layers of morello cherry chocolate cake and hazelnut gianduja swiss meringue buttercream.
Prep Time25 minutes mins
Cook Time40 minutes mins
Total Time1 hour hr 5 minutes mins
Course: Dessert
Servings: 6 servings
Author: i sugar coat it!

Ingredients

For the cake:

  • 360 grams granulated sugar
  • 100 grams bread flour
  • 100 grams cake/pastry flour
  • 73 grams cocoa I used Rodelle
  • 7 grams baking powder
  • 6 grams baking soda
  • 2.5 grams salt
  • 2 eggs
  • 185 ml milk
  • 93 ml vegetable oil
  • 8 grams pure vanilla extract
  • 188 ml pureed cherries and juices for brushing cake warmed

For the buttercream:

  • 120 grams liquid egg whites
  • 180 grams granulated sugar
  • pinch of salt
  • 340 grams unsalted butter room temperature
  • 300 grams gianduja melted

Instructions

Make the cake:

  • Preheat oven to 350ºF. Grease 3 6-inch pans brush with cake release place on a cookie sheet. Set aside.
  • Sift all the dry ingredients into a large bowl and make a well in the centre.
  • In a separate bowl, lightly whisk together all the wet ingredients, except puree.
  • Add the wet mixture to the dry ingredients and use a whisk to stir the batter. It will be thick.
  • Add the warm puree and continue to stir with the whisk until fully combined.
  • Divide the batter evenly into prepared cake pans. 
  • Bake for 25-30 minutes on the cookie sheet on the middle rack of the oven. Rotate cookie sheet halfway through baking. 
  • Remove from oven and allow to cool in pan for 10 minutes before turning them out onto a cooling rack.
  • Once completely cooled, level and torte cakes. You can brush the layers with some of the cherry/cointreau juices, like I did.

Make the gianduja buttercream:

  • Roughly chop the gianduja and add to a small bowl. Place the small bowl over a pot with simmering water to melt. Set aside to cool.
  • Using a clean towel and some lemon juice or vinegar, clean your mixing bowl, whisk attachment and utensils to remove any traces of grease.
  • Fill a heavy duty pot about a quarter of the way with water and place on the stove over medium heat to simmer.
  • Add egg whites, sugar and a pinch of salt to the bowl of a stand mixer and place over the pot of simmering water, ensuring the bottom of the bowl is not in contact with the water in the pot.
  • Whisk the sugar, egg white, salt mixture constantly, but gently, until temperature reaches 160°F.
  • Once at the correct temperature, remove from heat and dry the underside of the bowl with a towel before placing it on the stand mixer.
  • With the whisk attachment, begin to whip the meringue until it is thick, glossy, and the bottom of the bowl is no longer warm to the touch. Do not begin adding butter while the bowl is still warm.
  • With mixer on low speed, add butter cubes, one at a time, until incorporated. Continue to mix until it reaches a silky smooth texture.
  • Add the gianduja slowly, pouring in a constant stream, continuing to beat on low speed until well combined and silky smooth.

Assemble the cake:

  • Torte cakes and use a pastry brush, or spray bottle to soak the layers with the cherry/cointreau juice.
  • Smear a little buttercream on a cake board that is slightly larger than your cake. Place a layer onto the board and pipe a generous amount of buttercream onto the layer.
  • Repeat with another layer, until all layers are stacked. Ensure they are centred and level.
  • Crumb coat the cake, wrap with plastic wrap and place in the refrigerator for 15-30 minutes, depending on the temperature where you are.
  • Cover the sides and top of the cake with buttercream and use a spatula to spread and smooth the buttercream over the cake. 
  • Fill a piping bag fitted with the French tip with remaining buttercream and pipe little dollops around the cake. Use a small offset spatula to randomly attach gold flakes. Enjoy!

Notes

When making meringue, ensure your bowls and utensils are grease-free by cleaning with lemon juice or vinegar. Any trace of grease will prevent the egg whites from reaching maximum volume. therefore ruining the meringue. 🙁
Using a cake board that is slightly larger than your cake, provides a guide for applying an even coat of buttercream.
Hazelnut Gianduja Cherry Cake with six decadent layers of morello cherry chocolate cake and hazelnut gianduja swiss meringue buttercream.


Heart bonbons decorated with splashes of red and gold on white | i sugar coat it

February 2017 By i sugar coat it! 13 Comments

Spicy Raspberry Cinnamon Chocolate Hearts

Reminiscent of cinnamon heart candy, these Spicy Raspberry Cinnamon Chocolate Hearts are a perfect way to add a little sweet heat to your Valentine's Day!

Heart bonbons decorated with splashes of red and gold on white | i sugar coat it

Heat things up a little for Valentine's Day with my Spicy Raspberry Cinnamon Chocolate Hearts! Reminiscent of the little red heart candies that we see in abundance this time of year, my version is a spiced raspberry white chocolate ganache, housed in a thin layer of dark chocolate. Oh. So. YUMMMM!

But, let's talk about the new look of my blog, shall we... I purchased the Brunch Pro theme back when it first came out and was still called Dear. I've been meaning to install it for over a year now, but it was difficult to part with Foodie Pro and to be honest, I thought I would screw up the install. I have so little faith in myself...

Heart bonbons decorated with splashes of red and gold on white | i sugar coat it

Last weekend we had to go out of town and with nothing to do in the middle of nowhere, I thought I would take the leap. What should have taken me a couple hours, ended up taking what amounted to a day's work. Simply because I am stubborn.

Ever purchased a piece of furniture from Ikea and decided that you you knew better than the designers and engineers, so ignored the instructions? Insert photo of me with hex key cocked and pressed against at my head, with the Dude slightly out of focus in the background, incredulous expression, flailing the instructions at me. This was basically every Sunday of our lives when we bought our first place. Good times!

Spicy Raspberry Cinnamon Chocolate Hearts are a cinnamon and anise spiced raspberry white chocolate ganache, stuffed in a thin dark chocolate shell.

[Tweet "Treat your valentine to a little sweet heat with Spicy Raspberry Cinnamon Chocolate Hearts "]

I may be stubborn, but not stupid, so after a bit of time spent reading and watching the tutorials I was able to get some of the issues sorted. An outdated plugin that came with the theme caused some major headaches (read: wiped out my recipe index)  that required the help of the theme designers. Jodi, you probably aren't reading this, but I totally owe you a box of my best chocolates. Thank you!!

I really like how things are shaping up and welcome your feedback on what you find helpful, or a hindrance in navigating my site. I continue to tinker and I am working on a new logo, but I am already missing my beloved  green elephant. 🙁

Reminiscent of cinnamon heart candy, these Spicy Raspberry Cinnamon Chocolate Hearts are a perfect way to add a little sweet heat to your Valentine's Day!

OK, back to regular programming...

These Spicy Raspberry Cinnamon Chocolate Hearts are symbolic, not only of Valentine's Day, but of my tumultuous love affair with blogging. Seems silly, but this little refresh has somehow reignited my desire and passion to continue creating and sharing. A much needed jolt after weeks and weeks of contemplating throwing in the towel on blogging altogether.

Reminiscent of cinnamon heart candy, these Spicy Raspberry Cinnamon Chocolate Hearts are a perfect way to add a little sweet heat to your Valentine's Day!

These Spicy Raspberry Cinnamon Chocolate Hearts aren't just for reigniting my blogging passion, whip some up and treat that special someone to some sweet hot love this V-day!

raspberry cinnamon bonbon cut to reveal light pick ganache | i sugar coat it
Print Recipe
5 from 5 votes

Spicy Raspberry Cinnamon Chocolate Hearts

Reminiscent of cinnamon heart candy, these Spicy Raspberry Cinnamon Chocolate Hearts are a perfect way to add a little sweet heat to your Valentine's Day!
Course: Dessert
Keyword: bonbons, chocolate, confections
Servings: 24 bonbons
Author: jacquee | i sugar coat it

Ingredients

Chocolate for molding:

  • 300 grams dark couverture Valrhona 62%
  • red and white cocoa butter for decorating
  • edible gold dust for decorating

Ganache:

  • 12.5 grams invert sugar
  • 62.5 grams raspberry puree
  • 50 grams full fat coconut cream or 35% whipping cream
  • 1 stick ceylon cinnamon
  • 1-2 star anise
  • crushed pink peppercorn to taste
  • 225 grams white chocolate Valrhona Ivoire 35%
  • 17.5 grams unsalted butter
  • 1 teaspoon freeze-dried raspberry crushed

Instructions

Mold the chocolate:

  • Decorate the mold using coloured cocoa butter. I splattered the gold with a small paintbrush, layered that with random drops of red and airbrush with the white.
  • Temper the chocolate per manufacturers instructions and cast, using a mold of your preference.
    Reminiscent of cinnamon heart candy, these Spicy Raspberry Cinnamon Chocolate Hearts are a perfect way to add a little sweet heat to your Valentine's Day!

Make the ganache:

  • Add the invert sugar, puree, cream, cinnamon stick, and star anise to a saucepan and bring to a boil. Remove from heat, add peppercorn, cover and allow to infuse for 10-20 minutes.
  • Melt the chocolate over a double boiler or in the microwave and set aside. Depending on the conditions in your home, you may need to reheat the raspberry mixture. Sieve the raspberry mixture.
  • Pour the sieved raspberry mixture over the chocolate, while stirring until smooth. Allow to cool slightly, then stir in the butter until fully incorporated. 

Assemble:

  • Place the cooled ganache in a piping bag and cut a small opening at the tip.
  • Pipe into the cavities of the molded chocolate, leaving room at the top for capping (see how). Allow filling to set, overnight preferably. 
  • Cap with a thin layer of chocolate. Place in the refrigerator for a 10 minutes then unmold.

Notes

Sweet Tips:
Glucose is a bit of a sticky mess. To minimize the mess, use wet hands to scoop it out of its container.
To keep dishwashing to a minimum, I weigh directly in the pot or dish I am using. Use the 'tare' function on your scale to reset to zero before adding each ingredient.


A coffee lover's dream, these dark chocolate nespresso-like pods are filled with a luxurious white chocolate espresso caramelized cacao nib ganache.

February 2017 By i sugar coat it! 26 Comments

Caramelized Cacao Nibs Bonbons

A coffee lover's dream, these dark chocolate nespresso-like pods are filled with a luxurious white chocolate espresso caramelized cacao nib ganache.

A coffee lover's dream, these Caramelized Cacao Nibs Bonbons are dark chocolate nespresso-like pods are filled with a luxurious white chocolate espresso caramelized cacao nib ganache.

Happy February!! It's the month of all things, pink and red, but more importantly, chocolate! It's fitting then to kick things off with some seriously intense chocolate love. These Caramelized Cacao Nibs Bonbons are a coffee and chocolate lover's dream!

These Caramelized Cacao Nibs Bonbons are dark chocolate cast in a nespresso-pod-shaped mold, filled with a rich, dreamy caramelized cacao nib and espresso white chocolate ganache. I am  feeling ALL THE FEELS for this one, guys!

A coffee lover's dream, these Caramelized Cacao Nibs Bonbons are dark chocolate nespresso-like pods are filled with a luxurious white chocolate espresso caramelized cacao nib ganache.
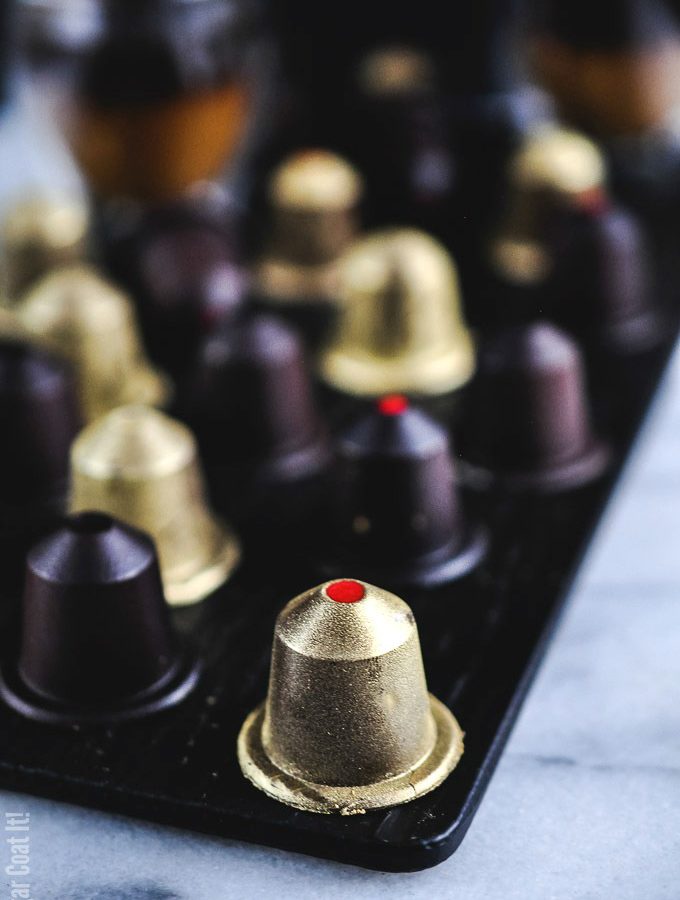
Oddly, I was never much of a coffee drinker - I made it through school and life on matcha and chai - but, these days I find myself indulging in the occasional latte, thanks to our Nespresso machine. Although I don't fancy myself much of a coffee drinker, I do love to add it to baking and desserts. It complements and enhances chocolate beautifully.

For these bonbons, I wanted to recreate the latte I've been enjoying in ganache form. I decided on Livanto Nespresso pods. It's an Arabica from South and Central America with distinct caramelized notes. Its aromatic profile is described as 'a combination of cereal, malted and caramelized notes, as well as fine fruity notes'.

A coffee lover's dream, these Caramelized Cacao Nibs Bonbons are dark chocolate nespresso-like pods are filled with a luxurious white chocolate espresso caramelized cacao nib ganache.To temper the sweetness of the white chocolate in the ganache and intensify the chocolate/coffee flavours and for added texture, I added cacao nibs. They are the unprocessed bits of the cacao bean that are eventually ground to make chocolate. They do not have any added sugar, which may be off-putting for some. I happen to love the natural bitterness of cacao nibs, but far be it from me to pass up a chance to sugar-coat them. 😉

I first learned of the idea of caramelizing cacao nibs from a Michael Recchiuti recipe. He sprinkled them onto white chocolate bark, which was YUM, but I thought they would be just as amazing in ganache.

I made a batch of caramelized cacao nibs and snacked my way through that in record time. To avoid a repeat, the second batch quickly went into the ganache, then into my Caramelized Cacao Nibs Bonbons and finally into a few eagerly waiting mouths and tummies.

A coffee lover's dream, these Caramelized Cacao Nibs Bonbons are dark chocolate nespresso-like pods are filled with a luxurious white chocolate espresso caramelized cacao nib ganache.

I know I am not alone in being totally consumed and at times appalled with all the goings on of late. It's partly why blogging hasn't been top of mind. It's been difficult to come here to sweet talk, while being force-fed intolerance and alternate truths on the daily.

What better way to get rid of some of that bad taste than with chocolate...times 3! With V-DAY not too far off, these Caramelized Cacao Nibs Bonbons might be just the thing to whip up to help sweeten our mood.

Print Recipe
5 from 7 votes

Caramelized Cacao Nibs Bonbons

A coffee lover's dream, these dark chocolate nespresso-like pods are filled with a luxurious white chocolate espresso caramelized cacao nib ganache.
Prep Time30 minutes mins
Cook Time10 minutes mins
Total Time40 minutes mins
Course: Dessert
Servings: 21 bonbons
Author: jacquee | i sugar coat it

Ingredients

Chocolate for Molding

  • 200 grams dark couverture, 70% (i used Valrhona Guanaja)

Cacao Nibs

  • 170 grams cacao nibs
  • 96 grams granulated sugar
  • 5 grams unsalted butter, high fat (i use Stirling Creamery 84)

Ganache

  • 100 grams cream 35%
  • 12 grams espresso or coffee
  • 210 grams white chocolate, 33% (i used Valrhona Ivoire)
  • 30 grams caramelized cacao nibs

Instructions

Mold the chocolate:

  • Temper the chocolate per the manufacturer's instructions, and cast using a mold of your preferred shape.

Caramelize the cacao nibs:

  • Prepare a sheet pan with a silicone baking mat or parchment paper.
  • Add the nibs and sugar to a saucepan and heat the mixture over high heat, stirring vigorously and continually with a wooden spoon until sugar is mostly melted.
  • Remove the saucepan from the heat and stir in the butter.
  • Spread the nibs onto the prepared sheet pan and allow to cool to room temperature.

Make the ganache:

  • Melt the chocolate in a medium size bowl and set aside.
  • Add the cream and coffee to a small saucepan and bring to a light boil. Cover and set aside to steep for 5-10 minutes.
  • Strain the cream and coffee mixture onto the melted chocolate, while stirring. Continue to stir until fully incorporated and smooth.
  • Crush some the caramelized cacao nibs into smaller bits and fold into the ganache. Allow to cool, preferably overnight for a more intense flavour.

Assemble the bonbons:

  • Pipe the cooled ganache into the molded chocolate and allow to set, preferable overnight.
  • Use the remaining tempered dark chocolate to cap the bonbons. Allow to set, then turn the bonbons out.

A coffee lover's dream, these dark chocolate nespresso-like pods are filled with a luxurious white chocolate espresso caramelized cacao nib ganache.


Filled with citrus, vanilla and a little bubbly, these Clementine Champagne Mini Bundt Cakes are akin to a mimosa.

January 2017 By i sugar coat it! 28 Comments

Clementine Champagne Mini Bundt Cakes

Filled with citrus, vanilla and a little bubbly, these Clementine Champagne Mini Bundt Cakes are akin to a mimosa.

Filled with citrus, vanilla and a little bubbly, these Clementine Champagne Mini Bundt Cakes are akin to a mimosa.
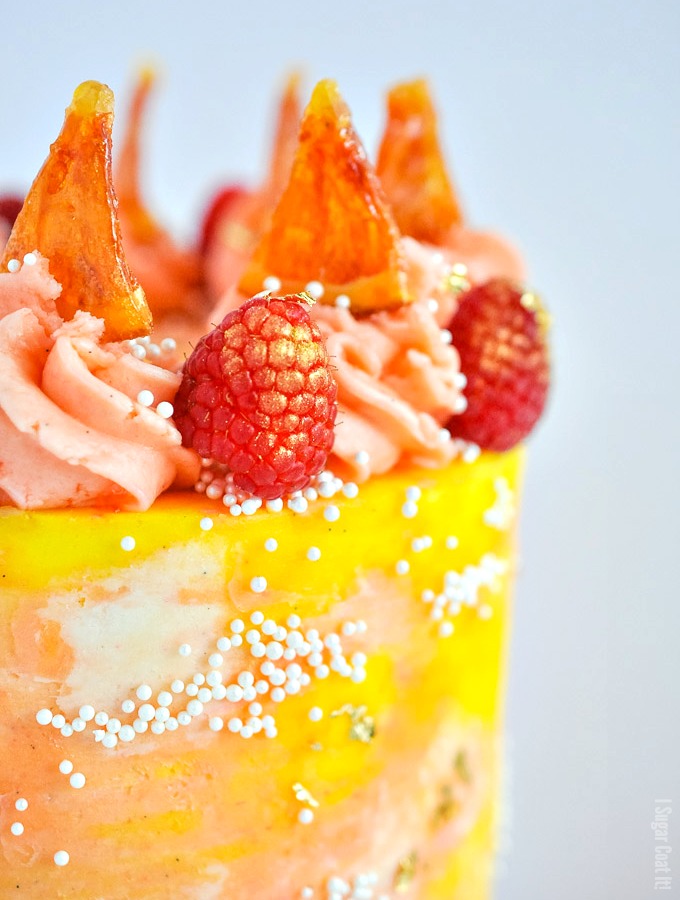
HELLO, HELLO! I know it's been a while, but I come bearing the perfect dose of citrus love - Clementine Champagne Mini Bundt Cakes. Filled with fresh clementine, loads of vanilla and a side of bubbly. They are like having a mimosa, only baked!

January has been hectic as hell. Between work and other commitments, I've seen very little of my kitchen and even less of my blog. This dark, dreary weather hasn't helped much either. My photography skills are mediocre at best when I have natural light and downright unpalatable with artificial lighting.

So, I wait...

Filled with citrus, vanilla and a little bubbly, these Clementine Champagne Mini Bundt Cakes are akin to a mimosa.It's easy to start feeling a little blue, when the sun doesn't make an appearance for such long stretches. I think that is why I get such a kick out of citrus season. The bright yellows, greens and oranges are enough to put a smile on my face! The aroma from fresh oranges being peeled perk me up instantly. I'll go so far as to say they are a turn-on! TMI?

Maybe, but not far-fetched! B and C vitamins and folic acid, all present in citrus fruits, are said to be essential for sexual health and drive. I see you... sneaking a few more in your lunch bag. LOL.

Filled with citrus, vanilla and a little bubbly, these Clementine Champagne Mini Bundt Cakes are akin to a mimosa.These Clementine Champagne Mini Bundt Cakes are simply delightful. A perfectly dense, but tender browned butter crumb, speckled with my vanilla beans of choice, Rodelle Vanilla. I topped them with a citrus and champagne white chocolate glaze, but that could easily be replaced with curd to amp up the citrus levels.

The orange flavoured crisp pearls add contrast both in colour and texture. The zest adds another punch of citrus and and gold flakes add a little necessary bling! And how about that Bundtlette pan? THE. CUTEST!!

Tips for Baking up Perfect Bundts:

I've shared these tips for using Bundt pans in a previous post, but I think they are worth sharing again. Would love to hear some of yours.

  • Just like new clothing, I always wash everything before I use them. Give your new pans an initial wash with a little soapy, warm water and a non-abrasive sponge or cloth. This gets rid of any production residue. The manufacturer does not recommend dishwasher use.
  • If you want your cake to exit the pan in one piece, you're going to have to get a little greasy. Ok, not you (unless that's your thing...), but the pan. I use cake release - I make it (equal amounts of oil, flour and shortening mixture), but you can also buy it. Or you can go old school with shortening and flour. If I'm baking a chocolate cake, I replace the flour with cocoa powder, to avoid a white residue on the finished cake.
  • When using a pan with an intricate design, before adding all the batter, use an off-set silicone spatula to smear a layer of the batter in the pan, so that it gets into the crevices. This provides a smoother finish and minimal air bubbles.
  • How much you fill the pan will depend on the recipe you use and the amount of leavening agents it contains. A good rule of thumb for most cakes is about ¾ full.
  • The first time I used a bundt pan, I inverted the pan too soon and the entire top of the cake clung to the inside of the pan for dear life. Allow your cakes to cool before trying to remove them. If I'm in a rush, I let it chill briefly in the freezer to speed up cooling, before turning out the cake.
  • I have said this many times on here, but it's worth repeating, bake your cakes, pies etc. on a baking sheet. It will save you having to clean up spills, drips and full on overflows. This is especially useful when recipe testing. Even with a self-cleaning oven, I'm all about that extra protection.

Filled with citrus, vanilla and a little bubbly, these Clementine Champagne Mini Bundt Cakes are akin to a mimosa.
Print Recipe
4.78 from 9 votes

Clementine Champagne Mini Bundt Cakes

Filled with citrus, vanilla and a little bubbly, these Clementine Champagne Mini Bundt Cakes are akin to a mimosa.
Prep Time20 minutes mins
Cook Time30 minutes mins
Total Time50 minutes mins
Course: Dessert
Servings: 6
Author: I Sugar Coat It

Ingredients

Bundt:

  • 149 grams unbleached all-purpose flour 11/2 cups, sifted
  • 2 grams baking soda ½ teaspoon
  • 2.5 grams sea salt ½ teaspoon
  • 144 grams granulated sugar ¾ cups
  • 115 grams browned butter, unsalted ½ cup
  • one vanilla bean reserve a little bit for the glaze, scraped
  • 3 large eggs
  • 59 grams freshly squeezed clementine juice ¼ cup
  • zest from one clementine
  • 45 grams sour cream, full fat

Glaze:

  • 180 grams white chocolate
  • 30 grams champagne 2 tablespoons
  • 15 grams fresh clementine juice 1 tablespoon
  • vanilla bean left over from above
  • zest from one clementine

Garnish (optional):

  • orange flavour crispy pearls
  • clementine zest
  • gold flakes

Instructions

To make the Bundts (have all ingredients at room temperature):

  • Preheat the over to 350F.
  • Prepare the bundtlette pan and place on a baking sheet (see tips above).
  • Sift the flour into a medium bowl and whisk in the baking soda and salt. Set aside.
  • Cream together the sugar, butter and about ¾ of the vanilla beans, using the paddle attachment of your stand mixer on medium-high speed.
  • Lower the speed and add the eggs one at a time. Turn the mixer to beat well and fully incorporate after each addition.
  • Add the juice and zest and beat to incorporate.
  • Turn the mixer down to low (stir setting) and add the flour in three additions, alternating with the sour cream and starting and ending with the flour.
  • Turn up up the mixer to medium (about 4) and beat well to fully incorporate.
  • Fill the bundtlette molds and bake on the middle rack for 30-35 minutes.
  • Test for readiness, remove from the oven and allow to cool on a rack before turning them out.

To make the glaze:

  • In a heatproof bowl, gently melt the chocolate.
  • Stir in the champagne, juice, vanilla bean and zest until well combined.
  • You may add more or less juice/champagne to suit your desired consistency.
  • Allow to cool slightly and spoon over Bundts.

Filled with citrus, vanilla and a little bubbly, these Clementine Champagne Mini Bundt Cakes are akin to a mimosa.


  • « Go to Previous Page
  • Page 1
  • Interim pages omitted …
  • Page 12
  • Page 13
  • Page 14
  • Page 15
  • Page 16
  • Interim pages omitted …
  • Page 51
  • Go to Next Page »

Primary Sidebar

Never Miss A Happy Ending...

Previous Sweetness...

Search

Filter by Category

Filter by Date

SWEETEN YOUR INBOX!

All Content Including Images Copyright Jacqueline | I Sugar Coat It© 2026