• Skip to primary navigation
  • Skip to main content
  • Skip to primary sidebar
  • Home
  • About
    • About I Sugar Coat It
    • Features & Press
    • Copyright
    • Disclosure
    • Privacy Policy
  • Recipes
  • How-To
  • Contact
  • sous vide sista

I Sugar Coat It

Home

All Posts

Craftsy Black Friday Event

November 2016 By i sugar coat it! Leave a Comment

Craftsy Black Friday Event

#ad It's Black Friday all weekend long on Craftsy! Enjoy up to 60% off all kits and supplies. Plus enrol in any class for $17.99 USD, or less!

Craftsy Black Friday Event

Use my affiliate link to snag a few deals during the Craftsy Black Friday Event!

Got a hobby you're looking to improve, or someone on your list who would like to learn a new hobby? Now's your chance to take advantage of the many courses available on Craftsy! From baking to cake decorating to cooking, knitting, woodworking, photography...the list goes on.

Gilded Cage Cake

Back when I started my blog, I looked to Craftsy to jazz up my decorating techniques. This Gilded Cage Cake  you see above was inspired by a Craftsy course taught by Colette Peters. It was like having a private class with Colette, but for a fraction of the cost!

Better, your purchase gives you lifetime access to your courses and to a community of creatives - novice and expert. You also have access to the instructor and the return policy is amazing. Pretty sweet, right!!

Click on my affiliate link  for the Craftsy Black Friday Event, pick your course(es) and start learning something new!

Happy crafting!!

I-Sugar-Coat-It-Blog-Signature-Green


Pumpkin Chai Latte Cocktail | I Sugar Coat It

November 2016 By i sugar coat it! 13 Comments

Pumpkin Chai Latte Cocktail

Inspired by a popular coffee house beverage, this Pumpkin Chai Latte Cocktail will add a sweet, spicy warmth to all your holiday gatherings.

Pumpkin Chai Latte Cocktail | I Sugar Coat It

Hey guys!! Where the heck did the last two weeks go? It felt like I pressed the schedule button on my last post just a minute ago, yet here we are some three weeks later, starting the week off with a Pumpkin Chai Latte Cocktail and a serious run-on sentence...I could really use a drink!

While we are throwing back cocktails first thing on a Monday, I may as well come clean... I have not done a single bit of holiday baking this season. WHAAAT? Yeah, I know, I am the worse kind of blogger. Life's just been a little chaotic and challenging of late, but I won't bore you.

Pumpkin Chai Latte Cocktail | I Sugar Coat It!Luckily, you are in the presence of a consummate procrastinator. I've dug up some posts from previous years that did not go to press, for good reason, I'm certain. I'll be sharing a few in the coming weeks. So there, holiday cheer restored - now we drink!

I shared this Pumpkin Chai Latte Cocktail on Instagram early last month. It's a take on a drink I used to order from Starbucks on the regular. Hmmm...that didn't sound as cool as I'd imagined. I don't believe it was on their menu, but I would almost always ask for a shot of pumpkin spice in my chai, and vice versa.

If they served alcohol, I would ask for many shots as well, but no such luck.  BTW, is it just me, or is there a dude sporting a mullet in my drink in this photo below???

Pumpkin Chai Latte Cocktail | I Sugar Coat It
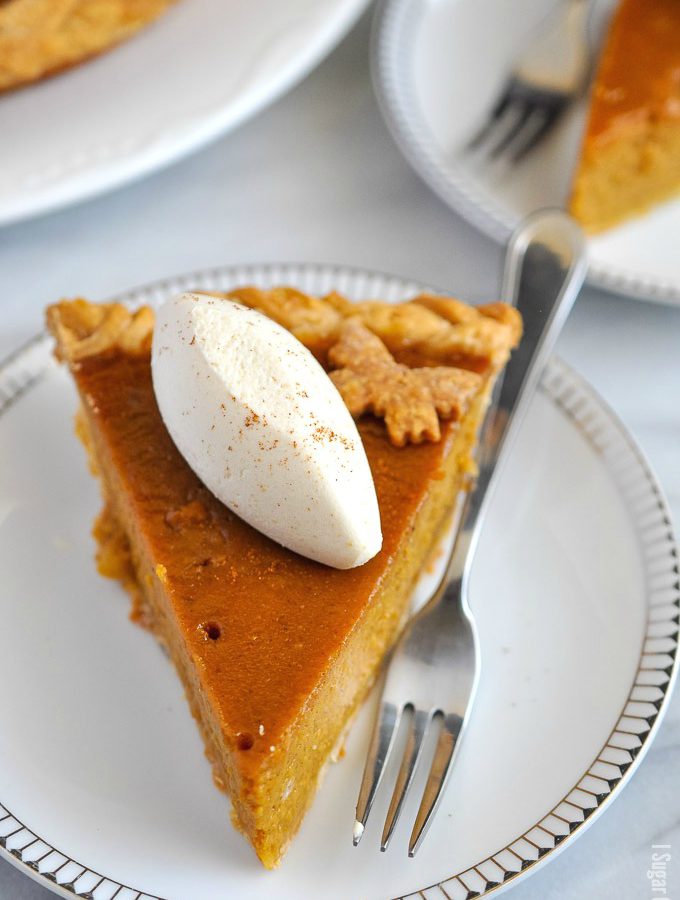
My version starts with a Chai Latte, a shot of espresso, a dash of pumpkin spice syrup and ends with a generous serving of Rum Chata. I like to think of it as a good tea gone bad, in a Rihanna kind of way. Have I lost you??

This drink is great served hot or cold. To cater to a more decadent drink palate, I sometimes top it with Rum Chata whipped cream. Simply add a generous shot of Rum Chata to a cup of 35% whipping cream, or coconut cream and whip to medium, but stable peaks. You can then spoon or pipe onto the drink. It's all sorts of YUM!

Be sure to add this Pumpkin Chai Latte Cocktail to your Thanksgiving and  Christmas drink menus. Until then, cheers to curing the Monday miserables! Have a wicked week, ya'll!

Pumpkin Chai Latte Cocktail | I Sugar Coat It
Print Recipe
4.67 from 3 votes

Pumpkin Chai Latte Cocktail

Inspired by a popular coffee house beverage, this Pumpkin Chai Latte Cocktail will add a sweet, spicy warmth to all your holiday gatherings.
Prep Time10 minutes mins
Total Time10 minutes mins
Course: Drinks
Servings: 4 -6 servings
Author: I Sugar Coat It

Ingredients

Garnish:

  • cocoa powder for rimming glasses

Cocktail:

  • 3 cups freshly brewed chai cooled
  • 1 cup Rum Chata
  • 1-2 shot pumpkin spice syrup homemade or store-bought, to taste
  • 1-2 shots espresso to taste
  • ice

Instructions

Prepare the glasses:

  • Prepare cocktail glasses by moistening the rims and dipping into a mix of cocoa and espresso powder.

Make the cocktail:

  • Brew the chai and allow to cool.
  • Add all ingredients, along with the ice, to a large cocktail shaker and shake a few times.
  • Pour into glasses and serve.
  • For a more decadent drink, top with Rum Chata whipped cream. Simply add a shot of Rum Chata to 35% whipping cream, or coconut cream and whip to soft, but stable peaks. Spoon onto cocktail and enjoy!
Inspired by a popular coffee house beverage, this Pumpkin Chai Latte Cocktail will add a sweet, spicy warmth to all your holiday gatherings. | I Sugar Coat It


This post contains affiliate links. Each purchase you make using these links may result in a small commission for my blog, without additional cost to you. Thank you for your support in making I Sugar Coat It a little sweeter!

Banana Cake with Peanut Butter Chantilly

November 2016 By i sugar coat it! 16 Comments

Banana Cake with Peanut Butter Chantilly

Banana Cake with Peanut Butter Chantilly is a lighter take on banana bread, speckled with bittersweet chocolate and topped with peanut butter white chocolate chantilly. 

Banana Cake with Peanut Butter Chantilly
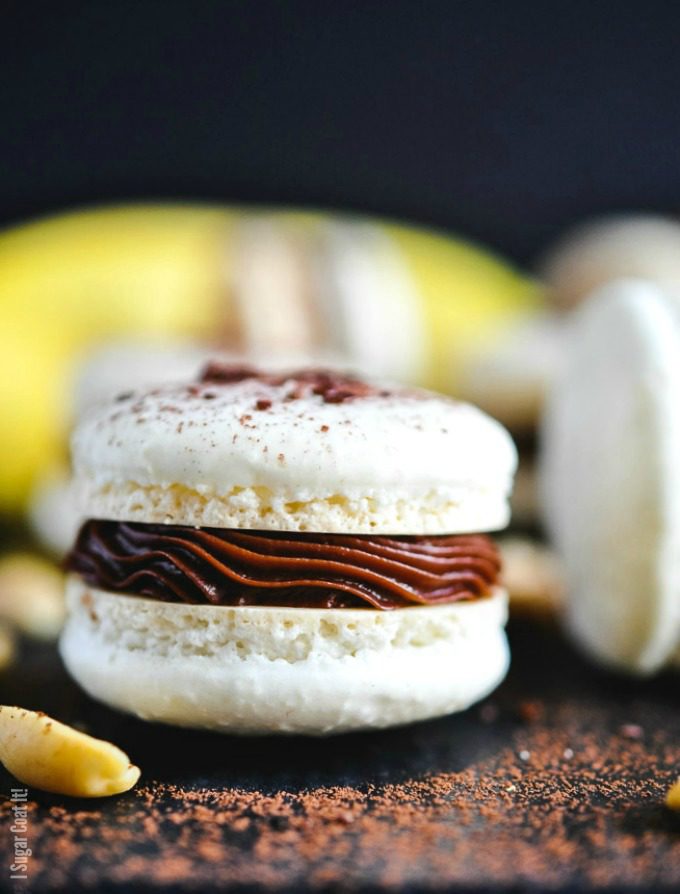
Happy Friday! I planned to share this Banana Cake with Peanut Butter Chantilly earlier in the week, but became completely engrossed in the election. My post election days were spent checking the markets every two minutes. I kid you not! Pathetic, right.

Regardless of which side you rooted for, I think it is reasonable to say that the whole debacle has left a bad taste in many a mouths. But, it's a new day folks! Let's live it the best we can while spreading love and acceptance for each other. A little slice of sweetness on the daily doesn't hurt either.

Banana Cake with Peanut Butter ChantillyI am a big banana bread fan (see here, here and here ) - it's comfort food in my books. It's popular around here, however, on the rare occasion that we have leftovers, I like to make banana bread french toast. It makes for a crazy decadent brunch treat that I try to limit to once every other blue moon, or so. Give it a try!

If you're looking for a less dense, but just as satisfying alternative to the bread, try a banana cake. I kept it as a simple, single layer cake baked in a tart pan this time around, but for a special occasion you make pretty layer cake like I did here and this here.

Banana Cake with Peanut Butter Chantilly

A banana cake will generally bake up lighter in colour than the bread. To get that rich, brown colour I was looking for, without over-baking, I buttered the pan and instead of flouring it, I sugared it. I first saw my grandmother do this back in the day and was reminded of it when I took baking arts a few years ago.

Normally I would use homemade cake release to ensure my cakes don't stick. However, it can sometimes leave a greyish residue on darker cakes. Greasing the pan then dusting it with sugar, not only gives the cake a beautiful caramel tone, but adds an irresistible light crunchy exterior.

Banana Cake with Peanut Butter ChantillyThat thin layer of crunch was the perfect complement to my topping, as it acted a thin, tasty barrier. I wasn't in the mood for buttercream, so I whipped up a cheater's kind of cremeux using whipped cream, peanut butter and a little white chocolate. Then I piped circles of creamy kisses (110 to be exact), which instantly raised this otherwise simple cake to pastry art status (but that may only be in my opinion ).

In a word, this Banana Cake with Peanut Butter Chantilly is simply sublime! Keep on smiling friends and eat cake, lots of cake!

Banana Cake with Peanut Butter Chantilly
Print Recipe
5 from 5 votes

Banana Cake with Peanut Butter Chantilly

Banana Cake with Peanut Butter Chantilly is a lighter take on banana bread, speckled with bittersweet chocolate and topped with peanut butter white chocolate chantilly.
Prep Time20 minutes mins
Cook Time30 minutes mins
Total Time50 minutes mins
Servings: 8 -10 servings
Author: I Sugar Coat It

Ingredients

Cake

  • 320 grams cake flour
  • 4 grams baking soda
  • 2 grams baking powder
  • 3 grams salt
  • 300 grams mashed bananas I used 3 large bananas
  • 61 grams buttermilk
  • 5 grams pure vanilla bean paste
  • 114 grams browned butter
  • 285 grams granulated sugar
  • 2 large eggs
  • 100 grams dark chocolate chips

Chantilly:

  • 250 grams coconut cream or 355 whipping cream
  • 100 grams creamy peanut butter
  • 75 grams melted white chocolate

Garnish:

  • shaved chocolate
  • crisp pearls

Instructions

  • Preheat oven to 350ºF (180ºC).
  • Use a pastry brush to apply butter to the bottom and sides of a 9-inch tart pan and dust with a tablespoon of butter, tapping out any extra. Place the prepared pan on a sheet pan.
  • Using a whisk, combine flour, baking soda, baking powder and salt in a medium bowl.
  • In a separate bowl combine mashed bananas, buttermilk, and vanilla.
  • Add butter and sugar to the bowl of your stand mixer and using the paddle attachment, beat until light and fluffy.
  • Add the eggs one at a time and continue to beat. Scrape down the sides of the bowl as needed.
  • Add the flour mixture in thirds, alternating with the banana mixture - ⅓ flour mixture, ½ banana mixture - repeat, ending with the flour mixture. Beat until fully incorporated.
  • Fold in chocolate chips.
  • Transfer to the pan and use an offset spatula to smooth the top.
  • Bake for 25-30 minutes, or until an inserted toothpick comes out clean.
  • Remove from the oven and allow the cake to cool in the pan on a wire rack for about 10-15 minutes. Invert on a wire rack to cool completely, if using immediately. Or wrap in plastic wrap and aluminum foil, while still warm, and store in freezer until needed.

To make the chantilly:

  • Heat the peanut butter to soften and combine with the melted white chocolate.
  • Whip the cream to soft peaks.
  • Fold in the peanut butter chocolate mixture until uniform.

Assembly:

  • Fit a plain tip in a piping bag and fill with the chantilly.
  • Pipe kisses onto cake and sprinkle with shaved chocolate and crisp pearls.
Banana Cake with Peanut Butter Chantilly is a lighter take on banana bread, speckled with bittersweet chocolate and topped with peanut butter chantilly.


This post contains affiliate links. Each purchase you make using these links may result in a small commission for my blog, without additional cost to you. Thank you for your support in making I Sugar Coat It a little sweeter!

This 5-Minute Maple Pecan Granola packs an unbelievable crunch and comes together quickly, easily and deliciously using the microwave.

November 2016 By i sugar coat it! 14 Comments

Maple Pecan Microwave Granola + Interview

This Maple Pecan Microwave Granola packs an unbelievable crunch and comes together quickly, easily and deliciously using the microwave.

5-Minute Maple Pecan Microwave Granola

GUYS... this Maple Pecan Microwave Granola with homemade sous vide yogurt is dangerous!! Why? Well, five minutes from start to my tummy! Ergo, more granola, more often! Somebody pass me my fat snack pants, quick!

Am I the last to find out about this microwave magic? I've made cakes using the microwave, but granola? Wouldn't think of it! Until a few weeks ago when I saw it on Instagram - which brings me to today's post.

Not too long after taking a cake decorating class at a local craft store, I was bitten by the baking bug. So, I enrolled in Pastry School at a local culinary college. My very first course was Baking Arts, taught by Chef Michelle Massey. I was quite nervous going in, but I heard her giggle and I immediately knew I would enjoy our twelve weeks together.

And I most certainly did!

5-Minute Maple Pecan Microwave Granola

Not only was her laugh infectious, so too was her passion and inventive/innovative approach to the most mundane of tasks. A total boss lady MacGyver in my books. I learned a great deal, plus a host of tips and tricks that have become a part of my kitchen routine.

About a month ago, I saw Michelle's Instagram post for granola made in the microwave. WHAAAT!?! How had I not heard of this?

I figured, like me, some of you may be hearing about this time-saving breakfast/snack game-changer for the first time, so Michelle shared the technique and a recipe with me and I made a batch. OK, let's be completely honest - I've made about ten small batches in a few different flavours. We'll just call it testing.

Before we get into the recipe for this Maple Pecan Microwave Granola, I'd like you to meet Michelle.

5-Minute Maple Pecan Microwave Granola

When did you first know you wanted a career in the culinary field?

I never really thought about doing this as a job. I came from one of those food obsessed families. The ones that sit around the table eating great food, while the conversation is all about what to eat next.

I actually went to art college and studied print making and photography. I managed to find the food-obsessed there as well. My group of friends would have a weekly "drawing class" on Sundays. Really it was just an excuse to feast. We would starve all week then blow our weekly grocery budget on one fantastic meal.

It was held in a very rough loft space where they lived, (before living in those types of spaces was legal in Toronto). It was shared with a guy that restored furniture. He didn't work on the weekends so we would use his furniture to accommodate everyone. We would just make whatever struck our fancy.

One of the most memorable dinners was the time we decided to make sushi. We had eaten a lot of it but no one had ever made it before. It actually was pretty impressive. We spread it all out on this giant table that was at least 12 feet long and it completely covered the table. We were all sitting on these ridiculous tall gold leafed chairs- very Game of Thrones!

What was your first food industry related job?

My first food related job was at "The Boardwalk Café" in the Beach here in Toronto. It was this tiny Italian café run by two brothers, Mario and Lino diPoce. I loved those guys, they were just like Primo and Secundo from Big Night! (if anyone out there reading this knows them, let them know I'm forever thankful).

I was 16 or 17, and was hired to work as a server/barista (before everyone knew what a barista was), but found myself more interested in what was going on in the kitchen. Lino made the most awesome gelato- this was before Gelato Fresco made the scene here and we got a rave write up in the Globe and Mail.

Mario was in charge of the cooking. Mostly sandwiches, but he made a few more hearty entrees as well. It was the first time I had been exposed to dishes like Veal Saltimbocca. I was smitten. Their Mom would do some baking. That's where I discovered biscotti. Tiny refined biscotti that are still my benchmark.

It seems funny now, since they're everywhere, but at the time, people here didn't know what to make of them. They couldn't understand why we were serving stale cookies. I think they were just ahead of their time. The people that got it adored it but it took a little too long to get the word out.

They eventually closed after a small expansion-victims of bureaucracy and red tape.

[Tweet "5 minutes to unbelievably crunchy Maple Pecan Granola using your microwave! "]

How did you get into teaching?

I got into teaching after many, many years of being the one in the kitchen who was always answering questions and training everyone. One day the lightbulb went on and I realized that I could make more money doing the thing I've been doing all along.

The industry is notorious for long brutal hours and low wages (although, I think the tide might be turning. It slowly seems to be getting kinder and gentler- a little more humane perhaps?) and even though I absolutely loved what I was doing, it was beginning to wear on me. I wasn't seeing my husband and my son as much as I liked and it seemed that the effort put forth in relation to the rewards were out of whack.

I started working at Dish Cooking Studio, a small private cooking school in Toronto. We did a lot of team building and corporate events as well as one off cooking classes. It was great after those 12 hour days, you'd work on average, a 6 hour shift and end up with more money! After the initial euphoria wore off, I kicked myself for not figuring it out sooner.

I eventually ended up at George Brown after a friend of mine, who also taught there, harassed me until I relented to an interview. I was used to working in very unstructured environments - at times I felt like I worked with pirates (lol). To be honest, I resisted her for so long because I didn't want to wear the hats that are part of the George Brown uniform. We would wear bandanas, baseball caps, little baker's pill box hats, but never, NEVER, a toque! I STILL hate those hats but she wore me down.

What's the one kitchen tool you can't live without?

The tool I can't live without is the one that I'm buying at the moment (which happens often, I admit I have a problem), but the one I reach for the most after my chef's knife is probably my microplane, oh and my citrus juicer. Did you see that? I just named three 🙂

Any baking secrets you care to share?

Don't name it 'til it's done! I actually tell my students that. They think I'm joking, but it's served me well.

So back to this Maple Pecan Microwave Granola. Above is a quick video of the microwave-made granola versus that made in the oven. Can you tell the difference? Not in taste you can't!

The recipe that Michelle shared with me is from Nekisia Davis' Early Bird Granola. I made a few minor changes based on the ingredients I had on hand. I replaced olive oil with coconut oil (it just tasted better in my opinion), brown sugar with coconut sugar, the raw pumpkin and sunflower seeds with roasted and added a generous serving of cinnamon. Finally, instead of baking it for forty-five minutes as called for in the original recipe, I followed Michelle's instructions to microwave it for three minutes. I ended up having to cook mine an extra minute, because I own a crappy microwave, apparently.

Michelle suggests adding dried fruits, but only after you have microwaved the granola. In her IG post, she added freeze-dried berries 'because they added a nice colour to the yogurt'. Priorities, right! She also applied the same technique to make candied nuts. I think I may need to invest in a new microwave for all the nuking I see ahead!

You simply must give this a try, especially if you are a skeptic like myself. You'll be pleasantly surprised!

This 5-Minute Maple Pecan Granola packs an unbelievable crunch and comes together quickly, easily and deliciously using the microwave.
Print Recipe
5 from 1 vote

5-Minute Maple Pecan Microwave Granola

This 5-Minute Microwave Maple Pecan Granola packs an unbelievable crunch and comes together quickly, easily and deliciously using the microwave.
Prep Time1 minute min
Cook Time4 minutes mins
Total Time5 minutes mins
Course: Breakfast
Servings: 10 -12 servings
Author: I Sugar Coat It (adapted from Early Bird Granola)

Ingredients

  • 240 grams old-fashioned rolled oats 3 cups
  • 130 grams unsalted roasted pumpkin seeds 1 cup
  • 130 grams unsalted roasted sunflower seeds 1 cup
  • 50 grams unsweetened coconut chips 1 cup
  • 120 grams raw pecans 1 ¼ cups, coarsely chopped
  • 2.5 grams ground cinnamon 1 teaspoon
  • 250 grams grade 'A' 100% pure maple syrup ¾ cup
  • 110 grams coconut oil ½ cup, liquid
  • 110 grams coconut sugar or packed light-brown sugar ½ cup
  • 2 grams teaspoon coarse sea salt ½
  • Add-ins:
  • dried pineapple papaya, mango, kiwi*

Instructions

Microwave:

  • Mix all ingredients together as in a large bowl.
  • Depending on the size and power of your microwave, half or quarter the batch, spread on a sheet of parchment paper and microwave on full power for 3-4 minutes. Stop to stir halfway.
  • Remove granola from oven and let cool completely before serving. Enjoy!

Oven:

  • Heat oven to 300° F.
  • Place oats, pumpkin seeds, sunflower seeds, coconut, pecans, syrup, coconut oil, sugar, and salt in a large bowl and mix until well combined.
  • Spread granola mixture in an even layer on a rimmed baking sheet. Transfer to oven and bake, stirring every 10 to 15 minutes, until granola is toasted, about 45 minutes.
  • Remove granola from oven and let cool completely before serving.
  • Store in an airtight container for up to 1 month.

Notes

SWEET TIPS:
*If adding dried fruit, do so after cooking.
Cooking time may differ depending on the size of the batch, as well as your particular microwave.
This 5-Minute Maple Pecan Microwave Granola packs an unbelievable crunch and comes together quickly, easily and deliciously using the microwave.
Triple Chocolate Ganache Tart. Chocolate pâte sucrée filled with layers of milk and dark chocolate ganache for a simple and truly decadent treat.

October 2016 By i sugar coat it! 16 Comments

Triple Chocolate Ganache Tart

Chocolate pâte sucrée filled with layers of milk and dark chocolate ganache for a simple and truly decadent treat.

Triple Chocolate Ganache Tart. Chocolate pâte sucrée filled with layers of milk and dark chocolate ganache for a simple and truly decadent treat.
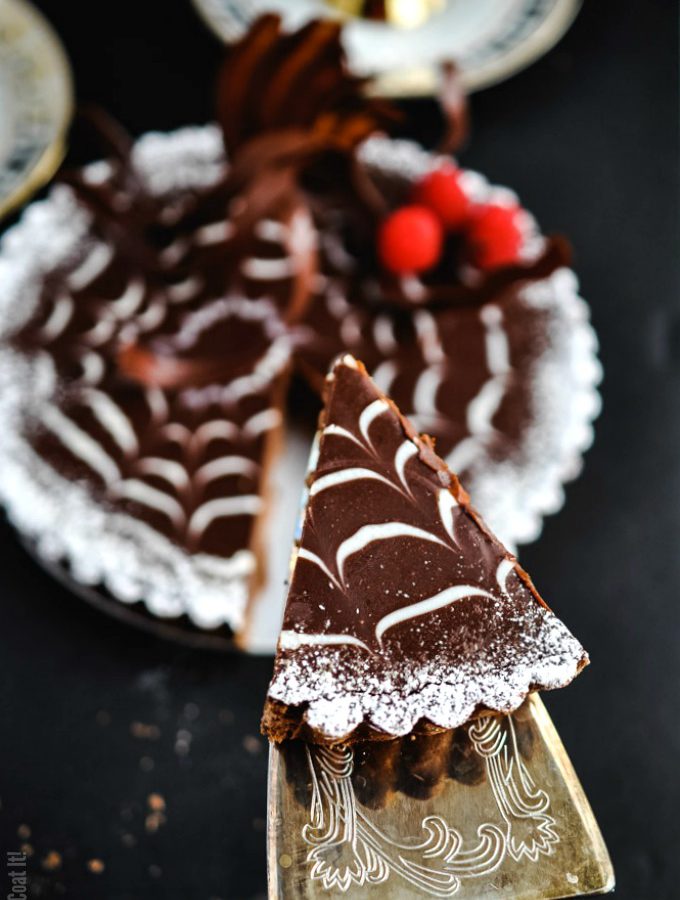
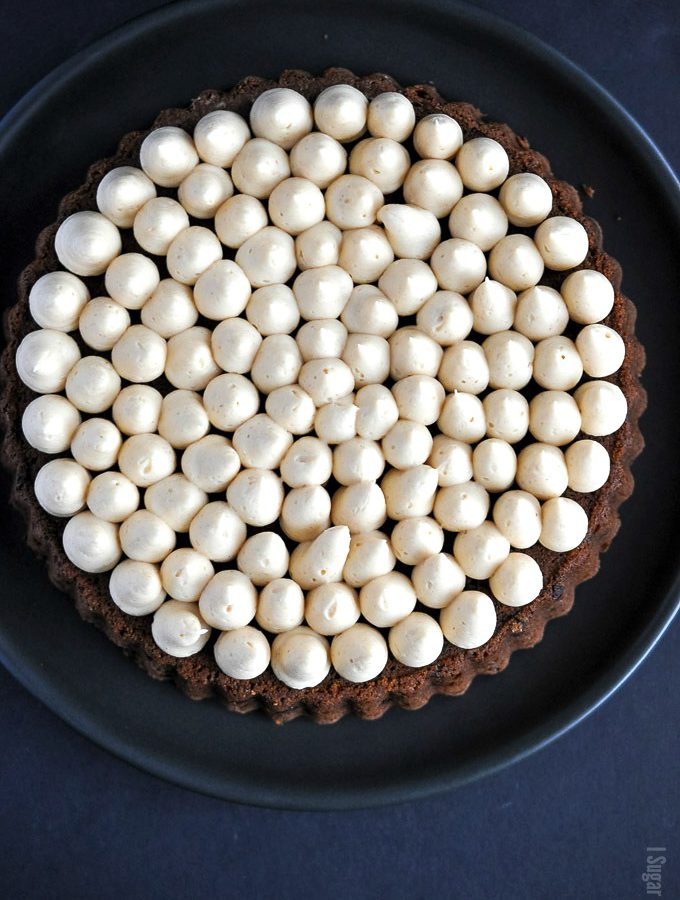
Happy Halloween, ya'll!! Let the sugar-induced madness begin! I'm keeping it classy with this decadent Triple Chocolate Ganache Tart, complete with quasi-spiderweb design.

Truth is, this is an old tart (lol) that I made a while back, but just never got to posting it. While perusing my photo files, I noticed that the design (unintentionally) resembled a spider web, so... stress-free Halloween post!!

Triple Chocolate Ganache Tart. Chocolate pâte sucrée filled with layers of milk and dark chocolate ganache for a simple and truly decadent treat.One of the courses in the Chocolatier program is Chocolate Desserts. Twelve weeks of amazing (and not so amazing) desserts - cakes, tarts, entremets etc. - meant weight gain for many in my 'come-sample-my-goodies circle, including myself. We even did a section on molecular gastronomy, which was a real treat. But I digress...

This Triple Chocolate Ganache Tart is a slight variation on one we made in class. I remember that class vividly, because it seemed everything went wrong. Most notably, the temperature in the lab was way above it's normally cool comfort and the chillers were not exactly in chill mode.

[Tweet "Forget the tricks, here's a real treat - Triple Chocolate Ganache Tart! "]

This meant longer wait times for the ganache layers to set and vying for space in the chillers located in the adjacent lab. Worse, working with the chocolate to make decorations was somewhat challenging. This also meant the timelines for completing the recipes set out for that class were unreasonable. Knowing that these challenges were out of our control, one expected the chef to show a little leniency with grading.

Triple Chocolate Ganache Tart. Chocolate pâte sucrée filled with layers of milk and dark chocolate ganache for a simple and truly decadent treat.She had been tough all along, so wishful thinking. My completed tart received a mere 89-percent. I remember being thoroughly annoyed - enough to stay back to complain explain that the school should do a better job of making sure the equipment worked...yada-yada-yada.

I wasn't wrong, but a few minutes into my controlled rant, I felt a little childish. I work in the corporate world and challenges and obstacles arise all the time, but I've never used them as excuses for poor performance. I've never worked in the food industry, but I imagine the same applies.

I am not one to shy away from fighting fiercely for the things I hold dear and fairness is one such thing. As shy as I am, I have zero trouble standing up for myself and others, where warranted. But in the grand scheme of things, in that moment, I realized how little it mattered. 89 or 100 - how would that change my life? So, I accepted the grade, packed up my tarts and went on my merry way.

Triple Chocolate Ganache Tart. Chocolate pâte sucrée filled with layers of milk and dark chocolate ganache for a simple and truly decadent treat.These next few paragraphs were where I planned to address some unsavory things that have come up in my blogging life, but in the midst of my reciprocal lambasting, it occurred to me that the person toward whom I was directing my disdain didn't matter enough to me. You don't get to be the focus beyond this paragraph - not today, not ever.

This tart does, however! I made a few changes from the one we made in class, like using browned butter in the crust, because...why not?!? Remember to brush a little chocolate on your still hot baked crust to keep it from getting soggy. I used coconut cream in place of 35% dairy cream. I also switched up the chocolate brand and flavours from what we used in school. I used Valrhona Caramelia 36% and Guanaja 70%.

The Chocolate Desserts chef taught us to prepare ganache in the way I've outlined in the recipe below.  It involves heating the chocolate, as well as the cream, so that you are blending two liquids. I find the results are always on point and have made it my preferred method.

The Caramelia milk chocolate worked well with the espresso add-in  - tasted like a macchiato. The Guanaja helped to balance the sweetness of the milk chocolate. Not your typical halloween fare, but that shouldn't stop you from indulging!

Have a safe and Happy Halloween and I'll see you in a few days for a candy-less treat!

Triple Chocolate Ganache Tart. Chocolate pâte sucrée filled with layers of milk and dark chocolate ganache for a simple and truly decadent treat.
Print Recipe
5 from 2 votes

Triple Chocolate Espresso Ganache Tart

Chocolate pâte sucrée filled with layers of milk and dark chocolate ganache for a simple and truly decadent treat.
Prep Time30 minutes mins
Cook Time30 minutes mins
Total Time1 hour hr
Course: Dessert
Servings: 6 -8 servings
Author: I Sugar Coat It

Ingredients

Chocolate pâte sucrée (for 2 tarts - shape and freeze extra dough):

  • 400 grams browned butter cold and roughly chopped
  • 250 grams granulated sugar
  • 2 grams salt
  • 50 ml egg 1 large
  • 600 grams cake flour
  • 60 grams cocoa powder

Milk Chocolate Ganache:

  • 145 grams coconut cream
  • 200 grams caramel milk chocolate 36%
  • 20 grams instant espresso powder

Dark Chocolate Ganache:

  • 175 ml coconut cream
  • 220 grams dark chocolate 70%

Garnish:

  • fresh fruit or chocolate decorations
  • white chocolate for web design
  • dark chocolate for sealing tart

Instructions

  • To make the pate sucree:
  • Add the butter, sugar and salt to the bowl of a stand mixer. With the speed set to low, cream the mixture, stopping just before fully creamed.
  • Gradually add the eggs and increase the speed to medium-low and finish creaming.
  • Sift together the cake flour and cocoa powder onto a parchment paper (easier to tip into the mixing bowl) or a bowl.
  • On low speed, add the dry ingredients to the butter mixture, until just incorporated. Do not over mix.
  • Turn the dough out onto a clean surface and divide into two portions. Press into discs, wrap in plastic wrap and refrigerate for a couple hours, or overnight.
  • Remove one disc refrigerator, place between two silicone mats, or parchment paper and roll out to ⅛-inch.
  • Press into tart pan, trimming any excess and use a fork to poke hole in the base of the tart. Return to the refrigerator to chill for 15 minutes.
  • Preheat oven to 400º F. Place the tart pan on a sheet pan (I use a perforated pan) and bake on the middle rack of the oven for 15-20 minutes.
  • Remove from oven and use a pastry brush to lightly coat the shell with tempered chocolate. This keeps your crust from getting soggy.

To make the milk chocolate ganache:

  • Melt the chocolate and set aside.
  • Bring the cream to a light boil and whisk in the espresso powder. If you are fussy, strain the milk mixture.
  • In three additions, add the milk mixture to the melted chocolate, while stirring slowly from the centre out with a whisk. (Stir, do not whisk.)
  • Stir until mixture becomes homogeneous, cover with a plastic wrap and allow to cool.
  • Fill the tart shell halfway and place in the refrigerator to set.

To make the dark chocolate ganache:

  • Melt the chocolate and set aside.
  • Bring the cream to a light boil.
  • In three additions, add the milk mixture to the melted chocolate, while stirring slowly from the centre out with a whisk. (Stir, do not whisk.)
  • Stir until mixture becomes homogeneous, cover with a plastic wrap and allow to cool at room temperature.
  • Pour over the milk chocolate, filling the tart shell to just below the top edge.
  • Pipe some white chocolate in concentric circles onto the ganache and drag a toothpick through the circles from the centre out, to create the design.
  • Place in the refrigerator to set.
  • Top with fresh fruit or chocolate decorations.
Triple Chocolate Ganache Tart. Chocolate pâte sucrée filled with layers of milk and dark chocolate ganache for a simple and truly decadent treat.


Aerated Milk Chocolate Skulls

October 2016 By i sugar coat it! 18 Comments

Aerated Milk Chocolate Skulls {Halloween}

These fully edible Aerated Milk Chocolate Skulls filled with bubbly clouds of espresso milk chocolate make a fun adult halloween treat.

Aerated Milk Chocolate Skulls
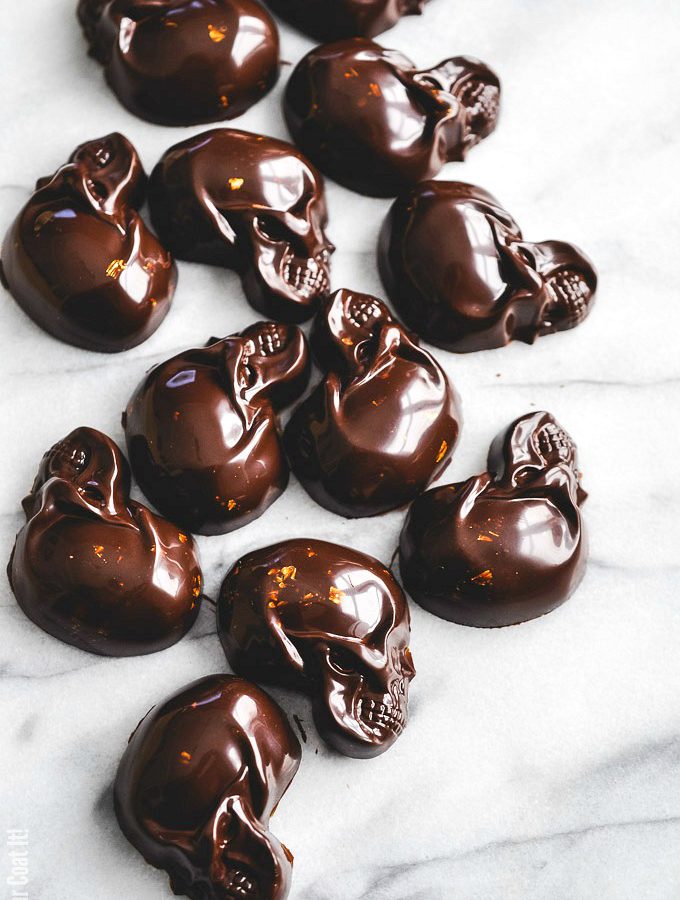
Halloween is just a week away! Soon we'll be turning back the clocks, which to this day still makes ZERO sense to me. Then we'll be on to carolling, ugly sweaters, snowfalls and the the big dude in red. But I'm getting ahead of myself. Back to Halloween and these Aerated Milk Chocolate Skulls!

Because Mondays are so very brutal, I am starting the week off with chocolate. Have you ever had an Aero chocolate bar? You know that melt-in-your-mouth, bubbly milk chocolate experience? Yeah, you do!

Aerated Milk Chocolate SkullsWell, thanks to Heston Blumenthal, I've created that same experience in these Aerated Milk Chocolate Skulls. Best part? One ingredient (two, if you want to flavour it like I did)!!

It's so easy, guys! However, the first time I made it, I foolishly neglected to warm the whipping siphon. I think you all know what happens when warm chocolate comes into contact with a cool surface. Once I ran out of f-bombs and melted the last bits of hardened chocolate from nooks and crannies of my whipper, I was at it again.

Aerated Milk Chocolate SkullsHeston used a vacuum cleaner and storage vacuum bag. HUH? Yup! I used my foodsaver vacuum sealer and marinator accessory. He added oil. I did and then I didn't. It worked out fine, but it all seemed too cumbersome. So I thought, HEY I've made fruit-based foams before without the dog and pony show, perhaps that would work for chocolate.

With just the whipping siphon, some experimenting with the amount of charges and some espresso flavoured milk chocolate, I was able to produce a similar effect. The bubbles weren't as well dispersed, but I really preferred the mouthfeel without the added oil. So I filled and closed the skulls and VOILA!

Aerated Milk Chocolate Skulls

But I could not leave well enough alone. I got it in my head that I wanted them to look more scary in a David Altmejd-ish kind of way. I'm sure you have heard me rave on social media about his work. So out came the cocoa butter, more chocolate and the spray gun and...  Aerated Milk Chocolate Skulls!

Before I go, I must know... Do you still dress up for halloween? You can tell me - it'll be our dark, little secret. Promise!

Aerated Milk Chocolate Skulls
Print Recipe
3.84 from 6 votes

Aerated Milk Chocolate Skulls

These fully edible Aerated Milk Chocolate Skulls filled with bubbly clouds of espresso milk chocolate make a fun adult halloween treat.
Prep Time30 minutes mins
Total Time30 minutes mins
Course: Dessert
Cuisine: Chocolate
Servings: 6
Author: i sugar coat it!

Ingredients

Skulls:

  • 250 grams dark chocolate I used Guanaja 70%

Filling:

  • 500 grams milk chocolate I used Jivara 40%
  • 3 grams espresso powder

Instructions

To cast the molds:

  • Temper the chocolate in your preferred method (seeding, tabling) and cast the molds.

To make the filling:

  • Warm the whipping siphon to 32ºC by placing it in bowl or pot of warm water. Sometimes I use a heat gun to do the job and keep things dry.
  • Melt and temper the chocolate, add in the espresso and pour into the warmed whipper.
  • Place the cap on and give it three charges, following the manufacturer's instructions. Shake vigorously and quickly dispense the chocolate into the molds, container or frame.
  • Place in the refrigerator to set.

Notes

You may skip step 1, if you do not own molds. Once the aerated chocolate sets, cut into bars and dip in tempered chocolate.
These fully edible Aerated Milk Chocolate Skulls filled with bubbly clouds of espresso milk chocolate make a fun adult halloween treat.


Butterflies and Braids Pumpkin Pie.

October 2016 By i sugar coat it! 13 Comments

Butterflies and Braids Pumpkin Pie

A classic pumpkin pie filled with all the flavours of fall baked in a perfectly flaky, buttery crust and topped with pumpkin spice whipped cream.

Butterflies and Braids Pumpkin Pie.

GUYS…this Butterflies and Braids Pumpkin Pie is my very first pie post!! OK, not exactly, if you count these mini pies, or the brief appearance of these apple pies from pastry school in this post. I'm talking pie proper! With an attempt at a fancy double crust to boot.

Pies and I have a lukewarm relationship, at best. Pies filled with cooked fruit, in particular, simply don't appeal to my palate. However, I love me some pie crust and will gladly eat my way around such filling, when no one is looking. Who am I kidding... I have no issue doing it under watchful eyes. 😳

I grew up with lots of fresh pumpkin-filled dishes - like my grandmother’s best-in-the-universe pumpkin pancakes and her soups to name a couple - oddly, she never made pumpkin pie ( at least not that I can recall - I'll have to check with her...)

Butterflies and Braids Pumpkin Pie.

I had my first slice of pumpkin pie in my early twenties and although the experience wasn't exactly one that compelled me to drop to my knees and kiss the crust, it was good. It wasn’t until I had a slice of a friend mom’s pie, that I truly appreciated and quite possibly fell in love with pumpkin pie. The flaky, butter-filled crust and the crunchy crumble topping provided the right texture contrast needed for me to truly enjoy the rich, creamy, spice-laden filling.
[Tweet "All butter crust classic Pumpkin Pie to celebrate fall's bounty."]
Apart from meat pies, pecan pie is the only other dessert pie that makes it past my lips. Although, I view it as more a tart, than pie. It's the Dude's favourite pie and it was he who talked me into trying my very first slice earlier in our relationship, after about one hundred attempts. It was his first lesson in 'Jacquee don't break easily'. (yes, yes - grammatically incorrect)
Personally, I find pecan pie way too sweet for even my sweet tooth, so we reserve it for once in a blue moon, or so. Pumpkin pie, however, I try to get a good homemade slice at least once a year around this time.

Butterflies and Braids Pumpkin Pie.

This Butterflies and Braids Pumpkin Pie was the perfect reward, after a reluctant run with the Dude early Saturday morning. I am so not in running form at the moment and it simply felt like pure torture. To be honest, I wouldn’t exactly call what I did running - the Dude described it as an embarrassing display of heavy breathing, stomping, stumbling and muffled expletives. And yeah, that about sums it up, so... PIE!!
This was my first attempt at a fancy topping - and I'll be the first to admit, it ain't at all fancy. I envisioned the cut-out butterflies in 3-D, wings aflutter, as if taking flight off the pie. They baked up flat, against my efforts. 😩
Also, it turns out that the ability to perfectly braid a head of curly hair does not translate to braiding pastry dough. They were either too tight or loose. It didn't help that I was trying to film my IG Story at the same time.
Finally, I decided I didn't want to wait for it to cool on its own because, you know... photos. So, in order to get it to stay intact while I sliced it for photos, I thew it in the freezer for what was supposed to be only a few minutes. Unfortunately, I didn't notice the white specks of what seemed to be frost, until I was browsing through the photos. OY!

Butterflies and Braids Pumpkin Pie.

A few things to note:
  • COLD butter and under-worked dough = perfectly flaky crust. The very first thing we made in Baking Arts a few years ago, was dough for apple pie. We used all-butter and chilled and grated it - my preference.
  • Bake the smaller decorations on a separate tray (that goes for anything, actually). The larger ones take a little longer to bake and by separating the sizes, this allows you to remove the small ones sooner.
  • I totally forgot that I own a pie crust protector and weights. Once I remembered, I dug them out and placed them on the half-baked pie and saved my edges from burning. YAAY for me!!
  • I talked about perforated pans in my most recent macaron post - I highly recommend them for tarts and pies.
  • Maybe I’m the last person on the planet to figure this out, but dough loves wood. I always find it easier to work with pastry dough when using a wooden rolling pin and work surface.
  • Don't skip the blind bake!
What are some of your pie making and decorating tips? School me, PLEASE!!

Butterflies and Braids Pumpkin Pie.
Print Recipe
4.67 from 3 votes

Butterflies and Braids Pumpkin Pie

A classic pumpkin pie filled with all the flavours of fall baked in a perfectly flaky, buttery crust and topped with pumpkin spice whipped cream.
Prep Time40 minutes mins
Cook Time1 hour hr
Total Time1 hour hr 40 minutes mins
Course: Dessert
Author: I Sugar Coat It

Ingredients

Pastry (for two 9-inch crusts) - adapted from Baking Arts course material:

  • 248 grams all-purpose unbleached flour
  • 12 grams granulated sugar
  • 2.5 grams salt
  • 229 grams unsalted butter chilled and grated
  • 125 grams very cold water
  • 1 egg

Filling (adapted from ED SmithPumpkin Puree:

  • 2 eggs
  • 175 grams full fat coconut milk
  • 1 vanilla bean scraped
  • 305 grams roasted pumpkin or canned pumpkin puree
  • 230 grams loosely packed brown sugar
  • 3 grams ground cinnamon
  • 1 gram ground nutmeg
  • 0.5 gram ground ginger
  • pinch of sea salt to taste

Topping:

  • 250 grams coconut cream
  • superfine sugar to taste
  • 1 g Rodelle pumpkin spice extract
  • 1 packet wipped cream stabilizer optional
  • 1 g pumpkin spice to garnish home-made or store bought

Instructions

To make the pastry:

  • Chill the butter in the freezer for a few hours, or overnight.
  • In a large bowl, combine flour, sugar and salt.
  • Grate the butter into the flour mixture and work with your fingers or a pastry cutter, until the mixture resembles coarse crumbs.
  • Gradually add water just until the pastry begins to come together.
  • Place the dough on a lightly floured surface and bring together into a ball.
  • Separate into two even pieces and wrap and chill each in plastic wrap. Chill for at least 1 hour, or overnight. One half will be used for the bottom and the other to decorate the top of the pie.
  • Once chilled, roll out one of the two balls of dough on a lightly floured surface.
  • Drape the rolled dough onto a pie plate and use your fingers to press the dough into the plate. Clean up any rough or hanging edges and use a fork to poke hole in the base.
  • Remove the other half of the dough from the fridge, roll out as above and and use a pastry/cookie cutter to cut desired shaped and strips for braiding.
  • Place the butterfly cut-outs on a small tray and return to the fridge to chill. Arrange the braids around the edge of the pie crust. Return everything to the fridge to chill.
  • Preheat oven to 425ºF and place a rack in the lower middle position of your oven. Blind bake for the crust by filling with parchment and pie weights, uncooked beans or rice and bake for about 10 minutes, just as the edges begin to show a little browning. Remove from the oven and remove the parchment and weights. Return to the oven for an additional 3-5 minutes.
  • Lower the oven temperature to 325F.

To make the pie filling:

  • Add the eggs and milk to a medium bowl. Scrape the beans from the vanilla pod into the eggs and whisk together lightly.
  • Whisk together the sugar, flour, cinnamon, salt, ginger and nutmeg in a separate bowl.
  • Add the egg mixture to the flour mixture and stir until fully combined.
  • Pour the mixture into the blind baked shell, place the pie shield on the edges and bake for 30-35 minutes.
  • Add the butterflies to the oven during the last 3-5 minutes to bake. The little one bake up quickly, so keep an eye on them.

To make the whipped topping:

  • Chill the cream, a stainless steel bowl and whisk in the freezer for 10 minutes.
  • Pour the cream into the chilled bowl, add the stabilizer (if using), sugar and spices and whip to soft peaks.
  • Add the pumpkin spice extract and continue to whip until stiff peaks form.

Assembly:

  • Add the baked butterflies to the baked pie, while still hot.
  • Top with whipped cream and a sprinkle of pumpkin pie spice.
  • Enjoy!!
Butterflies and Braids Pumpkin Pie. A classic pumpkin pie filled with all the flavours of fall baked in a perfectly flaky, buttery crust and toped with pumpkin spice whipped cream.


Browned Butter Pumpkin Caramel Bundt Cake - I Sugar Coat It!

October 2016 By i sugar coat it! 16 Comments

Browned Butter Pumpkin Caramel Bundt Cake

Lightly spiced, with a tender crumb and caramel drizzle, this Browned Butter Pumpkin Caramel Bundt Cake is bursting with the flavours of fall. A perfect addition to your Thanksgiving table!

Browned Butter Pumpkin Caramel Bundt Cake - I Sugar Coat It!
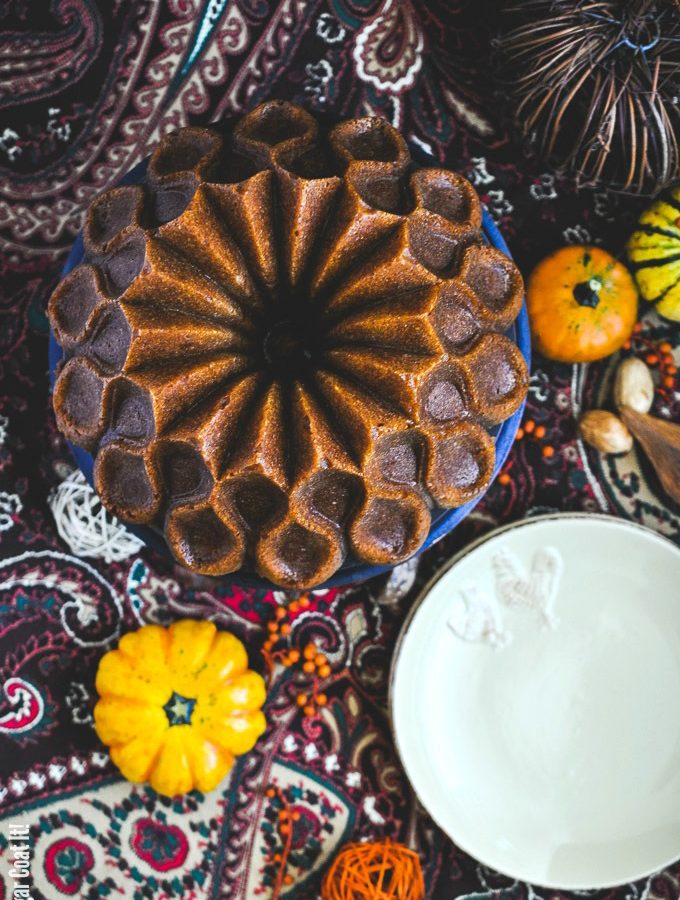
This Browned Butter Pumpkin Caramel Bundt Cake needs to make its way onto your dessert table and into your tummy for Thanksgiving this weekend! With ingredients like browned butter, ginger red sugar and fresh roasted pumpkin, why wouldn't you?

Last week, we had ourselves a bit of an impromptu vacation and the timing couldn't be better. We left fall weather behind us, only to return to beautiful, summer-like weather this week. I am talking sandals and outdoor grilling weather, folks! Just when I'd resolved to embrace fall, too. Go figure!

Browned Butter Pumpkin Caramel Bundt Cake - I Sugar Coat It!Everything about this post screams fall, though. Don't you think? I was reorganizing my prop shelves (ok, room ☺️) and stumbled across this Ralph Lauren tablecloth. Now, we aren't tablecloth kinda folks, so I was a little puzzled at first. Then I remembered I picked it up at HomeSense a long while back, when I thought we might convert to tablecloth wielding folk.

Being the naked wood loving folk that we are, I added the tablecloth to the Value Village pile. The Dude quickly pulled it out (a bit of a pack-rat, that one) and declared I should use it for photos (which is probably why I bought it in the first place). I figured I never would, but here we are...

And you know what - I love the fall bohemian vibe it lends the photos. Also, it turns out I used it at least once before in this Mad About You Butter Pecan Cake post! So there, not a completely wasted purchase.

Browned Butter Pumpkin Caramel Bundt Cake - I Sugar Coat It!But enough about that. This Browned Butter Pumpkin Caramel Bundt Cake is all that and a bag of decorative gourds. 😬 It's a remodelled version of a recipe I've used over the years and I think this is the way to go, going forward.

The ginger red sugar, traditionally used in asian cooking (soups, stews and the like), adds a hint of spicy aroma and flavour. With the addition of browned butter and roasted pumpkin, the resulting flavour is deep, rich and comforting. Everything a fall dessert should be.

An optional pumpkin simple syrup soak and pumpkin caramel drizzle (from an earlier post) and resistance is futile. Don't let the dark exterior fool you - the cake isn't overcooked or burnt. The colour darkened when I added the simple syrup soak. I quite like how that translated in the photos.

Browned Butter Pumpkin Caramel Bundt Cake - I Sugar Coat It!So, how about this art piece of a Bundt pan, huh!?! It's called the Crown Bundt Pan and it's really something special - so special, it took me like forever to unpack and use it. I've only used it a couple other times, both were for recipe testing. Not sure why, but I wanted to keep it shiny and new like the ridiculous pile of bundt pans I own and hardly ever use. Serious issues. 🙄

The pans won't retain their newness forever, but here are a few tips for use and care of your Bundt pans:

  • Just like new clothing, I always wash everything before I use them. Give your new pans an initial wash with a little soapy, warm water and a non-abrasive sponge or cloth. This gets rid of any production residue. The manufacturer does not recommend dishwasher use.
  • If you want your cake to exit the pan in one piece, you're going to have to get a little greasy. Ok, not you (unless that's your thing...), but the pan. I use cake release - I make it, but you can also buy it. Or you can go old school with grease and flour. If I'm baking a chocolate cake, I replace the flour with cocoa powder, to avoid a white residue on the finished cake.
  • When using a pan with an intricate design, before adding all the batter, use an off-set silicone spatula to smear a layer of the batter in the pan, so that it gets into the crevices. This provides a smoother finish and minimal air bubbles.
  • For this recipe, I filled the pan almost all the way to the top with batter. How much you fill the pan will depend on the recipe you use and the amount of leavening agents it contains. A good rule of thumb for most cakes is about ¾ full.
  • The first time I used a bundt pan years ago, I inverted the pan too soon and the entire top of the cake clung to the inside of the pan for dear life. Allow your cakes to cool before trying to remove them. If I'm in a rush, I let it chill in the fridge to speed up cooling, before turning out the cake.
  • I have said this many times on here, but it's worth repeating, bake your cakes, pies etc. on a baking sheet. It will save you having to clean up spills, drips and full on overflows. This is especially useful when recipe testing. Even with a self-clean oven, I'm all about that extra protection.😏

Now that I've talked your heads off about tablecloths and bundt pans , head to the kitchen and bake up this Browned Butter Pumpkin Caramel Bundt Cake for the family.

Wishing you all a Thanksgiving filled with loved ones and lots of delish bites! Happy Thanksgiving!

I-Sugar-Coat-It-Blog-Signature-Green

Browned Butter Pumpkin Caramel Bundt Cake - I Sugar Coat It!
Print Recipe
4.67 from 3 votes

Browned Butter Pumpkin Caramel Bundt Cake

Lightly spiced, with a tender crumb and caramel drizzle, this Browned Butter Pumpkin Caramel Bundt Cake is bursting with the flavours of fall. A perfect addition to your Thanksgiving table!
Prep Time15 minutes mins
Cook Time55 minutes mins
Total Time1 hour hr 10 minutes mins
Course: Dessert
Servings: 1
Author: I Sugar Coat It

Ingredients

Bundt:

  • 195 grams browned butter liquid
  • 384 grams granulated sugar
  • 36 grams ginger red sugar or brown sugar, unpacked
  • 4 large eggs
  • 6 grams vanilla bean paste
  • 425 grams pumpkin puree fresh or canned, but not pumpkin pie filling
  • 298 grams unbleached all-purpose flour
  • 8.5 grams baking soda
  • 7.5 grams pumpkin spice
  • 5 grams salt

Caramel:

  • 240 g pumpkin puree
  • 340 g 35% coconut milk
  • 450 g brown sugar
  • 1.5 g pure vanilla extract
  • 7.5 g ground cinnamon
  • 2.5 g ground ginger
  • 1 g freshly grated nutmeg
  • 0.5 g ground clove
  • 1.5 g sea salt

Simple syrup:

  • 118 grams water
  • 96 grams sugar
  • 2 grams pumpkin spice extract
  • 5-10 grams bourbon

Instructions

To make the Bundt:

  • Preheat oven to 350º F. Use a pastry brush to apply a generous coating of cake release to the Bundt pan, paying attention to the crevices. Place the pan on a sheet pan and set aside.
  • In a medium bowl, sift or whisk together the flour, baking soda, pumpkin spice and salt. Set aside.
  • Add the butter, granulated sugar and ginger sugar to the bowl of your stand mixer. Use the paddle attachment to beat the butter and sugar together on medium speed, until it lightens in colour and looks fluffy in appearance.
  • Stop the mixer and add the eggs and vanilla, then beat on medium speed until incorporated. Stop and add the pumpkin puree and beat to incorporate. Scrape down the sides of the bowl as needed.
  • Turn the mixer down to low and add the flour mixture. Mix until fully incorporated, scraping down the sides of the bowl as needed.
  • Using a small offset spatula, press some of the batter into the design of the Bundt pan - this helps prevent gaps in the finished cake. Add the remaining batter to the pan and tap the pan on the counter a couple times so that the batter settles in.
  • Place on the sheet pan and bake on the middle rack for 55-60 minutes. When ready, remove from the oven and allow to cool in the pan for approximately 15 minutes. Invert onto a cooling rack and allow to cool completely.

To make the caramel:

  • In a large, heavy saucepan over medium heat, melt the sugar. Continue to heat until it becomes amber gold in colour.
  • Remove the saucepan from the heat and slowly pour half the cream into the melted sugar. Stir using a wooden spoon. (Use extra care to avoid burns)
  • Using a hand whisk, whisk the mixture until combined and smooth.
  • Whisk in the remainder of the cream along with the pumpkin puree and vanilla extract. Add the spices and salt and leave to cool.
  • Once cooled, pour over cake and store any leftover in a sealed jar in the fridge.

To make the simple syrup:

  • Add the water and sugar to a small saucepan and bring to a boil.
  • Remove from heat and allow to cool a little, then stir in the pumpkin extract and bourbon.
  • Allow to cool completely. You may transfer to a squeeze bottle to soak the cake, or use a pastry brush.


Lightly spiced, with a tender crumb and caramel drizzle, this Browned Butter Pumpkin Caramel Bundt Cake is bursting with the flavours of fall. A perfect addition to your Thanksgiving table!
Peanut Butter Banana Macarons - I Sugar Coat It!

September 2016 By i sugar coat it! 26 Comments

Peanut Butter Banana Macarons

A throwback to my favourite childhood lunchbox sandwich, these Peanut Butter Banana Macarons are perfectly peanutty cookies, stuffed with a silky banana ganache and dollop of peanut butter.

Peanut Butter Banana Macarons - I Sugar Coat It!

I have no proof beyond my word, but I may quite possibly hold the record for most PB&B sandwiches eaten…in the entire universe. And I may have very well broken my own record with these Peanut Butter Banana Macarons.

Peanut butter-banana-chocolate pairing is high on my flavour combo list - it just never gets old. It reminds me of my childhood and if I am totally honest, much of my post-secondary years, as well.

Granted, in macaron form, they are a little more sophisticated and grown-up than my lunchbox sandwich. I’ve replaced the toasted wheat bread with cookies made of ground peanuts (peanut flour) and stuffed them with homemade peanut butter and a silky, rich dark chocolate, banana ganache. YUMMMMM...

Oh, and I boozed them up a little to distinguish them from the childhood lunchbox sandwich variety and because... well, ADULTHOOD!

Peanut Butter Banana Macarons - I Sugar Coat It!

My very first attempt at making macarons yielded a sad looking set of peachy, footless step cousins to the real deal. With my second batch, a foot fetish steeped in almonds and egg whites was born. I am still filled with disturbingly childish excitement each time I peer through the oven door to see those feet forming. Tell me I am not alone here. ANYONE??

Speaking of feet... I switched to perforated pans last year and noticed an improvement in the quality of my macaron feet - smoother and less sticky soles. Now, I am not suggesting these pans are needed to make better macarons - I've had great results over the years with regular sheet pans. Just thought I'd share. I've also found the perforated pans great for baking tarts and cookies.

Peanut Butter Banana Macarons - I Sugar Coat It!

This batch is made with ground peanuts - a very first for me! I bought a ton of peanuts to try my hand at panning (see previous post), so I had a bunch left over. Plus, peanut cookies seemed a more natural choice for recreating my beloved lunchbox sandwich.

Guys, they were OUT. OF. THIS. WORLD. AH-MAZING! The dark, nutty notes of the Valrhona Caraibe 66% was a perfect blend with the banana puree - rich and silky, but not too sweet. Add a touch of homemade one-ingredient peanut butter, stuff them between those peanut cookies and BOOM!

All that's missing are my juice box, my days of the week undies and my sesame street sing-a-long DVD. 🎶 Sunny days, chasing the clouds away.... 🎶 🙂

Peanut Butter Banana Macarons - I Sugar Coat It!

I sometimes get questions from family, friends, colleagues and my readers about secrets to making macarons. Secrets? None here. Hell, I still produce a bad batch from time to time, but way less often these days. I am certainly no expert, but here's my approach to making macarons:

  • Relax! They are just cookies, after all. I go into this in my post here.
  • Tap that a**, um... mac! Actually more like a few firm, show 'em who's boss whacks on a flat surface after piping to release any trapped air bubbles. I never skip this step.
  • My preference is the Italian meringue method - I have less failures with this method. But, I am too impatient, so I usually use the French method.
  • To rest or not to rest? I let me macs rest purely out of habit. One chef I was taught by, didn't and they turned out great! When I use the Italian method, I skip the resting, as she taught us and I have not had any problems.
  • Practice! I think about working with chocolate and how we were made to repeat the tempering process many times in each class, until we were at the point of recognizing its readiness by sight and feel. Same with macarons - over time, you will start to recognize when your meringue and batter are where they need to be. I made a small batch of macarons every week, to my friends and neighbours delight, back when I was frustrated with the failed batches. I still have some not so great batches, but way fewer.
  • If you are new to macaron making, do a little research. At the end of the day, good macarons are a result of good technique - The Brave Tart will tell you all about that. Also, Mardi at eatlivetravelwrite has a free guide and many macaron posts.
  • Experiment! One you are comfortable with the basics, experiment. You can use other nuts like pistachio, hazelnuts  and even seeds. You can also use fruit and vegetable powders to flavour the cookies. I've used beet, pumpkin and berry powders. Where you can really get creative with flavours, from sweet to savoury, are your fillings.
  • Finally, HAVE FUN!! I have a full time career unrelated to food, so any time I spend in the kitchen needs to have some element of fun.

[Tweet "My favourite sandwich, all grown up - Peanut Butter Banana Macarons."]

Soooo...have YOU made macarons? If not, what's your biggest fear/worry in tackling them? If yes, what's your favourite technique/tip? Would love to hear - leave me a note in the comments below.

I-Sugar-Coat-It-Blog-Signature-Green

Peanut Butter Banana Macarons - I Sugar Coat It!
Print Recipe
5 from 6 votes

Peanut Butter Banana Macarons

A throwback to my favourite childhood lunchbox sandwich, these Peanut Butter Banana Macarons are perfectly peanutty cookies, stuffed with a silky banana ganache and dollop of fresh peanut butter.
Prep Time30 minutes mins
Cook Time12 minutes mins
Total Time42 minutes mins
Course: Dessert
Servings: 20 -30 macarons
Author: I Sugar Coat It

Ingredients

Banana Ganache:

  • 142 grams cream 35%
  • 30 grams liquid glucose
  • 60 grams banana puree
  • 45 grams butter room temperature
  • 220 grams dark chocolate a mix of dark and milk would work, but I found it too sweet, 66%
  • 25 grams banana liqueur
  • cocoa for dusting

Macarons:

  • 110 grams egg whites
  • 75 grams granulated sugar
  • 125 grams roasted peanuts
  • 175 grams confectioner's sugar

Peanut Butter:

  • 300 grams peanuts roasted unsalted
  • peanut or coconut oil as needed
  • salt to taste

Instructions

To make the ganache:

  • Melt the chocolate and set aside.
  • Add the cream and glucose to a saucepan and bring to a boil.
  • Remove from heat and whisk into the banana puree.
  • Add the banana-cream mixture to the melted chocolate in two additions, stirring constantly.
  • Add the butter and liqueur and continue to stir until the mixture is smooth and homogenous. I sometimes use my hand/immersion blender to help emulsify the mixture.
  • Allow to cool and set at room temperature.

To make the macarons:

  • Line two cookie sheet pans with a template (if using one) and cover with Silpat mat or parchment.
  • In a food processor, combine the peanuts and confectioner's sugar and pulse until combined.
  • In the bowl of a stand mixer, whip the egg whites until foamy using the whisk attachment.
  • Gradually add the granulated sugar to the egg whites, continuing to whip and increasing the speed to high until stiff peaks are formed.
  • Remove the bowl from the stand mixer and one-third of the almond mixture to the meringue, using a spatula to fold into the meringue. Repeat with the other two-thirds. Do not over-mix.
  • The batter should flow back into a flat smooth surface when you run the spatula through it.
  • Transfer batter to a large pastry bag snipped to a half-inch opening, or fitted with a round piping tip.
  • Pipe to your preferred size/shape, leaving an inch between each.
  • Remove template (if one was used) by sliding it out from under the Silpat or parchment.
  • On a levelled surface, firmly tap the pans a few times to remove any peaks and air bubbles.
  • Allow the piped macarons to rest for thirty minutes, longer depending on the conditions in your home.
  • While the macarons are resting, pre-heat the oven to 325ºF.
  • Bake macarons on middle rack of oven for 5minutes. Rotate and bake another 5-7 minutes.
  • Remove from oven and allow to cool completely.

To make the peanut butter:

  • Place peanuts in a food processor and blend until smooth. If needed, add a little oil to help the process along. Add a pinch of salt close to the end.
  • Store in an airtight container.

Assembly:

  • Arrange cookies in pairs, one side facing up and the other down.
  • Use a little cocoa to dust the tops the cookies designated as the top.
  • Pipe a penny-size amount of peanut butter in the centre of the other half.
  • Using a decorative tip (I used the French tip), pipe around the outer edges.
  • Please the cocoa-dusted cookie on top of the filled side and press lightly, with a gentle twist to secure.
  • Place in a airtight container and refrigerate for 24 hours.

Notes

Use a clean, grease-free bowl and whisk for making the meringue.
A throwback to my favourite childhood lunchbox sandwich, these Peanut Butter Banana Macarons are perfectly peanutty cookies, stuffed with a silky banana ganache and dollop of fresh peanut butter.


  • « Go to Previous Page
  • Page 1
  • Interim pages omitted …
  • Page 14
  • Page 15
  • Page 16
  • Page 17
  • Page 18
  • Interim pages omitted …
  • Page 51
  • Go to Next Page »

Primary Sidebar

Never Miss A Happy Ending...

Previous Sweetness...

Search

Filter by Category

Filter by Date

SWEETEN YOUR INBOX!

All Content Including Images Copyright Jacqueline | I Sugar Coat It© 2026