• Skip to primary navigation
  • Skip to main content
  • Skip to primary sidebar
  • Home
  • About
    • About I Sugar Coat It
    • Features & Press
    • Copyright
    • Disclosure
    • Privacy Policy
  • Recipes
  • How-To
  • Contact
  • sous vide sista

I Sugar Coat It

Home

All Posts

Easter Bunny Layered Cookies

March 2016 By i sugar coat it! 10 Comments

7 Easy Easter Treats

From boiled eggs to bark, here are 7 Easy Easter Treats to make and enjoy for Easter.
7 Easy Easter TreatsEaster is almost upon us and although we don't celebrate it, I'll admit I do get a little caught up in the bunnies and chocolate side of the holiday. I mean come on...BUNNIES & CHOCOLATE...resistance is futile!

No need to resist these 7 Easy Easter Treats, they are fairly simple to whip up and pack a whopping dose of delicious.

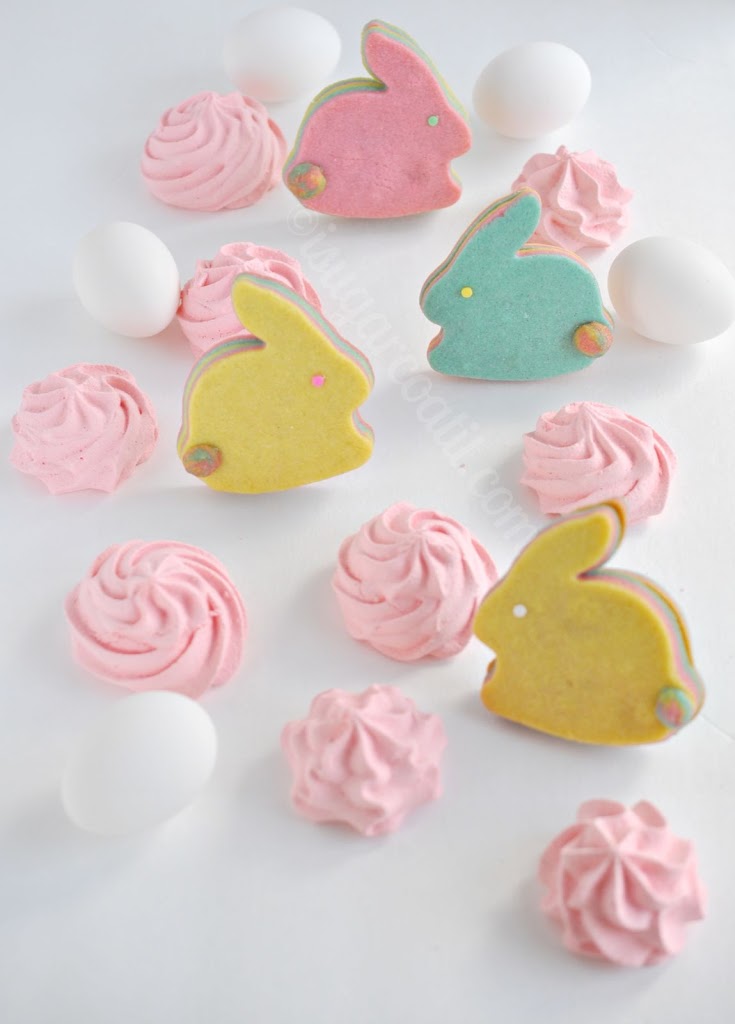
Clockwise from the top:

  • Boiled eggs dressed in florals and polka dots? Yes, please! These DIY Easter Eggs are a fun project to do with the kiddos.
  • Bunnies have many layers and not surprisingly, they are all pastel.Find out How Easter Bunnies Are Made and then bake up a few of your own. But be warned, you may find them too adorable to devour.
  • Have your cupcake and cookie too with these Easter Carrot Cupcakes With Bunny Cookie Toppers! There's carrot cake (sans raisins), cream cheese frosting and vanilla bean cookies - what's not to love!
  • Clouds of mascarpone whipped topping take these Mascarpone Clouds Mini Carrot Cakes over the top in taste. And they ain't so bad to loo at either.

Dark Chocolate Easter Eggs filled with Biscoff and White Chocolate.I made these Biscoff Easter Eggs by molding dark chocolate eggs, then filling them with a Biscoff and white chocolate filling. No Biscoff? Peanut Butter, or your favourite nut butter will work wonderfully. Just wrap them in candy foil and use them for your next Easter egg hunt. That is, of course, if you don't eat them all.

7 Easy Easter TreatsThis fun little Sprinkle Easter Egg Cake makes a beautiful centrepiece for your Easter dinner table. Under the sprinkle colour explosion are two layers of lemon vanilla bean cake. Exactly how I like my eggs!

Raspberry Sprinkle Chocolate BarkNeed a last minute treat that does not look last minute? Then Chocolate Bark is your man! Temper your favourite chocolate and get creative with toppings from nuts and seeds, to dehydrated fruits, to sprinkles and even more chocolate. Go for a good quality white, dark or milk chocolate. I'm not a fan of candy melts, but is that's your thing, go on and do you.

Wishing you all a Happy Hoppy Easter!!

I-Sugar-Coat-It-Blog-Signature-Green

Chouquettes: French Friday

March 2016 By i sugar coat it! 28 Comments

Chouquettes: French Friday

Chouquettes are balls of choux pastry sprinkled with pearl sugar and baked for a light, crisp, irresistible snack.

Chouquettes: French FridayThe things we tell ourselves!

Prior to my first culinary related course, just a few years ago, I would not dare venture into the world of French pastry. Oh, don't get me wrong, I ate them. Often. But I would never think to make any of the amazingly, buttery, deliciousness so readily available in the small shops and bakeries throughout Paris.

Chouquettes: French Friday
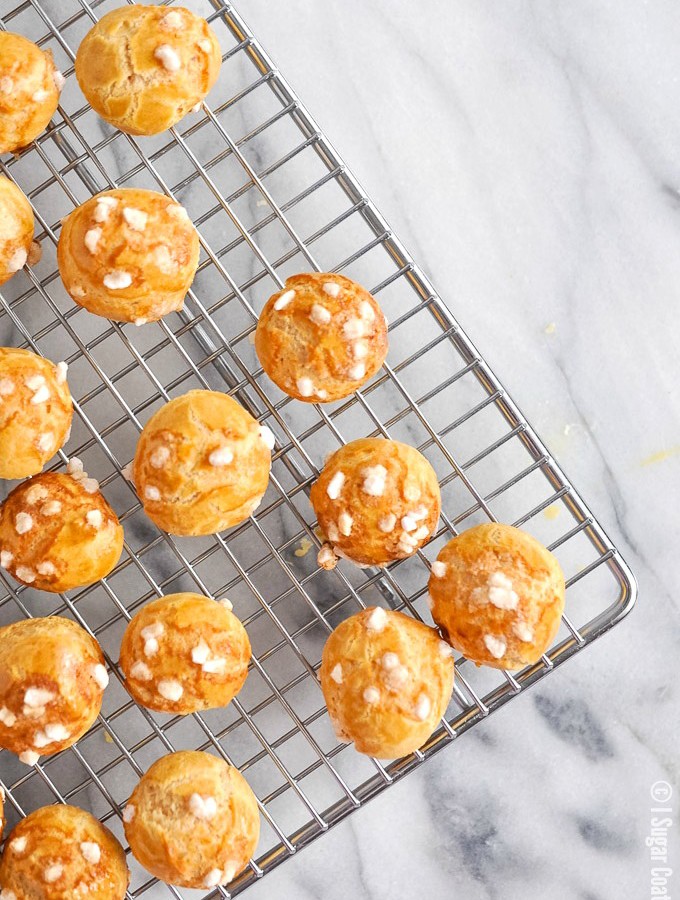
My very first experience with French pastry was around the age of thirteen. One of my aunts was dating a dude from France, who happened to be a chef. He was serious eye candy, but I totally fell for him and French pastry that morning years ago, when the house awakened to freshly baked croissants. One dozen, warm, flaky, buttery croissants. I would have shacked up with him right there and then had there not been the issue with age and the fact that he only had eyes for my aunt... SIGH...

I never thought in a million years I could recreate any of the wonderful treats he made over the course of their relationship, or that I've enjoyed through my travels. Until a few years ago, when I worked up the courage to enroll in a series of culinary courses just for fun.  I was hella nervous when we got around to choux pastry. Four hours later, picture me driving home with a box of eclairs, cream puffs, swans and a grin of accomplishment that spanned the entire width of my face.

Chouquettes: French Friday

Armed with the basics, I went choux paste craycray -  more eclairs with a variety of fillings, profiteroles stuffed with ice cream, cream puffs, crullers, beignets... until buttoning my jeans became optional. So, I was forced to skip the rich fillings and started making batches of Chouquettes, little balls of choux pastry sprinkled with pearl sugar. To satisfy my more savoury cravings, by sprinkling the batter with cheese instead of sugar, I would also make gougeres.

The recipe requires a very small amount of sugar, so you can get liberal with the pearl (nib) sugar. It does not melt in the oven and makes for such a fun and pretty finish. Chouquettes are my go-to for girls nite in. Try whipping up a batch for your next Netflixathon.

Chouquettes: French Friday

Amazing what a simple mixture of butter, water, eggs and flour will yield and all without a raising agent!


Recommended:


Chouquettes: French Friday
Print Recipe
5 from 4 votes

Chouquettes: French Friday

Chouquettes are balls of choux pastry sprinkled with pearl sugar and baked for a light, crisp, irresistible snack.
Prep Time20 minutes mins
Cook Time50 minutes mins
Total Time1 hour hr 10 minutes mins
Course: Dessert
Cuisine: French
Servings: 40 -50
Author: I Sugar Coat It

Ingredients

  • 60 grams unsalted butter ¼ cup, cut into cubes
  • 2 grams salt ½ teaspoon
  • 3 grams sugar 1 teaspoon
  • 120 grams water ½ cup
  • 85 grams unbleached all-purpose flour ⅔ cup, sifted
  • 2-3 large eggs
  • 1 egg for eggwash
  • pearl sugar for sprinkling nib sugar

Instructions

  • Preheat oven to 350ºF.
  • Line two large baking sheets with parchment paper or silicone mat.
  • To a small saucepan, melt butter and add salt, sugar and water and bring to a rolling boil.
  • Add the flour and use a wooden spoon to stir until a roux (a rough paste). Continue to stir vigorously for a couple minutes.
  • Transfer to a bowl and continue to stir until it cools down.
  • Add the eggs, one at a time making sure each is fully absorbed before adding the next. You may not need to add all three eggs, so be sure to check the texture after each addition.
  • Transfer to a piping bag and pipe onto prepared baking sheets. Brush with egg wash and sprinkle with pearl sugar.
  • Bake for 30-35 minutes until golden brown. Turn the oven off and leave the chouquettes in the oven for another 20-25 minutes.
  • Transfer to a wire rack to cool.
  • Enjoy!!

I-Sugar-Coat-It-Blog-Signature-Green

Dark Chocolate Peppermint Patties

March 2016 By i sugar coat it! 41 Comments

Dark Chocolate Peppermint Patties

These Dark Chocolate Peppermint Patties are stuffed with a refreshingly cool blend of fresh mint leaves and fondant dipped in silky, dark chocolate.

Dark Chocolate Peppermint Patties
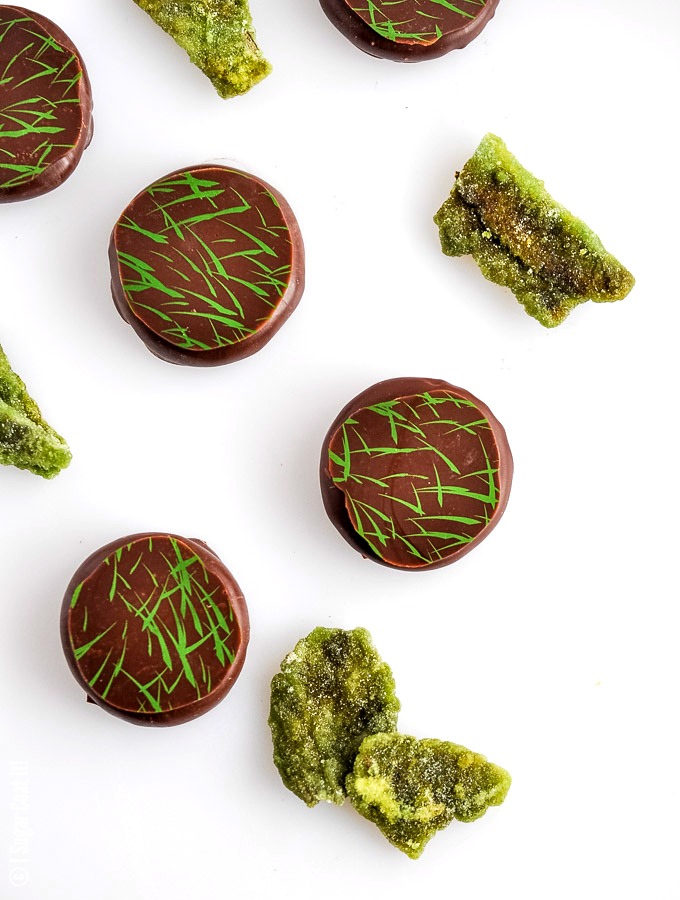
Anyone who knows me well, knows that I normally steer clear of anything that has peppermint in its name. The taste is almost always too medicinal for my palate. That I am sharing these Dark Chocolate Peppermint Patties will come as a surprise, no.... utter shock, to those very folks.

The thing is, I don't like not liking things. My problem has always been my need to experience everything...well, most  things at least once. OK, maybe not most, but a lot. Let's just say I was labelled a closet hedonist by a couple of my closest friends - a label I pretend to dislike, but secretly relish. But, I digress...

Dark Chocolate Peppermint PattiesFondant on its own can be pretty disgusting, so I try to use a quality brand, or better yet, whip up your very own batch of Marshmallow Fondant. Together with fresh mint leaves, a touch of natural peppermint mint flavour, invertase, dark, silky, bittersweet chocolate and crystallized mint leaves for additional texture, these Dark Chocolate Peppermint Patties have converted me. I also have a ganache version that is, in the words of the nineties, bomb-diggity!

Invertase? It's an enzyme that converts sucrose to glucose through the process of hydrolysis and is used widely in candy-making. The addition of invertase to these patties helped to liquefy the fondant over time, so that you get that gooey, caramel consistency when you bite into the patties. I should have waited a couple more days for a better result, but these were disappearing fast and I wanted to get some photos before they disappeared.

Dark Chocolate Peppermint PattiesTo finish them off, I added a leaf pattern to half the batch using transfer sheets, which are plastic sheets printed with coloured cocoa butter. They work best when your chocolate is properly tempered. The other half were topped with gold painted lines and pieces of homemade crystallized mint leaves. I used very few of those in the photos, as I wasn't too pleased with my painting.

From someone who was never been much of a peppermint patty fan, I really enjoyed these Dark Chocolate Peppermint Patties and think you will to. They come together easily and with a little cocoa butter magic, look pretty impressive. Don't you think? Make a few extras and gift them to your patty-loving friends for St. Patrick's Day.

[Tweet "So fresh and so cool - Dark Chocolate Peppermint Patties #StPatricksDay"]

Recommended:


Dark Chocolate Peppermint Patties
Print Recipe
5 from 8 votes

Dark Chocolate Peppermint Patties

These Dark Chocolate Peppermint Patties are stuffed with a refreshingly cool blend of fresh mint leaves and fondant dipped in silky, dark chocolate.
Prep Time20 minutes mins
Total Time20 minutes mins
Course: Dessert
Servings: 15 -20
Author: I Sugar Coat It

Ingredients

  • 200 grams rolled fondant just under 1 cup
  • 4 grams mint leaves 2 ½ tablespoons, finely chopped
  • a couple drops peppermint extract
  • 1-2 drops invertase
  • 300 grams dark chocolate about 1 ¼ cups
  • transfer paper and crystallized mint leaves to decorate

Instructions

  • Line a baking sheet with parchment and set aside.
  • Cut 1.5 by 1.5 squares of transfer sheet and set aside for decorating.
  • Coarsely chop crystallized mint leaves and set aside.
  • Chop the mint leaves very finely. I like using multi-blade scissors to speed things up.
  • On a clean surface, or in a bowl, knead the chopped mint, peppermint extract and invertase into the fondant until distributed and well blended. If you find the mixture too thick, you may thin it with a little water.
  • Roll fondant mixture into even-sized balls and shape into discs wth your fingers, or roll the fondant out flat and use a small round pastry to cut discs.
  • Temper chocolate and dip discs to coat. Tap off excess and move to a parchment lined baking sheet to set.
  • If decorating with transfer sheets, place a square, printed side down, onto each patty while chocolate is still wet. Or, sprinkle with crystallized mint.

Notes

Recipe adapted from Confection course material.

I-Sugar-Coat-It-Blog-Signature-Green

Dark Chocolate Peppermint Patties
3-Ingredient Chocolate Cheesecake

March 2016 By i sugar coat it! 35 Comments

Fluffy 3-Ingredient Chocolate Cheesecake

Soufflé meets custard in this Fluffy 3-Ingredient Chocolate Cheesecake - white chocolate, cream cheese, eggs - BOOM! 

Fluffy 3-Ingredient Chocolate Cheesecake
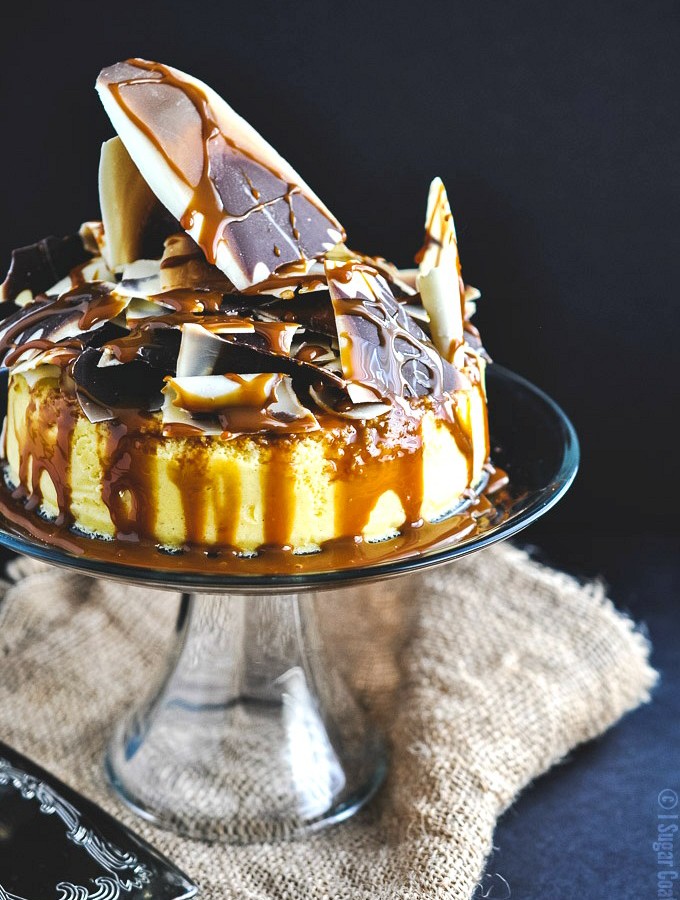
Of all the desserts presented on menus I've perused, cheesecake rarely ever grabbed my attention. It's a texture thing. That was until my mouth met this Fluffy 3-Ingredient Chocolate Cheesecake! 

Think 'When Harry Met Sally' (thanks You Tube), but with souffle and custard in the leading roles and all of a sudden 'I'll have what she's having'... please and THANK YOU!!

I've shared cheesecake recipes here on the blog, twice in the four years I've been blogging - Matcha Cheesecake and what I like to call a cheeseFAKE, my No-Bake Maple Berry Cheesecake. So, that really makes it only once in four years.

Fluffy 3-Ingredient Chocolate CheesecakeThe only cheesecake I've ever thoroughly enjoyed is my sister's - she is a baker extraordinaire! Second to that, those single serve Japanese cheesecake you find at Asian bakeries. Which is essentially what this is, but dripping with decadent date caramel with a pile of chocolate curls and shards stacked on top.

I've made this a few times, once with tofu for a no-bake version before the Dude reverted to a meatatarian. FAIL!! My other version used mascarpone cheese and although it tasted fabulous, the structure wasn't ideal. I used the packed, instead of whipped variety of mascarpone, so I was a little stumped when it flopped. Any ideas??

I like mascarpone for its less sharp taste and silky smooth texture. Personally, I just think it's a far more superior cheese than cream cheese. It's what made these Mascarpone Double Chocolate Chunk Cookies some of the best the Dude claims he has ever had. It's also what set these Mascarpone Clouds Mini Carrot Cakes afloat and what made this Key Lime Mojito Mousse Cake, simply magical!

Fluffy 3-Ingredient Chocolate Cheesecake

Until I can produce a great mascarpone version, I wanted to share the cream cheese version of this Fluffy 3-Ingredient Chocolate Cheesecake that has been floating around the web. To avoid messy slices like mine above, I'd advise you to chill and slice the cake with a warm, clean, sharp knife, prior to adding the chocolate topping. Also, I am not too pleased with the quality of my photos, but the world won't come to an end as a result. Soooo, if you're ready to have what I'm having, slide on down below and grab the goods...um recipe. 😉

[Tweet "Soufflé meets custard in this Fluffy 3-Ingredient Chocolate Cheesecake! "]

3-Ingredient Chocolate Cheesecake
Print Recipe
4.84 from 6 votes

Fluffy 3-Ingredient Chocolate Cheesecake

Soufflé meets custard in this Fluffy 3-Ingredient Chocolate Cheesecake - white chocolate, cream cheese, eggs - BOOM!
Prep Time10 minutes mins
Cook Time1 hour hr
Total Time1 hour hr 10 minutes mins
Course: Dessert
Cuisine: Cheesecake
Servings: 8
Author: I Sugar Coat It

Ingredients

Cheesecake:

  • 255 grams white chocolate 9 ounces, I used Valrhona Opalys 33%
  • 225 grams cream cheese 8 ounces, room temperature cut into cubes
  • 6 large eggs separated and at room temperature

Chocolate Curls:

  • Dark milk and white chocolate

Date Caramel

  • 150 grams dates about 1 cup
  • 125 grams water ½ cup
  • 6 grams vanilla bean paste 1 teaspoon

Instructions

Cheesecake:

  • Preheat oven to 350ºF. Line the base of a removable-bottom pan with a lightly sprayed parchment round. Cut a collar out of parchment that is the circumference of the pan and spray lightly so that it adheres to the sides of the pan. (I used a 6-inch pan). Wrap the pan in foil, so that it covers the base and sides of the pan (this will protect from water seeping in). Place prepared pan in a deep baking pan and set aside.
  • Place a large bowl over a pot with simmering water (bain-marie). Add chocolate to the bowl and heat until melted and smooth.
  • Stir in the cheesecake while still warm and allow to cool in preparation for the egg yolks.
  • Add the egg yolks and stir until completely combined.
  • Whip the egg whites to stiff peaks using an electric mixer and whip attachment.
  • Stir in a little of the whipped egg whites into the chocolate mixture. Then use a spatula to fold in the remaining egg whites in two additions until just combined.
  • Transfer the batter to the prepared pan and fill the pan that it is sitting in with water to about halfway up the outside of the baking pan.
  • Bake for 45 minutes, depending on your oven, or until set, then turn off the oven and do not remove the cake for another 15 minutes.
  • Remove cake from oven and place on a wire rack to cool in the pan.
  • Once completely cooled, lift the bottom out of the pan and chill in fridge, overnight preferably.
  • For best results cut the cake while still cold and before adding the toppings.

Chocolate Curls:

  • Temper chocolates and pour onto a sheet of parchment in any pattern you desire.
  • Allow to set and use the side of a knife or metal spatula to scrape along the surface of the chocolate to create curls.

Date Caramel:

  • Add water and dates to a high-powered blender and blender. This will produce a thicker consistency. Add more water a little at a time to achieve a more fluid consistency, if preferred. (see my mini video)

Notes

Recipe adapted from this YouTube channel.

I-Sugar-Coat-It-Blog-Signature-Green

3-Ingredient Chocolate Cheesecake
Cointreau Blood Orange Mimosa

March 2016 By i sugar coat it! 27 Comments

Cointreau Blood Orange Mimosa

Add some citrus and bubbly to brunch this weekend with Cointreau Blood Orange Mimosa.

Cointreau Blood Orange Mimosa 
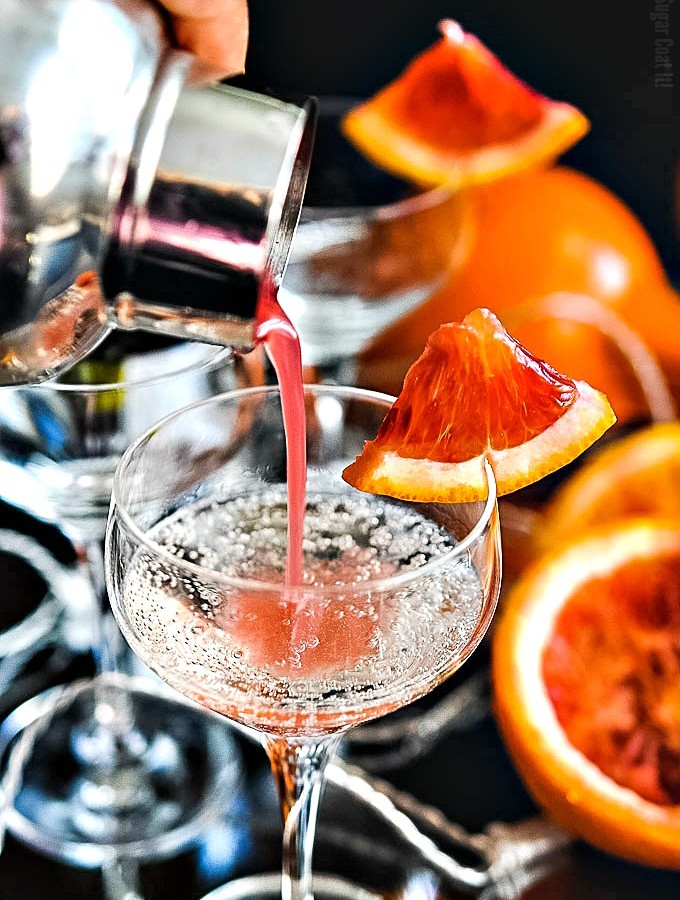
OK, I'm about to throw back one, who am I kidding, more like ten servings of this Cointreau Blood Orange Mimosa - three to ring in the weekend and seven to put the last few weeks behind me. Waaaay behind. Granted, these are fairly small glasses, so it may very well take more than ten to create the kind of distance a girl needs to move on.

Perhaps it had something to do with the leap year business, but last month was just JINXED. This is coming from someone who isn't the slightest bit superstitious.

Cointreau Blood Orange Mimosa

February was a bizarre and downright frustrating month - but I gather you picked up on that from my opening. OK, deep breath, and...

  • the stand-off with a feisty skunk on my driveway at six in the morning
  • my car blowing up on my driveway
  • being propositioned while waiting for the bus (YUCK! and by a creep on a bicycle, no doubt)
  • being sat on by a complete stranger (see bus above, no not that creep...)
  • forgetting my lunch on the train...THREE TIMES (not a charm)
  • two visits to the ER
  • PERSISTENT INSOMNIA
  • spontaneous tear-letting, general irritableness and fuzzy brain (see insomnia)
  • a nasty bug that has claimed me as its BFF against my will
  • having to cut short my karaoke session with Michelle Obama, due to a pesky puppy...

to name a few. Aaaand breathe.

Cointreau Blood Orange Mimosa

You're probably saying to yourself, 'yeah right'. Believe me, I wish I was making this shit up.

OK, slight exaggeration on the car explosion, it was more of a POOF, but a scary one just the same (and I actually went under the hood, as if...). Karaoke with Michelle was actually a dream. A dream I had during one of the ten hours of sleep I had all frickin month. A dream in which Michelle and I totally killed a rendition of Drake's Hotline Bling (including the daddy dance moves), only dressed in matching tank tops instead of ugly sweaters, cuz you know... the arms (hers, anyway). Can you see why I'd be a little peeved about cutting my time short POTUS-adjacent?

If you can tell me what that all means, I'll keep a Cointreau Blood Orange Mimosa chilling for you and I'll keep them coming, if you could somehow conjure up a more marvellous March.

If not, you'll have to make your own. When you do, be sure to use fresh Blood Oranges if they are available where you are - the bottled or frozen stuff works just as well. More importantly, add a generous shot, or ten, of Cointreau to get your brunch party popping.

[Tweet "Add some citrus and bubbly to brunch this weekend with Cointreau #BloodOrangeMimosa. "]

Cointreau Blood Orange Mimosa
Print Recipe
4.50 from 4 votes

Cointreau Blood Orange Mimosa

Add some citrus and bubbly to brunch this weekend with Cointreau Blood Orange Mimosa.
Prep Time15 minutes mins
Total Time15 minutes mins
Course: Drinks
Servings: 8 -10
Author: I Sugar Coat It

Ingredients

  • 1 bottle chilled champagne or dry sparkling wine I used a 750 ml bottle
  • 710 ml freshly squeezed blood orange juice 3 cups, I used 10 oranges, plus 1 to garnish
  • 80 ml Cointreau ⅓ cup

Instructions

  • Pour the champagne evenly among glasses.
  • Add freshly squeezed blood orange juice to a shaker with ice and cointreau.
  • Shake and top up each champagne filled glasses.
  • Garnish with blood orange slices.
  • Cheers!

I-Sugar-Coat-It-Blog-Signature-Green


Blood Orange Mimosa
Magical Matcha Ginger Smoothie Bowl

February 2016 By i sugar coat it! 12 Comments

The Great Big Book of Green Smoothies

My Magical Matcha Ginger Smoothie Bowl is one of over forty ways to go green in my new book, The Great Big Book of Green Smoothies - a deliciously, nutritious collaboration with 40+ amazingly talented bloggers. Be sure to grab a copy for $3.00 this week only!

Magical Matcha Ginger Smoothie Bowl - The Great Big Book of Green Smoothies!
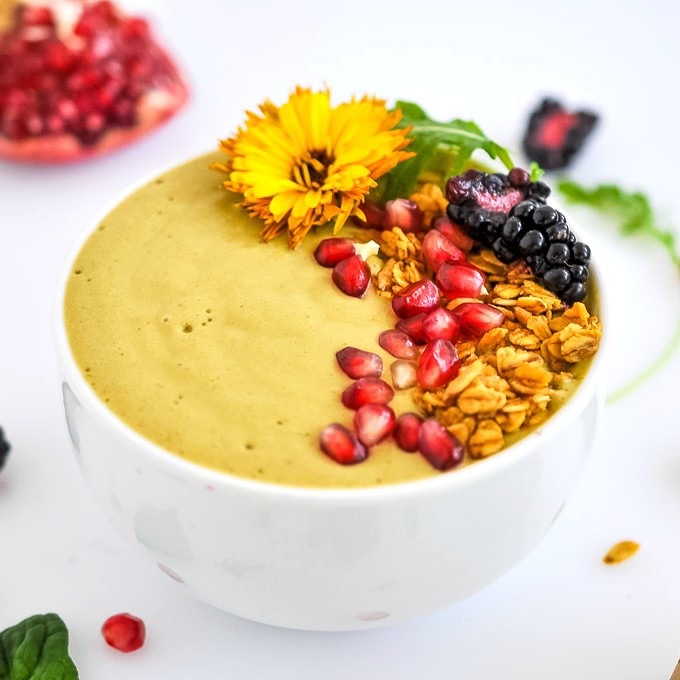
I am super excited to bring you my next book in the line of blogger collaborative e-books - The Great Big Book of Green Smoothies! I know those of you who purchased January's  5-Minute Healthy Snacks have no shortage of delicious, nutritious ideas to curb those snack attacks.

My blog predominantly caters to sweeter pursuits, but if you have been around here long enough, you know that I love me a good smoothie. You can find a few in the recipe tab and on my Instagram account. I usually have it as a first or second breakfast and in the warmer months, I freeze them into popsicles. I do love to whip up sweet treats, but a girl cannot live on cakes, cookies and chocolate alone, try as I might.

Green Smoothies e-BookI am not a fad dieter, nor am I on a scale everyday wondering whether that fraction of a pound is from the pasta or chocolate cake I ate an hour ago. Regardless of what the scale says, balance and moderation are key, in my opinion. I believe in eating the foods that bring you joy and satisfaction, guilt-free. That said, I am no expert on what is healthy or right for others and I don't pretend to be. I just love creating and sharing loads of deliciousness with you guys. That they are sometimes packed with naturally sweet and nutritious ingredients, well , let's just call that having our cake and eating it too! 😉

This book is packed with delicious, green love whipped up by some pretty talented bloggers and yours truly! (AHEM!) SMOOTHIES! What's not to love? Simply whip, pour and enjoy on-the-go! Forty-five quick, ridiculously easy, mouthwatering ways to fit the recommended fruit and vegetable servings into our crazy hectic lives. AAAAAND for only $3.00, if you purchase before March 6!
Big Book of Green Smoothies Freebies

We have also included some amazing freebies to help you master your smoothie game:

  • Quick-search, visual index for Kindles and eReaders. One click takes your straight to the recipe you want!
  • 30-Day Green Smoothie Challenge in both digital and as a printable download, to help motivate you to 30 consecutive days of Green Smoothie success!
  • 7-Day Green Smoothie Detox - an easy-to-follow plan to help you reset.
  • Foolproof Smoothie Formula - an easily customizable "formula" to help you become a green smoothies superstar.

Grab a copy today! The Great Big Book of Green Smoothies is on special this week for only for $3.00 (after sale price is $5.00)!

Thanks in advance for your support!

I-Sugar-Coat-It-Blog-Signature-Green

Matcha Passion Berry Cream Puffs

February 2016 By i sugar coat it! 24 Comments

Matcha Passion Berry Cream Puffs

Matcha Passion Berry Cream Puffs are freshly baked cream puffs filled with whipped coconut cream and naturally flavoured and coloured with matcha, passion fruit and raspberry and dipped in fruity chocolate.

Matcha Passion Berry Cream PuffsMy phone recently informed me that my storage was at capacity, so I asked Siri to 'clean up my phone' and I was promptly directed to the phone app to make a call. Useless. Just for fun, I asked her to give me the 411 on Idris Elba and my screen was immediately populated with data. Yup, Siri's got her priorities straight. 😉

Armed with useless tidbits about Idris, I set out to do what Siri couldn't - clean up my phone - when I came across these photos for Matcha Passion Berry Cream Puffs from about a year ago. I checked my blog to see if I'd already posted them. No! So, I checked my  Lightroom folders and there they sat, waiting for their moment to shine choux!

Matcha Passion Berry Cream PuffsYou may remember my love affair with Cream Puffs and Eclairs, back when I first learned choux in Baking Arts. I think I made them every week for a couple months before my waistline revolted. They are mini so you can eat more logic is a big fat lie.

These Matcha Passion Berry Cream Puffs are bursting with flavour! I flavoured whipped coconut cream with passion fruit and raspberry purees and matcha tea powder and piped them using a bismarck piping tip. To make the outside as pretty and flavourful as inside, I used fruit powder and matcha tea powder to colour and flavour some melted white chocolate. I then paired the matcha with lime zest garnish, a nice pop of citrus to complement to the earthiness of the matcha. I paired the passion fruit with freeze dried mango, because they just work so well together. You can also do 50/50 mango/passion fruit for the cream filling - so GOOD!! For the raspberry, I went with freeze dried raspberry.

Matcha Passion Berry Cream PuffsAs I was preparing to write this post, I looked back through my Baking Arts manual and was reminded of all the ways in which it helped to improve my baking and understanding of how ingredients work. The chef who taught the course is one of my favourite to date. She brought such a passion and excitement to her classes and freely shared many tips and techniques, not included in the course manual, that I still use today.

As I was freeing up space on my phone, I came across so many photos and videos of deliciousness I can't wait to share with you all. All I need are a few more hours in my day. Anyone know how to make that happen?

Matcha Passion Berry Cream Puffs
Print Recipe
5 from 4 votes

Matcha Passion Berry Cream Puffs

Matcha Passion Berry Cream Puffs are freshly baked cream puffs filled with whipped coconut cream and naturally flavoured and coloured with matcha, passion fruit and raspberry and dipped in fruity chocolate.
Prep Time20 minutes mins
Cook Time30 minutes mins
Total Time50 minutes mins
Course: Dessert
Servings: 20 -24
Author: I Sugar Coat It

Ingredients

Choux Paste:

  • 250 grams water 1 cup
  • 125 grams butter ½ cup
  • 5 grams salt 1 teaspoon
  • 185 grams all-purpose flour a little under 2 cups
  • 6 eggs

Filling:

  • 1 can coconut cream full fat
  • 5 grams passion fruit puree 1 teaspoon
  • 5 grams raspberry puree 1 teaspoon
  • 2 grams matcha green tea powder 1 teaspoon
  • icing sugar as needed to taste

Chocolate Glaze:

  • 200 g white chocolate
  • flavouring - 2 grams each passion fruit powder raspberry powder and matcha green tea powder

Garnish:

  • freeze dried raspberries
  • freeze dried mango
  • lime zest

Instructions

To make the choux:

  • Melt butter completely in a saucepan over med-low heat.
  • Add salt and water and bring to a rolling boil.
  • Add sifted flour and stir briskly until the paste (roux) has gelatinized and comes away clear from the sides of the saucepan.
  • Transfer dough to a mixing bowl and with the paddle attachment mix paste on low speed until it has cooled slightly.
  • Add eggs gradually, two at a time, mixing well until thoroughly incorporated between each addition. This will help prevent lumps.
  • When the consistency of the paste is similar to that of cake batter, transfer to a piping bag fitted with a plain tip. Pipe circles, about 2 inches apart, onto paper-lined baking sheets.
  • Bake at 400ºF for 30 minutes.
  • Remove from oven and allow to cool.

To make the filling:

  • Chill the coconut cream for a few hours, or overnight and place the bowl and whisk attachment in the freezer for 5-10 minutes before using.
  • Add the chilled cream to the chilled bowl and with the whisk attachment, whip the cream until medium peaks form.
  • Split the cream into thirds, add fruit puree into two and matcha in the third and whip each to stiff peaks, adding sugar to taste, if needed.
  • Use a Bismarck pastry tip to fill the puffs, or slice in half and pipe using an appropriately sized star tip.

To make glaze:

  • Add chocolate to a bowl and place over a pot with simmering water. Do not allow the bottom of the bowl to come into contact with the water in the pot.
  • Stir the chocolate until melted and smooth.
  • Separate into three bowls and sift in fruit powder and tea while still warm. Stir until combined.
  • Allow to cool a little then dip tops of pastry in chocolate and allow to dry.
  • Garnish with lime zest and freeze dried fruit.

I-Sugar-Coat-It-Blog-Signature-Green

Matcha Passion Berry Cream Puffs
OatBox Breakfast Cereals

February 2016 By i sugar coat it! 14 Comments

OatBox Breakfast Cereals + Special Offer

This post for OatBox Breakfast Cereals contains affiliate links. You will receive $5.00 off purchases made via these links and my blog will earn a small commission, a portion of which I've committed to donating. As always, I only share with you products I have tried and enjoy and all opinions are my own. Thank you for supporting the brands that help to make I Sugar Coat It a little sweeter!

OatBox Breakfast CerealsLionel Richie totally got it when he sang '...easy like Sunday morning'. Saturdays are great for sobering up and chore-ing, depending on how quickly the former is resolved. When Sunday rolls around, however, it's over-sized t-shirt, Uggs, extra hugs and cuddles, a mug of steaming hot chai or matcha, a stack of books and my playlist.

Sunday morning? Check.

Easy? Check.

Let's not forget brunch! There are few things more enjoyable than sharing a table and meal with those you love. Whether at your favourite greasy spoon, or in the comfort of your home, it's a ritual I look forward to each week.

Another ritual the Dude and I started when we got our first place, was spending a couple hours on Sunday evening preparing our meals for the week. We invariably bake up a few batches of granola, like this Biscoff Banana Granola for breakfast on-the-go. Oats, nuts and an array of add-ins make it a deliciously versatile and easy treat. Could it get any easier?

Yup! How about home delivery? We do it for coffee, so why not cereal?

OatBox Breakfast CerealsOatBox Cereal Company wants to give you your mornings back by making and delivering, direct to your table, deliciously, nutritious cereals.  Each month, you will receive two new granola mixes inspired by the seasons and prepared in Montreal by chefs, not machines.

January's Banana, Pecan and Walnut Granola was like have a slice of banana bread atop my homemade coconut yogurt. Equally amazing, were the Banana Granola Mini Leaves (seen in my photos) adapted from one of the recipe cards included with my delivery. The Coconut Kiwi and Almond Granola was mostly eaten straight from the package to curb a few snack attacks, but also made its way into a breakfast parfait.

February's mixes are all about chocolate and berries, and fittingly so!

OatBox Breakfast Cereals
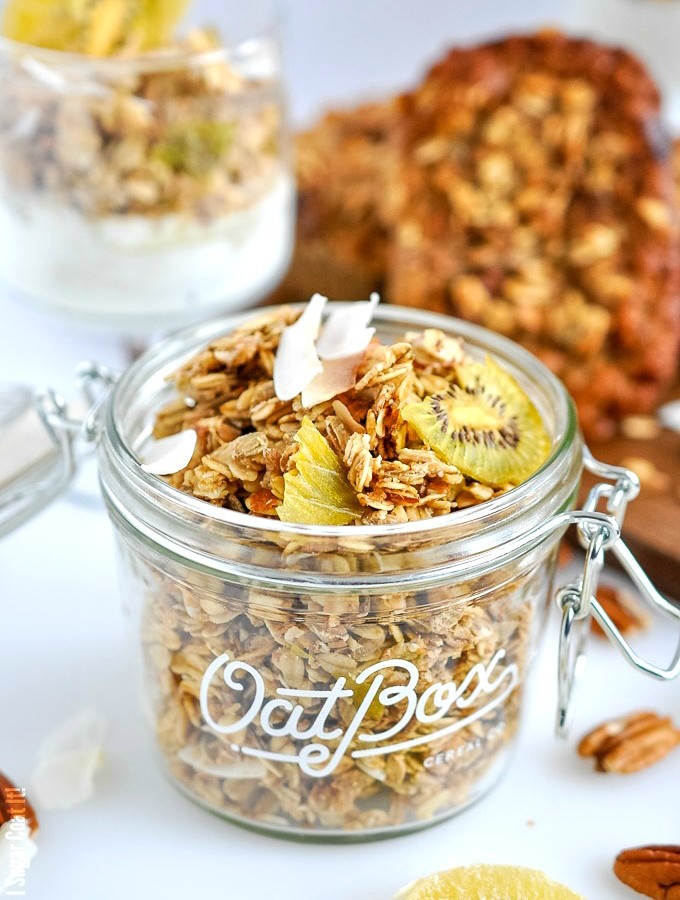
So why is she trying to sell me granola, you might ask. Three simple reasons:

  1. It's good! I wouldn't blog about it, or support OatBox otherwise.
  2. I am a huge supporter of homegrown businesses. OatBox is about a five-hour drive away in beautiful Montreal, one of my favourite Canadian cities.
  3. OatBox's partnership with the Breakfast Club of Canada. With each shipment, a child receives a full breakfast at school and you help OatBox reach its goal of 50,000 breakfasts donated.

No one should ever start their day without a nutritious meal, especially a child. I've decided to donate half of any commissions I make from sales via my OatBox Breakfast Cereal Affiliate links to the Breakfast Club of Canada.

Now you have four reasons why YOU should subscribe to OatBox. With your subscription, you will receive:

  • 2 bags of OatBox's unique featured flavours of the month delivered to your door
  • OatBox Glass Travel Jar (new subscription)
  • Free delivery
  • No commitment

It's a win-win! Less hectic, more delicious mornings and a child gets a well-deserved meal before school. I hope you will take a moment to learn more by visiting OatBox.

[Tweet "Delicious, nutritious @OatBox cereal mixes delivered to your doorstep each month! #OatBoxFBC"]

I-Sugar-Coat-It-Blog-Signature-Green

Easy Passion Fruit Mousse Brandy Snap Bowls

February 2016 By i sugar coat it! 28 Comments

Easy Passion Fruit Mousse Brandy Snap Bowls

Slip into a little lace for dessert with Easy Passion Fruit Mousse Brandy Snap Bowls. 

Easy Passion Fruit Mousse Brandy Snap Bowls
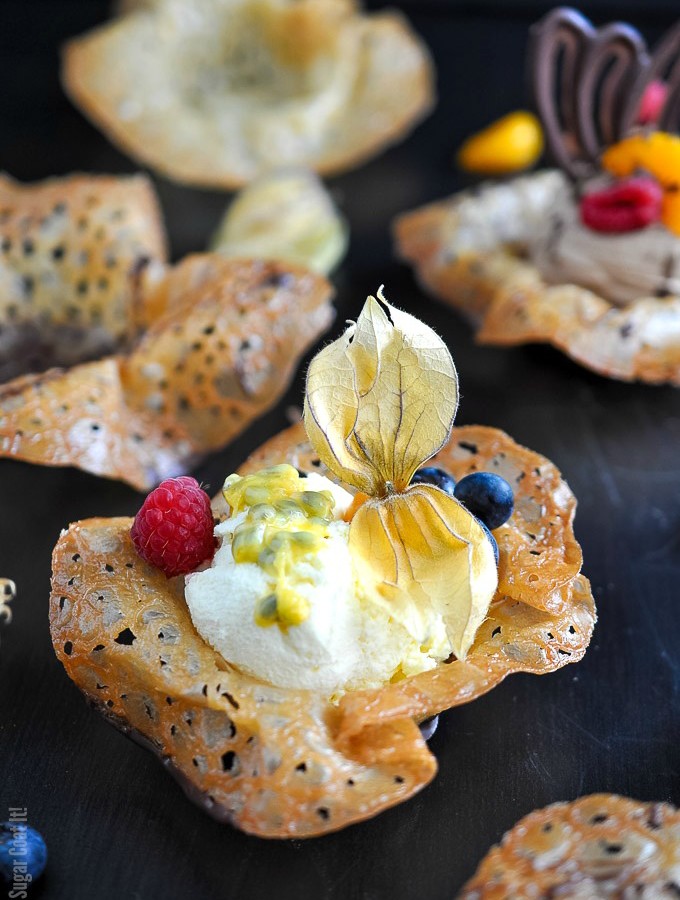
Happy Valentine's Day, ya'll!! I like to think this Easy Passion Fruit Mousse Brandy Snap Bowls dessert is all the things love should be, at its finest - uncomplicated, beautiful and sweet. Period. Oh, and if love were ever to be bottled, it would smell much like the buttery, sweet aroma these impart while baking.

That they require only four to five main ingredients that are staples in most pantries and bake up in less than five minutes make Brandy Snaps one of my go-to, quickie desserts. In all honesty, I make them just so I can play. I get full satisfaction from burning my fingertips while draping, wrapping, curling and scrunching them into beautiful edible art.
Easy Passion Fruit Mousse Brandy Snap Bowls

If you have never made Brandy Snaps, I suggest you scroll down to the recipe right this minute, skip to your pantry and fire up that oven. GO! While the oven preheats, here are a few tips:

  • Allow the dough to set by wrapping in plastic and refrigerate until ready to use. If you don't need all the batter at once, simply wrap tightly and store in the refrigerator for up to three months.
  • Use a small ice cream scoop (#40) to create medium discs like the one I have draped over the muffin tin above. For smaller discs, like the ones wrapped around the cannoli tubes, scoop the dough with a 1 tablespoon measuring spoon.
  • Leave lots of room between each scooped ball. I had forgotten how much they spread, ad as you can see from the photo above, they joined to form semi-perfect butt shapes. I used a pizza cutter to separate them immediately out of the oven.
  • Keep an eye on them while baking. Depending on your oven, they can be ready within 3 minutes.
  • Only bake a few at a time. Once baked, work quickly and carefully. Let them to cool for a few seconds before handling, then form into desired shapes.
  • Best of all - if you are not happy with a shape or they set before you could get to them, place them back in the oven for a few seconds for a do over.
  • The baked shells can be refrigerated only if filled. Do not refrigerate the baked shells on their own, simply store them at room temperature in an airtight container until you are ready to fill and enjoy.

Easy Passion Fruit and Chocolate Brandy Snap Bowls

Once baked, shaped and cooled, dip them in chocolate to help contain your fillings. I made these back in December when life was a wave of holiday shopping and entertaining. Half were filled with Easy Passion Fruit Mousse and the others with Orange Chocolate Mousse - they were both big hits. A few weeks ago, I found some leftover dough in the refrigerator and made a bowl for the Dude and I to share. We filled it with fresh fruit and vanilla bean whipped coconut cream.

Go ahead and whip up these Easy Passion Fruit Mousse Brandy Snap Bowls for your special someone. I have two different mousse flavours here, passion fruit and orange chocolate. If pressed for time, simply fill the Brandy Snap Bowls with ice cream, or freshly whipped cream (please, not the canned stuff), top with an array of fruits like caped gooseberry and a little chocolate drizzle and deco. The quick and easy parts will be our secret. 😉

[Tweet "Slip into a little lace for dessert with Easy Passion Fruit Mousse Brandy Snap Bowls"]

Easy Passion Fruit Mousse Brandy
Easy Passion Fruit Mousse Brandy Snap Bowls
Print Recipe
5 from 7 votes

Easy Passion Fruit Mousse Brandy Snap Bowls

Slip into a little lace for dessert with Easy Passion Fruit Mousse Brandy Snap Bowls
Prep Time30 minutes mins
Total Time30 minutes mins
Course: Dessert
Servings: 4 -6
Author: I Sugar Coat It

Ingredients

Brandy Snaps:

  • 112 grams butter
  • 112 grams sugar
  • 112 grams corn syrup
  • 450 grams bread flour
  • 2 grams ground ginger
  • 7 millitres cointreau optional

Mousse:

  • 1 litre whipping cream whipped to soft peaks
  • 17 grams gelatin
  • 100 millilitres cold water
  • 66 grams sugar
  • 6 egg yolks
  • 333 millilitres passion fruit puree
  • 20 millilitres lemon juice freshly squeezed

Instructions

To make the brandy snaps:

  • Line a baking sheet pan with parchment paper.
  • Place butter, sugar and corn syrup in a saucepan.
  • Sift in flour and ginger and stir to combine uniformly. Stir in the cointreau, if adding.
  • Wrap in plastic wrap and refrigerate.
  • Use a small ice cream scoop or spoon to scoop onto a parchment lined baking tray.
  • Bake until slightly golden.
  • Remove from oven and allow to cool a few seconds, then drape over the back of muffin tins, bowls etc, for desired shape.
  • Let cool completely then dip base in chocolate. Allow to set at room temperature.

To make the Mousse:

  • In a large bowl, whip the cream to soft peaks and set aside.
  • Bloom the gelatin in cold water.
  • Place the passion fruit puree and lemon juice in a medium bowl.
  • Place egg yolks and sugar in a bowl over a pot with simmering water (bain marie) and whip until thick and fluffy. Set aside.
  • Place the bowl with the bloomed gelatin over the bain marie and heat until melted. Add to the passion fruit puree.
  • Add the passion fruit/lemon mixture to the egg mixture. Temper the mixture with a little whipped cream and while whipping, add the tempered passion fruit mixture to the whipped cream.
  • Place in refrigerator to set.
  • Assembly:
  • Scoop or pipe mousse into bowls and top with your favourite fruits, chocolate deco or drizzle.

I-Sugar-Coat-It-Blog-Signature-Green

  • « Go to Previous Page
  • Page 1
  • Interim pages omitted …
  • Page 18
  • Page 19
  • Page 20
  • Page 21
  • Page 22
  • Interim pages omitted …
  • Page 51
  • Go to Next Page »

Primary Sidebar

Never Miss A Happy Ending...

Previous Sweetness...

Search

Filter by Category

Filter by Date

SWEETEN YOUR INBOX!

All Content Including Images Copyright Jacqueline | I Sugar Coat It© 2026