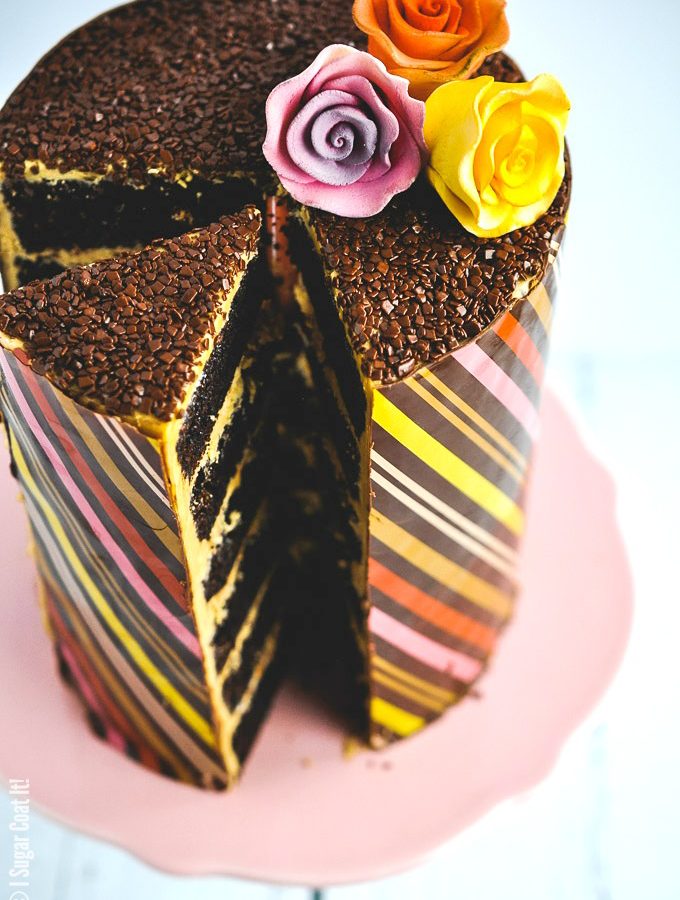
Whipped Dulcey Ganache Chocolate Wrapped Cake is six layers of pure decadence wrapped in a thin layer of dark chocolate.
 OK, before we delve into this tall, dark mass of decadence I call Whipped Dulcey Ganache Chocolate Wrapped Cake, I need your help. I suck at naming my recipes. How does one go about naming culinary creations?
I don't base my posts on what is trending online, I'm just not that savvy, I suppose. Giving name to what comes out of my kitchen has never been a strategic exercise in focus keywords. Both of which may explain my sub-par SEO. Still, I find myself fussing over recipe names, more than a person of sound mind should. Why can't they just roll off the tongue and stick like a Ben & Jerry's flavour? Is that asking too much?

Let's start with the fact that it's a cake. Check. I filled said cake with a ganache I made from my favourite blond chocolate, which I whipped into submission. Check. I layered said cake and whipped ganache and then wrapped the six layers in a thin sheet of dark chocolate. Check. There are also a couple layers of praline and chocolate flakes on the top, but adding those would make for a really cumbersome title. So my options:
- Dulcey and the Amazing Technicolor Dream Cake
- Whip Me Baby One More Time
- (Not so) Blurred Lines
- Dangerously In Line
- Watch Me Whip, Watch Me Layer
I settled on the less than exciting, but fitting Whipped Dulcey Ganache Chocolate Wrapped Cake. Not as catchy as Cherry Garcia, but hey.
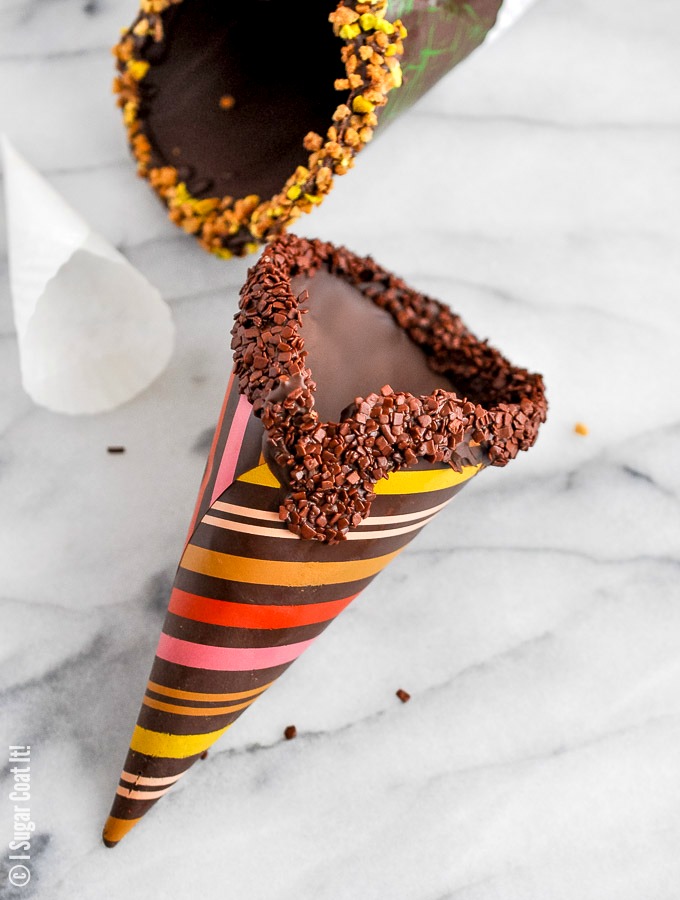
 As indicated in the title, this cake is wrapped in chocolate. You might recognize the transfer pattern from my Chocolate Cones. I actually made the cake first and decided to use up the small cuts to create ice cream cones. There is no waste on my watch.
This isn't the first time I've used chocolate transfer on a cake, however. This Think Pink cake for Breast Cancer Awareness month was one of my earliest forays into using chocolate transfer in caking. I've also used transfers on a number of smaller chocolate treats on the blog. It's an easy, completely edible way to add a little interest.
 Another area that stumps me every time is finishing a cake. Do I add flowers? Should I pipe buttercream rosettes around the top? Candles? Sparklers? I really suck at telling a story through my photos. Don't even get me started on styling, props, camera angles and settings - I turn into one of Woody Allen's characters, off meds.
All that matters, really, is that this cake tastes like a million bucks (anyone who has ever actually tasted a million bucks, feel free to back me up in the comments below). The cake recipe is adapted from one we used in school and has made many appearances on the blog. It's filled with Rodelle Baking Cocoa and Reserve Vanilla. What I love most about it is that it's a one-bowl affair - mixers need not apply.
The Ganache? Well, I can sit here and tell you how it tastes like a piece of buttery, biscuit caramelized heaven, but you really need to experience it. Go get your hands on some Valrhona Dulcey chocolate, you deserve it!
 To wrap things up, pun intended, be sure that your ganache (or buttercream) is applied smooth and evenly. This will make wrapping the sheet of chocolate a cinch! If you have never wrapped a cake in chocolate, consider practicing on a smaller cake first.
So what do you think about my Whipped Dulcey Ganache Chocolate Wrapped Cake? To my fellow bloggers - How do you go about naming your recipes? To my fellow non-blogging sweet fiends - What would have been your choice of name for this cake? I am dying to hear.


Whipped Dulcey Ganache Chocolate Wrapped Cake
Ingredients
Cake
- 360 grams granulated sugar
- 100 grams bread flour
- 100 grams cake/pastry flour
- 73 grams Rodelle Baking Cocoa
- 7 grams baking powder
- 6 grams baking soda
- 2.5 grams salt
- 2 eggs
- 185 ml coconut milk
- 93 ml coconut oil
- 8 grams Rodelle Reserve Vanilla
- 188 ml freshly brewed coffee or espresso warm
Ganache
- 400 grams Dulcey Blond chocolate
- 200 grams 35% whipping cream or coconut cream
- 25 grams glucose optional
Chocolate Transfer Wrap
- 200 grams chocolate I used Guanaja 70%
- Transfer sheet design of your preference
Instructions
- Preheat oven to 350ºF.
- Grease three 6-inch pans, line with parchment rounds and place on a cookie sheet. Set aside.
- Sift all the dry ingredients into a large bowl and make a well in the centre.
- In a separate bowl, lightly whisk together all the wet ingredients, except coffee.
- Add the wet mixture to the dry ingredients and use a whisk to stir the batter. It will be thick.
- Add the warm coffee and continue to stir with the whisk until fully combined.
- Divide the batter evenly into prepared cake pans. (I place each pan on a scale for even distribution - anal, I know...)
- Bake for 25-30 minutes on the cookie sheet on the middle rack of the oven. Rotate cookie sheet halfway through baking.
- Remove from oven and allow to cool in pan for ten minutes before turning them out onto a cooling rack.
- Once completely cooled, level and torte cakes.
To make the ganache:
- Place chocolate in a medium bowl and set over a bain-marie to melt partially.
- Add the glucose to a small pot and then add the cream. Bring to a light boil, stirring occasionally.
- Pour the boiling cream mixture over the melted chocolate in three additions, stirring with a whisk until fully combined after each addition.
- Allow to set at room temperature for a few hours until a spreadable consistency that closely resembles peanut butter is achieved.
- Add ganache to the bowl of a stand mixer fitted with the paddle attachment and whip on low, until light and fluffy.
- Fill and frost the cake, adding praline grains in two of the layers. Place in the refrigerator until ready to wrap.
Chocolate transfer wrap:
- Temper the chocolate.
- Cut a sheet of transfer to the hight and circumference of the cake.
- Lay the transfer, printed side up, onto a flat, clean surface.
- Pour chocolate onto the transfer sheet and use a large offset spatula to spread an even, thin layer. Allow to set for a couple minutes, depending on the temperature conditions in your home.
Assembly
- Remove the cake from the refrigerator and set it on a flat, even surface.
- Lift the chocolate covered transfer sheet by the corners and with one edge flush with the base of the cake, wrap the cake.
- Be careful not to rub the transfer sheet with your hands, use a smoother to help the wrap adhere to the cake. The heat from your hands can melt and smudge the design.
- Allow to set completely then peel away the plastic backing from the chocolate.
- Trim the to edge with a sharp knife, if needed and top with chocolate flakes.
- Best enjoyed at room temperature and within a week.
This post contains affiliate links. Each purchase you make using these links may result in a small commission for my I Sugar Coat It, without additional cost to you. Thank you for your support in making I Sugar Coat It a little sweeter!
 HEY YOU! Yes, I'm still kicking around - in case you were wondering. I've been busy making up for last summer and that has meant less blogging and social media. Soaking up the rays and frolicking in the lake has its downside, apparently. It's called heat stroke. So no trek to the cottage this long weekend, which provides the perfect opportunity to catch up and chill with you guys!
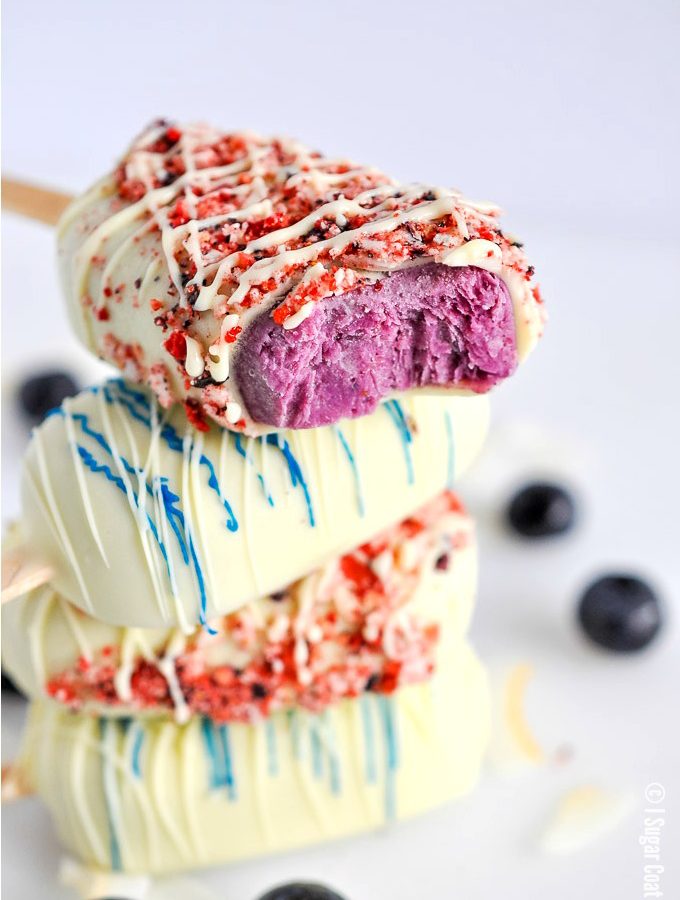
 Blueberries are in season and make an appearance in just about everything we make lately, from salads to smoothies, crumbles, pancakes and popsicles. That they are a known source of Vitamin C and fibre makes them all the more attractive, beyond their rich, jewel tone.
 Some of our haul, naturally end up in the freezer for smoothies. Here are a few things to keep in mind when storing and using blueberries:
 These mini Blueberry Coconut Popsicles are a delightful way to enjoy some blueberries this season. They are basically three ingredients and are easy on the eyes, even if you choose not to dip and decorate them. Here's a little video I shot and edited rather amateurishly from my phone.

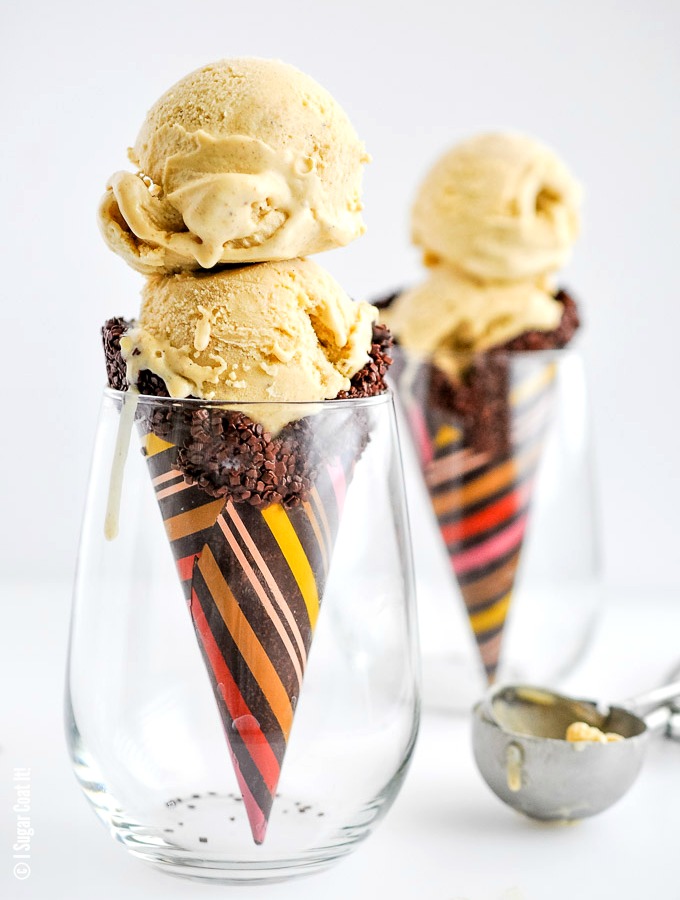

 Like popsicles, ice cream is synonymous with summer and my childhood. I remember Sunday afternoon walks to the neighbourhood ice cream shop, where we got to pile a few of our chosen flavours high onto a waffle cone. Then the fun began on the walk back as we kids would compete to see who could finish theirs without having a scoop hit the pavement. I can still hear the laughter, cries and slurping of what eventually turned into a sweet drippy mess of a glove that covered our little hands and most of our forearms.
 Inspiration for the ice cream portion of these Caramelized Banana Hazelnut Ice Cream Chocolate Cones comes from


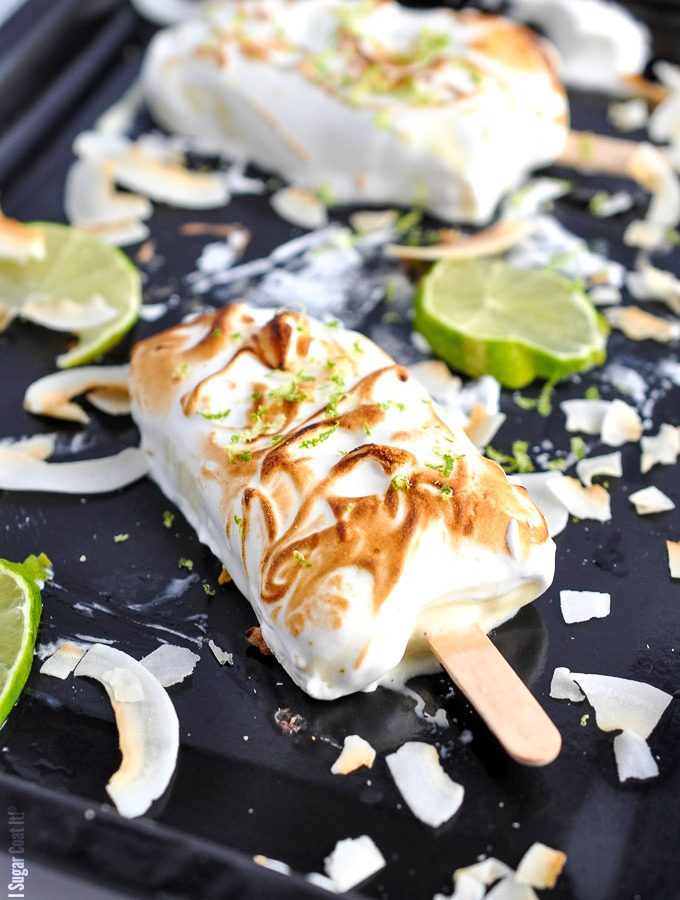
 It's a long weekend here in 'the six' and although one needs no excuse to eat all the popsicles, this would be a perfect one. Three sun-drenched days of impromptu dips in the lake, fiercely competitive board games, sundown walks in the woods accompanied by scary stories and an array of melty, drippy popsicles to cool things down. Don't you just LOVE summer? How about these Key Lime Curd Meringue Popsicles?
 A few weeks back, I made a variety of curds and compotes, key lime being among the mix. I had a bit left over the recipe I was working on and decided to make these Key Lime Curd Meringue Popsicles. Boy, were they ever GOOD! A perfect balance of creamy, tart and sweet. The Dude and I shared one and after his first bite, declared that they tasted EXACTLY like key lime pie. And you know what goes splendidly well with key lime pie? YUP! Meringue.


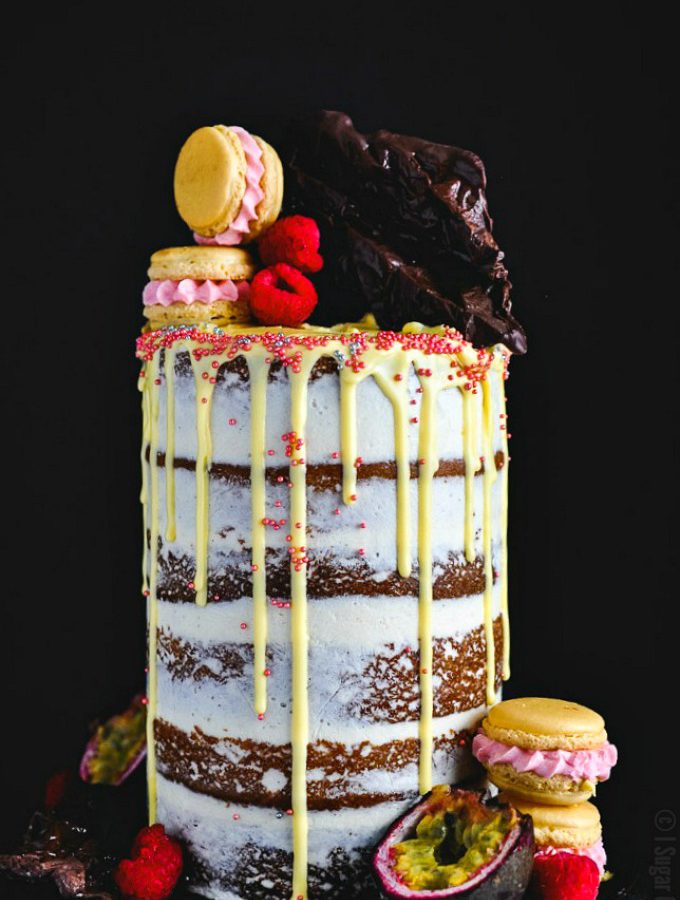
 Guess what?? I am a year older! EEEEEKKKK...To prove I am totally cool with this aging thing, I'm celebrating in the buff. Alright, stop cringing...the only thing naked on the blog today is my Passion Fruit Raspberry Naked Birthday Cake. It's ridiculously tall and mostly naked, with a few strategically placed macarons, chocolate drips and fresh fruit. Totally PG. 😉
 I actually preferred the cake just as it appears above - six passion fruit-raspberry-browned butter buttercream filled layers of mouthwatering simplicity. But being gemini, I yielded to my polar-opposite twinsie, who is clearly farther along on the expressive spectrum than I. Ummm... macarons, fresh fruit, sprinkles, drippy chocolate AND an out-of-place chocolate sculpture thingy...all together on one cake?? I soon began to have serious doubts. Plus, it's not a chocolate cake. I ALWAYS do chocolate on my birthday!
 First off,
  Layered cakes can get a little tricky once you get past three layers, particularly for smaller cakes. Here are a few sweet tip reminders I've used and shared with you over the years to avoid the leaning tower of pisa syndrome:


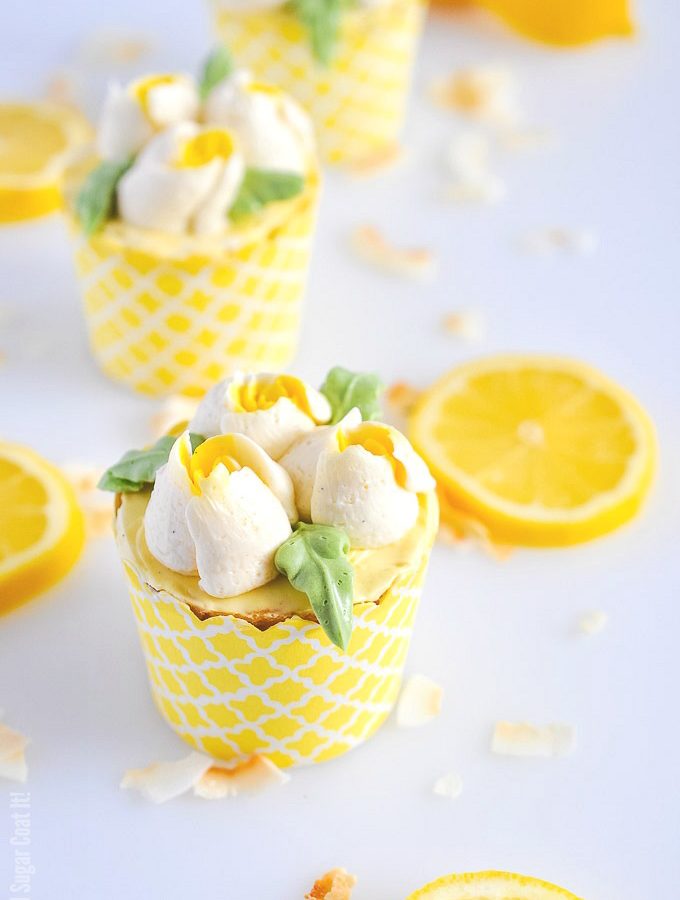
 I know you want to get to these Lemon Ginger Cupcakes, but indulge me for a moment...
 The liquor store carding coupled with the incident a couple months prior, where the convenience store attendant questioned my age before selling me a lottery ticket (which, I rarely buy BTW), are allowing me to move into this upcoming birthday with less anxiety. So are these Lemon Ginger Cupcakes!
 The rose buds were stupid easy to make, with the help of the increasingly popular Russian piping tips (see link below in case you can't live without them). Such a time saver! Granted, it takes a little practice to get the pressure and release just right, but the fun is in experimenting. No lessons needed, just some trial and error and of course there is always
  >
>