• Skip to primary navigation
  • Skip to main content
  • Skip to primary sidebar
  • Home
  • About
    • About I Sugar Coat It
    • Features & Press
    • Copyright
    • Disclosure
    • Privacy Policy
  • Recipes
  • How-To
  • Contact
  • sous vide sista

I Sugar Coat It

Home

All Posts

Sous Vide Dulce de Leche is an easy, foolproof way for making the silkiest version of this popular caramel spread that just as delicious!

September 2017 By i sugar coat it! 13 Comments

Sous Vide Dulce de Leche

Sous Vide Dulce de Leche is an easy, foolproof way to make the silkiest version of this popular caramel spread, that's just as delicious!

Sous Vide Dulce de Leche is an easy, foolproof way for making the silkiest version of this popular caramel spread that's just as delicious!

Much of this Sous Vide Dulce de Leche found its way into bonbons that I'll soon share here on the blog. First, I want to show you how easy and effective it was to make this using our sous vide immersion cooker.

You have likely made a batch, or ten, of dulce de leche using the condensed milk method via stovetop, oven or slow cooker. It's a fairly effortless alternative to the traditional, from-scratch recipe that requires a lot of stirring, like I did here, but with goats' milk. So worth it, as it produces a caramel that is simply out of this world.

However, sometimes you want an effortless caramel that starts with milky yumminess that comes in a can.

Sous Vide Dulce de Leche is an easy, foolproof way for making the silkiest version of this popular caramel spread that's just as delicious!A few years back when we got our sous vide cooker, this was the first non-meat thing I made. It's one of the basic recipes in the recipe book that came with our unit. After having made this condensed milk dulce de leche in all the ways mentioned above, I was very curious to try this method.

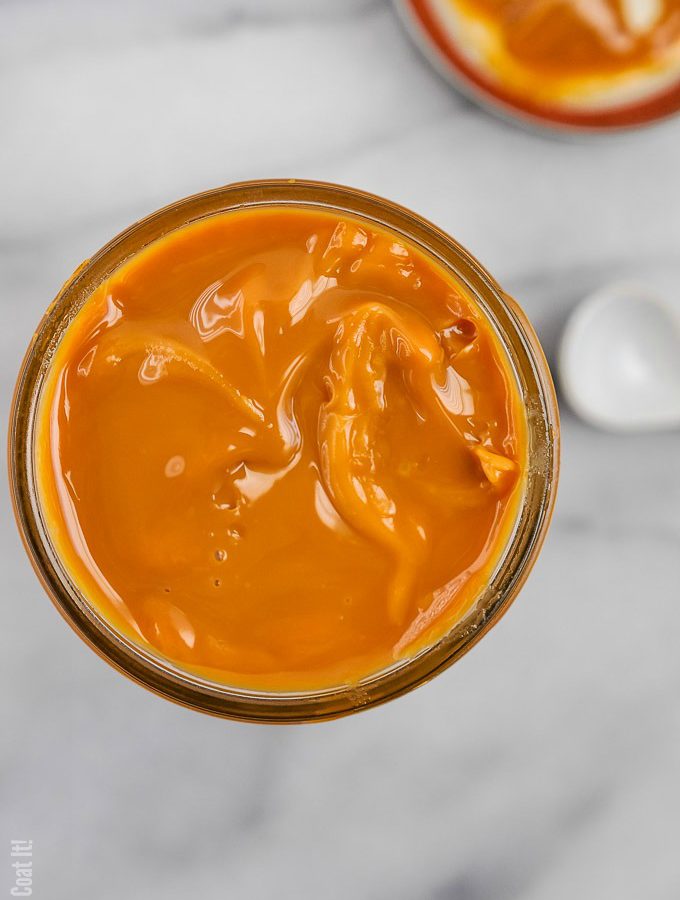
The batch in the photo above was cooked for ten hours. It's a little lighter in colour, but thick, silky and delish. The batch in the first photo and the one below were left in the water bath to cook for an additional two hours. As you can see, this produced a richer colour with a silky texture and more complex flavour. YUM!

Starting with a can of condensed milk, whether it's made via sous vide, oven, pot or slow cooker, is great and all, but nothing beats caramel made from scratch. Must be that little reaction called Maillard that makes food taste and look so damn fine!

Sous Vide Dulce de Leche is an easy, foolproof way for making the silkiest version of this popular caramel spread that's just as delicious!What I loved about the sous vide version is that I could turn it on and walk away - no stirring, no burning, no fuss. Similar to the can in the slow cooker technique, but without the metallic aftertaste.

Sweet Tips For Success:

  • You can cook it in the can instead of a vacuum-sealed bag, but like the slow cooker version, I usually detect a slight metallic taste. Plus, I have heard there is a chance the can could explode??
  • My preference is to make it in a mason jar, you'll just need to remember not to tighten the lid too much, or your jar may crack during cooking. And we all know wasted caramel is just a downright crime. 😉
  • If using a vacuum bag/sealer, be sure to switch the setting on your sealer to wet. I think you get the picture here - and it ain't pretty when you forget to. I know someone, who knows someone who can tell you all about that...
  • No vacuum sealer?  Use the water displacement method with freezer bags you already have on hand.
  • You can stop cooking at 10 hours, or continue to 12 hours for a darker caramel. The latter is much tastier!
  • Be careful removing the finished caramel from the hot water bath. I think that is self-explanatory, yes? Yes!
  • To avoid evaporation and heat loss from the water bath, cover the bin/pot well with foil or plastic wrap. You can also Macgyver a cover of your own with a quick Google search. I've more recently seen covers made specifically for the bin that accommodate the sous vide cooker, but they are grossly overpriced. I've also seen ping-pong balls being sold as an option. Of course, if your budget allows, you can go the way of a sous vide oven, instead of an immersion circulator.
  • I was at first concerned with cooking in plastic, but you need only do a little research to determine the best option that works for you. What is labelled safe and healthy today, could very well change with additional research. I share what I use in the Amazon links below, but I'll stay away from making any outright recommendations around this. Where it makes sense, mason jars are a great option.
Print Recipe
5 from 7 votes

Sous Vide Dulce de Leche

Sous Vide Dulce de Leche is an easy, foolproof way for making the silkiest version of this popular caramel spread that just as delicious!
Prep Time10 minutes mins
Cook Time12 hours hrs
Total Time20 minutes mins
Course: Dessert
Cuisine: Confections
Servings: 1
Author: i sugar coat it!

Ingredients

  • 1 can sweetened condensed milk

Instructions

  • Set the cooker to 85ºC/185ºF.
  • Open a can of condensed milk and add to a vacuum seal pouch, freezer bag or mason jar.
  • When the water bath is at the correct temperature, submerge the prepared condensed milk and cook for 10-12 hours.
  • Remove from water bath when time is up and add to an ice bath to cool down before using. If cooked in a bag, transfer to a clean mason jar and store in the refrigerator.


Sous Vide Dulce de Leche is an easy, foolproof way for making the silkiest version of this popular caramel spread that just as delicious!
Honey Lavender Peach Mimosa with sous vide honey lavender poached peaches and champagne make a delightful addition to your end-of-summer brunch!

September 2017 By i sugar coat it! 10 Comments

Honey Lavender Peach Mimosa

Honey Lavender Peach Mimosa with sous vide honey lavender poached peaches and champagne make a delightful addition to your end-of-summer brunch!

Honey Lavender Peach Mimosa with sous vide honey lavender poached peaches and champagne make a delightful addition to your end-of-summer brunch!
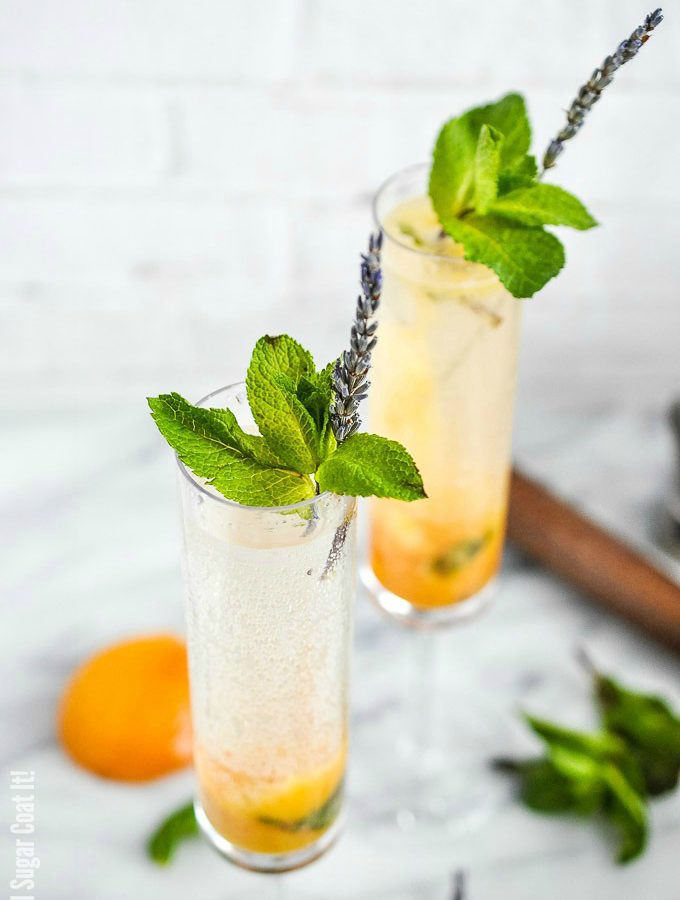
Remember those sous vide peaches from my last post? I thought they would be great in a cocktail, so I made us Honey Lavender Peach Mimosa for Sunday brunch! Although... they do look more like mojitos, don't you think?

Either way, they are the perfect addition to our brunch today, as it is HAWT! I am talking biking a few blocks, getting three shades darker HOT. I don't know if summer is into hockey, but her weather hat trick game is strong! AND I am loving it!

Honey Lavender Peach Mimosa with sous vide honey lavender poached peaches and champagne make a delightful addition to your end-of-summer brunch!I don't know if I should feel ashamed or proud of the volume of stone fruit I've eaten in the last few weeks. Somewhere along my binge, I developed a couple cankers around my inner lower lip. Painful as they were, I was not deterred. As the saying goes... no pain, no peach? 😉

I made these Honey Lavender Peach Mimosa using some of the sous vide peaches I made in my last post, complete with a little video. They were stupid simple - poached peaches muddled with fresh mint leaves, added some of the honey lavender poaching syrup and topped with champagne.

Sunday brunch = an excuse to get tipsy before five o'clock!

Honey Lavender Peach Mimosa with sous vide honey lavender poached peaches and champagne make a delightful addition to your end-of-summer brunch!

Summer makes her official exit in a few days, so I've packaged up a bunch of the fresh local fruits I love and will miss and have stashed them away in the freezer. They will make their way into smoothies and what not over the winter months.

And because I have inundated you with peach love very late in the game, I am making this my last peach post of the season. But, if peaches are in season in your neck of the woods, you might also want to try them in these or these.

For those of you in my part of the world, I promise I'll be moving on to more fall fare...

Print Recipe
5 from 4 votes

Honey Lavender Peach Mimosa

Honey Lavender Peach Mimosa with sous vide honey lavender poached peaches and champagne make a delightful addition to your end-of-summer brunch!
Prep Time15 minutes mins
Course: Drinks
Cuisine: Cocktails
Servings: 4
Author: i sugar coat it!

Ingredients

  • 1 lavender poached peach
  • fresh mint leaves
  • poaching syrup from peaches above reduced
  • champagne or sparkling wine
  • lavender and mint to garnish

Instructions

  • Muddle the peach and mint at the bottom of each glass. Top with poaching syrup (adjust for preferred sweetness) and top with champagne. Garnish with lavender and mint sprigs. Enjoy!


Honey Lavender Peach Mimosa with sous vide honey lavender poached peaches and champagne make a delightful addition to your end-of-summer brunch!
How to make Sous Vide Honey Lavender Poached Peaches, cooked to perfection and topped with clouds of honey whipped mascarpone.

September 2017 By i sugar coat it! 10 Comments

Sous Vide Honey Lavender Poached Peaches + Video

How to make Sous Vide Honey Lavender Poached Peaches, cooked to perfection and topped with clouds of honey whipped mascarpone.

How to make Sous Vide Honey Lavender Poached Peaches, cooked to perfection and topped with clouds of honey whipped mascarpone.I know...here we go with the peaches again! Well, this time it's how to make Sous Vide Honey Lavender Poached Peaches, with a little video! Plus, like I said in my last post - I am riding the stone fruit train to the sweet, juicy end.

I realize that peaches may no longer be available to some of you, so choose a fruit you like and play around with flavouring. With fall lurking around the bend, these would be a great seasonal option!

How to make Sous Vide Honey Lavender Poached Peaches, cooked to perfection and topped with clouds of honey whipped mascarpone.

I adore lavender, especially when paired with lemon. So, when I saw this recipe for lavender poached peaches in my sous vide cooker cookbook, I had to make it. But, here's the problem... I'm not a big fan of cooked fruit. Solution: make it for guests (a.k.a guinea pigs) and hope for the best! 🙂

Of course, I always sample what I make before sharing, even if it's the smallest bite, so that makes me guinea pig numero uno. It's hard work, but it must be done. 😉

Another reason for making them... to show you how easy it is to sous vide! Maybe you are thinking about adding sous vide to your repertoire, or just curious. Of course, you can make these without a sous vide, so don't click away just yet.

Here are some tips and a quick video I made if sous vide is of interest to you.

How to make Sous Vide Honey Lavender Poached Peaches, cooked to perfection and topped with clouds of honey whipped mascarpone.Sweet Tips for Success:
  • Start with fresh, firm fruits. Use organic if you are planning to keep skins on.
  • A cold water/ice bath immediately after cooking will rapidly cool the peaches, which helps prevent further cooking from residual heat.
  • Use the poaching juices as is, or reduce for a thicker consistency to drizzle over the fruit. I used some of mine to make cocktails, which I'll be sharing in my next post.
  • If you do not own a vacuum sealer, you can use the water displacement method shown here.
  • Sous Vide is all about cooking under precise temperature. To avoid excess heat loss from the water bath, cover the bin/pot with foil or plastic wrap. You can also Macgyver a cover of your own with a quick Google search. I've more recently seen covers made specifically for the bin that accommodate the sous vide cooker, but they are grossly overpriced. I've also seen ping-pong balls being sold as an option.
  • I was at first concerned with cooking in plastic, but you need only do a little research to determine the best option that works for you. What is labelled safe and healthy today, could very well change with additional research. I share what I use in the Amazon links below, but I'll stay away from making any outright recommendations around this.
  • Where it makes sense, mason jars are a great option for killing two birds with one stone - cooking and storage. I promise, no bird was injured or killed in the making of this dish or post...just watch the video below.
Print Recipe
5 from 2 votes

Sous Vide Honey Lavender Poached Peaches

How to make Sous Vide Honey Lavender Poached Peaches, cooked to perfection and topped with clouds of honey whipped mascarpone.
Prep Time10 minutes mins
Cook Time20 minutes mins
Total Time40 minutes mins
Course: Dessert
Cuisine: Fruit
Servings: 4
Author: i sugar coat it!

Ingredients

For the peaches (adapted from Avova Sous Vide Cookbook):

  • 2 peaches halved and pitted
  • 1 tablespoon dried culinary lavender plus extra for garnish
  • ¼ cup water
  • ¼ cup honey
  • ¼ teaspoon sea salt finely ground

For the whipped mascarpone:

  • ⅓ cup mascarpone cheese
  • ½ cup coconut cream or 35% whipping cream
  • 1 tablespoon maple syrup or honey
  • drop lavender extract optional

Instructions

Cook the peaches:

  • Heat the water bath to 185ºF/85ºC. Cover the water bin or pot with plastic wrap or aluminum foil. While the bath is heating, wash, cut and pit the peaches. Prepare a pouch for the vacuum sealer, or use a freezer bag and the displacement method for removing the air.
  • Add the peaches and all the ingredients to the bag, seal and submerge in water bath. Cook for 20 minutes.
  • Remove the bag with peaches form the hot water bath and place in a cold water bath to cool down. Refrigerate for an hour.

Make the whipped topping:

  • To a chilled bowl, add the chilled coconut cream and mascarpone cheese. Whisk until soft peaks form, then add the syrup and and lavender (if using). Whip to stable peaks - still soft, but able to hold it's shape when piped.

Assemble:

  • Serve the peaches with a dollop of whipped mascarpone and a drizzle of the poaching syrup from the bag. Garnish with dried lavender.


How to make Sous Vide Honey Lavender Poached Peaches, cooked to perfection and topped with clouds of honey whipped mascarpone.
Say farewell to stone fruit season and summer with a Sous Vide Cinnamon Browned Butter Peach Trifle for breakfast or dessert.

September 2017 By i sugar coat it! 10 Comments

Sous Vide Cinnamon Browned Butter Peach Trifle

Say farewell to stone fruit season and summer with a Sous Vide Cinnamon Browned Butter Peach Trifle for breakfast or dessert.

Say farewell to stone fruit season and summer with a Sous Vide Cinnamon Browned Butter Peach Trifle for breakfast or dessert.These Sous Vide Cinnamon Browned Butter Peach Trifle are my desperate attempt to hold on to summer. Regardless of the noticeable chill in the air, summer's end isn't official for a few more weeks. Plus, local peaches are still in abundance and I plan to keep riding the stone fruit wagon to the sweet, juicy end.

You with?

Say farewell to stone fruit season and summer with a Sous Vide Cinnamon Browned Butter Peach Trifle for breakfast or dessert.Sous WHAT? Sous Vide!

Simply put, it's cooking in a precise temperature-controlled water bath. Professional chefs and restaurants have relied upon it for decades. However, over the last few years, the equipment has become more accessible and sous vide cooking has been gaining popularity with us home cooks.

We purchased our precision cooker just over three years back. We've used it mostly for cooking meat, poultry, fish and incubating homemade yogurt. I gotta say, my meat game has improved noticeably. Also, once you have had homemade yogurt, it's quite difficult to go back to store-bought.

Best part, sous vide cooking is super easy! I particularly enjoy the set-it-and-forget-it (for most things) approach.

Say farewell to stone fruit season and summer with a Sous Vide Cinnamon Browned Butter Peach Trifle for breakfast or dessert.More recently, I started using our sous vide cooker to experiment with desserts - from dulce de leche to ice cream to chocolate. It's been fun learning what works and what's just plain nasty. I started a Sous Vide Sunday series on my Instagram stories, which have resulted in a number of questions and general interest.

Those stories disappear in 24-hours, so I thought I would share some here on the blog to make them a little more permanent. Maybe you're new to sous vide, or planning to try it and want to see how other home cooks use it.

Which brings us to this Sous Vide Cinnamon Browned Butter Peach Trifle. It's layers of cinnamon-sprinkled, browned butter, maple syrup poached peaches, homemade granola and clouds of whipped mascarpone, like I used here.

Say farewell to stone fruit season and summer with a Sous Vide Cinnamon Browned Butter Peach Trifle for breakfast or dessert.Sure you can poach your peaches the conventional way, but why not try something new to keep your time spent in the kitchen fresh and exciting!

Sweet Tips for Success:
  • Start with fresh firm peaches (or other suitable fruit of your preference), preferably organic, as I've left the skins on.
  • If you do not own a vacuum sealer, one of my favourite culinary nerds, J. Kenji Lopez-Alt, shows us how to get similar results without a sealer here.
  • Sous Vide is all about cooking under precise temperature. To avoid excess heat loss from the water bath, cover the bin/pot with foil or plastic wrap. You can also Macgyver a cover of your own with a quick Google search. I've more recently seen covers made specifically for the bin that accommodate the sous vide cooker, but they are grossly overpriced. I've also seen ping-pong balls being sold as an option. Of course, if your budget allows, you can go the way of a sous vide oven, instead of an immersion circulator.
  • I was at first concerned with cooking in plastic, but you need only do a little research to determine the best option that works for you. What is labelled safe and healthy today, could very well change with additional research. I share what I use in the Amazon links below, but I'll stay away from making any outright recommendations around this. Where it makes sense, mason jars are a great option.

So... have you ever cooked sous vide or are you planning to try? Let me know in the comments below!

[Tweet "Give those last few local peaches a sweet season send-off with Cinnamon Browned Butter Peach Trifle."]

Print Recipe
5 from 4 votes

Sous Vide Cinnamon Browned Butter Peach Trifle

Say farewell to stone fruit season and summer with a Sous Vide Cinnamon Browned Butter Peach Trifle for breakfast or dessert.
Prep Time15 minutes mins
Cook Time20 minutes mins
Total Time35 minutes mins
Course: Breakfast
Cuisine: Trifle
Servings: 4
Author: i sugar coat it!

Ingredients

For the peaches:

  • 2 peaches halved and pitted
  • ¼ cup browned butter
  • ¼ teaspoon vanilla pean paste
  • 1 tablespoon pure maple syrup
  • 1 teaspoon ground cinnamon plus extra to sprinkle

For the whipped mascarpone:

  • ½ cup mascarpone
  • ¼ cup coconut cream or 35% heavy whipping
  • 2 tablespoons super fine sugar
  • 1 teaspoon vanilla bean paste or extract

Instructions

Cook the peaches:

  • Fill a pot or heatproof container with water per your sous vide cooker manufacturer instructions. Set the sous vide cooker to 185ºF/85ºC and allow the water bath to heat up.
  • Wash, halve and pit the peaches and place them in a prepared vacuum bag, or freezer bag. Add all the ingredients, except the cinnamon and shake the bag so that the peaches are well coated. If using a vacuum sealer, vacuum-seal the bag. If using a freezer bag, use the water displacement method to remove excess air before sealing.
  • Once the water bath reaches the correct temperature, submerge the sealed bag in the water bath and cook for 20 minutes.
  • After 20 minutes, carefully remove bag from the hot water bath and allow to cool slightly before draining the liquids. (I used the liquid as an ingredient in my granola!).

Make the whipped mascarpone:

  • Add all the ingredients to a chilled bowl and whip until fluffy and stable (not stiff) peaks form.

Assemble the trifles:

  • Add a generous dollop of the whipped mascarpone to the bottom of each cup and layer with the poached peaches and granola. Top with a dollop of whipped mascarpone and sprinkle with cinnamon.
Say farewell to stone fruit season and summer with a Sous Vide Cinnamon Browned Butter Peach Trifle for breakfast or dessert.


With a flavour profile similar to a blend of grapefruit and mandarin, this divinely aromatic Yuzu Whipped Coconut Cream Tart brings all the citrus love!

August 2017 By i sugar coat it! 12 Comments

Yuzu Whipped Coconut Cream Tart

With a flavour profile similar to a blend of grapefruit and mandarin, this divinely aromatic Yuzu Whipped Coconut Cream Tart brings all the citrus love!

With a flavour profile similar to a blend of grapefruit and mandarin, this divinely aromatic Yuzu Whipped Coconut Cream Tart brings all the citrus love!I am in serious denial about summer ending, so this Yuzu Whipped Coconut Cream Tart is just one way I've been holding on. It's nine inches of citrus heaven! But be warned, heaven comes at a pretty sour price. I am talking $12 per lemon kind of sour... GASP!

I tend not to dwell, but you know you've been hella ripped off when, almost a year later, you still pine about the price. Yuzu in its fruit form is not a common supermarket find in North America, so I was ecstatic when a little Japanese market came through for me.

I generally keep a few bottles of the juice on hand for more savoury dishes, but had been searching desperately for fresh yuzu for a while. The shop owner must have sensed my desperation and the rest was history.

Let's chalk this up to me taking one for the team. So worth it though!

With a flavour profile similar to a blend of grapefruit and mandarin, this divinely aromatic Yuzu Whipped Coconut Cream Tart brings all the citrus love!
Yu-WHO? Yuzu!

What's this Yuzu, you ask? In a nutshell... heavenly citrusliciousness! I know... that doesn't tell you much.

Yuzu is a popular Japanese citrus fruit that grows in the winter months. It looks like a small tangerine-shaped grapefruit with a bumpy exterior. HUH?? It's tart like a grapefruit, with subtle sweet mandarin orange notes. With three times the vitamin C of a lemon, it's been deemed a superfood and boasts anti-inflammatory and antioxidant properties. It's also said to be great for your skin.

[Tweet "Nine inches of sweet, summer loving - Yuzu Whipped Coconut Tart!"]

If you caught my first Insta Pantry Peek a couple months ago on my Instagram stories, you may remember me sharing yuzu in its fruit, juice and freeze-dried forms. If this is your first time hearing of yuzu, you are likely in the majority.

My introduction to the yellow, bumpy citrus came a few years ago on a trip and I was instantly drawn to its mildly floral, citrus flavour in a savoury dish. I used to have to special order the bottled juice, but it is becoming more readily available, at least in local Asian and specialty shops, more so than the fruit itself.

With a flavour profile similar to a blend of grapefruit and mandarin, this divinely aromatic Yuzu Whipped Coconut Cream Tart brings all the citrus love!

As mentioned, my introduction to yuzu was in savoury dishes, but I've started to play with it in sweet applications over the last year and a bit. This Yuzu Whipped Coconut Cream Tart is a good first place to start, if you have never worked with it. It's comes together easily and fairly quickly.

I topped it off with whipped coconut cream, which I first shared on here some five years back. I like dairy, but my stomach does not share those feelings. I've seen this piping style on the accounts of pastry greats on Instagram, so I thought I'd give it a go. Turned out a little messy because I was filming with my phone in one hand while piping (when will I learn). It was a one-shot deal, so I lived with it and so did the folks who gobbled it up at a barbecue party the same night.

Whether or not you have a dairy intolerance, you most definitely should try whipped coconut cream at least once. It's a wonderful addition on fresh fruits, as well.

With a flavour profile similar to a blend of grapefruit and mandarin, this divinely aromatic Yuzu Whipped Coconut Cream Tart brings all the citrus love!

Sweet Tips:

  • If you are unable to find fresh yuzu, I've added a link below to the bottled juice brand I use. It has one ingredient - yuzu. Some brabds have salt added, which works for savoury applications, so be sure to check the label.
  • The fruit is pricey, so you will want to mix it with bottled juice (or use bottled only) and throw in some lemon, orange, grapefruit, or other complementary citrus. Experiment - it's what I love most about baking/cooking!
  • For best results, whether whipping dairy cream or coconut, ensure the cream and your utensils are well chilled. I always chill the bowl and whisk in the freezer before use. 5-10 minutes should do it for the utensils. For the coconut milk, chill overnight or just do like I do and keep a few cans in the refrigerator for convenience.
  • Make the curd ahead of time. A day before is deal - not only does that lower kitchen stress levels, I think curd tastes better a day later.
  • I used a disposable aluminum baking dish with a lid. Although not attractive, it was perfect for transporting and storing.
  • If you can get your hands on freeze-dried yuzu (I found mine locally), whiz it through a clean coffee grinder to create powder. It's optional, but it really helps to amp up the flavour and adds a irresistible aroma.
  • If you don't already own St. Honore tips, you must add them to your decorating arsenal! They just make the prettiest piped designs, like these.
  • Any leftover curd may be stored in an airtight container and refrigerated for up to two weeks.

If you want to join me in holding on to summer, check out these citrus-licious treats!

Print Recipe
5 from 5 votes

Yuzu Whipped Coconut Cream Tart

With a flavour profile similar to that of a blend of grapefruit and mandarin, this divinely aromatic Yuzu Whipped Coconut Cream Tart brings all the citrus love!
Prep Time25 minutes mins
Cook Time15 minutes mins
Total Time40 minutes mins
Course: Dessert
Cuisine: Tarts
Servings: 10
Author: i sugar coat it!

Ingredients

For the Base:

  • 120 grams honey graham crumbs
  • 60 grams butter melted

For the Filling:

  • 4 eggs 2 eggs and 2 yolks
  • 200 grams super fine sugar
  • 160 grams yuzu juice
  • 30 grams lemon juice
  • 200 grams butter unsalted and softened
  • 4 grams freeze-dried yuzu powder optional, but really punches up the flavour

For the Topping:

  • 2 cans coconut cream chilled overnight
  • 30 grams super fine sugar adjust for preferred sweetness
  • 1 vanilla bean scraped
  • 1 packet Whip It Stabilizer optional
  • freeze-dried yuzu to garnish

Instructions

Prepare the Base:

  • Combine the crumbs and butter and press into the bottom and sides of a 9-inch pie plate. I used a disposable foil baking tin with lid for easy transport.

Prepare the Filling:

  • In a medium bowl, whisk together the eggs and sugar. Set aside.
  • Add both juices to a small saucepan and bring to a rapid simmer over medium-high heat. Pour the juice mixture into the egg mixture in a steady stream, while whisking. 
  • Pour the juice and egg mixture back into the saucepan and set it over medium heat. Gently stir the mixture constantly until it thickens enough to coat the back of a spoon, or reaches 180ºF.
  • Remove from heat and pour through a sieve into a clean bowl. This removes any chunky bits of eggs. 
  • While still warm, stir in the yuzu powder and butter until fully combined. Allow to cool to room temperature then fill the prepared tart base. Cover and chill in the refrigerator for at 8 hours, or overnight for best results.

Prepare the Topping:

  • Chill the coconut milk overnight. This will allow the milk solids and liquids to separate. DO NOT shake the can when you remove it from the fridge.
  • Flip the can over and open. Drain off the liquids and scoop the solids only into a well-chilled bowl. I chill my whisk attachment, as well.
  • Whip on high until soft peaks form. Add the sugar, vanilla and whip until full, fluffy, firm peaks form. Cover and keep chilled until ready to use.

Decorate the Tart:

  • Outfit a large piping bag with a St. Honore pastry tip and fill with the chilled whipped coconut cream. Pipe at a slight angle, starting at the edge of the tart and tapering off in the centre. Top with freeze-dried yuzu or zest.


With a flavour profile similar to a blend of grapefruit and mandarin, this divinely aromatic Yuzu Whipped Coconut Cream Tart brings all the citrus love!
Celebrate stone fruit season with Pistachio Peach Kamut Crumble - a layer of juicy, fresh, maple soaked peaches topped with a super crunchy, nutty crumble! 

August 2017 By i sugar coat it! 12 Comments

Pistachio Peach Kamut Crumble

Celebrate stone fruit season with Pistachio Peach Kamut Crumble - a layer of juicy, fresh, maple soaked peaches topped with a super crunchy, nutty crumble!

Celebrate stone fruit season with Pistachio Peach Kamut Crumble - a layer of juicy, fresh, maple soaked peaches topped with a super crunchy, nutty crumble! 
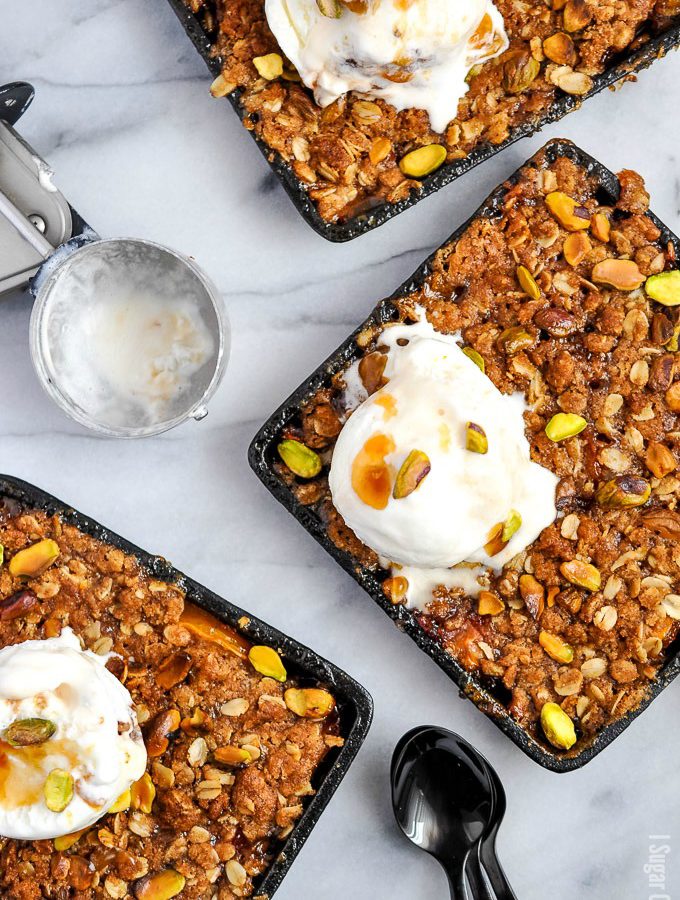
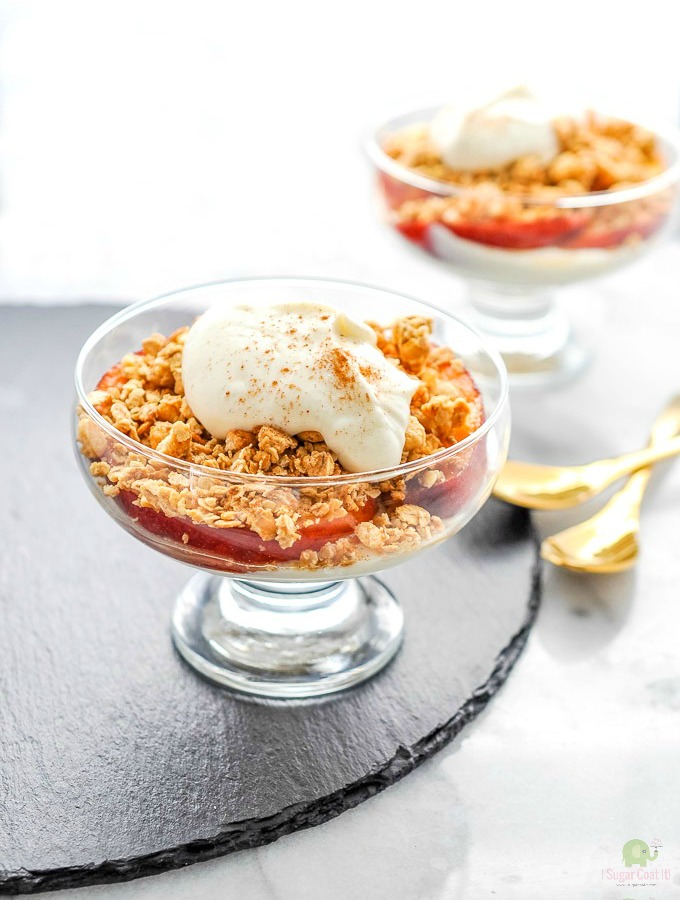
I generally buy way too much of the things I love and lord knows I love me some stone fruit. These Pistachio Peach Kamut Crumble were a quick, easy way for us to use up the season's bounty. Also, a perfectly stress-free throw together in a pinch.

BTW, is there a difference between a crisp and a crumble? Or are these terms used interchangeably? I settled on crumble, because I think that best described the topping. However, the end result, in all its crunchy, caramelized glory could easily don the crisp crown.

Celebrate stone fruit season with Pistachio Peach Kamut Crumble - a layer of juicy, fresh, maple soaked peaches topped with a super crunchy, nutty crumble! I used a mix of regular and saturn/donut peaches - I used the latter for its mild, sweet almond flavour. To draw out the flavours and juices, I tossed them in a mixture of maple syrup and vanilla bean. You could totally get off the crumble train right here and enjoy as-is with a dollop of yogurt. If want to take things further, then let's get ready to crumble!!

In one corner, we have buckwheat flour. Buckwheat actually isn't a grain, nor is it related to wheat, but rhubarb and sorrel and is high in essential nutrients and resistant fibre. For those with gluten sensitivities, buckwheat is gluten-free. I used it for its nutty, earthy flavour.

[Tweet "Grab your peaches, fire up the grill and let's get ready to Pistachio Peach Kamut Crumble!"]

In the next corner, we have Kamut. I've used Kamut before and decided it would work well here. It too has a nutty flavour coupled with a hearty bite. I also added pistachio for some colour initially, but it ended up playing a big enough role, flavour-wise, which earned it a place in the title.

Celebrate stone fruit season with Pistachio Peach Kamut Crumble - a layer of juicy, fresh, maple soaked peaches topped with a super crunchy, nutty crumble! Together, with the demerara sugar, this blend made for a killer crumble/crisp.

In the warmer summer months, we tend to do a lot of our cooking outdoors on the grill - from bacon to broccoli. These Pistachio Peach Kamut Crumble were no different. You can make them in the oven, but why pass up a chance to pretend you're roughing it in the wilderness right from the comfort of your own backyard!?!

And we all know a tub of homemade ice cream is just a freezer away in the wilderness, so be sure to drop a dollop, or two on top of these babies before digging in.

Celebrate stone fruit season with Pistachio Peach Kamut Crumble - a layer of juicy, fresh, maple soaked peaches topped with a super crunchy, nutty crumble! I think you already know that I am not one for cooked fruit generally, but that shot above is seriously drool-worthy in my humble opinion. I made my mine extra crunchy, to offset the soft cooked fruit. I won't go so far as to say I'm a cooked fruit convert, but I'd be lying if I said I didn't enjoy it. Shhh...

Celebrate stone fruit season with Pistachio Peach Kamut Crumble - a layer of juicy, fresh, maple soaked peaches topped with a super crunchy, nutty crumble! 

Be sure to add these Pistachio Peach Kamut Crumble to your weekend brunch before stone fruits go bye-bye and summer gets herself a chill!

Print Recipe
5 from 3 votes

Pistachio Peach Kamut Crumble

Celebrate stone fruit season with Pistachio Peach Kamut Crumble - a layer of juicy, fresh, maple soaked peaches topped with a super crunchy, nutty crumble! 
Prep Time15 minutes mins
Cook Time20 minutes mins
Total Time35 minutes mins
Course: Dessert
Cuisine: Pie
Servings: 6
Author: i sugar coat it!

Ingredients

Crumble:

  • 85 grams buckwheat flour
  • 80 grams kamut oats
  • 72 grams demerara sugar
  • 40 grams raw pistachio nuts roughly chopped
  • 3 grams ground cinnamon
  • 1 gram salt
  • 115 grams butter cold

Filling:

  • 4 cups fresh peaches sliced
  • 20 grams maple syrup
  • 3 grams vanilla bean paste

Topping:

  • ice cream, whipped cream, extra nuts, peach syrup

Instructions

Prepare the peaches:

  • Preheat grill or oven to 350ºF.
  • Slice peaches thinly and toss in a bowl with maple syrup and vanilla bean paste. Set aside.

Make the topping:

  • Mix flour, oats, sugar, nuts, cinnamon, salt and butter until the mixture takes on a crumbly texture.

Assemble and grill/bake:

  • Arrange peaches evenly in mini skillets (or one large skillet). Sprinkle the topping onto the peaches and place on the heated grill. If baking, place on a sheet pan before placing in the over. This will save your oven from any messy overflow.
  • Grill/bake until topping is a rich, caramel brown - about 15-20 on the grill, or 25-30 minutes in the oven.
  • Top with ice cream or whipped coconut cream and a drizzle of peach syrup.


Snippets from my day at a Valrhona Chocolate Workshop, where I got to taste and create with l'Ecole Valrhona Pastry Chef, Sarah Tibbetts!

August 2017 By i sugar coat it! 2 Comments

Valrhona Chocolate Workshop

Snippets from my day at a Valrhona Chocolate Workshop, where I got to taste and create with l'Ecole Valrhona Pastry Chef, Sarah Tibbetts!

Snippets from my day at a Valrhona Chocolate Workshop, where I got to taste and create with l'Ecole Valrhona Pastry Chef, Sarah Tibbetts!
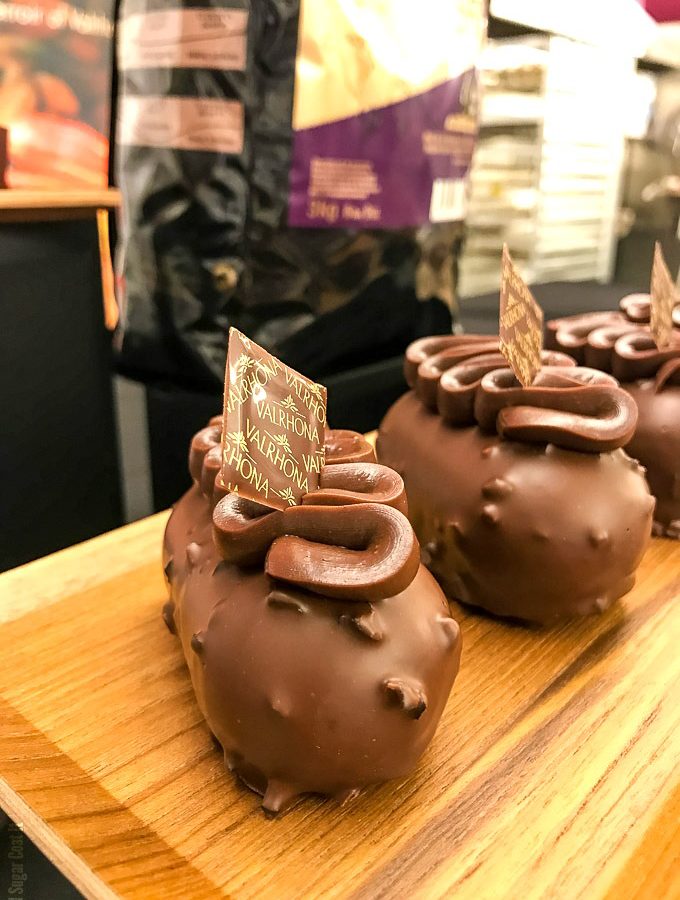
If you're a regular or longtime reader of my blog, then you are fully aware of my love affair with all things Valrhona. I've introduced a number of other bloggers and readers to the brand, in particular, their first blond, Dulcey.

So, imagine my excitement when I was invited to a one-day workshop with one of their talented pastry chefs, Sarah Tibbetts! It was a small group of eight professional chefs - I felt like the oddball. But that didn't stop me from jumping right in, after a few moments of sheer trepidation and seeing a familiar face.

We tackled nine recipes in the eight hours we had, but not before a little tasting...

Snippets from my day at a Valrhona Chocolate Workshop, where I got to taste and create with l'Ecole Valrhona Pastry Chef, Sarah Tibbetts!If you follow my Instagram feed, you may remember this teaser post from the workshop. I also shared some behind-the-scenes snippets on my IG stories. Let's just say that I was hopped up on chocolate before 9:00am on a Monday and don't regret it one bit.

Some of the usual suspects (Guanaja, Jivara, Dulcey, Oriado, Illanka) and a couple less familiar bags (Itakuja, Orelys) lined a counter, with sample bowls set in front. If you follow my Instagram feed, you may remember this teaser post from the workshop, where I profess my love for Itakuja 55% dark.

Given my life-long love of passionfruit, it's no surprise that this became an instant favourite. I purchased two bags as soon as I returned home. It's a bold, Single Origin Brazil and is double fermented, with the passion fruit added in the second fermentation stage. Heaven in a feve!

Ya'll know how much I love Dulcey, but there is a new blond in my life, Orelys 35%. Unlike Dulcey, which is more of a caramelized white chocolate, Orelys is a white chocolate with Muscavado sugar. This imparts an earthy flavour and colour, with hints of liquorice. It reminds me of my childhood.

Snippets from my day at a Valrhona Chocolate Workshop, where I got to taste and create with l'Ecole Valrhona Pastry Chef, Sarah Tibbetts!We quickly got down to the business of preparing, plating and devouring nine exquisite recipes.

The opening shot is the Oriado 60% Chocolate Financier. Oriado is a Grand Cru blend from Peru and Dominican Republic and is a part of Valrhona's Organic & Fair Trade Certified range. Made with almond flour, brown sugar, brown butter and Valrhona cocoa powder, these little cakes were perfectly acceptable on their own. Topped with a cocoa nib glaze and ganache, they rose to all that and a bag of nibs status.

Next up, Mojito Illanka 63% Truffles. Illanka is made from a rare white cocoa bean and is the 'face' of Valrhona's Clean Water Project. A charity aimed at improving living conditions and public health of the cocoa producing community of Los Ranchos, Peru.

With a layer each of mint ganache and boozy gel that explode in your mouth, these truffles easily meet cocktail status!

Snippets from my day at a Valrhona Chocolate Workshop, where I got to taste and create with l'Ecole Valrhona Pastry Chef, Sarah Tibbetts!Illanka makes another appearance in this plated dessert called Japanese Maple. This chocolate goes extremely well with black fruit and is paired here with maple-poached black fruits, piped dollops of Illanka Namelaka all anchored by mini financiers.

Top right is a simple Itakuja 55% ganache sandwiched between slivers of chocolate shards, that delivers a passion fruit flavour punch that is on point! The secret, we made a water ganache. Using water instead of cream allows the flavours in the chocolate to shine and produces a light, silky texture.

Below that is the plated Barbados Brûlée - an Orelys 32% brûlée, anchored by a gluten-free sable, topped with an orange sauce. The photo does it no justice. Fantastic!

Snippets from my day at a Valrhona Chocolate Workshop, where I got to taste and create with l'Ecole Valrhona Pastry Chef, Sarah Tibbetts!These gluten-free Chai Cupcakes were a hit! They are a chocolate dough base topped with a surprise inside cashew butter filling cupcake and an Oriado 60% chai whipped ganache, finished with spiced cashews. Superb!

Snippets from my day at a Valrhona Chocolate Workshop, where I got to taste and create with l'Ecole Valrhona Pastry Chef, Sarah Tibbetts!Another take on the Barbados Brûlée, but in a cup and garnished with sable round, crystallized orange peel and Orelys Rocher (another of the recipes we made).

Snippets from my day at a Valrhona Chocolate Workshop, where I got to taste and create with l'Ecole Valrhona Pastry Chef, Sarah Tibbetts!Another fave, this Azelia-Licious is a base layer of Azelia 35% 'panna cotta' topped with hazelnut streusel, praline lemon sauce and microwave sponge.

Snippets from my day at a Valrhona Chocolate Workshop, where I got to taste and create with l'Ecole Valrhona Pastry Chef, Sarah Tibbetts!In addition to a broadened knowledge base and new techniques, we all had lots of goodies to take away. And that's what I call a win-win-win! Thank you, Valrhona!

Hope you are having a wonderful summer (or other applicable season). I'll be back soon with a recipe full of citrus love!

I-Sugar-Coat-It-Blog-Signature-Green

Blueberry Lemon Cupcakes topped with decadent blueberry lemon buttercream flowers, deliver fresh, tangy sweetness in every bite!

August 2017 By i sugar coat it! 8 Comments

Blueberry Lemon Cupcakes

Blueberry Lemon Cupcakes topped with decadent blueberry lemon buttercream flowers, deliver fresh, tangy sweetness in every bite!

Blueberry Lemon Cupcakes topped with decadent blueberry lemon buttercream flowers, deliver fresh, tangy sweetness in every bite!
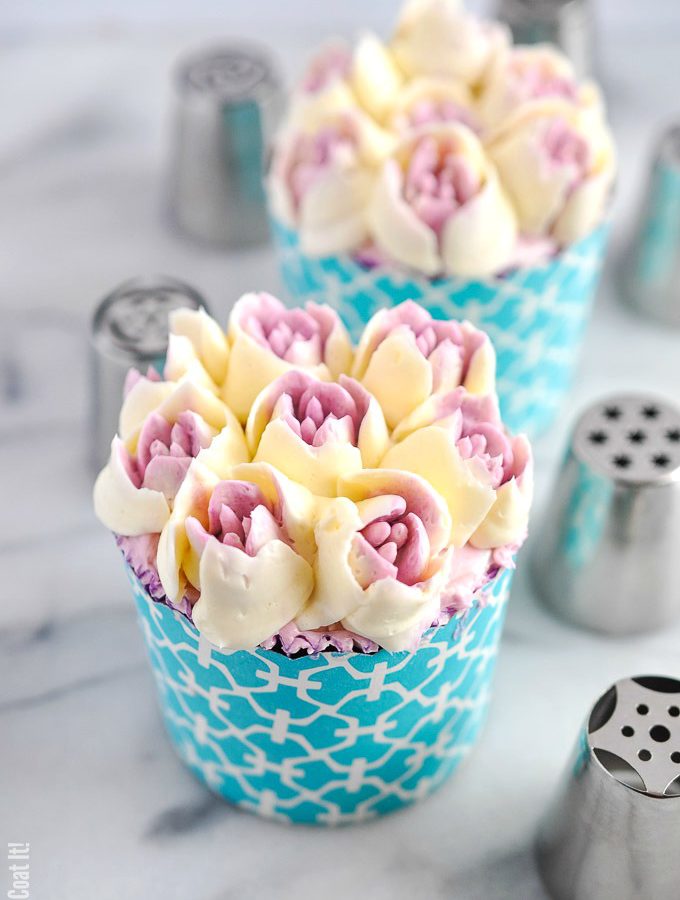
I'm way overdue in bringing you these Blueberry Lemon Cupcakes, but it's August and blueberries abound! I suppose, my procrastination can be summed up as perfect timing. 😉

Really though, guys... it's August! I feel like I cleaned the last bit of snow and salt off my boots just hours ago, yet here we are headed to the inevitable.

OK, enough with my first-world drama. Let's talk cupcakes!

Blueberry Lemon Cupcakes topped with decadent blueberry lemon buttercream flowers, deliver fresh, tangy sweetness in every bite!I made these pretty little Blueberry Lemon Cupcakes back when I made these. It was around the time I purchased the Russian piping tips - you can see my practice piping on the tray in the photo above.

I haven't gotten around to using all the tips from the set, but this is one of my favourite from the bunch. The flowers it produces remind me of tulips and who doesn't love a sea of tulips, even out of season.

As with my other flower power cupcakes, I used a meringue-based buttercream flavoured and coloured naturally. In this case, I used freeze-dried blueberry powder for the flower centers and lemon curd for the petals.

Blueberry Lemon Cupcakes topped with decadent blueberry lemon buttercream flowers, deliver fresh, tangy sweetness in every bite!I think I'll make these again, just so you could see the inside. I added a little blueberry powder to a bit of the batter to create a lovely pattern throughout the cupcakes.  I was pretty sure I took a few shots, but they are nowhere to be found.

Anyhoo, do you own any of the Russian tips? What's your fave?

Blueberry Lemon Cupcakes topped with decadent blueberry lemon buttercream flowers, deliver fresh, tangy sweetness in every bite!
I Sugar Coat It Logo
Print Recipe
5 from 2 votes

Blueberry Lemon Cupcakes

Blueberry Lemon Cupcakes topped with decadent blueberry lemon buttercream flowers, deliver fresh, tangy sweetness in every bite!
Prep Time30 minutes mins
Cook Time25 minutes mins
Total Time55 minutes mins
Course: Dessert
Cuisine: Cupcakes
Servings: 8
Author: i sugar coat it!

Ingredients

For the cupcakes:

  • 172 grams butter unsalted
  • 300 grams granulated sugar
  • 2 large eggs
  • 1 vanilla bean scraped
  • 1 large lemon zest and juice
  • 225 grams cake flour
  • 7 grams baking powder
  • 2.5 grams salt
  • 250 ml milk
  • 15 grams freeze-dried blueberry powder

For the buttercream:

  • 63 grams water
  • 170 grams sugar
  • 125 grams egg whites
  • 57 grams sugar
  • 340 grams butter
  • .5 vanilla bean
  • 15-20 grams lemon curd optional

Instructions

  • Preheat oven to 350º F. Place baking cups on a baking sheet. If you are using paper cups like I did, no need to spray of grease. If using liners, place then in the wells of a muffin tin.
  • Add the lemon juice to the milk and set aside.
  • Cream butter and sugar using the paddle attachment of stand mixer.
  • Gradually beat in sugar until light and fluffy.
  • Lightly whisk the eggs with the vanilla beans, lemon zest and ginger and add to the creamed butter. Mix on low until fully combined.
  • Blend flour, salt and baking powder and add to the butter mixture in three additions, alternating with the milk mixture. Beat until smooth.
  • Remove about a half cup of the batter and add to a small bowl. Sift in the blueberry powder and mix with a spatula until well blended. 
  • Divide batter evenly among the cups - I weigh mine to be certain. Add a dollop of the blueberry batter and use a toothpick or small knife to swirl into the plain batter.
  • Bake for 20-25 minutes. Test with a cake tester to toothpick to be sure. Cool completely before decorating.

To make the buttercream:

  • In a medium saucepan, add the water and the first measure of sugar and cook without stirring until the mixture reaches (116ºC/240ºF), or what is labelled as 'soft ball' on your thermometer. 
  • While the sugar is cooking, add the egg whites to the bowl of a stand mixer fitted with the whisk attachment and set aside.
  • Once the sugar syrup reaches 110C/230F, start whipping the eggs on medium speed. When the egg whites begin to appear foam, sprinkle in the second measure of sugar while whipping.
  • The egg whites should be at soft peaks by the time the sugar reaches 116C/240F/soft ball.
  • With the egg whites whipping on medium speed, rest the lip of the pot on the lip of the mixing bowl and pour the syrup into the whipping egg whites in a slow, steady stream down the side of of the bowl.
  • Continue to whip until the mixture has cooled to room temperature and the meringue is full and billowy.
  • On medium speed, add the butter in small chunks and continuing to whip until the smooth and light. Add the lemon curd and whip on low until fully incorporated.

Assembly:

  • Top each cupcake with a thin layer of buttercream - this ensures the top of the cupcake is covered and the piped flowers have a foundation for attaching.
  • Spread a generous layer of the lemon curd buttercream over a sheet of plastic wrap, then spoon the blueberry buttercream in the shape of a log down the middle of the lemon buttercream.
  • Roll up the plastic wrap and place in a piping bag fitted with the nozzle of choice. Pipe flowers, starting from the middle.


Sriracha Sweet Potato Chips

July 2017 By i sugar coat it! 1 Comment

Sriracha Sweet Potato Chips

Sriracha Sweet Potato Chips are a little sweet, a little spicy, a whole lot of crunchy and perfect for binge watching your fave shows!

Sriracha Sweet Potato Chips 
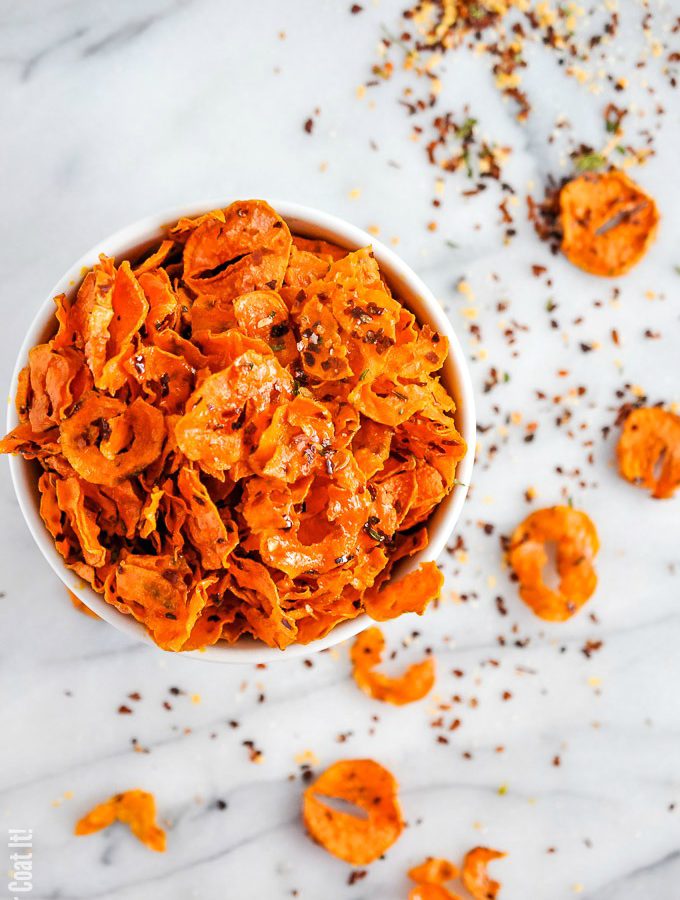
These Sriracha Sweet Potato Chips are the perfect snack to accompany binging on your favourite shows. They are super crunchy and a nice mix of sweet and spicy thanks to the addition of maple syrup and Rodelle Sriracha seasoning. You may remember these chips, seasoned similarly.

But let's talk binge-watching for a minute. Anyone else totally hooked on The Handmaid's Tale? It is based on a best-selling novel by Margaret Atwood, which I read years ago and didn't quite like. I generally don't take well to books turned into films - most just don't hit the mark. One exception is the original Swedish version of The Girl with the Dragon Tattoo series. I thoroughly enjoyed the books and the original movies. But I digress...

Sriracha Sweet Potato Chips

It was a subway poster that read, The Future is a F^*#ing Nightmare, that first piqued my interest, but I shrugged it off, because I didn't really enjoy the book. Then a friend and I were chatting about it and I realized that my dislike was more for Atwood's writing style, than for the story itself. The story, although written over thirty years ago, still manages to be relevant. I mean, women's rights is not a topic that will ever lose steam in my books.

The Handmaid's Tale TV series, shot in Toronto, Hamilton and Cambridge, is about a totalitarian society that decides to deal with its plummeting birth rate by forcing the remaining fertile women into sexual servitude. It's about power, sex, lies, survival, politics, love - all the things that make for a great story line. Offred, the main character, played by Elisabeth Moss (Peggy from Mad Men), gives a surprisingly powerful performance.

I highly recommend adding it to your watch list.

Sriracha Sweet Potato ChipsThe series started in April and I became fully engrossed from the very first episode. Life got in the way and I fell behind, but thanks to a recent dark and rainy day, I was able to binge-watch the rest of the season in one afternoon. My only distraction was a super-sized bowl of Sriracha Sweet Potato Chips.

And since I was already in full couch potato mode, I also caught the last few episodes of the current season of Veep. LOVE that show! In fact, I am a big fan of most HBO original series!

What are you watching that you simply can't get enough of? Perhaps a bowl of Sriracha Sweet Potato Chips is just the thing with which to enjoy it!

[Tweet "Perfect company for Netflix binge watching - Sriracha Sweet Potato Chips"]

Print Recipe

Sriracha Sweet Potato Chips

Sriracha Sweet Potato Chips are a little sweet, a little spicy, a whole lot of crunchy and perfect for binge watching your fave shows!
Prep Time15 minutes mins
Cook Time30 minutes mins
Total Time45 minutes mins
Course: Snack
Cuisine: Chips
Servings: 2

Ingredients

  • 2 sweet potatoes
  • 2 tablespoons olive oil
  • 1 tablespoon maple syrup
  • Sriracha Seasoning to taste

Instructions

  • Preheat the oven to 400ºF. Line a perforated pan with a silpain mat.
  • Peel the sweet potato and run through the spiralizer, or cut into thin slices.
  • Soak in ice cold water for a few minutes and pat dry completely.
  • Toss the sweet potatoes with the olive oil, syrup and sriracha seasoning.
  • Place the potatoes on the prepared pan. Bake for 20-30 minutes, turning them halfway through.
  • Allow to cool before serving.


  • « Go to Previous Page
  • Page 1
  • Interim pages omitted …
  • Page 10
  • Page 11
  • Page 12
  • Page 13
  • Page 14
  • Interim pages omitted …
  • Page 51
  • Go to Next Page »

Primary Sidebar

Never Miss A Happy Ending...

Previous Sweetness...

Search

Filter by Category

Filter by Date

SWEETEN YOUR INBOX!

All Content Including Images Copyright Jacqueline | I Sugar Coat It© 2026