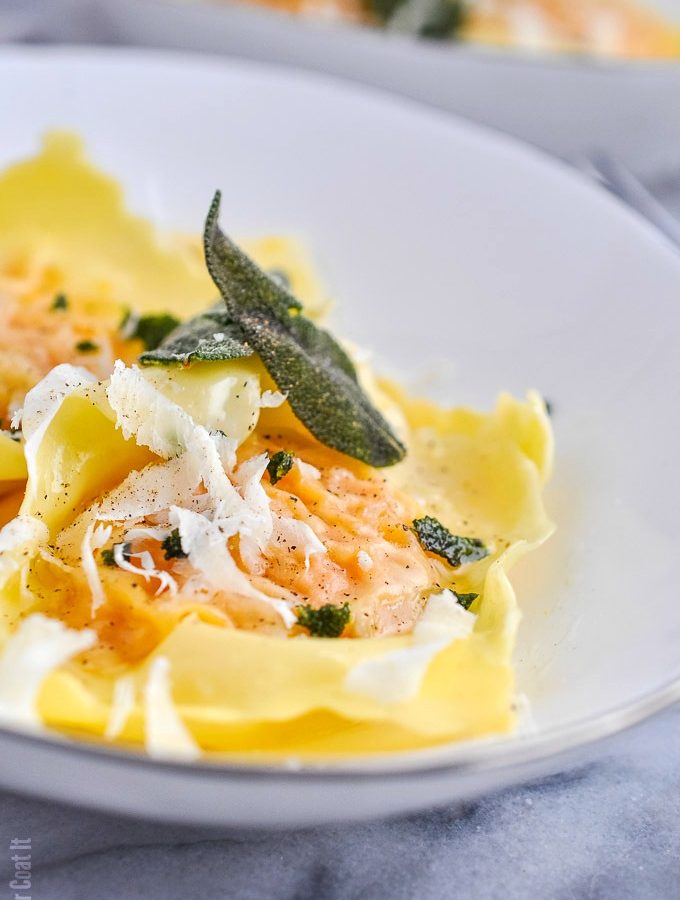
Sous Vide Lobster Smoked Pumpkin Ravioli with poached lobster and smoked pumpkin stuffed in homemade ravioli and served with crispy sage.
 This post for Succulent Sous Vide Poached Lobster was created in partnership with Clearwater Seafoods LP.
Sous Vide Lobster Smoked Pumpkin Ravioli
With the holiday season upon us, so are office parties and other gatherings to celebrate the lead-up to the big day. For larger gatherings, I like the finger foods and scattered cocktail tables approach - easier for me to sneak off without anyone noticing (I am really shy and awkward).
For more intimate gatherings with close friends, I tend to go the sit down and enjoy a few light courses approach. The conversations (ahem...debates) almost always focus on politics, religion, social injustice and whatever happens to be breaking news.
We are a very opinionated group from diverse professions, with very differing beliefs and opinions. Mutual respect and good food (and limited drinks) help to keep things civilized.
 Sous Vide Smoked Pumpkin
This Sous Vide Lobster Smoked Pumpkin Ravioli dish was enjoyed at such a gathering, back in October. I used some of the smoked pumpkin from this post, to make the ravioli stuffing. Instead of a smooth puree, I mashed a portion of the sous vide pumpkin and combined it with some lobster, herbs, seasoning, olive oil and cheese.
It was likened to lobster bisque, stuffed inside fresh, homemade pasta!
Quick & Easy Homemade Pasta
We really enjoy making pasta from scratch - it requires very little ingredients, is quick, easy and deliciously fresh. For the ravioli dough, I used two ingredients, '00' flour, but all purpose would work and whole eggs. With the help of our pasta roller attachment, we rolled out thin, uniform sheets to hold our filling.
Oddly, this is only our second time making fresh ravioli - the first was years ago with a pumpkin and sage filling. We normally make just the various noodles - spaghetti, linguini, pappardelle, ribbon pasta for lasagna- and the occasional farfalle (bow tie).
The texture of the pasta was good, but I wasn't pleased with the bumpy appearance of the cooked ravioli. A friend later suggested that I brush the dough with egg prior to filling - I used water to help the layers stick. Maybe one of you pasta experts reading this can enlighten me!
 Sous Vide Lobster
I used Cleawater Seafoods raw, frozen lobster knuckle and claw meat - same deliciousness as their live lobsters, but without the killing, blanching and shelling. Totally convenient for a lavish midweek meal.
If you caught (no pun intended :)) my last post, then you already know how we like to cook our lobster. Lobster is one of those things that can easily go from fancy dinner intentions to overcooked unpalatable-ness. It's delicate nature, makes it a perfect candidate for sous vide bath.
 Pulling It Together
We finished this dish with a generous drizzle of homemade, sage-infused oil, cheese and crispy sage. I think I first saw the idea for crispy herbs in Modernist Cuisine, and it became an immediate hit for the Dude and me. Simply wash, pat dry and fry in shallow oil for a few seconds.
There is something very satisfying about about creating a meal from scratch and sharing it with those you love. My grandmother cooked and baked from scratch when we were kids and still does to this day. I didn't always appreciate it, but as I get older I am beginning to fully understand and embrace this labour of love.
I hope you will find some time over these hectic holidays to prepare a meal or two from scratch for those you love most.
Sous Vide Lobster Smoked Pumpkin Ravioli
Ingredients
For the filling:
- 455 grams sous vide smoked pumpkin
- 3 pieces sous vide poached lobster claw and knuckle
- 1 cup grana padano cheese shaved
- 1 shallot finely diced
- 2 leaves fresh sage or tarragon finely sliced
- 1 spring fresh thyme leaves only
- 1 clove garlic finely diced
- 2 tablespoons oil or melted butter
- salt and pepper to taste
For the pasta:
- 198 grams 00-flour
- 2 eggs
For the garnishes:
- fresh sage leaves fried in shallow oil for a few seconds
- olive oil infused or plain
- cheese shaved
Instructions
Make the filling:
- Mix all the ingredients until well combined and is able to hold its shape. Adjust seasoning to your preference. Scoop with a small ice cream scoop and chill for 1-3 hours.
Make the dough:
- Break the eggs into a small bowl and whisk lightly to break up the yolks. Make a well in the flour, add the eggs and work it into the flour until combined. Knead the dough until smooth, shape into a ball and wrap in plastic wrap. Let the dough rest for 30 minutes.
- If manual labour doesn't interest you, use a stand mixer to prepare the dough. Simply add all the ingredients and use the paddle attachment to combine on low speed. Switch to the dough hook attachment and knead on medium, until smooth. Wrap and allow to rest for 30 minutes.
- Once rested, lightly flour your work surface and use a rolling pin to flatten the dough ball. Set the pasta roller to '0' and pass the dough through. Fold the end of the dough over each other, like an envelope (see video) and pass through the roller, still set to '0'.
- Continue to pass the dough through the roller, adjusting the setting to a higher number each time. If the strip of dough become unmanageable, use a pizza cutter or knife to cut it in half or thirds and continue to setting '7' or '8'. You' will need two sheets for dough to make the ravioli.
- If using a ravioli kit, drape one sheet of dough over the metal base and use the bottom of the plastic mold to create wells. Add the chilled filling to the wells and cover with second sheet of dough. Pass a rolling pin over the ravioli to perforate the dough. Separate the ravioli packets.
- Bring a pot of water to a boil and cook the ravioli for 1-2 minutes. Remove with a slotted spoon and serve immediately.
Plate and serve:
- Place 2-3 ravioli in shallow bowls, drizzle with olive oil and top with crispy sage and shaved cheese.


 How To Prepare The Lobster
 How To Bag & Bath Your Lobster


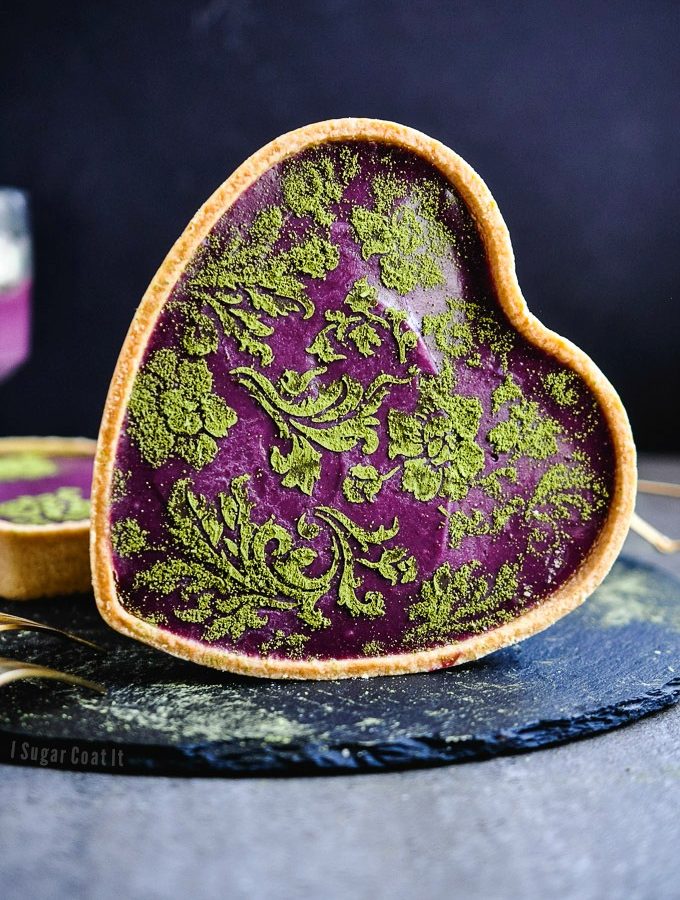
 I wanted to share this Purple Sweet Potato Cheesecake Tart with you back in the fall, as an alternative to the ubiquitous pumpkin-laden everything. I made them at night and the photos were pretty crappy, so I canned the post and waited for another opportunity to make and share them.
 No-Bake... Not Really
 How To Stencil on Desserts
 Also, you want to fill and level the tart shell as close to the top as possible. This provides a great working surface for stencilling. I sometimes make my own stencils using my Cricut, but get much better results with pre-made stencils. I have a bunch from
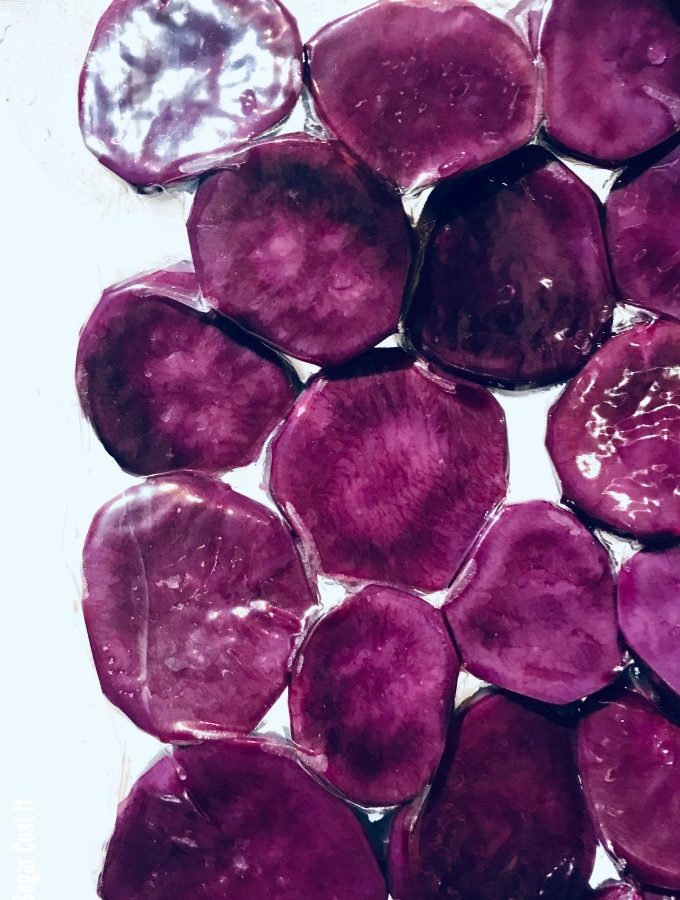
 Bringing you a jewel-toned batch of Sous Vide Purple Sweet Potato Puree for this instalment of #sousvidesista. A sweet, creamy, stunning substitute for your holiday pumpkin or sweet potato dishes.
 Sweet Potato or Yam?
 Why Sous Vide?
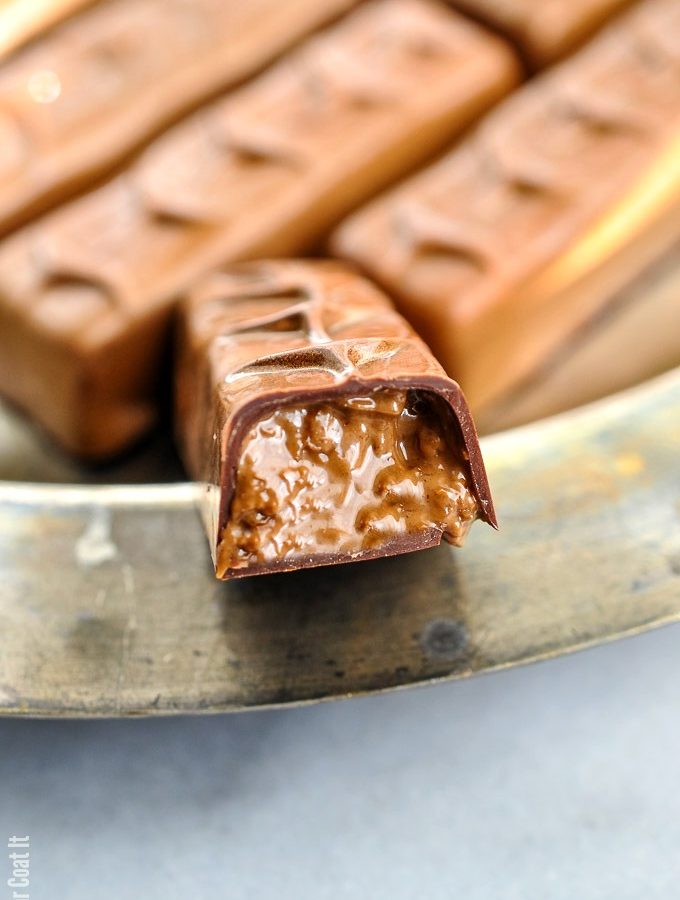
 HAI! Sometimes Wednesday requires a little sumin-sumin to get over that mid-week hump. I got you covered with one, or fifteen, Almond Coffee Crunch Chocolate Bars! Snack-size Almond Coffee Crunch Chocolate Bars with a crunchy, coffee, milk chocolate filling, wrapped in 70% dark chocolate.
 Prep Your Mold
 Temper, Temper - Chocolate

 These Almond Coffee Crunch Chocolate Bars would make great holiday gifts to show off your newly acquired chocolate skills. If you make them, I would love to see your results. Tag
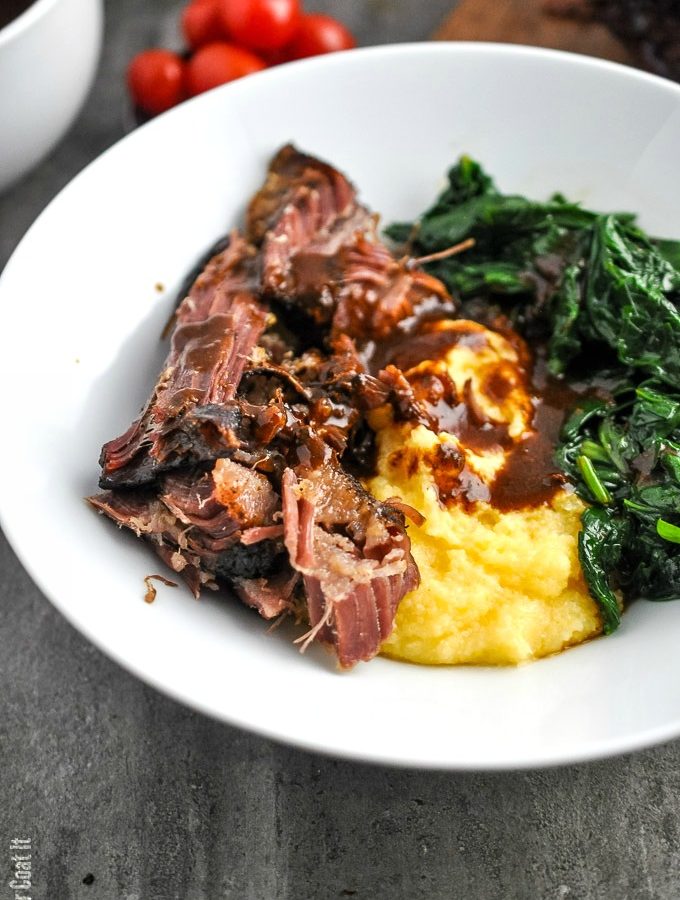
 Hey-hey! I am back with another mouth-watering installment of Sous Vide Sunday; featuring my slow-cooked-to-succulent-perfection Sous Vide Goat Shoulder. With a side of creamy polenta, sauteed garlic and wilted spinach for a little seasonal comfort!
 Goat Is Goat
 Simple Sides

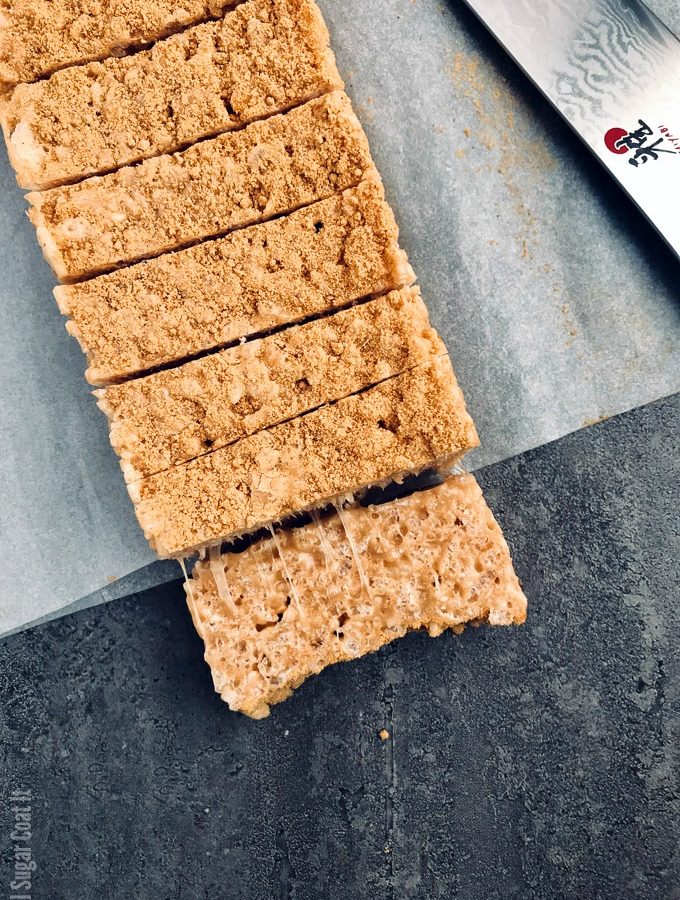
 OK, so you really can't go wrong with rice krispie treats, especially when stuffed with homemade marshmallows, amaretto and nut couverture. You know, like these Almond Amaretto Rice Krispies Bars!
 Cereal For Dessert
 Make Your Own Mallow
 Nuts About Chocolate
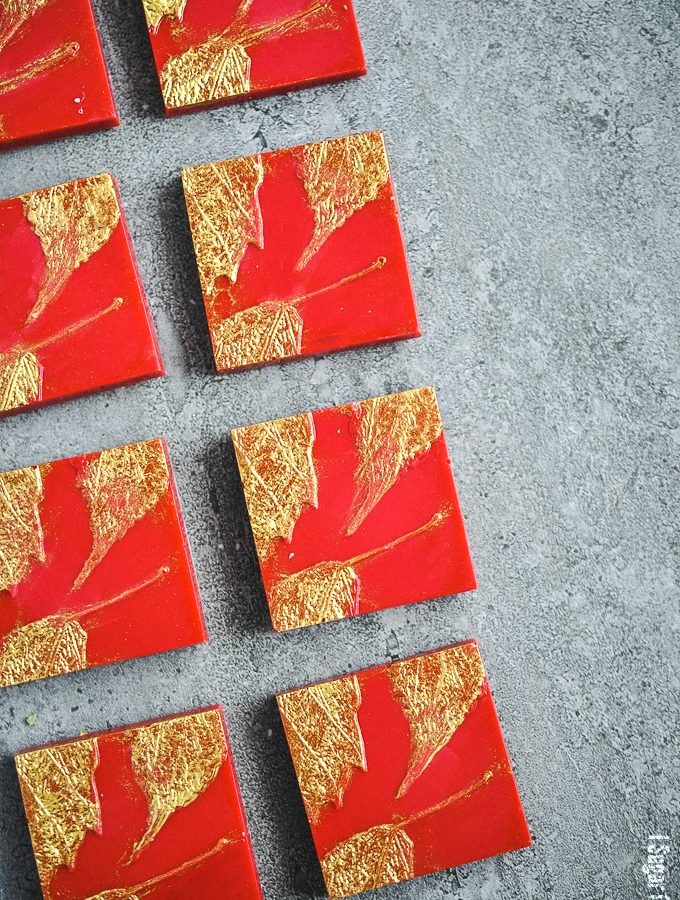
 Back in September, to my utter surprise and delight, I received a package of Valrhona's new Strawberry Inspiration to sample. I think you guys already know what a huge fan I am of their chocolate. Yeah? OK, I'll spare you the gush fest.
 So there I was thinking the passion fruit was the Inspiration holy grail, then along came strawberry. Competition got fierce AF. I lined up a few of my real life choco-loving friends and we taste-tested, for probably longer than was necessary, only to reach a stalemate. Personally, I place both on equal footing, but I can see why the strawberry might be more popular - it's a more familiar fruit and flavour to the masses.
 Solid bars like
  I've never been one to paint within the lines, although that would be a great skill to have in this case. If you are worried about using gold shimmer, use cocoa butter to add colour, instead. Can't find freeze-dried yuzu, citrus zest will do the trick.
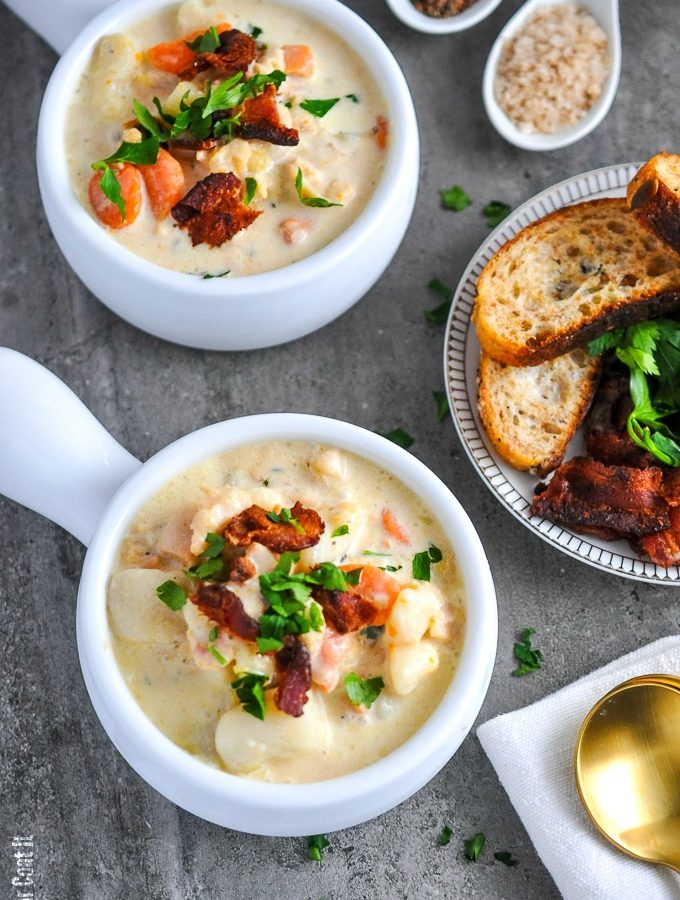
 This post for Curried Arctic Surf Clam Chowder was created in partnership with Clearwater Seafoods LP.
 Curry Leaves
 Top with a few pieces of oven-baked, crispy smoked bacon for a little crunch and a few pops of green and it's time to start shovelling warm, yummy comfort by the spoonful! I also topped mine with a pinch of smoked sea salt flakes and peppercorn for good measure. YUMMM!