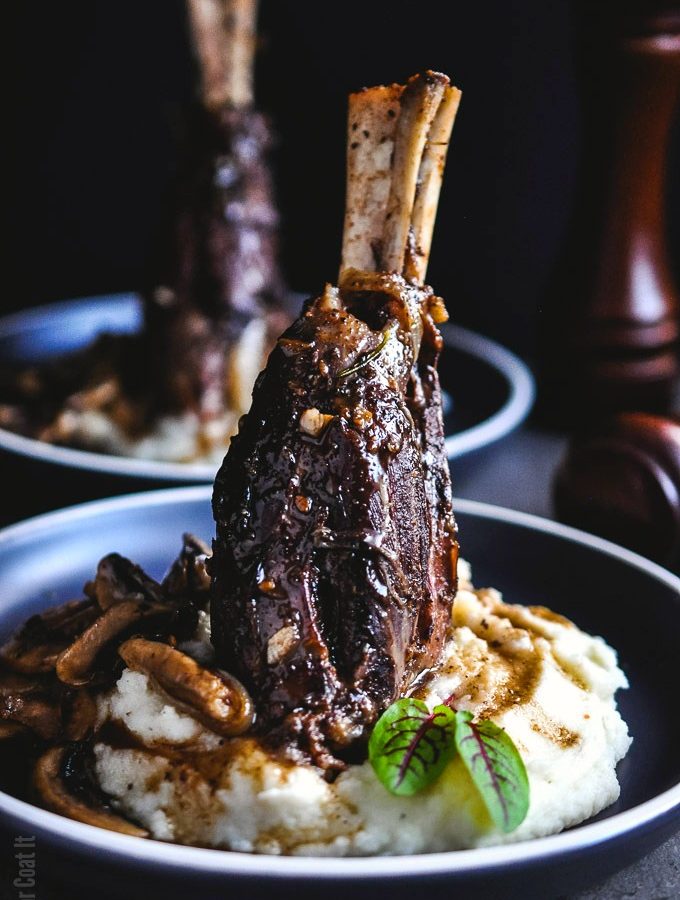
Succulent Sous Vide Licorice Braised Lamb Shanks served on a cloud of mashed potatoes with a side of sautéed flavourful mushrooms.

Before you whip out the chocolate, champagne and maybe put a ring on it, treat your babe to an unforgettable Sous Vide Licorice Braised Lamb Shanks dinner. If he or she is anything like me, that will pretty much seal the deal... 🙂
Served with a bed of the dreamiest sous vide mashed (whipped really) potatoes brought this meal into serious comfort food territory. That was the general consensus when we served the same shanks atop polenta for a pre-holiday dinner with friends back in December.

Time, Temperature, Texture
Cooking tough cuts of meat, such as shanks, sous vide, ensures the perfect doneness, whether you like it tender, flaky, medium, rare or well-done. A longer cook time at a lower temperature will yield a fall-off-the-bone texture that is out of this world. A shorter cook time at a higher temperature produces a tender, but firmer texture.
The temperatures and times below are from Modernist Cuisine. My texture preference is the first, tender and succulent:
- Tender - 48 hours @ 62ºC/144ºF
- Tender/Flaky - 5 hours @ 85ºC/185ºF
- Very Flaky - 5 hours @ 88ºC/190ºF

Lip-Smacking Licorice
I love the flavour of licorice, it's one of those flavours from my childhood, but I am not a fan of the rubbery candy of the same name. I usually keep the bark on hand for tea and have been playing with it for a bonbon flavour. If you are a fan of anise, you might like licorice.
We drank it as tea to settle our little tummies, when we were kids and chewing on it helps a toothache, according to my grandma. It goes splendidly with, and is commonly used in goat or lamb dishes. What the root lacks in looks, is made up plenty in flavour and aroma. If you don't have access to the root, powders are widely available and some health food stores will carry the compound.

Dreamy Potatoes
Make it a meal to remember with a bed of the fluffiest, most flavourful mashed potatoes, cooked sous vide. We keep a jar of sous vide garlic confit on hand, because we are garlic addicts. The stuff is amazing on pasta, pizza, sandwiches, the list goes on.
I decided to add a bit to the cooked mashed potatoes, instead of adding fresh garlic in the bag with the potatoes, as part of the sous vide cook. A definite keeper and repeater, this mash! Top with a flavourful, aromatic licorice glaze made with the bag juices, mushrooms and sorrel leaves for an intimate dinner for two.
Sous Vide Licorice Braised Lamb Shanks
Ingredients
For the lamb:
- 2 lamb shanks
- sea salt to taste
- freshly ground black pepper to taste
- pinch dried oregano
- 2 licorice root, peeled and sliced or 3-5 grams licorice powder
- 2 sprigs fresh thyme
- 30 milliliters olive oil
For the glaze:
- pat butter
- 3 large shallots peeled and quartered
- 1 clove garlic minced
- handful button mushrooms sliced
- 12 grams all-purpose flour
- 90 milliliters liquid from the bags in which the shanks were cooked in strained
- 90 milliliters red wine vinegar
- splash red wine cabernet sauvignon or Bordeaux
For the potatoes:
- 3-4 medium russet potatoes cubed
- 1 sprig fresh thyme
- 60 grams unsalted butter cubed
- 90 grams 35% whipping cream
- 4 cloves sous vide garlic confit or roasted garlic
- salt and freshly ground pepper to taste
Instructions
Cook the lamb:
- Prepare a water bath by filling a large pot or other heat-proof container with clean water and attach your immersion cooker. Set the cooker to 61.6C/143F and allow the water bath to heat.
- While the water heats, clean and trim the meat of excess fat and make a couple slits across the meaty parts of the shank. Drizzle the shanks with the olive oil. Combine salt, ground pepper, oregano and licorice powder (if using) and rub liberally onto the meat. If using the whole root, use the above rub, leaving out the licorice powder. Peel the outer layer of the licorice root and cut in half. Add each piece of seasoned meat to a prepared vacuum bag along with the licorice root pieces and fresh thyme. Vacuum seal the bags, add to the heated water and cook for 48 hours.
- A few minutes before the cook is complete, heat a heavy-duty skillet with a little olive oil. Place a double layer of paper towel on a plate. Once cooked, remove the shanks from the water, cut open bags and transfer the meat to the paper towel lined plates. Pat dry.
Prepare the glaze:
- About 20 minutes before the meat is ready, add the shallots, garlic, mushrooms and butter to a small saucepan and cook over medium heat for a few minutes until softened. Sift and whisk the flour into the mixture and allow to brown, whisking continually.
- Add the strained bag juice, vinegar and wine and bring to a boil. Allow to simmer, stirring occasionally, until thickened.
Make the potatoes:
- Set up another water bath if you have a second immersion cooker and heat to 90C/194F. Or use the same water bath used for the lamb and increase the temperature once you have removed the lamb.
- Add the potatoes, thyme, butter and cream to a freezer bag and use the water displacement method to remove the air form the bag, as you add it to the water bath. if you own a chamber vacuum sealer then use that to seal the bag.
- Cook for 45 minutes. Remove the bag from the bath, cut open and strain the liquids from the bag into a measuring cup. Add the rest of the bag contents to a bowl and discard the thyme sprig.
- Add the garlic confit to the bowl of potatoes and use a potato masher or hand mixer to combine. Add the reserved liquid a little at a time and combine until the potatoes are smooth. Season to taste with salt and pepper.
Plate and serve:
- Place a bed of mashed potato in the center of each plate, creating a well to hold the lamb shank. Place a lamb shank upright on each plate, spoon glaze over meat and mash and add a few mushrooms on the side. Garnish with sorrel leaves and serve!