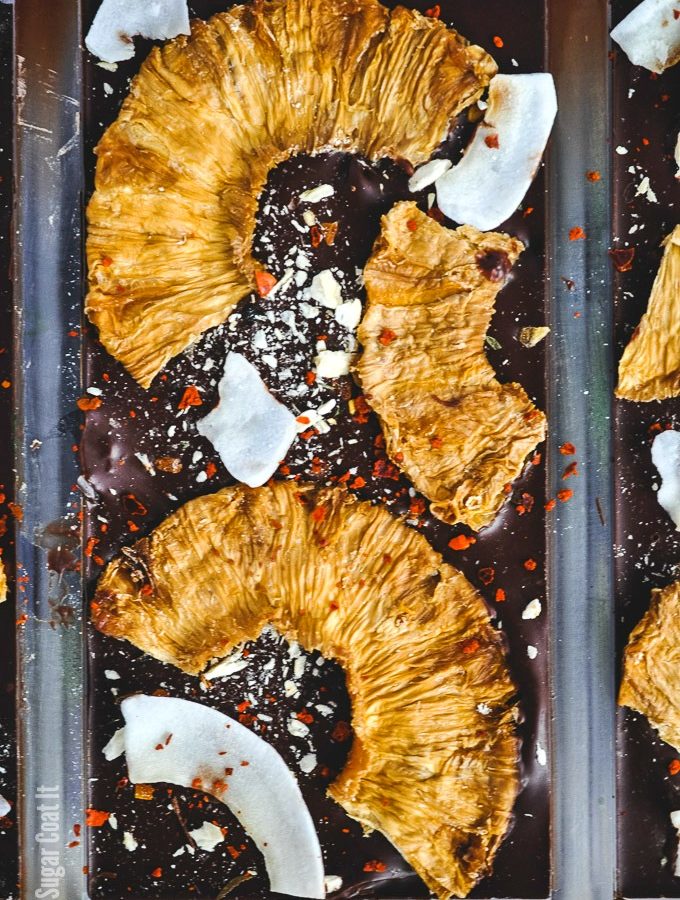
Spicy Pina Colada Dark Chocolate Bar with coconut rum-soaked dehydrated and freeze-dried pineapple, shaved coconut and Aleppo flakes on dark chocolate.

This Spicy Pina Colada Dark Chocolate Bar was the second in a series of four bars I made earlier this year, as a result of an Instagram poll. This was the first.
I received a few suggestions for pineapple from the those who responded to my poll. I immediately thought of Pina Colada - one of the very first alcoholic drinks I tried when I became of age. Coconut and pineapple are a tropical dream couple I simply can't resist.
When we were kids, as we often did with mango, we would sometimes eat pineapples before fully ripened, sprinkled with a little salt and pepper sauce. That's why I worked in the spicy addition to this recipe.

I attended a work function a few weeks ago and while I was waiting to partake in one (or three) of the mini, mouthwatering dessert choices, I chatted with the president's spouse.
They had recently returned from a trip to the Azores and she was raving about the pineapples. She was particularly taken with the salty notes, intense flavour, size and the two years it took to grow them.
I couldn't help but salivate and then I remembered I still hadn't shared these bars...

Decorating The Mold
I purchased this mold a little while back because it reminded me of pineapple, even before I added the colour. The Dude calls it the braid mold. It's shallow enough that it works as a solid bar, but also does well as a filled bar (to come).
I layered a couple shades of green, yellow and bronze cocoa butter to mimic pineapple skin. I used my airbrush to add random flicks of yellow, then lightly layered the colours until I was satisfied with the look.
By lightly, I mean don't spray it on opaque. I was still able to see light come through the mold and colours when I held it up to the window. They looked a great deal better than they do in these photos.

Pina Colada on Dark
I caramelized fresh pineapple slices in a boozy, coconut, lime, brown sugar and a touch of salt concoction, then dried them in my dehydrator. The dehydrated pineapple slices were an amazing snack on their own, but I combined them with toasted coconut, Aleppo pepper flakes and laid then onto the tempered dark chocolate before it set in the mold.
Not everyone likes dehydrated fruit, so I made three with and for the other three, I replaced them with freeze-dried pineapple - those were my preference.

White Variation
Initially, I made the bars with white chocolate, to really capture that pina colada look (see photo above). The white worked better with the freeze-dried fruit - the dehydrated fruit made the combination a little too sweet.

Give it a try, play with the flavours and let me know your results! If you happen to live where you can get your hands and lips on sone Azores pineapple...well, enjoy a slice, or ten, for me!