• Skip to primary navigation
  • Skip to main content
  • Skip to primary sidebar
  • Home
  • About
    • About I Sugar Coat It
    • Features & Press
    • Copyright
    • Disclosure
    • Privacy Policy
  • Recipes
  • How-To
  • Contact
  • sous vide sista

I Sugar Coat It

Home

All Posts

June 2012 By i sugar coat it! 4 Comments

Poppy Tutorial

Sugar Poppy Tutorial
 There is no cake or cookie in this post, just a slide show and some self promotion. Still interested?

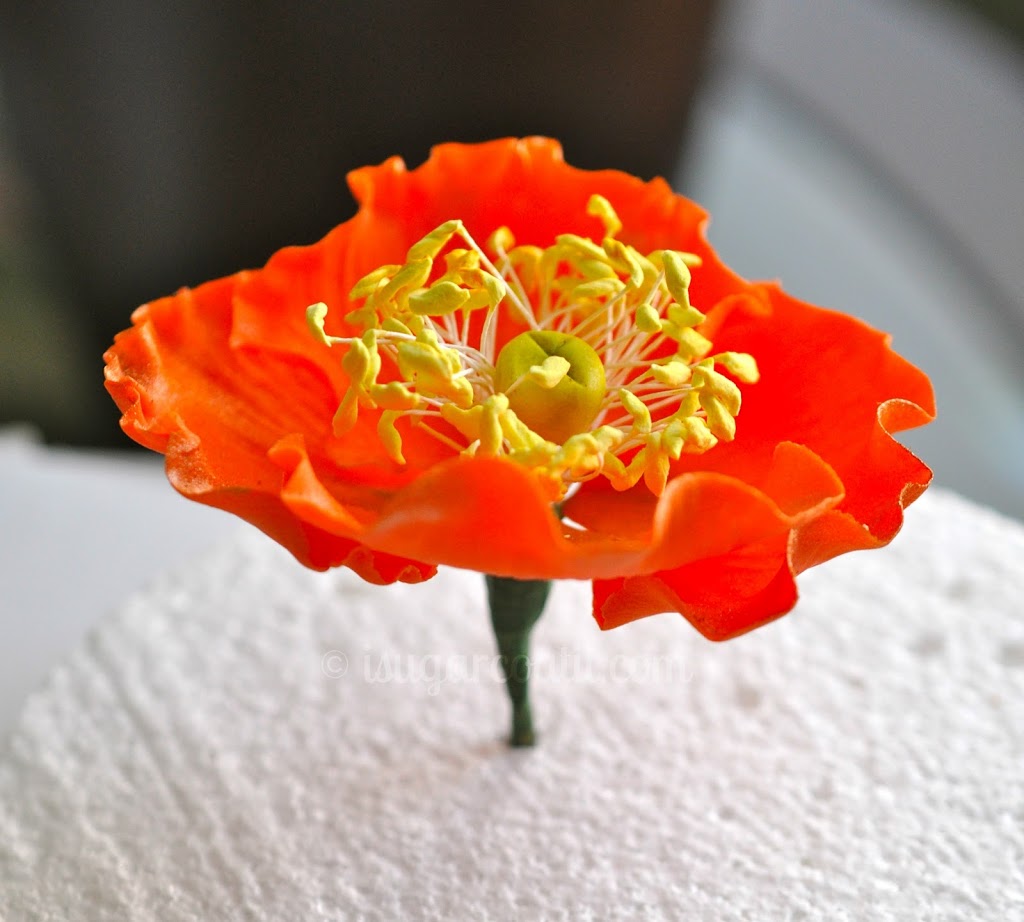
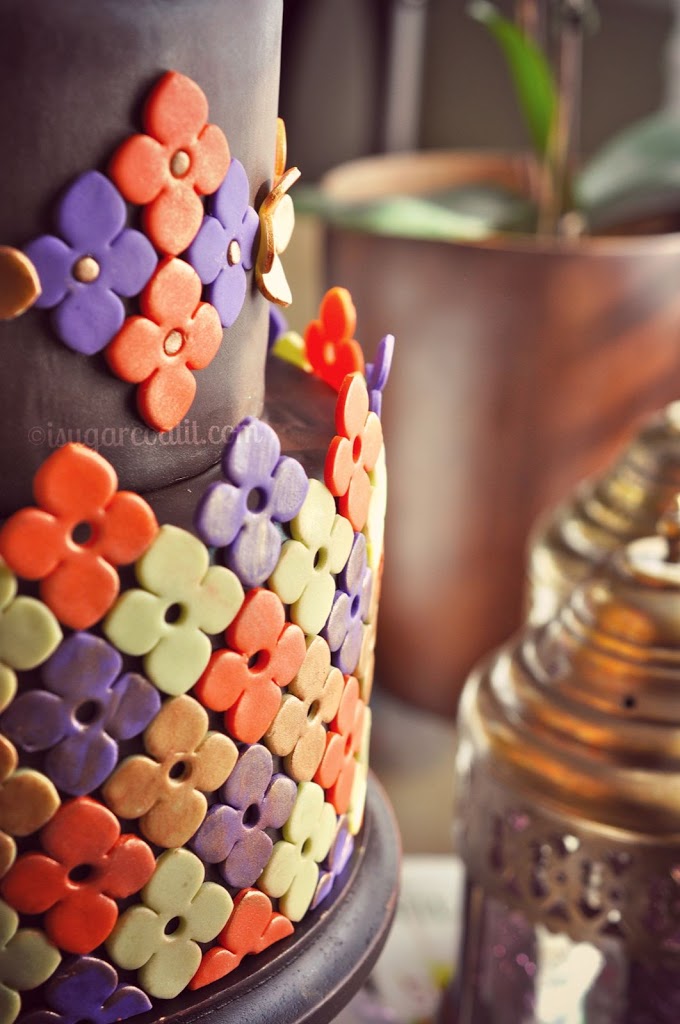
The last cake I posted was topped with flowers that were inspired by a photo I found online through a search for Moroccan Poppy.

Here is how I made them...

No Expert
I have made a few other 'How-To's', but I am always a little shy about posting them - I am no expert after all. I've recently realized, however, that it is less about 'expertise' and more about sharing - and I love to share. What's a good deal, sale, tip or trick if not shared?

Medium - How Best To Share?
I am still playing around and trying to determine the best medium in which to present my how-to's. I did a pictorial on sugar brooches, which I also adapted into one of my favourite Apps, SnapGuide. It's available for free download from the App store on your iOS device (iPad, iPhone) - it may also be available on Android. Check it out, lots of great How To Guides on a number of unexpected topics.

For this how-to, I created a slideshow using Keynote on my Mac - the equivalent to PowerPoint on a PC. It was as easy as dragging and dropping the photos into the slides, adding instructions and some music - I used a Zero 7 song called End Theme, uploaded to YouTube and Voila!

I'd like your feedback and I am only interested in the constructive kind. If you don't like this format, tell me why - are the slides too quick? instructions too vague? is your preference video? is the music distracting? Be honest, but be kind.

Unfinished Business
In going through my iMovie library, I came across a number of unfinished projects (haha - a real Gemini, huh?). Over a year ago I created a how-to video for this Anemone in video format. I spent so much time editing it in iMovie then decided it was not good enough, but never found the time for a redo. And they will never be completed, I am more likely to start afresh or move on to something else - I eyes are set at the front of my head, and that's the way I move.

Self Promotion
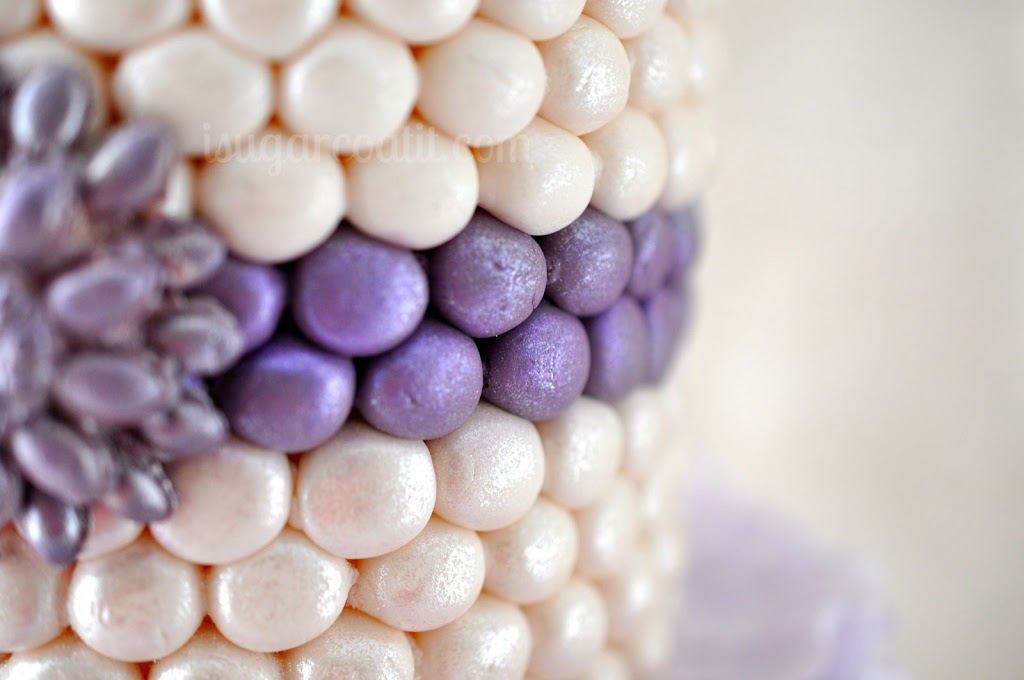
I am proud to report that out of hundreds of entries, my Ruffles & Pearls cake was one of the lucky 24 chosen for Sweetopia's Sweet of the Month. Head on over and vote for mine here and if there are others that tickle your fancy, I won't be hurt if you voted for them as well. I believe you are allowed one vote for each cake. Although I only have 11 votes, I feel like a winner. I do this cake thing as a hobby and I am fairly new to it, so having been chosen as a finalist is a bit of an accomplishment in my opinion. YAY for me!!

Speaking of accomplishments, I was recently named Cake Decorator of the Week over at CakesDecor.com, and have had a few of my cakes/cupcakes make it to the Daily Top 3.


Ok, that is as much self promotion as I am comfortable doing, and even that was a little painful. A mentor in my professional life outside the sweets world recently said to me, "if you do the work, don't shy away from the attention it garners and stop feeling so undeserving" - see, I listened. 🙂 Although the advice was in context of my career, I feel it applies here and in other areas of my life. It also applies to you, yes, YOU! WE are all deserving!

June 2012 By i sugar coat it! 11 Comments

My Twins' Birthday Cake

Moroccan Chocolate Birthday Cake - I Sugar Coat It!
I celebrated my birthday recently and although I am not into astrology, I thought I would consult the stars for the purpose of this post. They say I'm gemini - constantly conflicting emotions in one spontaneous, excitable package. Meet the twins!
Moroccan Chocolate Birthday Cake - I Sugar Coat It!
According to sources on the matter, "those of us born between May 21 and June 20 personify the airy agility of Gemini, the Twins. We tend to soar in the ether of abstractions, ideas, and - most of all - words. We are the zodiac's wordsmiths, the lovers of language, the poets and bards, the verbal magicians.
While other signs may initiate life's energy, or give it solidity and form, Geminis expand it, extend it, and turn it toward interconnection and communication. Astrology holds that geminis are the nerve synapses of culture, the facilitators who coordinate information and pass it along.
We crave experience, variety, mobility, change, company, banter, and intellectual play. We are mentally quick, endlessly curious and experimental, loathe routine, and fear stagnation. We are generalist. Befitting our sign, we are skilled at seeing two-sides, or all sides, of a topic.
Geminis are forever beset by ephemeral enthusiasms. For us, to discuss an idea is wonderful and magical, but to implement it is tiresome. We are said to be the masters of the half-finished project, the thought abandoned short of fruition once talking stops and tedious work begins.

The Twins' manifest intellectual gifts often bring us great success with no real effort - but we are hard put to sustain it. Thus our quest is to learn perseverance and cultivate depth. We aspire to substance as well as style. We must learn to take ourself and our words seriously."*
It reads like drivel to me, yet a number of those traits fit like a sweater that's snug in all the right places - the others, I'll leave to my twin.
Ahhh, my twin... Those who know me well and long enough will have no trouble believing the duality claim.
Moroccan Chocolate Birthday Cake - I Sugar Coat It!
I could stick with that storyline and flush it out, but that would be tiresome. So, in true gemini fashion, I will abandon it and maintain the 'master of half-finished projects' title bestowed upon us twins.

On to more exciting projects - this Birthday Cake! As you can see I was able to see this through, even when it became tiresome and after the tedious work had begun. Am I trying too hard to dispel the astrology drivel?

Moroccan Chocolate Birthday Cake - I Sugar Coat It!

We purchased a Moroccan tagine set about a month ago from HomeSense and used it for the first time recently. We christened it with a vegetarian tagine, but I can't wait to try a lamb, chicken or beef version. The Moroccan fare got us thinking, well, Moroccan - I see a trip in our future. With my birthday around the corner, I thought I would stay with that theme for my birthday cake.

Moroccan Chocolate Birthday Cake - I Sugar Coat It!

So, I got to work implementing the idea floating around in my head. The base would be a deep, rich brown, framed with colourful, yet muted tiles in three of my favourite colours.

I whipped up a double batch of my currently favourite chocolate cake recipe. I made an 8" base and topped it with a 6" and filled them with colours that coordinated with the tiles. A thin layer of vanilla bean buttercream was then applied to prepare the cakes for the chocolate fondant.

Moroccan Chocolate Birthday Cake - I Sugar Coat It!

Now the fun stuff. I used my hydrangea petal cutter to cut out the tile shapes and then used a #2 round piping tip to create holes in the center of each. As I discarded each into a close-by bowl, I thought of ways to incorporate them back into the design. I planned to add gold dragees to the tiles in the top tier; instead, I found good use for the discarded centers. Can you say, homemade sequins?! Using a mixture of lustre dust and vodka, I painted a number of the tiles to try and achive a more rustic look. Then I placed the centers, now dry-dusted with lustre dust back in their rightful place - well, some of them.

My birthday cake was complete in my opinion, until I came across this photo. I instantly knew they would become a part of my cake. With photo in view, I set about recreating the Moroccan Poppies to top my cake. I think they turned out just lovely and are now number three in my sugar flower repertoire.

Moroccan Chocolate Birthday Cake - I Sugar Coat It!

One more thing about Geminis not mentioned above - we love to share. Here, have a slice on me!

*Astrology info found on the web, but can't recall the link.

Print Recipe

Chocolate Espresso Cake with Whipped Vanilla Bean Frosting

Prep Time10 minutes mins
Cook Time40 minutes mins
Total Time50 minutes mins
Course: Dessert
Author: I Sugar Coat It

Ingredients

Cake:

  • 2 sticks unsalted butter
  • ½ cup high quality Dutch process cocoa
  • 1 tablespoon instant espresso powder dissolved into ¾ cup water
  • 2 cups granulated sugar
  • 1 cup sour cream
  • 1 tablespoon almond extract
  • 2 large eggs
  • 2 cups all-purpose flour
  • 1 ½ teaspoon baking soda
  • ½ teaspoon salt

Frosting:

  • 3 sticks + 2 tablespoons unsalted butter softened and cut into cubes
  • 3 cups confectioners' sugar icing/powdered
  • 3 tablespoons milk
  • 1 vanilla bean scraped
  • 1 teaspoon pure vanilla extract
  • pinch of salt
  • 1 drop each of Avocado Violet and Orange Americolor gel paste

Instructions

  • Preheat oven to 350° F. Prepare pans - I use cake release.
  • Melt butter in a large saucepan over medium-low heat; add cocoa, stirring until smooth. Whisk in the espresso water and remove from heat.
  • Add the sugar, sour cream, vanilla, and eggs to the warmed cocoa mixture and whisk until smooth.
  • In a medium bowl, combine the flour, baking soda, and salt. Add to the first mixture, whisking until well blended.
  • Pour batter into the prepared pans. Bake for 40-45 minutes, or until it feels firm to the touch and has slightly pulled away from the sides of the pan.
  • Cool in pans on a rack for 20 minutes. Remove from pan by placing the rack over the cake and invert, tapping pan lightly, if required to loosen.

To make the frosting:

  • In the bowl of an electric mixer fitted with the paddle attachment, whip butter for 8 minutes on medium speed until very pale & creamy.
  • Add remaining ingredients and mix on low speed for 1 minute, then on medium speed for 6 minutes. Frosting will be very light, creamy, and fluffy. Place about ½ cup of frosting in three small bowls and add the colours to each. Use the coloured frosting to fill each layer of the cake. Use the remaining frosting to mask the entire cake.

Notes

adapted from Sweetapolita

 I-Sugar-Coat-It-Blog-Signature-Green

Chocolate Giraffe Cookies

May 2012 By i sugar coat it! 6 Comments

Giraffe Cookies for Taylor


Imagine after numerous attempts, learning that you are finally going to have a baby! Imagine a healthy pregnancy and safe birth. Imagine the joy that fills you, your family and friends. Imagine taking your little girl home with the new title and responsibilities that she brings. Imagine immersing yourself fully into your new role and loving every second of it. Scenes of her future play in your mind like that movie you wish would never end, you know, the one where everything turns out just the way you imagined...

Imagine ten months later gathering to celebrate your little girl's life; balloons, butterflies and bubbles released in her honour, floating up towards the heavens to greet her. Hard to imagine.

Taylor was born to my dear friend Jess and her husband on July 25, 2010 and presented her wings exactly two months before her first birthday.  Most of her ten months were spent at Sick Children Hospital in Toronto, also known as Sick Kids, where she lit up her ward with her smile and spirit. It was there she was diagnosed with Type 1 Spinal Muscular Atrophy (SMA), and where she spent her final days before being summoned for angel duty.
 
Prior to Taylor's diagnosis, I knew very little about SMA. Through the knowledge I gained from Jess from her experience and scouring the net once I learned of Tay's diagnosis, here are a few key points about the disease:
  • SMA is a group of inherited diseases that damages and weakens muscles, eventually leading to death.
  • It is the second leading cause of neuromuscular disease.
  • A person must get the defective gene from both parents to be affected.
  • The most severe form is SMA type I, also called Werdnig-Hoffman disease.
  • Life expectancy for SMA type 1 is usually no longer than 2-3 years because of respiratory problems and infections.
  • Although rare, SMA may begin in adulthood, but is usually a milder form of the disease.
Symptoms include:
  • Breathing difficulty, leading to a lack of oxygen
  • Feeding difficulty (food may go into the windpipe instead of the stomach)
  • Poor muscle tone
  • Lack of head control
  • Little movement
  • Weakness that gets worse
Sadly, there isn't a cure.
I was at work when I received the message from Jess saying that Tay was no longer with us in body. There were messages in the weeks prior filled with panic and elation; flat-lining and stability. We were all warned that it was only a matter of time, but no one abandoned hope. Knowing what we knew about the disease, hope would have to be accompanied by a miracle for a more desirable outcome.
Tay put up an impressive fight and wore a smile all the while. You could not help but see beyond the tubes connecting her to numerous machines, and be happy in her presence. There was something so other-worldly about her, and it resided in her eyes. I know now we were all in the presence of an angel.
Just as impressive a fight was the one waged by Taylor's mama, Jess. What would bring most to their knees and keep them there in submission, catapulted Jess to move mountains in ways I had never before seen, and all without losing her composure.

Bravery beads from SickKids Bravery Bead Program.

I wrote this post in an effort to bring awareness to Spinal Muscular Atrophy, but more importantly, in honour and memory of a special little girl whose time here on earth was shortened by this disease.

Although short, her life touched all around her and brought to light a disease most of us knew very little about. With eyes as bright as stars and a smile that warmed our hearts, Taylor has greatly impacted our lives.
She’s an angel now; a part of every sunny day and star-filled night for eternity.
Jess, my thoughts and prayers are with you on this day and always. I speak for a number of people in saying, Taylor will forever remain a part of our lives. Thanks for allowing us to be a part of hers and yours.

Taylor's favourite toy was a stuffed Giraffe. I think she would have been amused by these cookies I made just for her. Perhaps they can be shared with the other wee angels.

Please visit Families of SMA Canada to learn more about the disease and if you can, make a donation.

Sources: curesma.ca, PubMEDHealth.com
Ivory Sweet Hearts Shower Cake

May 2012 By i sugar coat it! 8 Comments

Sweet Hearts

Ivory Sweet Hearts Shower Cake

Being deeply loved by someone gives you strength, while loving someone deeply gives you courage. Lao Tzu

My sister, and her partner of many years are getting married - a formal blending of hearts and families.

It was mostly girls on Sunday as we came together to celebrate my sister's upcoming nuptials. The weather was great, the food was divine and the company was gut-busting fun - but one expects nothing less when a giant trampoline is involved.
It's always a treat to see my sister and nieces. Since they moved to another city, visits have gone from weekly to a few times a year. Also gone, is frequent access to my sister's amazing desserts. Where I have to try in the kitchen, she is a natural.
My aunt did a fabulous job organizing the event - she had tents set up so that we could keep everything outdoors and arranged for entertainment to keep everyone engaged and light tasty food and drinks for the health-conscious bunch. I was responsible for desserts.
Ivory Sweet Hearts Shower Cake
I had so many great ideas pop into my head that included a sweet table boasting cake pops, push pops, macarons, cookies, a three-tier cake etc. - but had to quiet them due to lack of time. Plus, we really would not get through all that sugar. So, I kept it simple, and even that had its challenges.
The venue for the wedding is a historical building and so I thought I would go for a vintage feel. Purple is a big part of the wedding's colour palette, so I have incorporated it in all three sweets.
First up, something for our guests to take away. I used my favourite cookie recipe, covered them with a fondant circle and decorated with fondant abstract bride and groom silhouettes inspired by this pin. Cutting each out freehand was time-consuming, but I only needed two dozen. A little sanding sugar, and crumbs, and voila! I found the cookie packaging at Michael's. They came complete with little bags for the cookies, polka-dotted envelope cases, ribbons and do-it-yourself print labels. You gotta love anything that aims to make life easier!
Wedding Shower Silhouette Cookie Favors
Next on the list, cupcakes. My Red Velvet cake seems to be a hit among the adults and kids alike, so I went with that. I topped them off with a very light cream cheese/white chocolate frosting and adorned them with dragee-centered, fondant sugar flowers in a vintage purple. I found these great cupcake liners at Fancy Flours. The flowers were very simple to make and the addition of dragees added interest and bling.
Wedding Shower Red Velvet Cupcakes
Finally, the cake! The bride and groom to be have four beautiful girls between them; three separately and the fourth they created together just over three years ago. There is a whole lot of parties involved in blended families, and with that sometimes comes a little drama, but more importantly a whole lot of love. It's like having three sets of parents and all the associated relatives - a community of people with a shared interest. Add grandparents, aunts, uncles and there is never a shortage of love.

The cake represents all the love this union brings to the couple, their kids and the extended family. The purple hearts are his, her's and their's. All the hearts link to make one big heart that contains their love, or in this case, cake.

May sound corny to some, but that's just me, corny! I love a happy ending and I try to look for meaning and good in everything and everyone.

Ivory Sweet Hearts Shower Cake  - I Sugar Coat It!
I used a peony cutter and a mix of fondant and gum paste to create this ruffled flower. I dusted it and added dragees to the center. The cake is small around but very tall - I used two 6" x 3" pans. Filled and covered, it stood around 8" high.
Ivory Sweet Hearts Shower Cake
The photos aren't my best, but are a testament to how occupied I was enjoying the food entertainment and most importantly, the company - I did not have a chance to take photos while the light was good.

Sis and bro in-law, I wish you both the very best and look forward to your big day!

Keep an eye out for a post-wedding post!

May 2012 By i sugar coat it! 11 Comments

Ruffles & Pearls Mother's Day Cake

Mother's Day Ruffles and Pearls Cake
Mom, Mother, Ma, Mommy, Momma, Mum, Mumsie, Madame, Mama, M... Whatever you are called - Happy Mother's Day!
Mother's Day Ruffles and Pearls Cake
I am extremely blessed to have a number of women in my life that I can call 'Mother'. My mom, from whom I was conceived, my grandmother, with whom I spent my formative first years, my aunts, who, when my sister and I moved to Canada, adjusted their very young and child-free lives to accommodate us - the list goes on.

Although my gratitude can often be unconventional and subtle, there is no shortage of it throughout the year. Today, however, it comes in the form of cake - ruffled and pearled.

Mother's Day Ruffles and Pearls Cake
The ruffles represent times of turbulence, sadness, adversity that were in turn corrected, consoled, and resolved by their wisdom, love, and experience, represented by the pearls. The band of aubergine pearls are those milestones that could not be achieved without their unabating support and encouragement. Thanks!
Mother's Day Ruffles and Pearls Cake
Inspiration for this Ruffles & Pearls Mother's Day Cake came from a number of sources. I have seen a number of ruffled cakes around, I even attempted one with buttercream back in February for my sister's birthday. Remember this? This time around I used fondant to create the ruffles and pearls. The pearl design is inspired by a cake I saw on Sweetapolita's facebook page and the ruffles were inspired by a Fondant Flinger cake also on Facebook.


Mother's Day Ruffles and Pearls Cake


I Ishould note that this is my first tiered cake - YAY!! Both tiers are vanilla bean, filled and masked with white chocolate ganache. The base is two 6" and the top tier, 4". I used a rose cutter set that comes with six pieces/sizes - I placed the larger petals as the base row and used the next size down as I made my way up the base tier. For the pearls I used a pearl mould - the same one I used to create the pearls on this cake. The mould and instructions to make the brooch can be found here. I added some colour and shine with my new decorating addiction - edible dust.


Mother's Day Ruffles and Pearls Cake
Fairly easy techniques, but the petals were time consuming and the pearl strings broke each time I lifted them to attach to the cake. They lost their perfectly rounded shapes in the process.

By the time this post goes live, you would have already had your celebratory brunches, dinners etc. I hope that your day was filled with love, laughter and the company of loved ones.

Happy Mother's Day!

I-Sugar-Coat-It-Blog-Signature-Green

May 2012 By i sugar coat it! 5 Comments

100 Days Celebration Cupcakes

  100 Days Celebration Cupcakes

Back in January of this year, I made these for my good friends who were expecting their first child. Since that post, they have become parents to a beautiful, healthy baby girl who, at 100 days expressed interest in writing her first post.

Hi, I'm Kiernen! I recently turned 100 days and celebrated by throwing an eight-hour party for family and friends. Mind you, I slept through half of it, but you can't fault me - sleeping and eating are a huge part of my growth regimen. In fact, this will be a short post, as I am following a very strict feed-and-sleep program. 

The events leading up to my delivery were well documented in the birth announcement penned by yours truly and shared with family and close friends while my exhausted parents slept. I've summarized for this purpose.

It's quite a riveting tale of speeding, being pulled over by the police, mommy setting the police straight and getting out of a ticket, daddy panicking the entire way and forgetting to pack a change of clothes, but somehow packing a kettle instead, mommy being fully dilated upon arriving at the hospital, me stubbornly resisting against mommy's pushes for ten hours and finally heading to my new home four days after being pushed from my home of almost nine months. I am tired just reliving the events.

Fast forward to 100 days later and a house buzzing with excitement and my favourite thing that I can't yet eat, cake! But I digress... 

100 Days Celebration Cupcakes
By Chinese tradition, "100 days birth celebration represents the wish that the baby will live 100 years." It's a celebration of my birth and health and all the good things that my family wishes to come my way - I think you folks call it prosperity. That's about as much as I gathered from mom and dad and I am not yet allowed to surf the net. If your culture has similar celebrations, I would love to hear about them.

In addition to all the wonderful food, and I mean a whole lot of food, there was cake! Cupcakes for my guests to enjoy and a little tri-colour cake made especially for me, which, when cut, revealed a soft, sponge-like cake bursting with vanilla beans, and the prettiest colours I have ever seen - SQUEEEEE!!!

It's nap time again, but I hope you enjoyed my post. I am pretty sure I'll be back in the near future. In the meantime, feel free to leave me a note below. I'd love to hear from you.

xoxo, Kiernen

April 2012 By i sugar coat it! 16 Comments

Gastro-Entomology or Lavender Honey Cupcakes

Lavender Honey Cupcakes by I Sugar Coat It!
Welcome to Gastro-Entomology 101! Today we will take a closer look at the predatory dragonfly and the very sociable honey bee. Let's start this lesson off with a video clip I prepared. Will someone kindly turn down the lights?

Now that we've had a glimpse of the dietary behaviour shared among the Odonata and Apoidea, let's explore how they might fit into our diet.
Ever had stir-fry grasshoppers or beetles? Well, the Dude was brave enough to sample the street fare while in Thailand a few years back, circa the meat-eating days. I still gag each time I think about it, yet, I am fascinated. So much so, that I decided to finally indulge - wuss style.
Lavender Honey Cupcakes by I Sugar Coat It!
Insects are best enjoyed fresh, but first you need to catch them. I designed two types of traps, as shown above, each specific to a type of insect and concocted from secret ingredients to attract and lure the prey.
Lavender Honey Cupcakes by I Sugar Coat It!
First in line, the ever sociable Honey Bee. Difficult to distract from its busy-bee, buzzing around for the queen all day long self. This one was instantly attracted to the set trap, cleverly disguised by what he mistook for a honeycomb.
Once in contact with the surface, a magical adhesive was released, trapping the insect. No buzzing off for this little guy. Where's your queen when you need her, huh?
Lavender Honey Cupcakes by I Sugar Coat It!
Next up, the super-cool, flying dragon with its long slender body and stained glass-like wings. Doesn't he just reek of coolness? I mean look at those sun goggles! Really? He too met the same fate as our bee friend.
Once trapped, they were prepared to my liking and immediately enjoyed. Don't know why it has taken me this long! I think I can get used to this.
Lavender Honey Cupcakes by I Sugar Coat It!
So that we are clear - no insect was hurt in the making of the movie clip or cupcakes. These entomological delicacies were hatched from this recipe for modelling chocolate and this silicone mould. I then made them all pretty and blingy-like with edible dust in various colours (remember my sugar brooches?). The ingredients that attracted and lured these fancy fliers, lavender and honey - Lavender Honey cupcakes, to be exact. That secret adhesive, royal icing - yup!
Lavender Honey Cupcakes by I Sugar Coat It!
I topped off this batch of cupcakes with black marshmallow fondant and used impression mats to create the patterns, which I then painted with edible dust dissolved in vodka. The other batch were treated differently and queued for a future post.
Lavender Honey Cupcakes by I Sugar Coat It!
How about we end this lesson with a little bee rap? Cue the beat -
I like bee butts and I cannot lie, those other bees can't deny, that when a bee flies by with an itty bitty waist and a round thing in your face, you get stung...

Sir-Mix-A-Lot remake not your thing? How about a little bee humour?

Q: Who is the bee's favourite singer?
A: Sting!
Q: What did the bee say to the naughty bee?
A: Bee-hive yourself.
Q: What did the confused bee say?
A: To bee or not to bee.
Had enough?

How about some dragonfly humour? Not to worry, couldn't find any worth sharing. Cue the sighs of relief...

Consider this the next time you reach for the honey -
Honey bees transform nectar into honey by a process of regurgitation? YUM!!

These cupcakes are tres facile to make, so what you waiting for?

(Bee humour borrowed from here.)
Print Recipe

Gastro-Entomology or Lavender Honey Cupcakes

Lavender & Honey Cupcakes Yields 18 regular-size cupcakes
Prep Time10 minutes mins
Cook Time20 minutes mins
Total Time30 minutes mins
Course: Dessert
Servings: 18
Author: I Sugar Coat It

Ingredients

  • 1 cup unsalted 2 sticks, softened
  • 1 cup superfine sugar
  • 2 cups self-rising flour
  • 4 eggs
  • 1 tablespoon . lavender honey
  • 1 teaspoon . vanilla extract

Instructions

  • Prepare your muffin pan. If not using baking cups, grease and flour the pan.
  • Preheat your oven to 400ºF.
  • Combine all the ingredients in a mixer bowl fitted with the paddle attachment and beat on medium for 2-3 minutes, or until fully combined.
  • Use an ice-cream scooper to spoon batter into the cups/wells.
  • Bake for 20 minutes. Remove from oven and let cool for 5 minutes in pan. Remove from pan and let cool on a rack.
  • Decorate to your liking and enjoy!

April 2012 By i sugar coat it! 4 Comments

Chocolate Forest

If a tree falls in a forest and no one is around to hear it, does it make a sound? What if the tree is made of chocolate???
This is my first time participating in 'cooperative' baking, or baker's challenge as it's called. I was invited to join Walnuts and Honey, Sugar Vanilla Bakes,  Bakes-A-Lot, Anuta Loves Cupcakes, and a few others on Facebook to create a dessert each month that embodies the chosen theme for that particular month.
This month's theme is 'The Forest', which coincides nicely with Earth Month (well, day actually, but I'm sure Mother Nature won't mind the extended recognition).
For instant grass, add shredded coconut and green food colour to a freezer bag, shake and Voila!.
I have never really done a 'themed' cake, so was a little unsure of my approach.
My original plan was a little dark in it's depiction of our abuse and misuse of our natural resources and the impending catastrophic end. Sounds pretty, huh? Phew! That all went out the window when I happened upon new inspiration by way of a Thank You card at Mandagirl, a scrapbooking site. The colour scheme of the card spoke to me and I listened. And, even more so, when I received my daily dose of design seeds.
 
 
The plan was to keep it simple with just the tree, some painted on grass at the base of the cake and maybe a couple birds perched atop the cake. The tree on its own made a statement and was in line with my taste - simple, uncluttered and lots of green.
Through the camera lens, however, it appeared bland and uninteresting. So I added and subtracted and shifted and repeated until I got here - a completely edible and palatable 8 x 4 chunk of chocolate forest. I used fondant and modelling chocolate to decorate and ate a few birds and leaves along the way.
 
Here is a list of the items I used to decorate my little chocolate forest:
  • Square Pans - two 4x4x4
  • Fondant - to cover cake
  • Modelling Chocolate - white and dark
  • Sugar Flair - yellow, green, violet, orange
  • Americolor - avocado
  • Veiner - for leaf detail
  • Scriber - to create bark texture on the trees
  • Wilton Mold - birds and blossoms
  • Xacto Knife - to carve tree and leaf shapes
  • Fondant Smoother - I love these new edgers!
  • Cake Board
  • Paint Brush
For the cake, I used the same recipe used for the Chocolate Espresso Cake. It's a fairly dense cake, so will stack well without compromising moisture and taste. Really, I just needed another excuse to make it.
Instead of buttercream, I used chocolate ganache under the fondant. Not only does it taste better, in my opinion, it allows for sharper edges - still not as sharp as I would like, but that takes practice. I came across this trio of videos from Inspired by Michelle some time ago and finally got around to trying it. Her cakes are just stunning. I'm a convert.
Ganache is basically two ingredients - chocolate and cream - YUM!
For dark chocolate - 2 parts dark chocolate to 1 part cream.
For white chocolate - 3 parts chocolate to 1 part cream. The cream should be heavy, I used 35%.
Hope the videos will inspired you to give ganache a go for your next cake.
It's always great hearing from you - feel free to leave a comment or question below.
Visit me on Facebook for additional photos.


Lavender Rose French Macarons - I Sugar Coat It

April 2012 By i sugar coat it! 14 Comments

Lavender Rose French Macarons

Lavender Rose French Macarons - I Sugar Coat It

Lavender Rose French Macarons

FEET! FEET! They've got FEET!! I burst into the quiet, little room reserved for yoga, meditation and nothing louder than the all encompassing Ohmmmmmmmm. My screams pierced the silence, almost knocking the Dude over from his Sirshasan (head stand). THEY HAVE FEET!!!
Once right-side-up, he reluctantly climbed the stairs and followed me to the kitchen. We peered through the oven window, and in that moment of silence I felt a foot feetish take form.
Lavender Rose French Macarons - I Sugar Coat It
If you have been following me long enough to remember these, then my reaction to this success should come as no surprise. Although I tried to make the best of my first attempt, I was terribly disappointed. I followed the steps to the letter and failed.
Lavender Rose French Macarons - I Sugar Coat It
The experience reminded me of my first Orchid plant. The Dude gifted me beautiful Phalaenopsis in the early days of our relationship - a gift leading to a long-lasting obsession with orchids. They were so stunning, I did not want them to meet the same end as most plants left in my care.
Instead of simply enjoying the plant, its beauty and the meaning behind the gift, I focused solely on keeping them alive - how much water, when to water, temperature, lighting, nutrients. They died within ten days. I learned my lesson and have had great success with orchids since. I basically just let them be, and they thrive.
Lavender Rose French Macarons - I Sugar Coat It
Macaron Pops
In my second attempt at macarons, I decided to take the same approach. I didn't over-think, didn't age the eggs, didn't let the macarons rest for extended periods, I made my own almond flour and didn't over-sift, didn't open the oven door after five minutes. I'd become so overwhelmed by the many conflicting advice/tips that exist on the web the first time around, I decided to bypass them this try. Two things I did that I felt may have contributed to the outcome - I became fully acquainted with my oven and I invested in an oven thermometer. No-brainer for some, but light bulb moments for me.
I have a gas oven, but only just learned about its convection feature, and finally put it to use. I baked three batches and there was not a single crack. Oh, and I baked them all at once, another no-no, apparently.
I may have just gotten lucky, but I don't believe in luck. I'd like to say it's all skill, but that would be a lie. I am told these little wonders are hit-and-miss.  Perhaps the universe felt I deserved this one after such a horrible first attempt. Yeah, I'll go with that!
Lavender Rose French Macarons

If you have not yet tried a Macaron, I urge you to. They are widely available, heck, you can even find them at McDonald's McCafés in France.

I used the recipe from my previous attempt, but coloured them purple (5 drops of Americolor Regal Purple). They turned out a beautiful, soft, vintage purple. The baked shells turned out lighter than the batter, something to keep in mind if you are trying to achieve a specific colour.

Once they were completely cooled, I dry-dusted the shells with edible luster dust in Violet. This didn't change the shell colour, but provided a satiny sheen that photographs nicely.

I whipped up some Lavender Rose Buttercream to create the centers of this delicate cookies. Some of them were treated with a little Ultra Violet bling from the India Tree line of sparkling sugars. They come in the most striking colours and are all natural.

Lavender Rose French Macarons

I have been trying out my new Nikon Macro lens, an early birthday gift from the Dude. I shot the photos for this and my last post using the macro lens - explains all the close-ups. LOL I have always been interested in photography, but only tackled food as a subject when I started blogging. I see improvement - even had a few shots accepted on foodgawker, still, I have a great deal to learn and improve.

Mac Attack:
Orange Blossom French Chantilly Macarons
Matcha Mojito Macarons

I would love to hear from you, leave a comment below and feel free to share the sweets!
I-Sugar-Coat-It-Blog-Signature-Green


  • « Go to Previous Page
  • Page 1
  • Interim pages omitted …
  • Page 48
  • Page 49
  • Page 50
  • Page 51
  • Go to Next Page »

Primary Sidebar

Never Miss A Happy Ending...

Previous Sweetness...

Search

Filter by Category

Filter by Date

SWEETEN YOUR INBOX!

All Content Including Images Copyright Jacqueline | I Sugar Coat It© 2026