• Skip to primary navigation
  • Skip to main content
  • Skip to primary sidebar
  • Home
  • About
    • About I Sugar Coat It
    • Features & Press
    • Copyright
    • Disclosure
    • Privacy Policy
  • Recipes
  • How-To
  • Contact
  • sous vide sista

I Sugar Coat It

Home

All Posts

October 2012 By i sugar coat it! 10 Comments

Cool Tools Thursday - Agbay Leveler

Butter Pecan Cake

Welcome to my first instalment of Cool Tools Thursday!! Since I started on this sweet journey, I have amassed a number of tools of the trade - some necessary, some not so, and others I certainly could have done without.

Once each month on Thursday, I will share with you one or more of the above and some money-saving alternatives. Heck, maybe even a giveaway or two!Let me start this series off by levelling with you...

Meet the Agbay Jr. Double Blade, one sibling up from the baby of the family of levelers.
This baby slices through cakes like a hot knife through butter - effortlessly. With perfomance like that, you will quickly learn that the blades are super SHARP.

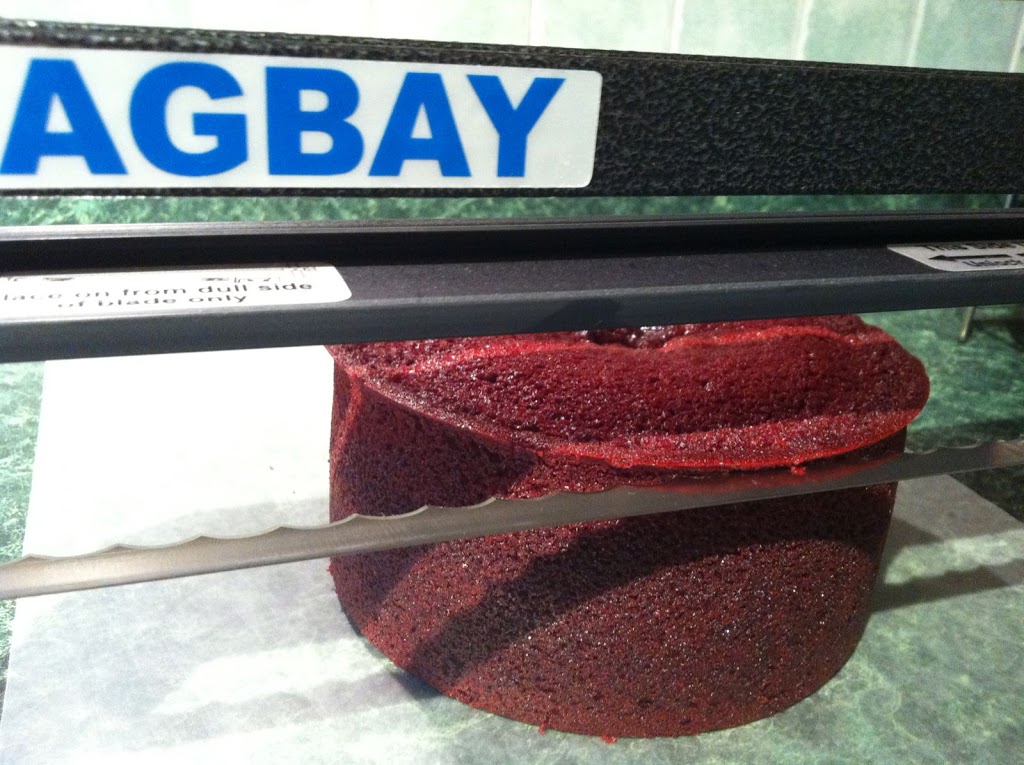
When I bought it back in October of 2011, I was a novice in this sweets arena, with only a few cakes in my repertoire. Still, I was getting very annoyed with the flimsy wire cutter I owned and I wasted a lot of cake using a serrated knife - I am just not skilled that way I suppose. So after coming across this product online, I sent an email to the address provided and within a matter of minutes, Maureen, the creator of this product, responded.

She was was very helpful and pointed me in the direction of Chrissie at Icing Inspirations, located in Kitchener. The rest is history. 

As previously noted, the blades are extremely sharp. It is important that you cut in a direction away from you, with fingers out of the path of the blade and that you use the protective covers on the blade(s) when not in use.

It's a great tool, in my opinion - well constructed, lightweight, but sturdy and easy to use. Although I have not had to replace any parts, I did notice that they can run a little pricey - that would be my only concern.

The initial cost may also seem a little outrageous, but once you use it, you will find that it is well worth it. However, here is a list of some less expensive alternatives:

  • Ultimate Cake Leveler
  • Cake Slicer Deluxe
  • Multi-Layer Cake Slicing Kit
Of course you can use baking strips to help your cakes bake leveled, or if you are blessed with a level-eye, a large serrated knife will do the job!
Here's how the Agbay works:

The cakes in this video look pretty dense - I have used it on cakes less dense and it works just a beautifully.

So... What do you think about the Agbay Leveler?


It should be noted that I am not being compensated for any of the items I feature in these posts. This is simply me sharing items I enjoy. If at any point I am in a position where I am being compensated, I will certainly make that transparent.
Think Pink! Breast Cancer Awareness Month Ribbon Cake

October 2012 By i sugar coat it! 12 Comments

Think Pink! Breast Cancer Awareness Month

 Think Pink! Breast Cancer Awareness Month Ribbon Cake
One in 9 women is expected to develop breast cancer during her lifetime and one in 29 will die of it.
Breast cancer is the most common cancer among Canadian women (excluding non-melanoma skin cancer).
In 2012:
  • An estimated 22,700 women will be diagnosed with breast cancer and 5,100 will die of it.
  • An estimated 200 men will be diagnosed with breast cancer and 55 will die of it.
  • On average, 62 Canadian women will be diagnosed with breast cancer every day.
  • On average, 14 Canadian women will die of breast cancer every day.
Source: Canadian Cancer Society

Last year, as one of the 365 baker/bloggers committed to baking a difference through the Frosting for the Cause project (spearheaded by the lovely Paula, the Vanilla Bean Baker), I paid tribute to Catherine the Great, my great-grand mother, who lost her battle to breast cancer while only in her fifties.

Think Pink! Breast Cancer Awareness Month Ribbon Cake
Each day I live and breathe, I realize how fortunate the women in my family and myself have been to have not had to deal with this disease again. So many of our friends and colleagues have either fought their personal battle, or are supporting a loved one through their battle.

The statistics are frightening. I can remember sitting through one of our Lunch & Learn sessions at work a few years ago where the guest speaker was a geneticist from one of our client organizations - a cancer research agency. The session was very informative and engaging, but this one statistic at the time struck me and has stuck with me - 1 in every 10 of us in the room will be diagnosed with cancer at some point in our lives. I remember surveying the room and counting off the faces ten at a time, not wanting to include myself in the count.

Think Pink! Breast Cancer Awareness Month Ribbon Cake
The ribbons on this cake represent a fraction of the countless women who have had to deal with this disease - some fortunate to live to tell, others who continue in their battle and those who are now with us only in spirit.

A group of us girls who have a shared passion for the written word, came together today, not for the usual dissection of books we've recently read, but in remembrance and celebration of these women for Think Pink! Breast Cancer Awareness Month.

Think Pink! Breast Cancer Awareness Month Ribbon Cake
For the occasion, I baked a few goodies and in the process set up my very first sweet table, which included:
  • Vanilla Bean Cookies
  • Chocolate Vanilla Cookies
  • Brownie Bowls
  • Funfetti Vanilla Cake filled with Whipped Vanilla Bean Buttercream, masked with White Chocolate Ganache and decorated with White Chocolate Fondant and Chocolate Transfer.
  • Double Chocolate Cupcakes with Whipped Vanilla Bean Buttercream
  • Funfetti Cake Pops
There were also lots of great food and drinks provided by others in the group.
Think Pink! Breast Cancer Awareness Month Ribbon Cake
 The mini chalkboards are bargain bin finds from my local craft store a few months back. The cookie envelopes were also purchased from my local craft store and the cupcake boxes were purchased from Creative Bag - I added the cancer awareness wrappers around the lids.
The signage are all free printables from Frog Prince Paperie - just download, print, cut and assemble. I used toothpicks and a little royal icing to make the cupcake toppers.
Think Pink! Breast Cancer Awareness Month Ribbon Cake
The afternoon was a success, at least in my opinion, we raised $2500 between us and it will all go to a charity of our collective choosing.

Although no cure currently exists for breast cancer, you can give yourself a fighting chance of beating the disease, with early detection in five simple steps. Make it a part of your daily or weekly routine - before you get out of bed in the morning, or when you go to bed at night, in the shower, or in front of a mirror. Where ever you choose to, just do it and remember to go for your annual checkup with your family doctor.

In the meantime, let me help you become more acquainted with your breasts.

Source: Canadian Cancer Society

For more information, visit the Canadian Cancer Society.

Until next time, Think Pink, Hope, Cure, Live!

October 2012 By i sugar coat it! 6 Comments

Giving Thanks & Getting Older

To educate yourself for the feeling of gratitude means to take nothing for granted, but to always seek out and value the kind that will stand behind the action. Nothing that is done for you is a matter of course. Everything originates in a will for the good, which is directed at you. Train yourself never to put off the word or action for the expression of gratitude.
Albert Schweitzer
On Sunday we got together gave thanks and then we had cake - Birthday Cake!
One of my nieces is celebrating her birthday next week, and since I won't see her again until Christmas, we decided to surprise her and celebrate a little early. Hence, this cake and not the regular Thanksgiving fare one might expect to see on this particular day.
Yes, this cake... Where do I begin? I had such big plans for this cake and I let myself down in ways impossible to convey without reclining face up on the leather couch. Ok, slightly exaggerated, but I was quite disappointed with the end result.
I recently purchased an airbrush for cake decorating and had hoped to produce works the likes of Rembrandt and Picasso only after a couple tries - you see where this is going, right?
The base tier, 10" of airbrushed gold, was easy enough. Fill and mask. Check. Cover with white chocolate fondant. Check. Airbrush the fondant with a gold shimmer. Check. Airbrush the stencil pattern onto the gold fondant with a mix of gold and purple. Check. Rest...
Tier two... fill, stack, chop, chop, simmer, stir, melt, refrigerate, bring to room temperature, microwave, stir, mask, level, smooth, leave to dry overnight, colour and roll fondant, brush to dampen, cover with fondant, smooth, sharpen, bubble pop, smooth, sharpen, smooth, smoo... You get the picture? If not, see below.
Ahhh, my canvas! Not exactly the purple for which I aimed, but after countless drops of black and violet gel food colour I abandoned aubergine for fear of an unpalatable end. I won't be working with purple again for some time. As the colour choice for a number my recent cakes, I fear I have misled you into thinking it is my favourite colour. It isn't. It is, however, my niece's.
My niece is somewhat of a budding artist. My sister sent me some of her sketches and I got the idea to incorporate one into my cake plans. Oh, how I would wield that airbrush and create a work of wonder to wow the birthday girl. I wielded and wielded and it all left me wondering. Why the %#&* isn't this working? WHY? After countless pieces of cardboards and practice fondant, I came to a full understanding of why Van Gogh cut off his ear.
 
Plan B! Return the airbrush, it's clearly the problem. 😉 Nah, the real Plan B involved some serious manual labour; you know, the type that involves modelling chocolate, a scalpel, bone tool and gum glue. You may remember my 100 Days Cupcake toppers - a real pain in the behind when you have to do more than five. After five the expletives tend to flow freely. I was down to the wire on this cake and I only needed to make one, so I put those curse words on pause for the moment.
It was all going so very well until I felt I had something to prove - a bone to pick with the almighty airbrush. The silver pistol that needed to be pushed, pulled and toggled just so, in order to produce thin, clean lines. I don't respond well to high maintenance. Can you tell it's now personal? Guess who won?

 
Clearly, it wasn't me. 🙁 I had a perfectly carved and painted image and I screwed it up by trying to prove something to a machine. Time to grow up and get on with it. In the end, I had to quickly pull together the image that appears on the cake. Cut and paste modelling chocolate, with really bad skin tone strokes, a dilapidated nose and missing eyebrows or lashes. Doesn't look much like my niece's artwork, but the chocolate cake on the inside made up for my failed exterior.
 
From my Intsagram feed.
In one of my niece's drawings, the girl in the image wore a red rose in her hair. I went with pink, a nod to Cancer Awareness Month and instead of painting it on, opted to make an over-sized version for more of a 3D effect. This was my first rose and although it took extremely long to dry for some strange reason, I rather like the way it turned out.
So, Shay will be a year older in a few days and I feel like I have aged 5 years battling with the airbrush. In the end, it's all about spending quality, fun time with the people who matter, oh, and when it comes to cake, taste - it's all about taste. And on last count the ayes had it on both fronts.
Hope those of you who celebrated Thanksgiving had a wonderful time. Even when we have litte, we have so much for which to be thankful. My sincerest thanks to you, for staying the course with me.
 
Don't forget, October is Breast Cancer Awareness Month. Think Pink!
salted caramel creme brulee recipe

October 2012 By i sugar coat it! 8 Comments

Salted Caramel Crème Brûlée: Eat Your Tea Tuesday!

Salted Caramel Crème Brûlée: Eat Your Tea Tuesday!
"Salted Caramel - A rich, black tea, strewn with with English toffee, coconut, caramel and a touch of French sea salt. Guaranteed to seduce your taste buds!"

That's what the package says and that is exactly what it does - as a tea and when infused into Crème Brûlée.

Salted Caramel Tea From DavidsTEA for Eat Your Tea Tuesday!
Salted Caramel Black Tea
Welcome to the second instalment of Eat Your Tea Tuesday! You may remember my first instalment, Matcha Cheesecake. At the time of that post, I had no idea I would make this a feature post. But I really enjoyed the end result and wanted to try other flavoured teas in desserts. So, with a desire to experiment, this monthly feature was born.
Salted Caramel Crème Brûlée: Eat Your Tea Tuesday!
Tea has been a constant in my life. When I was a wee little thing I needed only go as far as my grandparents backyard to find a variety of cures for all that ailed - nature's pharmacy. Lemongrass, bitterbush, sarsaparilla, and some others that escape me at the moment - all in arm's reach.

I especially love lemongrass, hot or cold, and have used it in my cooking - when I am able to find it. Not sure how that might translate in a dessert, but I will most certainly try it sometime.

I made lavender crème brûlée a couple weeks ago and boy was it good, so I thought I would also try it with a black tea I recently started enjoying - Salted Caramel from DAVIDsTEA.

Salted Caramel Crème Brûlée: Eat Your Tea Tuesday!

Crème brûlée is rather easy to make and can be made ahead and stored in the fridge, which is exactly what I did. To infuse the cream, I added the tea leaves to the cream and stored in the refrigerator in a covered container for a day. When I was ready to make the crème brûlée, I brought the mixture to a light simmer, so that the tea flavour would be more pronounced. I was concerned that the tea would darken the cream, but I did not have that issue. Once removed from the heat, I poured the infused mixture through a strainer and left it to cool down while I prepared the rest of the recipe.

Salted Caramel Crème Brûlée: Eat Your Tea Tuesday!
Excuse the bad lighting, I made this late Friday night.

Before enjoying these little custard treats, sprinkle the top with sugar and use a kitchen torch to caramelize the sugar, which adds an attractive caramel colour to an otherwise bland-looking dessert. My aim was to use bits of English toffee instead of sugar in this step, but I did not have any on hand. I would have then garnished with bits of coarse salt. Instead, I used some multi-coloured, shredded coconut that was left over from another project (I removed my coconut before digging in).


We used a torch in the video above, as we just happend to have one - a housewarming gift that has only been used twice prior, once more than the slow-cooker. In the absence of a torch, the same effect can be achieved by placing the crème brûlées just below the broiler for 3-5 minutes or until sugar bubbles and turns golden brown.

A Word of Caution: It is never a good idea to handle open flame with one hand while trying to shoot a video with the other - NEVER!! After a few tries and a couple close mishaps, I thought I would wait until K was back to assist. He burned two of the custards, but we spared the house.

I was quite pleased with the way this Salted Caramel Crème Brûlée turned out. The tea flavour was strong enough that it was noticeable, but not overpowering. I would have liked it a little more pronounced, but I like my tea quite strong.

I hope that you have enjoyed this instalment of Eat Your Tea! I'll be featuring a tea-infused recipe on the first Tuesday of each month going forward.

 
Print Recipe

Salted Caramel Crème Brûlée

A black tea blend of English toffee, coconut, caramel and French sea salt infused in a traditional custard.
Prep Time20 minutes mins
Cook Time1 hour hr 30 minutes mins
Total Time1 hour hr 50 minutes mins
Course: Dessert
Servings: 4 servings
Author: I Sugar Coat It

Ingredients

  • 2 cups heavy cream I use 35%
  • 2 tablespoon Salted Caramel black tea I used DAVIDsTEA
  • 4 egg yolks
  • ½ cup granulated sugar divided
  • 2-3 cups water for water bath

Instructions

  • Add cream and tea leaves in a container with a lid and store in the refrigerator for at 24 hours.
  • Preheat oven to 325ºF.
  • Pour the infused mixture in a heavy saucepan and bring to a light simmer over medium heat. Remove from heat and strain to remove tea leaves.
  • Whisk together the egg yolks and the sugar, less 4 tsps, until light and creamy.
  • Add the strained cream to the egg mixture, blending well. Pour the mixture into crème brûlée cups.
  • Add the water to a small saucepan and bring to a light simmer. Pour the hot water into the baking pan until it reaches halfway up the sides of the cups.
  • Place in the oven and bake for 45-50 minutes or until edges appear set. Turn off the oven and let the custard remain in the oven for another 30 minutes, or until center of the custard is almost set.
  • Remove from oven and leave in the water bath until cooled. Once cooled, cover the surface of each crème brûlée with plastic wrap - this helps prevent a skin from forming.
  • Pour out the water bath and refrigerate the custards for at least 3 hours. I refrigerated mine for 24 hours before torching them.
  • When ready to serve, sprinkle a little of the remaining sugar over the tops of each crème brûlée and use a small hand-held torch to caramelize the sugar.
  • For best results, hold the torch a few inches (about 4-5) away from the sugar, and move the flame around slowly and evenly until desired colour is reached. Cups will be hot, so be careful.
  • Garnish and enjoy!
 I-Sugar-Coat-It-Blog-Signature-Green
 

September 2012 By i sugar coat it! 6 Comments

BAKED: A Visit To The Canada Baking & Sweets Show

BAKED: A Visit To The Canada Baking & Sweets Show
Clear orders were stamped in bold, red, upper-case letters on my wrist. But at what temperature and for how long I wondered?

It's Sunday, I am exhausted. K and I spent two hours at the grocery store (I wonder how many relationships end as a result of grocery shopping...). Last night we pulled an all-nighter at Nuit Blanche (a little disappointing this year if you ask me). I spent four hours at a pastry arts course prior to that and another two hours trying to decide on a new car. I spent most of Friday at a work-related conference, trekked to the other end of the city for a medical appointment and then went to class (unrelated to baking) in the evening for 3.5 long hours.

So yeah, it's Sunday and I am exhausted, but I could not let the weekend end without a trip to the second annual Canada Baking & Sweets Show. I really enjoyed it last year, so I figured it could only get better.

It's 11:30 and with the back seat overcrowded with grocery, K dropped me off at the entrance to Hall 5. Two hours I tell him, ok, three the most! Or you can come in with me and I'll be less likely to stay longer... we both looked at each other and laughed. Ok, you're off the hook - and away he went to unload and put away groceries.

BAKED: A Visit To The Canada Baking & Sweets Show
I skipped through the entrance doors and up to the ticket counter. "Next!" Just as I was about to step forward to purchase a ticket, a voice asked if I would like a ticket. Well, of course I would like a ticket, it's precisely why I am lined up at the ticket counter! I turned to see a woman with a half-opened envelope and five tickets spilling out. Is she really scalping tickets, right in the line-up? I guess she read my mind, because before I could verbalize my thoughts, she said they were free.
The law-abiding side of my brain sent alarms ringing through my head at decibels only dogs should be able to hear. The frugal side of my brain set my hand in motion in a gesture of acceptance and instructed my mouth to do the same. Thank you!! OMG, are you sure? Oh, thank you!! The other four people in queue behind me, also took her up on her offer. Then we all looked at each other and had the same thought/question - what if they're fake? Thank goodness, they weren't!! I have the letters in ink on my body to prove it.
 
Gravity Feed Airbrush - BAKED: A Visit To The Canada Baking & Sweets Show
First stop, Flour Confections. I had been thinking about getting an entry-level airbrush and they just happened to have it on sale and no tax. Wrap it up! I also picked up some petal dusts, disco dusts and airbrush colours. Freebie - a 'Go Frost Yourself' tote bag. 🙂
Also picked up some molds from Icing Inspirations and met the man behind Marvelous Molds. A person could go broke on molds alone.
Strawberry Shortbread - BAKED: A Visit To The Canada Baking & Sweets Show
Next stop, the Sprucewood booth. I was not going to leave that hall without these cookies. I purchased four boxes last year and have been hooked since. This year, I picked up eight, so that I can spread the sweetness. My fave is Raspberry, but I also really like Maple and Spicy Thai, oh, and Irish Cream - so I got them all.
 
Next up, DAVIDsTEA! These three lovely ladies were super sweet and so was the tea!
Oh, how I wish you could smell this tea. It contains chocolate - NO LIE!!
Next, over to my cookie crush - Marian of Sweetopia - for a little how-to session. Then to the Duff presentation (was not close enough to get a decent photo). The guy is hilarious, though.
 
 
Now it's off to be awed by the amazing creations of some very talented cake artists. Here are just a few...
 
There were so many amazingly, intricate designs on some of the cakes, a photo taken with my iPhone did not do them justice.
 
 
This would have been a cool ride home, but K showed up before I had the opportunity to find out. Hmm, I wonder if I could arrange to make this my next car... Saturday's search did not yield any results.
 
 
Time to head home. Five hours and 20°C later, I was BAKED!

Ruffled Rose Lavender Cupcakes

September 2012 By i sugar coat it! 12 Comments

Ruffled Rose Lavender Cupcakes

Ruffled Rose Lavender Cupcakes are light and fragrant lavender-infused cupcakes topped with feminine ruffles made from modelling chocolate.
Last week I tried to light up a friend's birthday with a lamp made from chocolate and quickly learned that I am no electrician.So what do you do with a chocolate lamp that does not produce any light? You ingest it!

The cake was a mere six inches, so I also made a dozen (plus two) cupcakes, so that there would be plenty to feed the masses. Also, to appease that rare breed with an aversion to chocolate. C'mon really? (Let it be known that I have no association with that breed). In any case, they were treated to Lavender Cupcakes.
Ruffled Rose Lavender Cupcakes are light and fragrant lavender-infused cupcakes topped with feminine ruffles made from modelling chocolate.
Why the 'plus two', you ask? Well, I have learned that there is nothing worse for a food blogger than not having a decent photo of your work to share with readers. So going forward I'll try to make extras where feasible for this purpose. Knowing that I would not be able to attend my friend's birthday shindig, I kept two of these babies as insurance. (btw - still waiting for photos of the cut cake...)

Ruffled Rose Lavender Cupcakes are light and fragrant lavender-infused cupcakes topped with feminine ruffles made from modelling chocolate.

I didn't include these cupcakes in my last post, as I felt they deserved a post all their own. They are really tasty and so easy to make. If you like lavender, this will become a go-to treat. Not only do I now have another favourite sweet, I also have a new drink. I added a couple tablespoons to a cup of soymilk, steamed and enjoyed - perfect evening snack.

To give the cupcakes a subtle lavender flavour, infuse the milk called for in the recipe with dried lavender flowers for a few hours. For a stronger hit of lavender, let the milk mixture sit in the refrigerator overnight, or warm the milk. If warming, let cool completely before adding to other ingredients.

Ruffled Rose Lavender Cupcakes are light and fragrant lavender-infused cupcakes topped with feminine ruffles made from modelling chocolate.

I love the soft, sweet aroma of lavender - it translates well in baking and cooking. I have used it before in baking, but as honey - remember my Gastro-entomology experiment? I also love to use the infused honey in herbal teas.

Ruffled Rose Lavender Cupcakes are light and fragrant lavender-infused cupcakes topped with feminine ruffles made from modelling chocolate.

Keeping with the theme of the cake, I topped these light lavenderlicious beauties off with ruffled roses. Saw them over at Jessicakes and fell head-over-heels. Actually, all her cakes have that effect.

These were super easy to make, yet they provided such impact. Colour some modelling chocolate, roll out and cut disks in desired sizes, fold in halves twice, let set and apply to cake with melted chocolate. How easy was that!!

Ruffled Rose Lavender Cupcakes are light and fragrant lavender-infused cupcakes topped with feminine ruffles made from modelling chocolate.


Ruffled Rose Lavender Cupcakes
Print Recipe

Ruffled Rose Lavender Cupcakes

Light and fragrant lavender-infused cupcakes topped with feminine ruffles made from modelling chocolate.
Prep Time10 minutes mins
Cook Time20 minutes mins
Total Time30 minutes mins
Course: Dessert
Cuisine: Cake
Servings: 12 cupcakes
Author: i sugar coat it!

Ingredients

  • 120 millilitres milk
  • 3 tablespoons dried lavender flowers
  • 120 grams all-purpose flour
  • 140 grams sugar
  • 1½ teaspoons baking powder
  • 40 grams unsalted butter at room temperature
  • 1 egg

Instructions

  • Place the milk and dried lavender flowers in a container with a lid, cover and store in the refrigerate overnight.
  • Preheat the oven to 325°F.
  • Place the flour, sugar, baking powder and butter in a stand mixer fitted with with the paddle attachment. Beat on slow speed until you get a grainy/sandy consistency and everything is combined.
  • Strain the lavender-infused milk and discard the lavender flowers. Slowly pour the lavender-infused milk into the flour mixture, beating well until all the ingredients are combined.
  • Add the egg and beat well (scrape any unmixed ingredients from the side of the bowl with a rubber spatula).
  • Line twelve muffin wells with paper liners. Using a medium ice-cream scooper, fill each liner to two-thirds with batter. Bake for 20 to 25 minutes, or until a skewer inserted in the centre comes out clean.
  • Leave to cool in the tray. Decorate as above, or to your liking. Enjoy!

September 2012 By i sugar coat it! 9 Comments

Light It Up Chocolate Mud Cake

Light It Up Chocolate Mud Cake - I Sugar Coat it!
It's adorned with ruffles and crystal, fits perfectly on my hallway table, shimmers in the light and is mostly edible. I may have found the perfect lamp!

The moment I saw this lamp months ago, I knew that I would be making a couple for my home, and that eventually it would become a cake. Eventually came this week, in the form of a friend's birthday, whose passion for interior design makes her the perfect candidate.

When, over drinks last week, she requested I make her a cake, I whipped out my iPad and showed her the photo of the lamp. The deal was sealed with a stifled shriek.

Light It Up Chocolate Mud Cake - I Sugar Coat it!

The cake, as shown here, isn't exactly as I imagined, however. I could not quite figure out how I would defy the laws of physics with carved cake as the base, so I decided to use an inverted crystal cake stand instead.

I also decided to tame my ambitions and went with 6", instead of 9" cakes - and am I ever happy I did. The cake, after all the ruffles were applied, weighed a tonne. There are matching cupcakes that I have saved for another post.

Light It Up Chocolate Mud Cake - I Sugar Coat it!

I created the ruffles by cutting strips of fondant slightly longer than the height of the cake and approximately 2" in width. I folded each lengthwise, brushed with water and applied to the fondant covered cake from top to bottom, ruching as I went. I then lightly dusted with edible shimmer.

Under all that fondant is a Chocolate Mud Cake with Lavender-infused Buttercream. I should have photos of the cut cake sometime next week, which I will share with you. Until then, here is a close-up of the ruffles. I am also sharing the recipes, should you care to try them.

Light It Up Chocolate Mud Cake - I Sugar Coat it!

Turns out I am not much of an electrician. The lamp didn't produce much light beyond the shimmer dust on the fondant, so we disposed of it the only way we knew how... YUMMM!

Print Recipe

Light It Up Chocolate Mud Cake with Lavender-Infused Buttercream

Prep Time20 minutes mins
Cook Time1 hour hr 30 minutes mins
Total Time1 hour hr 50 minutes mins
Course: Dessert
Author: I Sugar Coat It

Ingredients

Cake:

  • 7 oz dark chocolate chopped coarsely
  • 9 oz butter diced
  • 1 ¾ cups whole milk
  • 2 ¼ cups granulated sugar
  • 2 large eggs lightly beaten
  • 1 ¼ cups grams all-purpose flour
  • ¾ cup self-rising flour
  • ¾ cup dark cocoa powder

Frosting:

  • ½ cup unsalted Butter
  • ¼ cup water
  • 1 tablespoon . culinary lavender
  • ½ cup granulated sugar
  • 3-4 cups powdered sugar

Instructions

  • Preheat oven to 325 F.
  • Place sugar and milk in a saucepan and stir over low heat until the sugar is completely melted.
  • Remove from heat and add the butter and chocolate. Stir until butter and chocolate are melted. Set aside to cool completely.
  • Add the beaten eggs and sift in the dry ingredients. Whisk until smooth and without any lumps.
  • Pour the mixture into the prepared cake pans and bake for 1½ hours, or until an inserted skewer comes out clean.
  • Let the cake cool completely in the cake pan.

To make the frosting:

  • In a small saucepan, bring the water and granulated sugar to a light boil, then add the lavender leaves. Remove from heat, cover and set aside to cool.
  • In the bowl of an electric mixer, fitted with the flat beater attachment, whip butter on high until pale and fluffy. Add the lavender infused mixture and beat until fluffy. Add powdered sugar a little at a time, until the frosting is at the desired consistency.


Matcha Cheesecake

September 2012 By i sugar coat it! 20 Comments

Matcha Cheesecake

Deliciously light and airy, this nine-inch piece of Matcha Cheesecake heaven is the perfect, not-too-sweet, gloriously green treat to satisfy your dessert craving.
Deliciously light and airy, this Matcha Cheesecake is nine-inch piece of green heaven is the perfect, not-to-sweet treat to satisfy your dessert craving.
I must admit that cheesecake has never been high on my list of desserts. I like it, but I have not gone out of my way to make it and I usually bypass it on a menu.
This week-end, after making and taste-testing many slices, this cheesecake has got me singing a different tune. In fact, I am enjoying a slice as I prepare this post, so forgive the long pauses...
Deliciously light and airy, this Matcha Cheesecake is nine-inch piece of green heaven is the perfect, not-to-sweet treat to satisfy your dessert craving.

I am a tea connoisseur. OK... that may be a little overstated. I am a lover of tea, and I take every opportunity to try the many flavours that exist. I do have a few favourites and at the top of that list is Matcha. It helped me survive university, after all.

One might argue that it is a favourite because of the colour - valid argument - but, it also boasts a long list of health benefits (see here).

So with all those wonderful health benefits, I am guessing this would qualify as a healthy dessert. Right?

Deliciously light and airy, this Matcha Cheesecake is nine-inch piece of green heaven is the perfect, not-to-sweet treat to satisfy your dessert craving.

Well, let's pretend it is, because I have already had two slices and I see no sign of slowing down. I kid you not when I say it is GOOD! K has had three slices - he isn't huge on sweets and likes that it isn't very sweet, even with the oreo base.

This 9-inch piece of green heaven almost didn't make it onto the blog. Not because of taste, but aesthetics. Someone wasn't feeling well and fell asleep while this was in the oven. That someone is on medication that 'causes drowsiness' and warns not to 'operate machinery', which, I suppose includes an oven. 🙂

When I was finally jolted awake by the incessant beeping of the oven timer, the cake had already been in the oven five minutes longer than it should. Fortunately, my oven turns off with the timer and cools down fairly quickly, so I was able to salvage the cake.

Deliciously light and airy, this Matcha Cheesecake is nine-inch piece of green heaven is the perfect, not-to-sweet treat to satisfy your dessert craving.
Featured as Recipe of the Day on DAVIDsTEA.

However, the edges were visibly more tanned than is natural for a green cake. I was so disappointed and wanted to start over, but like I said earlier, I was in no shape to be baking in the first place, a second attempt was just not in the cards.

So once the cake had cooled and chilled, I undertook the tedious task of removing the caramel skin - all the while trying to stay awake and not completely ruin the edges. This is as good as I could get it; which, in the grand scheme of things isn't horrible.

To finish it off, I used a stencil and some Matcha powder to create this feather pattern. I don't think I've ever seen this done, so this may be a first for a cheesecake. 😉 Now cut and enjoy! Repeat as often as desired.

Deliciously light and airy, this Matcha Cheesecake is nine-inch piece of green heaven is the perfect, not-to-sweet treat to satisfy your dessert craving.
What's your hot beverage of choice and how would you use it in a dessert?
Matcha Cheesecake
Print Recipe

Matcha Cheesecake

Deliciously light and airy, this Matcha Cheesecake is nine-inch piece of green heaven is the perfect, not-to-sweet treat to satisfy your dessert craving.
Prep Time25 minutes mins
Cook Time1 hour hr 30 minutes mins
Total Time1 hour hr 55 minutes mins
Course: Dessert
Author: I Sugar Coat It

Ingredients

Crust:

  • 1½ cups Oreo crumbs
  • ½ cup melted butter

Cheesecake:

  • 3 tablespoon water
  • ½ cup sugar
  • 2 tablespoon Matcha tea powder
  • 2 - 250 g packages cream cheese room temperature
  • 1 teaspoon vanilla extract
  • 2½ tablespoon corn starch sifted
  • 2 large eggs lightly beaten
  • ⅓ cup whipping cream
  • ½ cup milk

Instructions

To make the crust:

  • Combine the Oreo crumbs with the melted butter and press into the bottom of a 7” or 9” spring-form pan. Bake at 325F for 5-7 minutes. Remove from oven and let cool before we pour in the cheesecake base.

For the cheesecake:

  • Combine water and ⅓ cup of sugar in a small saucepan and heat until the mixture is warm and the sugar has dissolved completely. Add the Matcha powder and mix well. Set aside.
  • Cut cream cheese into cubes and place in the mixing bowl of stand mixer. Attach the paddle attachment and set to low speed (#2 if using a Kitchen Aid). Add the remaining sugar and Matcha tea mixture to the cream cheese and blend until smooth, about 2 minutes.
  • Add the vanilla extract and sifted corn-starch. Lower speed to 1 and slowly add the eggs, beat until fully incorporated. Add the whipping cream and milk and mix until they are well combined.
  • Bake cheesecake at 325F for 45-55 mins, or until the edges are set. Turn oven off and, with oven door closed, allow the cheesecake to continue to cook for another 30 minutes. After 30 minutes, remove the cheesecake from the oven and let it cool completely.
  • Refrigerate for a few hours or overnight. Decorate to your liking, or enjoy as is!

Blue and Silver Quatrefoil Birthday Cake

September 2012 By i sugar coat it! 15 Comments

One Under My Belt! - A Year In Review.

Blue and Silver Quatrefoil Birthday Cake
Silver Quatrefoil pattern on blue fondant, with fondant plaque and pearls and gumpaste flower.

My first foray into cake decorating led me to a room at the back of my local Michael's store last Spring, accompanied by 11 other girls attempting to make magic with sugar and shortening. Day one of a four-week Wilton beginners course and there I sat with the Ultimate Decorating Set Tool Caddy, overkill for someone who knew nothing about cake decorating, or how long the excitement or interest would last.

African Violets and Buttercups Cake
My very first decorated cake - Wilton Cake Decorating 1


Well, here I am, evidence that the interest and excitement did not wane. In fact, one year later and it's developed into a full-blown passion. That first course was followed by two other Wilton courses. I then had the privilege of being a part of a test group, earlier this year, for the recently introduced Wilton Course 4: Advanced Gum Paste Flowers, complete with a swag bag that made all ten invited 'guinea pigs' swoon. Free course and tools - SWEET!!
It has taken some time, but it all seems to be coming together and I couldn't be more pleased. This blogging business is a great deal of work, but it has certainly awakened my creativity. I am a hobbyist baker/decorator - I don't charge for my goods - but, perhaps one day my abilities will match my imagination and I will make the switch. For now, I am enjoying the learning process and sating a few sweet-tooths along the way (you know who you are).

My first fondant cake. This was meant to look like a cake I saw in one of Peggy Porschen's books. I'd say I missed the mark - by a very long shot!

I've progressed from the two cakes shown above, my very first decorated cakes, to the cake at the top of this post, this, this and this! And even though I am called cookie by some in my family, I had never decorated a cookie before I started this blog. I could not have asked for a better start, as these cookies were for a great cause. They were followed by love and ruffles, baby bump and wedding favours. I also learned to make a special type of cookie and how to macronage - no, not macarena - in process. Macarons!!

Lavender Rose French Macarons
Second try at Macarons! I still remember the joy I experienced when I saw the feet begin to form...

I developed a green thumb, of the sweet variety, and grew some Anemone, Magnolias, and more recently, Poppies, and Ranunculuses. Oh, and I created some edible brooches, explored the topic of gastro-entomology in baking and produced a little girl along the way!

Fondant Figure Model
I have also experienced some failures along the way - a part of the learning process. My first try at the ruffled technique turned into a green mudslide. My first try at macarons produced a not-so-distant cousin. And what I thought would be a walk in the park, my cake pops, well, drooped more than they popped.

I have had a few accomplishments, as well. I was named Decorator of the Week over at CakesDecor.com and have had a number of my creations in the Daily Top 3. My Ruffles & Pearls mother's day cake made it into the Sweetopia's Sweet of the Month 4. And the Huffington Post Kitchen Daily included my Key Lime Mojito Mousse cake in their Key Lime Dessert line-up.

As I look back at my 52 posts, I realize how much I have improved and how many sweet memories I have created along the way. I truly enjoy the process of creating and sharing with you each week. I am always eager to learn and improve and so pleased you join me each week to show your support. I hope that you will continue along with me on this sweet journey, as we kick off year 2!

My first cake for my second blog year appears at the top of this post and in the following shots. It was made for a little girl who turned 12 and whose favourite colour happens to be blue. And in true me form, I could not decide which flower to use, so I shot the cake with a few that I made and lost a couple in the process. 🙁

Blue and Silver Quatrefoil Birthday Cake

I rather like the unexpected pop of orange. What's your favourite?

I hope you have enjoyed this post! To never miss a post, subscribe to my RSS feed, or through email. Hope to see you around these parts!


  • « Go to Previous Page
  • Page 1
  • Interim pages omitted …
  • Page 46
  • Page 47
  • Page 48
  • Page 49
  • Page 50
  • Page 51
  • Go to Next Page »

Primary Sidebar

Never Miss A Happy Ending...

Previous Sweetness...

Search

Filter by Category

Filter by Date

SWEETEN YOUR INBOX!

All Content Including Images Copyright Jacqueline | I Sugar Coat It© 2026