• Skip to primary navigation
  • Skip to main content
  • Skip to primary sidebar
  • Home
  • About
    • About I Sugar Coat It
    • Features & Press
    • Copyright
    • Disclosure
    • Privacy Policy
  • Recipes
  • How-To
  • Contact
  • sous vide sista

I Sugar Coat It

Home

All Posts

November 2012 By i sugar coat it! 7 Comments

Ruffled Crème de Cassis Swiss Meringue Buttercream

Ruffled Crème de Cassis Swiss Meringue Buttercream
So, I have been contemplating my next career move and its got me up all hours of the night strategizing, weighing options, taking inventory of my skills and experience, searching out networking opportunities, taking courses and showing up to the office tired as hell the next day, and the days after.

Tuesday night was taking the same course until I happened upon a mini bottle of Crème de Cassis de Dijon.

Ruffled Crème de Cassis Swiss Meringue Buttercream
The Dude does not drink at all. He gave that up when he gave up meat, among other things. Every so often I'll enjoy a glass of wine, or a girly drink when I am out with friends. Given most of my friends are male, it's always quite humorous when the drink orders are placed. Members of my family laugh at me, as I am known to get tipsy just by the smell of alcohol. So to get to the point - drinking isn't commonplace in our home, yet we find ourselves with a fully stocked bar. Although more recently, it has become home to a number of cake stands. But I digress...
Ruffled Crème de Cassis Swiss Meringue Buttercream
At 20 percent alcohol, I was  expecting the typical alcohol smell when I opened the bottle. Instead, my nose was treated to a subtle, fruity aroma. A small sip quickly removed any doubts about its alcohol content. Turns out this little bottle of fiery syrup:
  1. Is made from macerated real fruit, instead of flavourings.
  2. The 'Dijon' in the name means that the currants used to make the drink were grown only in Dijon, France.
  3. The currants used are picked at their peak and are immediately immersed in alcohol, where they macerate for 3 months.
  4. It is quite versatile and is enjoyed as an apèritif, in cocktails and in cooking. (Try kir - ¼ Dijon Cassis and ¾ dry white wine)
A little blurb at the back of the bottle reads: "Lejay liqueurs have been bringing out the spirit of fruit since 1841." Or, "Depuis 1841, Lejay vous revele l'Esprit de Fruit." Everything sounds better in French, don't you think?
Ruffled Crème de Cassis Swiss Meringue Buttercream

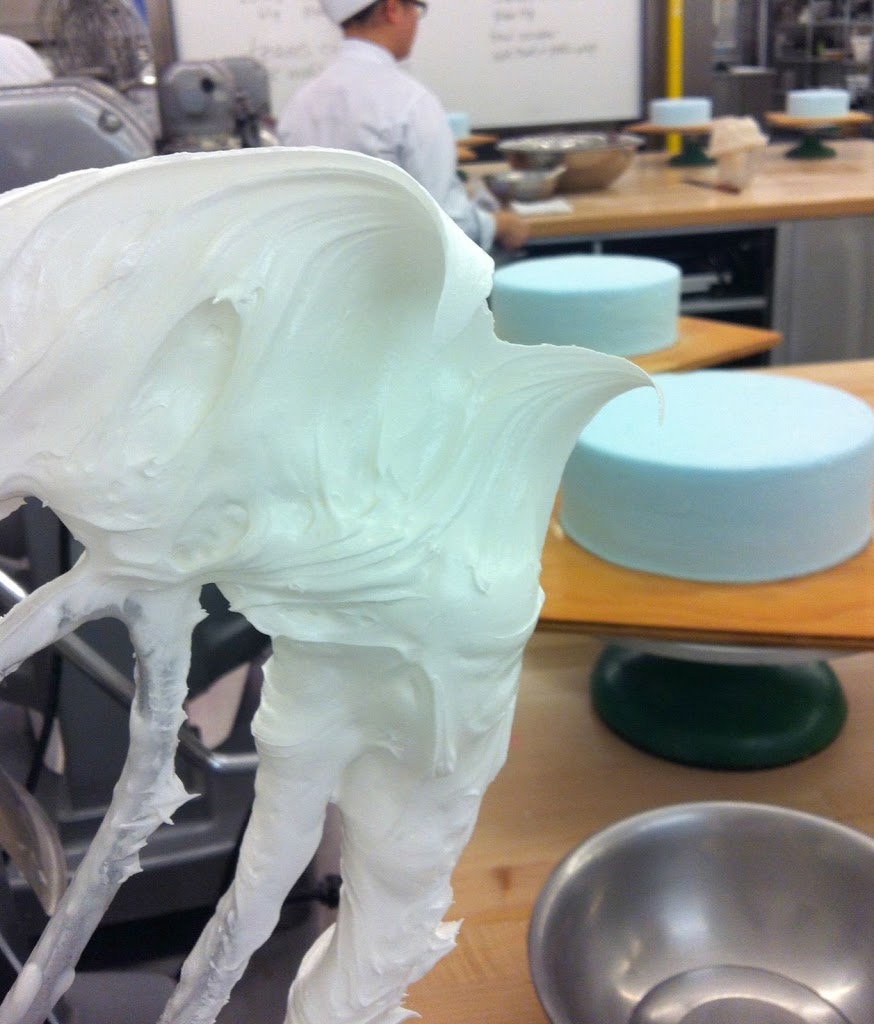
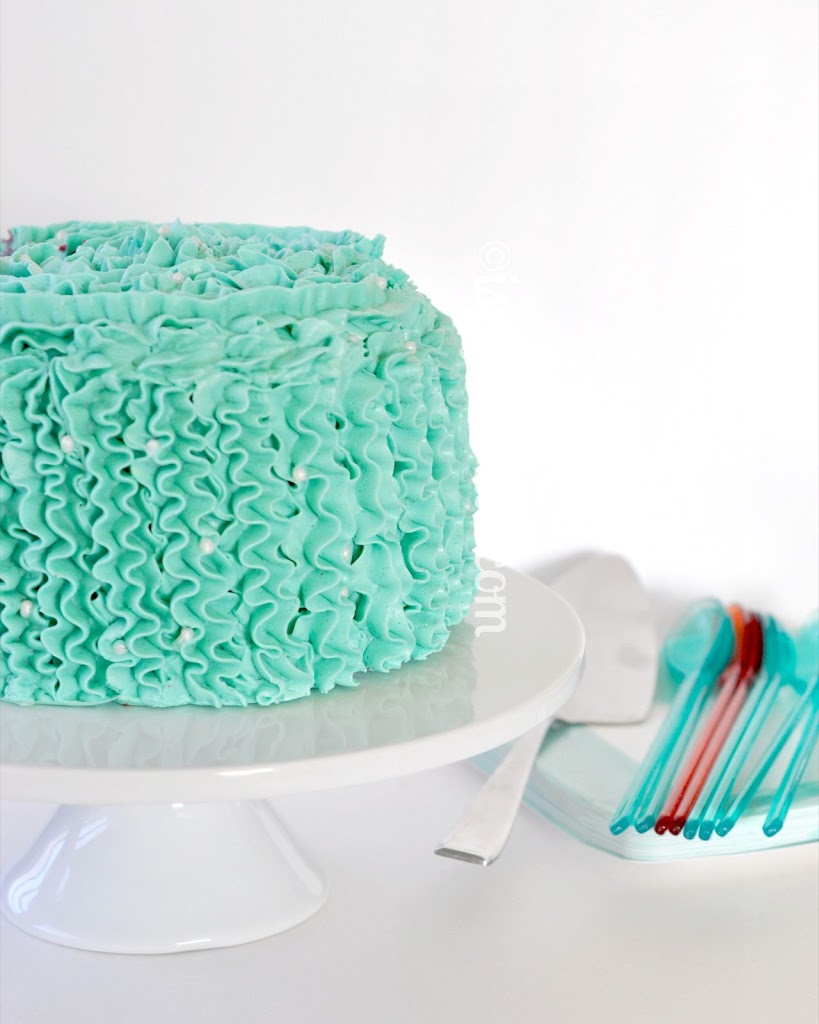
And since they have done such a great job of 'bringing out the spirit of the fruit', I thought I'd guide that spirit into a batch of Swiss Meringue Buttercream (SMBC). And man, was it ever a good call. Paired with a little crushed vanilla beans, it turned out AWESOME. I was not too fond of the colour, however. So, instead of going the obvious redish route, I opted for Americolor teal. I love how it plays against the Red Velvet and Vanilla cake layers.

Tuesday night was beginning to look up, so to top it off I thought I'd ruffle a few feathers, or SMBC, in this case. You may remember my Red Velvet Avocado Mudslide post from earlier this year - a failed attempt at ruffles. I didn't use SMBC then, and I think I now understand why things went south, literally.

This time I used SMBC and the 1M Wilton tip, I started at the base of the cake and made my way up the cake. I later realized that I tapered off too soon, causing the cake to look a little lopsided, when time came to decorate the top.


I have seen ruffles done in a number of ways and they all produce such lovely results. I rather like the technique, but it requires a great deal of buttercream. I actually thought I was going to come up short about three quarters of the way in. It all worked out in the end, and the cake was a hit.

I used a basic SMBC recipe found on Sweetapolita's post, Swiss Meringue Buttercream Demystified and I added crushed vanilla bean and Crème de Cassis de Dijon to create this little boozy number.

Print Recipe

Ruffled Crème de Cassis Swiss Meringue Buttercream

The light, airy, goodness of Swiss Meringue Buttercream, infused with a French blackcurrant liqueur, paired with moist, delicious layers of red velvet and vanilla cake.
Course: Dessert
Servings: 10 cups
Author: I Sugar Coat It

Ingredients

  • 300 g liquid egg whites
  • 500 g sugar
  • 680 g unsalted butter cut into cubes and cool
  • Tahitian crushed vanilla beans
  • pinch of salt
  • ⅓ cup Crème de Cassis de Dijon to flavour
  • 2-3 drops Americolor teal to colour

Instructions

  • Using a clean towel and some lemon juice or vinegar, clean your mixing bowl, whisk attachment to remove any traces of grease.
  • Fill a heavy duty pot about a quarter of the way with water and place on the stove over medium heat to simmer.
  • Add egg whites and sugar to the mixing bowl and place on top of the pot, ensuring the bottom of the bowl is not in contact with the water in the pot. Whisk the sugar egg white mixture constantly, but gently, until temperature reaches 160°F.
  • Once at the correct temperature, remove from heat and transfer mixing bowl to the stand mixer. With the whisk attachment, begin to whip the meringue until it is thick, glossy, and the bottom of the bowl is no longer warm to the touch. Do not begin adding butter while the bowl is still warm.
  • Switch from your whisk to paddle attachment and with mixer on low speed, add butter cubes, one at a time, until incorporated.  Continue to mix until it has reached a silky smooth texture.
  • Add vanilla, salt and crème de cassis, continuing to beat on low speed until well combined.
  • Add colour and beat until fully incorporated.


Cream Puffs and Eclairs {Baking Arts}

November 2012 By i sugar coat it! 12 Comments

Sweet Nothings: Cream Puffs & Eclairs

Cream Puffs and Eclairs {Baking Arts}
Come closer. Closer. Don't be shy.
Gently grab me between your fingers and draw me closer to your lips. Slowly.
Bite me. Go ahead, bite me. Again.
Let me fill your mouth with sweet nothings.
Cream Puffs and Eclairs {Baking Arts}
What you see is what you get with these little guys. Very little on the outside and even less on the inside. Have as many as you desire; no strings attached.
Well, maybe a few strings of chocolate and whipped cream if you're the type who eats these in two, instead of one bite. In which case, simply lick the remains away and carry on.
Cream Puffs and Eclairs {Baking Arts}
Is it just me, or is there something devilishly sexy about choux pastry? Is it it's light, airy, delicate, nothingness? Or that it's French? Oui! Oui! Oui! to all of the above.
I love the combination of flaky-meets-creamy-meets-bittersweet and how they come together to fill a void. I love that they are not too sweet, as we added very little sugar to the whipped cream filling and sugar did not make the ingredients list for the pastry.
So, it's probably accurate to say that one may eat as many as it takes to sate one's sweet-tooth and not worry about growth of the horizontal nature. Right? A resounding Yes! Glad we are in agreement.

Cream Puffs and Eclairs {Baking Arts}

And who could resist these edible water birds, with their long, elegant necks and whipped creamy feathers! No ugly ducklings to be found among the bunch. There is beauty even in the misshapen ones, and there were many of those.

Week 7. This is another first for me. I love me a good eclair, but like so many, have always been intimated about making them. I almost worked up the courage when my bloggy bud Paula from Vanilla Bean Baker quelled her fear and produced these prefect Cream Puffs. Check out her pictorial - there is a great shot of the inside of the pastry. That void just waiting to be filled. Mmm.
Much easier than I could have ever imagined. I'll definitely be making these again, with a savoury twist, perhaps!
Cream Puffs and Eclairs {Baking Arts}
Print Recipe

Cream Puffs & Eclairs

The perfect balance of flaky-meets-creamy-meets-bittersweet chocolate in one bite.
Course: Dessert
Servings: 40
Author: I Sugar Coat It

Ingredients

Choux Paste

  • 500 ml water
  • 250 g butter
  • 10 g salt
  • 370 g all-purpose flour
  • 12 eggs

Whipped Cream Filling

  • 2 L cream 35%
  • ½ c icing sugar or as needed
  • Chocolate Glaze
  • 150 g chocolate

Instructions

  • Melt butter completely in a saucepan over med-low heat.
  • Add salt and water and bring to a rolling boil.
  • Add flour and stir briskly until the paste (roux) has gelatinized and comes away clear from the sides of the saucepan.
  • Transfer dough to a mixing bowl and with the paddle attachment mix paste on low speed until it has cooled slightly.
  • Add eggs gradually, two at a time, mixing well until thoroughly incorporated between each addition. This will help prevent lumps.
  • When the consistency of the paste is similar to that of cake batter, transfer to a piping bag. Pipe logs (eclairs) and circles (puffs), about 2 inches apart, onto paper-lined baking sheets using a plain tip.
  • Bake at 400ºF for 30 minutes.

To make the filling:

  • With the whisk attachment, whip the cream until stiff peaks form, adding sugar to taste along the way.
  • Use a Bismarck pastry tip to fill the puffs and eclairs, or slice in half and pipe using an appropriately sized star tip.

To make glaze:

  • Add chocolate to a bowl and place over a pot with simmering water. Do not allow the bottom of the bowl to come into contact with the water in the pot. Stir the chocolate until melted and smooth.
  • Allow to cool a little then dip tops of pastry in chocolate and allow to dry.

November 2012 By i sugar coat it! 8 Comments

Hand Painted Chevron Birthday Cake

"Beautiful young people are accidents of nature, but beautiful old people are works of art." -- Eleanor Roosevelt


My friend's mom celebrated her 50th birthday on Sunday and in true C fashion, he left it until the very last possible moment to let me know he wants me to "whip something up" to surprise her. I told him flat out, 'NO'!

Can you tell that wasn't my final answer?

I am normally not easily persuaded - twist my arm until the bones crack and shatter and I generally won't budge.  Anyone who knows me well will attest to that. I was labeled stubborn and overly inquisitive as a child and those labels still stand today, albeit honed.

Um... sure... you say as you eye the cake on the screen. So now is a good time to make it clear that I was not persuaded - I simply changed my mind. If you knew his mom, you'd understand.

She is a super sweet, beautiful, fun-loving, 50 going on 35, uber-intelligent without being intimidating woman. She is classy, but down to earth and given more time I could have come up with something that more closely represented her.

Chevron cakes have been quite popular the last little while and they still seem to be of late. I made a chevron cake back in August using the fondant transfer technique from JessiCakes blog. It's a very effective technique and can be applied to a number of different applications. I also used her upside-down masking technique. SCARY!!
For my Hand Painted Chevron Birthday Cake, I decided to hand-paint the chevrons onto the cake using gel and powder food colours diluted in a little lemon extract. I thought the gold and purple would speak to her classy, regal look and the chevrons to her fun, easy-going personality. I was very foolish to think painting would take less time and effort than the above mentioned method. The colour separation was a little murky, so I decided to add strings of fondant made using an extruder, to cover up my mistakes and add some interest.
I was reminded I am not a natural painter. Heck, I could hardly stay inside the lines of my colouring book as a child. So why would I think that this would be any different! Rushing this at the last minute certainly did not help.
"And in the end, it's not the years in your life that count. It's the life in your years." – Abraham Lincoln

Mrs. M is a fellow chocolate fiend, so I used one of my favourite chocolate cake recipe for both tiers and filled each layer with an SMBC recipe I will share with you in a future post - it is to die for! I then masked the cakes in white chocolate ganache and fondant. The cake is a little wonky, my stencilling and piping were way off point, but my edges turned out not too shabby. I was happy to have a few minutes to take a couple photos of the completed cake to share with you.

Well, we shan't live in the past. I was told the cake was loved and enjoyed by the birthday girl and all in attendance on.

Now,  I have a confession to make. Ok, I didn't change my mind all on my own, I was a little persuaded by theatre tickets, a bottle of wine and a few other goodies and favours. Gosh, now I sound cheap and easy. Just forget everything I said above about not being easily persuaded. Clearly, I have proven otherwise by way of this post.

November 2012 By i sugar coat it! 10 Comments

I Sugar Coat It Sweet Rewards Program!


Hi All and Happy Friday!

Just a quick post to once again say thanks and to formally introduce a reward program some of you have already begun to enjoy. In fact, today saw the first prize of my program redeemed. 


Congratulations G. Pavao! You have earned 8500 loyalty points and have snagged yourself a $5 Starbucks eGift Card. Rewards are fulfilled by PunchTab, who will contact you directly to make arrangements.

You, my blog subscribers and Facebook fans, have grown over the last year - slowly, but steadily. I am extremely grateful that you reserve a little time from your busy schedules to drop by and sample my sweets and say hello. I appreciate your comments, emails, tweets, pins, likes and the many other ways you enjoy and share my sweets.


How does one show one's appreciation to a wonderful group of individuals one has never meet in person? (I know, that was one too many ones). A single thanks just seems insufficient. 

How about a perpetual THANK YOU by way of my Sweet Rewards Loyalty Program? My small way of continually thanking you, my sugar cubes. 🙂


Currently, the prizes offered through my Sweet Rewards Program are from PunchTab's default rewards catalogue and include exciting prizes like Amazon.com and Starbucks giftcards, to name a few - and to keep things exciting, catalogue prizes are rotated. 

At some point in the future, I hope to offer a more baking-related catalogue of prizes. In the meantime, join the other sugar cubes by clicking here to learn how to start earning your rewards.

November 2012 By i sugar coat it! 5 Comments

Caraway Cheddar Soft Rolls

Caraway Cheddar Soft Rolls
Don't you just love firsts? Whether good or bad, they tend to remain etched in your memory.
First car, driving solo, near miss, accident.
First date, relationship, kiss, heartbreak.
First house, mortgage, reno, sale.
First day of school, college, university, work.
First time rollerblading, ice skating, skiing, snowboarding.
First time canoeing, kayaking, waterskiing, whitewater rafting.
First time you worked up the nerve (or some might say abandoned common sense) to voluntarily jump 100 feet teethered only to a bungee cord.
Caraway Cheddar Soft Rolls
Oh, and let's not forget, first time making bread from scratch!!

I braided, twisted, rolled and sprinkled to create an assortment of breads. Not much of a feat to some, but a huge deal for me. But then, I get excited by the Sesame Street theme song. 🙂

So back to my bread, or as they're called in the course guide, Soft Rolls. And that they were - soft, fluffy, clouds of warm goodness begging to be slathered with butter.

Mise en place - Caraway Cheddar Soft Rolls
mise en place

This was my fist time working with fresh yeast. I have a huge sensitivity to smells and this stuff... well, let's say showing up for class on an empty stomach was not such a good idea on this particular day. Thank goodness for strong gag reflex. I kept my tea close at hand, or at nose in this case. Fortunately, I became so immersed in the process, it wasn't long before I was able to move past it.

Fresh yeast has a short shelf life (approx. 3 weeks), so it is not commonly stocked in regular grocery stores. Here's a tip I learned. Should a recipe call for fresh yeast and you can't get your hands on the stuff, no worries, dry yeast may be substituted as follows:
  • Active yeast is 2x stronger than fresh yeast, so use half as much as what the recipe calls for of the fresh yeast.
  • Instant yeast is 3x stronger than fresh yeast, so use one third as much as what the recipe calls for of the fresh yeast.
After a good whirl in the mixer, we found ourselves looking at a somewhat moist ball of dough, which was quickly removed and sandwiched between a sheet of plastic to rise - and boy did it ever! The plastic also helps to keep the gases from escaping too quickly and prevents the out layer of the dough from crusting prior to baking.
There is a real science to bread-making, and I think that is what makes it so appealing to me. The same could be said for baking in general, but the bread making process is quite foreign to me. The thrill of a first!
Most breads are typically made as follows:
  • the ingredients are scaled and weighed
  • the dough is mixed and kneaded, allowed to ferment, punched down, divided into portions
  • the portions are rounded and shaped
  • the shaped portions of dough are proofed
  • the portions are baked, cooled and stored
I'd switch that last bullet to bake and enjoy right away.
There are 12 steps to bread making and although each step isn't necessarily involved in each recipe, I find them quite fascinating and useful for a novice baker like myself. The Butcher, The Baker has a Bread Essentials post that details each step. Serious Eats also has great posts on bread making.
Caraway Cheddar Soft Rolls
This caraway seed and old cheddar covered piece of deliciousness above came about as a result of placing eight pieces of tightly rolled dough in a 7" round cake pan before baking. Brush with an egg wash, snip the tops with a pair of scissors, sprinkle some toppings of your choosing, and voila!, you have a center piece to complement steamy bowls of soups.
Caraway Cheddar Soft Rolls
Next up... Rustic Breads!
Print Recipe

Caraway Cheddar Soft Rolls

A light, fluffy, cloud of warm goodness topped with aromatic, flavourful caraway and sharp cheddar.
Course: Breakfast
Author: I Sugar Coat It

Ingredients

  • 750 ml water
  • 80 g fresh yeast
  • 1250 g all purpose or bread flour sifted
  • 60 g milk powder
  • 20 g salt
  • 60 ml oil
  • 3 eggs
  • Toppings cheddar optional, caraway seeds

Instructions

  • Prepare the ‘yeast slurry’ by pouring the water into the bowl of stand mixer and breaking the yeast into pieces so that it dissolves in the water.
  • Pour the sifted flour onto the yeast slurry.
  • Add the other ingredients, adding the salt last, so that it does not come into contact with the yeast before mixing.
  • Using the dough hook, mix the ingredients on slow to the ‘clean up’ stage - when all the dough is removed from the sides of the bowl and is clinging on the hook.
  • Transfer dough to floured surface. Round into a ball, cover and bench (allow to ferment) for 30 minutes. The dough will rise to about 2.5 times its original size.
  • Divide the dough into equal sizes, 36 large or 48 small rolls. Round-up each piece of dough so that the cut sides are not exposed and place on a floured surface, seam side down. Cover and allow to rest for a few minutes before shaping.
  • Shape into desired shapes and place on paper-lined baking sheets, top with egg wash and caraway seeds. Proof the dough for 20-30 minutes by covering with plastic and placing on a warm area. It’s ready to be baked when the dough springs back when lightly pushed with a finger.
  • Bake at 215ºC for about 20 minutes, or until golden brown and done. Add cheddar to tops halfway through baking

Chocolate Orange Coffee Bavarian Cream

November 2012 By i sugar coat it! 6 Comments

Chocolate Orange Coffee Bavarian Cream

Week 5 of Baking Arts saw us making cremes and creams - Crème Caramel and Bavarian Cream to be exact. 
Chocolate Orange Coffee Bavarian Cream
We started off with Creme Caramel. The process is somewhat similar to Creme Brûlée, so I was quite comfortable with this recipe.
 
Creme Caramel
Crème Caramel
 
 
Chef also taught us how to make sugar decorations (as shown at the bottom of the collage above), something I had not tried before. I love seeing the sugar transform through the various stages of heating - much like watching the leaves change colours in fall. I'll definitely play with sugar a little more and dedicate a future post to it.
 
Chocolate Orange Coffee Bavarian Cream
Bavarian Cream
 
While the Crème Caramel baked in a bain-marie (water bath), we prepared Bavarian Cream.
 
We were provided a number of flavour options - I chose a combination of chocolate, orange and coffee for my batch. If you ever try these, please DO try this flavour pairing - it is to die for. See recipe below.
Chocolate Orange Coffee Bavarian Cream
No baking is involved in making these decadent little treats - they set in the refrigerator. The demo batch that Chef made was in the freezer for a while and was slightly frozen by the time we sampled them. They were the consistency of a semifreddo. I quite enjoyed them that way.
 
 
If semifreddo isn't your scene, enjoy chilled and topped with fresh whipped cream. But hurry, they won't last long.
 
 
Chocolate Orange Coffee Bavarian Cream
Print Recipe

Chocolate Orange Coffee Bavarian Cream

Course: Dessert
Servings: 22
Author: I Sugar Coat It

Ingredients

  • 500 ml milk
  • 250 g sugar
  • 20 g gelatin
  • 200 g whole eggs 4
  • 2 g salt
  • 5 g vanilla extract
  • 500 g whipping cream
  • 20 g chocolate
  • 1 tablespoon each of
  • orange and coffee flavourings

Instructions

  • Place milk in a medium saucepan and heat to a temperature comfortable enough to dip your finger.
  • Remove from heat and sprinkle gelatin over top.
  • In a stainless steel mixing bowl, whisk together sugar, eggs and salt. Place in refrigerator to chill.
  • Pour the milk/gelatin mixture over the chocolate. DO NOT stir. Shake bowl to move mixture around to aid in the melting of the chocolate.
  • Add your flavourings and w
  • hisk mixture until smooth and combined and set in the refrigerator to chill.
  • Whisk whipping cream to a soft peak and set in refrigerator to chill.
  • Remove the milk mixture and the egg mixture from fridge and add milk mixture to egg mixture and combine well. Pour through a sieve.
  • Add whipped cream in thirds to chocolate mixture and fold gently to incorporate.
  • Pour into cups - the mixture should be thick, but still runny.
  • Refrigerate to set.
Spicy Pumpkin Bundt Cake

October 2012 By i sugar coat it! 8 Comments

Spicy Pumpkin Bundt Cake & Pecan Pumpkin Butter Frosting

Spicy Pumpkin Bundt Cake & Pecan Pumpkin Butter Frosting
A folklore tale states that if you care to encounter a witch, put your clothes on inside-out and walk backwards on Halloween night. Or... Just keep your clothes as they are and click below to see one now.
 Spicy Pumpkin Bundt Cake & Pecan Pumpkin Butter Frosting

Good, you made it, and without humiliation! Of course, if seeing a witch on halloween night is important to you, feel free to follow folklore, or just hop on over here again in a few days.

Truth be told, I am not a huge fan of halloween. I just don't get it! Yet, I love a number of things associated with this day - the color orange, pumpkin, candy, costumes, scary movies, spiders - okay, maybe not spiders.

I know you're thinking, 'this chick is in denial'. I am starting to think so myself. Oh no, could it be that I am a closet Hallowe'ener!

If there is any truth to that, then the closet door just swung wide open and revealed all my cobwebs and the spiders spinning them.

Speaking of spiders - legend claims that if you see a spider on this particular night, it could be the spirit of a deceased loved one who is watching over you. Sorry daddy, I can't promise not to whack you with a shoe.

Spicy Pumpkin Bundt Cake & Pecan Pumpkin Butter Frosting

I usually make this Spicy Bundt Cake recipe around this time of year. I absolutely love all the spices involved, but I hadn't planned on doing a halloween post. However, as I was going through the cupboard looking for my go-to Bundt pan, I came across the Wilton Wonder Mold, still in its box. I honestly don't remember purchasing it, but it was time to put it to use.

If you follow me on Instagram, you may remember my first attempt with SugarVeil, well it was about time I tried it again. They turned out great when I made them back in April of this year, but I stored them for later use and forgot about them. By the time I found them, they unusable. 🙁 Not this time though!

Spicy Pumpkin Bundt Cake & Pecan Pumpkin Butter Frosting

After baking the cake, I wrapped it in a layer each of plastic wrap and waxed paper, while still warm. I learned about this technique on CakesDecor.com and have used it for a few cakes with great results. It's especially helpful when you don't plan to decorate the cake immediately. It keeps the cake moist and fresh. Once I remove it from the freezer, I remove the wrappings and wrap it in a tea towel to thaw.

Once thawed, I leveled and torted the cake, brushed with simple syrup, filled, stacked and masked it with my Pecan Pumpkin Buttercream - see recipe below. I used a plastic cake dowel down the middle to keep the levels aligned. I then covered the entire cake with plastic wrap and placed in the fridge to set. It's helpful to place some weight on the cake to help the layers adhere and level. Helps to prevent bulging and shifting of the layers.

Now on to decorating. I quickly tore the head off the doll torso that came with the pan, the thought of that hair on my cake made me gag. Plus, the face of the doll, didn't quite read halloween. I made the head using fondant somewhat in the fashion of Pasta di zucchero torte decorate Sweetwins. If you haven't already, I urge you to visit their FB page. Their talent is out of this world.

I covered the torso with black fondant and used the SugarVeil mat to add the net pattern. Attached the head and set it aside to dry. In the meantime, I covered rolled out some Trendy Orange Fondx fondant and gathered the top edge before attaching to the cake.

I made a batch of SugarVeil the night prior and colored it using Sugarflair's Black Extra food gel. I made three panels using the Mesh Lace Mat, gathered the top edges and attached them over the orange fondant. Her waist is lined with nonpareils.

As I was putting the finishing touches on the cake Saturday night, K looked at it and said, "I think you've channeled Lady Gaga." HA!

So, some final notes -

  • Using the Wilton Wonder Mold resulted in an evenly shaped cake - no carving, no mess, no waste. However, baking three cakes would have cut down the baking time and produced a more evenly cake throughout, in my opinion.
  • Humidity is no friend to SugarVeil. It took forever to set, so I decided to use the oven method, which worked like a charm. You can find the SugarVeil how-to here.
  • Fondx fondant tastes like the filling of an oreo and is super easy to work with - it's my new rediscovered fave.
  • I have fallen in love all over again with SugarVeil. The taste, the endless possibilities, the simplicity. You will definitely see more of it here.
  • I don't like working with Isomalt. Period.
That's it folks! The recipe for the cake is originally from Martha Stewart. The frosting is my own recipe. They both appear below.

Happy Halloween!

Spicy Pumpkin Bundt Cake
Print Recipe

Spicy Pumpkin Bundt Cake & Pecan Pumpkin Butter Frosting

Pumpkin and spices make this witch's skirt the perfect halloween treatt!
Prep Time20 minutes mins
Cook Time55 minutes mins
Total Time1 hour hr 15 minutes mins
Course: Dessert
Servings: 1
Author: I Sugar Coat It

Ingredients

  • 4 cups cake flour not self-rising, plus more for dusting
  • 4 teaspoons baking powder
  • 1 teaspoon baking soda
  • 1 teaspoon salt
  • 1 tablespoon ground ginger
  • 2 teaspoons ground cinnamon
  • 1 teaspoon freshly grated nutmeg
  • ½ teaspoon ground cloves
  • 1 cup unsalted butter 2 sticks, room temperature, plus more for pan
  • 2 ½ cups packed light-brown sugar
  • 4 large eggs
  • 1 cup buttermilk
  • 1 ½ cups canned pumpkin pureeFrosting
  • 3 tablespoons Pecan Pumpkin Butter
  • ½ cup butter
  • 1 teaspoon crushed vanilla bean
  • 1 teaspoon cinnamon
  • 1 teaspoon ground nutmeg
  • ½ teaspoon ground clove
  • 4-5 cups of confectioner’s sugar
  • 3 tablespoons fresh ginger tea depending on desired consistency

Instructions

  • Preheat oven to 350 degrees. Prepare a 14-cup Bundt pan of your choice.
  • Whisk together flour, baking powder, baking soda, salt, ginger, cinnamon, nutmeg, and cloves. Set aside.
  • Beat butter and brown sugar together in the bowl of an electric mixer fitted with the paddle attachment, on medium speed until pale and fluffy, 2 to 3 minutes.
  • Add eggs, one at a time, beating well after each addition and scraping down sides of bowl.
  • Reduce speed to low. Beat in flour mixture in 3 additions, alternating with the buttermilk. Beat until just combined.
  • Add pumpkin puree, and beat until combined.
  • Pour batter into prepared pan.
  • Bake cake until golden and a wooden skewer inserted into the center comes out clean, about 55 minutes
  • Let cool on a wire rack for 30 minutes.
  • Carefully turn cake onto rack to cool completely.
  • For the buttercream: Using the flat blade attachment of your mixer (or a regular hand mixer), cream butter and pecan butter until creamy. Add crushed vanilla beans and spices and mix until fully combined. Turn mixer to low (stir setting on a KA) and add the confectioner’s sugar, one cup at a time, adding a tablespoon of tea with each addition. Turn the blender up to high and beat until fully combined.

Peanut Butter & Jam Banana Bread

October 2012 By i sugar coat it! 11 Comments

Peanut Butter & Jam Banana Bread

Peanut Butter & Jam Banana Bread
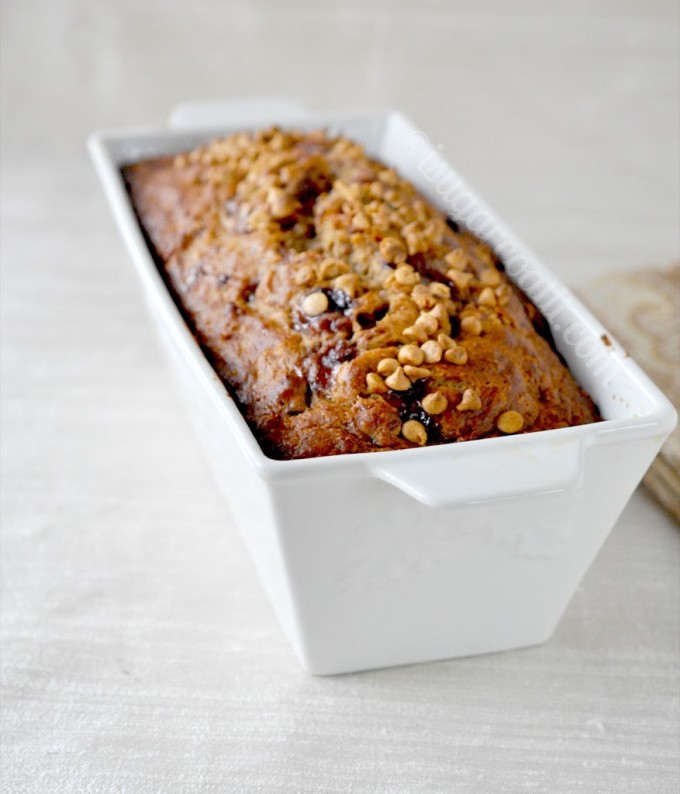
Unless you have a nut allergy, I imagine you have had a Peanut Butter and Jam/Jelly sandwich at some point in your life. If you haven't, well... I have no words. However, I do have a loaf that is pretty close to the real deal...and then some. Peanut Butter & Jam Banana Bread!
I am a simple girl. If I had my way I'd live on PB&J sandwiches - actually, it was my staple all through Uni. It's one of my go to treats - sometimes accompanied by fresh bananas, cheese or chocolate, but never at once. Although, now I'll have to try it.
Peanut Butter & Jam Banana Bread
And since I enjoy it so very much as a sandwich, I thought I'd try it as a baked good.


Are you familiar with the Milk calendars? If not, I'll spare you the agony of having to wait until later in the year when they arrive tucked in between the classified section of the newspaper just in time for the New Year. Calendars dating back to 1974 can be found on the Milk website. Yeah, ya heard right - 1974!!

My first paper copy dates back to 1995 and contains my go-to banana bread recipe. Yes, I have a calendar from 1995. No, I'm not a packrat.

All my previous versions of this recipe omit the pecans and is usually packed with chunks of bitter-sweet chocolate. Mmmmm.

Peanut Butter & Jam Banana Bread

Back to my baked hybrid cake/sandwich thingy.

While shopping for chocolate to make ganache, I came across peanut butter chips. They spoke to me, so I brought them home and introduced them to some over-ripened bananas. They hit it off immediately, making the merger pretty painless.

For the most part, I prepared the recipe as usual. I poured some of the banana bread batter in the baking dish then added a layer of strawberry jam and peanut butter chips. I repeated this for a second layer, then topped the batter off with a bit of jam andPB chips. Baked at 350º for just over an hour and enjoyed it warm.

Think of this Peanut Butter & Jam Banana Bread as a double-decker, baked PB&J sandwich. Try it! I think you will find it reminiscent of the real deal.

Print Recipe

Peanut Butter and Jam Banana Bread

A traditional banana loaf layered with strawberry jam and peanut butter chips, reminiscent of the popular PB&J sandwich.
Prep Time15 minutes mins
Cook Time1 hour hr
Total Time1 hour hr 15 minutes mins
Course: Breakfast
Author: I Sugar Coat It

Ingredients

  • 2 ripe bananas mashed
  • ¾ cup brown sugar
  • 1 egg
  • 1 teaspoon vanilla bean paste
  • 1 cup milk
  • ⅓ cup butter melted
  • 1 cup unbleached all-purpose flour
  • 1 cup whole wheat flour
  • 1 tablespoon baking powder
  • 1 teaspoon cinnamon
  • ¼ teaspoon salt
  • 1 cup peanut butter chips
  • ½ cup strawberry jam

Instructions

  • Preheat oven to 350°F (180°C).
  • In a large bowl, combine mashed bananas with brown sugar, egg, vanilla, milk and butter.
  • In separate bowl, mix all-purpose flour with whole wheat flour, baking powder, cinnamon, salt and peanut butter chips.
  • Stir milk mixture into flour mixture just until combined.
  • Pour half the batter into a buttered loaf pan.
  • Spoon half the jam onto the batter and use a knife to swirl the jam into the batter.
  • Pour the remaining batter into pan and add the remaining jam in the same manner as above.
  • Sprinkle the top with any leftover peanut butter chip.
  • Bake for 1 to 1 ¼ hrs or until a cake tester comes out clean.
  • Allow to cool, slice and enjoy!

Notes

Sweet Tip:
Leftover banana bread makes great French toast. I like to add a little vanilla or strawberry flavoured soy milk in with my eggs and dip the banana bread slices before frying. Top with plain yogurt and a sprinkle of cinnamon sugar. Enjoy with a side of fresh berries.

October 2012 By i sugar coat it! 8 Comments

Baking Arts: Back To Basics {Tea Biscuits}

Baking Arts Course
I bake from scratch 100-percent of the time and I like switching up and introducing other ingredients to recipes. So naturally, I have developed a deeper interest in understanding how ingredients work together and how I might better develop my own recipes.
As I am primarily self-taught, I thought it would be beneficial to learn from the pros. Soooo, I decided to enrol in a part-time culinary certificate program!

I am also quite taken with the design aspect of caking, so one of my birthday gifts this year from the Dude, was  tuition for Bonnie Gordon College courses. However, the course I wanted to take is no longer being offered part-time. 🙁 I am hoping it is re-introduced in the Spring - I would definitely free up some time to take it then. In the meantime, it's back to basics for me.

Baking Arts Course
Week 1. Saturday. First day of class and I am not as bright-eyed and bushy-tailed as I normally am - even in my full chef's uniform. I work full-time and I am taking two other courses as part of my career development (unrelated to caking), one of which is on a Friday night. What was I thinking!?!
After introductions, an orientation of the lab, ingredients etc. we got onto the business of making and rolling pie dough using the biscuit method.
Week 2. We made fresh apple pie. I had never made a pie - I don't like my fruits cooked. This, however, I tested and by that I mean I had the crust and sauce, and it was great. The Dude pretty much inhaled the whole thing once I got it home. How he never gains a pound is beyond me.
Week 3. All about quick breads - three dozen each of bran muffins and tea biscuits that were shared with my lab partner. I omitted the raisins from my half of the muffins and opted for chopped walnuts sprinkled on top. For my biscuits, I passed on the currants and topped them with an egg wash and coarse sugar. On my way to the parking lot, I treated a police officer to a biscuit. The car was a good place to be for the ride home - smelled a bakery on wheels. Mmmm.
Week 4. Had us working on our masking and piping skills. We finally got to use, what I like to call a stand mixer on steroids - the industrial mixers. As huge as they are, they are surprisingly quiet. I want one for my basement kitchen reno. If anyone is reading this, feel free to add it to your holiday shopping list, right next to my name. Thanks! 🙂
Once we were done masking the dummies, I thought I would finally try the rose technique using the left over icing. I am hooked! So easy and such a lovely effect. I came home and made a rose cake, which I will share in a  future post.
I have been enjoying the classes, the other students, the chef and I am getting used to the uniform and steel-toe shoes. The campus is dedicated to Culinary Arts, and is evident by the various aromas as you walk through the halls. I plan to make friends with the chocolate people and the charcuterie folks - if you happen to be reading this, I am available for sampling.
Sorry for the crappy photos, I steal quick moments to snap what we are doing with my iPhone - against the rules, but I promise, I wash my hands after. ALWAYS.
My weeks seem so much longer now and there is no denying that I am sleep-deprived, but for good reason. I am a firm believer in continuous learning - formal and informal. Life is all about balance and finding and doing things I love, helps me keep that balance. I look forward to my weekend classes, they are a departure from a somewhat stressful week - a happy ending!
So after class, I strolled through Kensington market and picked up some spices and then stopped by my favourite tea place for a hot cup of Read My Lips before hopping on the highway. Later, the Dude and I had a date with Cat Power.
It's 3:00AM and we are back home from the concert. I am wired, so thought I'd work on this post, as I plan to sleep most of Sunday away.
Below, I've shared the tea biscuit recipe from class. I'll share some others in future posts.
Week 5 , Week 6, Week 7, Week 8, Week 9, Week 10, Week 11, Week 12

Print Recipe

Baking Arts: Back To Basics {Tea Biscuits}

Prep Time15 minutes mins
Cook Time15 minutes mins
Total Time30 minutes mins
Course: Breakfast
Servings: 3 dozen
Author: I Sugar Coat It

Ingredients

  • 1200 g    bread flour
  • 40 g        baking powder
  • 250 g     butter cold
  • 500 ml    water cold
  • 50 g        milk powder
  • 4            eggs
  • 250 g       sugar
  • 20 g         salt
  • 250 g       currants optional

Instructions

  • Pre-heat oven to 375ºF.
  • Sift together the flour and baking powder.
  • Grate the cold butter into the flour mixture.
  • Use your fingers to lightly blend the ingredients to a mealy stage.
  • By hand, lightly whisk together the water and milk powder, then add the eggs, sugar and salt.
  • Add to the flour mixture all at once. Use your fingers to mix for a short time, until the dough is just slightly developed.
  • If adding currants, do so at this stage, mixing only long enough to incorporate.
  • Transfer dough to a sheet of parchment paper and work the dough by folding and pressing gently all sides for about 1 minute, until all ingredients are fully incorporated. The dough should still be flaky.
  • Lightly flour a rolling pin and roll the dough out to approximately 1.5 cm thickness. Cut into desired shapes and sizes.
  • Once cut, turn upside down onto lined baking sheet. Egg wash and sprinkle with coarse sugar and bake for 15 minutes, or until tops are golden brown and done.
  • Serve hot, or freeze for future use.


I-Sugar-Coat-It-Blog-Signature-Green

  • « Go to Previous Page
  • Page 1
  • Interim pages omitted …
  • Page 45
  • Page 46
  • Page 47
  • Page 48
  • Page 49
  • Interim pages omitted …
  • Page 51
  • Go to Next Page »

Primary Sidebar

Never Miss A Happy Ending...

Previous Sweetness...

Search

Filter by Category

Filter by Date

SWEETEN YOUR INBOX!

All Content Including Images Copyright Jacqueline | I Sugar Coat It© 2026