• Skip to primary navigation
  • Skip to main content
  • Skip to primary sidebar
  • Home
  • About
    • About I Sugar Coat It
    • Features & Press
    • Copyright
    • Disclosure
    • Privacy Policy
  • Recipes
  • How-To
  • Contact
  • sous vide sista

I Sugar Coat It

Home

All Posts

December 2012 By i sugar coat it! 8 Comments

Thank You For The Awesome Spiderman Cake!

Spiderman Cake
There is no better thank you than a video message from a two year old who has not yet mastered the words 'awesome' or 'Jacquee', but who is so passionate in his delivery it makes you smile and tear up at once.
I have replayed the video too many times to count since receiving it and it brings a smile to my face each time.
"TANK YOU FOR THE AWMUM CAKE, YACKEE! MWAH (hand gesture included)!"
Spiderman Cake
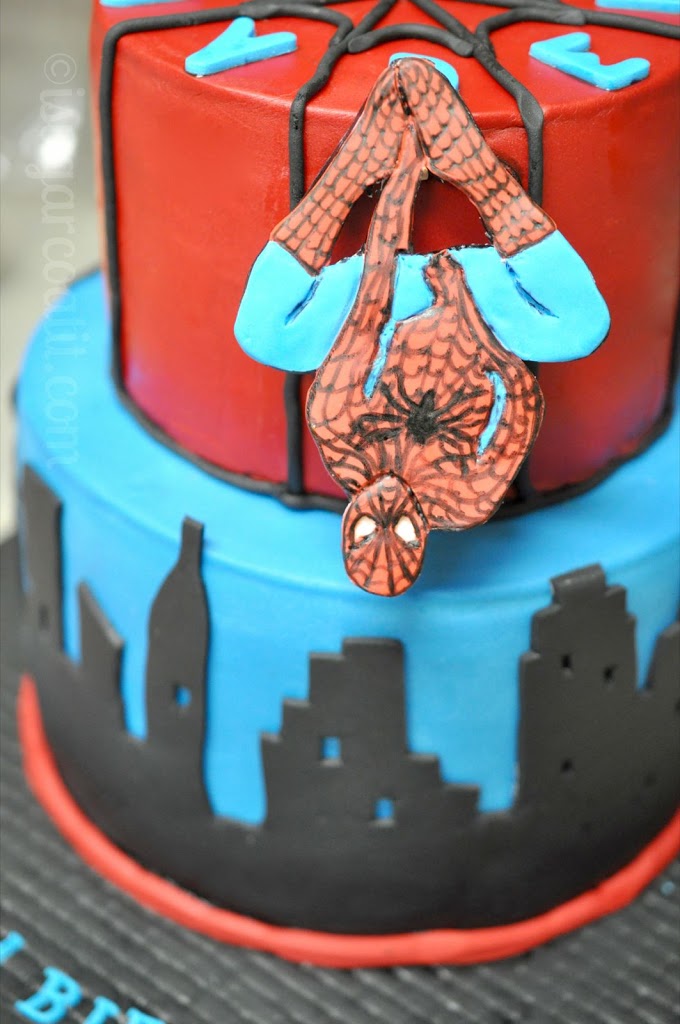
Brayden turned two at the beginning of December and his mom asked me to make him a Spiderman cake. I was so very nervous about saying yes and stalled for quite some time. Weeks later I agreed and his mom and I settled on a two-tier chocolate and vanilla cake along with a couple dozen red velvet cupcakes for the adults in attendance.
Spiderman Cake
The bottom tier is double chocolate and the top tier is vanilla bean. Both were filled with whipped vanilla bean buttercream and masked in chocolate ganache before being decorated with fondant. The red velvet cupcakes were topped with white chocolate Swiss Meringue Buttercream.
I must admit, I love tall cakes, but I am not always comfortable with the stacking process - even more nerve-wracking is transporting the cake. I ended up taking it in two pieces and assembling it on location before snapping a few quick shots. Unfortunately, I didn't stay for the party, as the Dude and I had other plans.
I decided to have Spiderman hover over the buildings upside down. My original plan was a little more elaborate, but things kept breaking and I knew it would be a nightmare to transport, so I adjusted and came up with this.
From what I understand the cake went over very well.
Spiderman Cake
R, thank you so very much for trusting me with preparing this cake for Bray's 2nd birthday. I think you see more potential in me than I sometimes see in myself and I am truly grateful for your constant, kind words.
Brayden, you're a gem of a little boy. Thanks for the sweet, entertaining video - and a big, wet MHAW (with hand gesture), right back at you!!

December 2012 By i sugar coat it! 6 Comments

Raspberry Coconut Meringue Cookies

 Raspberry Coconut Meringue Cookies
The old adage, if you love something let it go, should be revised to say - if you love something, share some of it, keep most of it, make lots more so that you are never without it.
Okay, put mildly, my adage crafting skills are lacking, but I guarantee after just one bite of these cookies, you'll quickly see the flaw in that love them and set them free business.
Raspberry Coconut Meringue Cookies
I absolutely love these cookies and set out to make them for gifting purposes, but as hard as I try, there is just no setting them free. And if I am not mistaken, K might just feel the same way about them - he ate half the Cocoa Rouge Meringue Cookies within hours of me taking them from the oven. BTW - he claims to not have much of a sweet tooth...
With hardly any of the first batch left, I set out to make a variety of flavours for gifting purposes. I made sure K was not around. First, I made coconut flavoured meringue and piped them onto a lined cookie sheet. I separated the remaining batter and added some raspberry flavour and a touch of pink gel food colouring to half. Using a double piping bag inserted into a large piping bag fitted with the star tip, I swirled to my heart's desire.
Raspberry Coconut Meringue Cookies
Heaven in a feather-light cookie! Yup, those are my teeth marks. It's called testing the product - over and over and over... I had more jars than I had cookies left, so another batch was in order. If you have never made or eaten meringue cookies, I urge you to try them. Your tastebuds will be forever indebted.
Raspberry Coconut Meringue CookiesRaspberry Coconut Meringue CookiesRaspberry Coconut Meringue Cookies
As it's the season for giving - they also make great gifts! So get in the kitchen and start whipping. Only eight more sleeps before Christmas!
Print Recipe

Raspberry Coconut Meringue Cookies

A light, flaky cookie with a marshmallowy soft center, infused with raspberry and coconut to make your taste buds dance.
Prep Time20 minutes mins
Cook Time40 minutes mins
Total Time1 hour hr
Course: Dessert
Servings: 24
Author: I Sugar Coat It

Ingredients

  • 200 g superfine sugar
  • 100 g egg whites I used pasteurized egg whites
  • ¼ teaspoon cream of tartar
  • a pinch of salt
  • ¼ teaspoon coconut emulsion
  • ¼ teaspoon raspberry emulsion
  • a small drop of pink gel food colour

Instructions

  • Preheat oven to 250ºF.
  • Prepare two cookie sheets by lining with silpat mats or parchment paper.
  • Place egg whites, sugar, cream of tartar and salt in the bowl of an electric mixer and mix on high speed until soft peaks form.
  • Turn mixer down to medium and sprinkle in the sugar a little at a time. Once all the sugar is added, turn mixer back to high and whip to stiff peaks.
  • Divide the meringue evenly and whip the coconut emulsion into half the batter for a few seconds. Add the raspberry emulsion and the food colour to the other half and whip for a few seconds, until colour is evenly incorporated.
  • Using a double decorating bag insert (like the one shown above) and the star tip, pipe meringue onto lined baking sheets.
  • Bake for 40 minutes.

I-Sugar-Coat-It-Blog-Signature-Green

Chai Eggnog Latte Cupcakes with Spiked Swiss Meringue Buttercream

December 2012 By i sugar coat it! 3 Comments

Chai Eggnog Latte Cupcakes with Spiked Swiss Meringue Buttercream

Chai Eggnog Latte Cupcakes with Spiked Swiss Meringue Buttercream
The holidays don't officially start until you bring out the eggnog - preferably spiked. So, say hello to ma lil frwends - excuse the slurring.
Chai Eggnog Latte Cupcakes with Spiked Swiss Meringue ButtercreamChai Eggnog Latte Cupcakes with Spiked Swiss Meringue Buttercream
I have not always been a fan of eggnog, but I find if I add it to something I truly enjoy it can actually be quite tasty. For instance, chai tea - more specifically, chai latte from Starbucks. I am addicted to the stuff. And, around this time of year SB features a few drinks to help bring on the holiday cheer, one of which is eggnog latte.
Do you see where this is going? It's a little place called Cheggnog! Translation - Chai Eggnog. A shot of chai (or two, if you're like me), a shot of eggnog, some soy milk, heat, froth, enjoy! It's my mid-morning warm-up.
Chai Eggnog Latte Cupcakes with Spiked Swiss Meringue Buttercream
I enjoy eggnog best when baked. Last year, I introduced eggnog into my baking when I made these Pumpkin Spice Mini Donuts with Eggnog Glaze. They were great and a certain individual who claims eggnog is vile, inhaled a few of the donuts and survived - enjoyed them, even.
So this year, I decided to turn one of my favourite drinks into a baked good to try to convert the tastebuds of eggnog haters, including one, Nina Roy as part of the Eggnog Challenge.
Cupcakes make everything better, even eggnog. These Chai Eggnog Cupcakes topped with spiked Cheggnog Swiss Meringue Buttercream will have you asking begging for seconds, if not more. The light spicy flavour of the chai is nicely complemented by the smooth rich taste of the buttercream. The added alcohol provides the festive factor. But not too much alcohol, or you might find yourself seeing strange things. Quick... blink to make it disappear!

Chai Eggnog Latte Cupcakes with Spiked Swiss Meringue Buttercream
What are you waiting for? I've already started eating mine - you'll need to make your own. The recipe is below. Whatever eggnog treat you decide to make, be sure to share it with Nina Roy for a chance to win an Ultimate Eggnog Lovers Prize Pack!
 
Chai Eggnog Latte Cupcakes with Spiked Swiss Meringue Buttercream
Print Recipe

Chai Eggnog Latte Cupcakes with Spiked Swiss Meringue Buttercream

A light, spicy chai cupcake complemented by the smooth rich taste of swiss meringue buttercream and a festive touch of brandy.
Cook Time20 minutes mins
Total Time20 minutes mins
Course: Dessert
Servings: 12
Author: I Sugar Coat It

Ingredients

Cupcakes

  • 220 g self-rising flour with baking powder and salt
  • 16 g chai tea powder
  • 52 g unsalted butter softened
  • 175 g light brown sugar
  • 63 g egg whites
  • 150 ml eggnog

Frosting

  • 150 g liquid egg whites
  • 250 g sugar
  • 340 g unsalted crushed vanilla beans
  • pinch of salt
  • 75 ml chai eggnog latte
  • 1 tablespoon brandy

Instructions

  • Preheat the oven to 350ºF. Line muffin pan with baking cups (12).
  • Using the paddle attachment, beat the butter and sugar on medium speed until smooth.
  • Add the egg whites slowly, mixing until fully incorporated.
  • Sift the flour onto the butter mixture and add the chai tea powder. Mix until blended.
  • Add the eggnog and continue mixing until combined.
  • Using an ice-cream scooper, scoop the batter into the cups and bake for 20-25 minutes.
  • Remove from oven and cool.

For the frosting:

  • While the cupcakes are baking , fill a heavy duty pot about a quarter of the way with water and place on the stove over medium heat to simmer.
  • Add egg whites and sugar to the mixing bowl and place on top of the pot, ensuring the bottom of the bowl is not in contact with the water in the pot. Whisk the sugar and egg white mixture constantly, but gently, until temperature reaches 160°F.
  • Once at the correct temperature, remove from heat, wipe away the water from the underside of the bowl and transfer to the stand mixer. With the whisk attachment, begin to whip the meringue until it is thick, glossy, and the bottom of the bowl is no longer warm to the touch.
  • Switch from the whisk to paddle attachment and with the mixer on low speed, add butter cubes, one at a time, until incorporated. Continue to mix until it has reached a silky smooth texture.
  • Add vanilla beans and salt, continuing to beat on low speed until well combined. Then add the spiked chai eggnog latte and beat until combined.
  • Using a 6B French tip, pipe swirls onto the cupcakes and garnish with a little chai tea powder and nutmeg.

I-Sugar-Coat-It-Blog-Signature-Green

Black Forest Cake

December 2012 By i sugar coat it! 11 Comments

Black Forest Cake & Cherry Impostors

Black Forest Cake
I remember the first time I heard the name of this cake, my head filled with images of dilapidated chalets tucked in the darkest recesses of a forest lined with burnt, hollowed-out trees with branches mimicking witches fingers and a silence so stifling, nothing grew.
Dramatic much?
Black Forest Cake
Oops! Got a little messy while I was trying to plate it.
Um, yes! However, back when I learned that the cake contained a cherry filling, I was instantly turned off. Still, to this day, the name itself conjures up similar images now that I'm an adult, but with less fear and wonder.
I used to be a very picky eater. When I was little, I wouldn't eat my meals if the various items on my plate touched and for some sick reason I always put brown sugar on stuff - soup, rice, you name it. Gross, I know. It's a wonder I never had a cavity and I managed to stay tiny for so long (not so much anymore, though - those days have caught up with my hips...).
I don't have many culinary aversions, but if I had to choose one from my top five, cooked/processed/canned fruit makes the list and could quite possibly be at the very top. What sick mind decided it was okay to take perfectly picked, fresh fruit and process and package them beyond recognition? In my world, fruits are meant to be eaten as is.
Black Forest Cake
So when I looked at week 9 in the course syllabus and saw Black Forest cake, I made my mind up to skip that class. Instead, I reluctantly showed up for class and decided to save my absence for a time when I really needed to be away. While scaling the ingredients, I noticed Chef unpacking chocolate - Callebaut bars and vermicelli. My mouth watered and mood perked up and I turned my attention back to scaling. Then I got to ingredient #6 and felt a little queasy. Cherries don't belong in a jar suspended in what looks like red snot. They just don't!
Maraschino cherries are the worst offenders of processed fruit, in my opinion. Just read the FDA's definition of the artificial process used to create them - "The term "Maraschino Cherries" is regarded as the common or usual name of an article consisting of cherries which have been dyed red, impregnated with sugar and packed in a sugar sirup flavored with oil of bitter almonds or a similar flavor."
They don't even refer to them as food, but 'an article'!! Need I say more? They are pretty to look at though, I must say. Like little jewels. But we don't eat jewels, do we...
Black Forest Cake
It's unfortunate, because I love cherries - you know the kind you pick, fill a basket with, sit out in the sun and enjoy. I love fruits, I grew up with a number of them hanging off trees in my backyard. I guess that's why it is so difficult for me to appreciate them any other way, but fresh.
In the end, I really enjoyed this cake - sans cherries. I scraped away the cherry filling and passed the little jewels that adorned the top, over to K (surprisingly, he likes them). With the wanna-be fruits out of the way, I had a good share of the chocolate cake and whipped cream frosting. There is always a work-around my friends. You should know by now that there is just no way this fiend would pass up a chance at good chocolate. It was indeed 'the cherry' atop this cake!
Happy Hump Day!
Black Forest Cake
Print Recipe

Black Forest Cake & Cherry Impostors

Chocolate and whipped cream stacked high and topped with cherries!
Prep Time15 minutes mins
Cook Time30 minutes mins
Total Time45 minutes mins
Course: Dessert
Cuisine: Cake
Servings: 12
Author: i sugar coat it!

Ingredients

Devil’s Food Cake

  • 235 grams sugar
  • 80 grams butter at room temp
  • 2.5 grams salt
  • 160 grams water
  • 3 grams vanilla
  • 160 grams pastry flour
  • 45 grams cocoa powder
  • 20 grams whole milk powder
  • 5 grams baking powder
  • 2.5 grams baking soda
  • 2.5 whole eggs

Filling and Frosting

  • 500 grams cherry pie filling or sour cherries
  • 500 grams whipping cream 35%
  • 32 grams icing sugar
  • 250 grams chocolate shavings
  • 8 maraschino cherries

Instructions

  • Preheat oven to 380ºF.
  • In the bowl of an electric mixer using the paddle attachment, cream together butter, sugar and salt. Scrape the bowl.
  • Sift together the pastry flour, cocoa powder, milk powder, baking powder and baking soda. Add to butter mixture.
  • Add water and continue to mix on medium speed for about 5 minutes. Scrape sides.
  • Turn mixer to low and gradually add the eggs one at a time until blended, about 1 minute. Scrape the bowl. Do not over mix after eggs are added.
  • Scale the batter into two 9” or three 7” greased and floured baking pans.
  • Bake for 30-40 minutes.
  • To make the filling: whip the 35% cream, adding the icing sugar until firm peaks are achieved. Set aside.
  • To assemble the cake: Cut cakes into three layers. Place the the first layer on cake board and soak with Kirsch or simple syrup, if desired. Use an angled spatula to spread a thin layer of cream on the cake. Using a #5 star tip, pipe a rim of cream around the edge of the cake layer. Fill the center with cherry filling. Place a small amount of cream on the cherry filling and place another layer of cake on top. Repeat steps 5-8 for the next layer. Place the final layer on top and mask the entire cake with whipped cream. To finish the cake, you may use a pastry comb to decorate the sides, or smooth the sides and decorate with chocolate shavings or vermicelli. Pipe rosettes around the top edge of the cake using the whip cream and fill the center with chocolate shavings.


Cocoa Rouge Meringue Cookies

December 2012 By i sugar coat it! 7 Comments

Cocoa Rouge Meringue Cookies

 Cocoa Rouge Meringue Cookies
Christmas is fast approaching and nothing says Happy Holidays like a fresh batch of home-made cookies. Ahhh, make that low-fat, gluten-free, great tasting cookies.

I might just be able to get through the holidays without having to pull out my fat pants, after all.

Cocoa Rouge Meringue Cookies

I've been on a bit of a Swiss Meringue craze of late. In the last few weeks alone, I have made five batches of Swiss Meringue Buttercream (SMBC) in various flavours for various cakes - I have posts queued for each.

To make SMBC, you first make swiss meringue and then add butter to create the buttercream. Meringue cookies skip the butter step, so one might say they are in effect, unfinished SMBC. Well, maybe not, as there is nothing unfinished about these cookies.Here's a quick visual on how I made my cookies:

Cocoa Rouge Meringue Cookies
Cocoa Rouge Meringue CookiesCocoa Rouge Meringue Cookies
I made two batches - one piped and one spooned. For the spooned batch, shown above with the caption, 'Enjoy!', I used regular cocoa and added multi-coloured chocolate chips. They tasted great, but I wasn't too impressed with the way they looked. So for the second batch I used Cocoa Rouge, the cocoa powder I normally use for my Red Velvet cakes, and I skipped the chocolate chips. I was pleasantly surprised with how they turned out. The colour was a little unusual - pinkish gray on the outside and reddish, chocolaty-brown on the inside. I piped them using an Ateco tip #885.
Cocoa Rouge Meringue Cookies
They were wonderfully light, flaky on the outside with a marshmallowy soft core. The Cocoa Rouge was a wonderful addition for both its rich, fudge-like flavour and subtle blush colour. I think I just might be on to something here!

They use very little ingredients and require very little effort - perfect for impromptu gatherings and gift giving. Package them in a jar, like I have done above, for that special someone(s). And if you're like me, gifting to self is always an option.

Making them was a cinch; however, keeping them around has proven somewhat of a challenge.


Cocoa Rouge Meringue Cookies
Print Recipe

Cocoa Rouge Meringue Cookies

A wonderfully light cookie with a flaky shell that reveals a sponge-like core, bursting with rich chocolate flavour.
Prep Time15 minutes mins
Cook Time40 minutes mins
Total Time55 minutes mins
Course: Dessert
Servings: 24
Author: I Sugar Coat It

Ingredients

  • 200 g superfine sugar
  • 100 g egg whites
  • ¼ teaspoon cream of tartar
  • a pinch of salt
  • 20 g cocoa rouge
  • 45 g semi-sweet chocolate chips optional

Instructions

  • Preheat oven to 250ºF.
  • Use a clean towel or paper towel and lemon juice or vinegar to clean your mixer bowl, whisk and spatula. This will remove any traces of grease that could prevent the meringue from forming.
  • Place egg whites, sugar, cream of tartar and salt in the bowl of an electric mixer (a hand-held mixer works as well) and mix on high speed until soft peaks form.
  • (see photo above).
  • Turn mixer down to medium and sprinkle in the sugar a little at a time. Once all the sugar is added, turn mixer back to high and whip to stiff peaks.
  • Remove bowl from mixer stand and sift chocolate over meringue. Fold in chocolate until fully incorporated. Fold in chocolate chips.
  • Spoon or pipe meringue onto lined baking sheets and bake for 35 - 40 minutes.

December 2012 By i sugar coat it! 21 Comments

Cool Tools Thursday Give Away! {CLOSED}

 This give away is now closed. The winner of the Edgers Smoother Set is: 
"Erin Brankowitz • 3 days ago
How do I get my edges sharp under my fondant? I don't 🙁 I'd love tp try these smoothers to help me out with my cake decorating! I've been looking at them for a long time now. :)"
Prepping the top tier of my Think Pink cake - October 2012 - from my Instagram feed.
In this second instalment of Cool Tools Thursday, I'll introduce you to a few buddies of mine that help keep me sharp and on the straight and narrow. Edgers!
Back in February, I happened upon a set of smoothers while shopping online at Flour Confections. I already owned a couple of the standard white fondant smoothers, but these little black beauties lured me with the promise of smoother cakes and sharper edges. As a novice cake decorator at the time, I took the bait and purchased the three from which I felt I would benefit most - the Sharp Top, the Smedger and the Inside Curve smoothers.
image source: flourconfections.com

I have used the Smedger on every fondant-covered cake I have made since the purchase and it works like a charm, especially for finishing off the bottom edges. I've used the Inside Curve a couple times and was also happy with the results. But I'll be honest, I didn't have much luck with the Sharp Top Smoother at first. As much as I wanted to blame the tool, I knew that I was the problem - in hindsight, of course.

Common sense would dictate that fondant on a cake will only look as smooth as the foundation it covers. But in my world of fairies and magic wands, that sort of logic does not apply. When I first used the Sharp Top Smoother, my ganached edges were far from sharp, yet I expected the tool to magically make the fondant that was draped over a sub-par foundation, look perfect. This was back in April.

 Fast-forward a few months to my Think Pink cake in October. With my ganaching technique a little cleaner, I thought I'd give the Sharp Edge another go... and it's been going since. I even use it on my round cakes now. Check out the clean edges on the tuxedo cake I recently made for my cousin.


There are some amazing cake designers that have mastered the art of sharp edges and clean designs. Michelle Rea of Inspired by Michelle is one such designer. I learned all about ganaching and sharp edges from her videos.

In the quest for extreme sharp edges, decorators have resorted to a technique that seems to be gaining popularity; the upside-down method. Though it appears to yield great results, I am not ready to flip a perfectly baked cake upside down - doesn't mean I won't try at some point, however.

In the meantime, I'll work on perfecting my technique using these handy tools. Would you be interested in having a set of your own? I am giving away a set of three smoothers from the line of Edgers Smoothers to one lucky winner!

The giveaway is now closed.

To enter I Sugar Coat It's Edgers Smother Prize Pack Giveaway, simply:

  • Login to the PunchTab Giveaway Widget below using your email address or Facebook account.
  • You will be prompted to:
  • Answer the following question in the comments section of my blog, "How do you get your cakes smooth and edges sharp?"
  1. For additional entries, perform any or all of the additional actions presented in the widget -
    • Like my Facebook fan page.
    • Share this post on your Facebook page.
    • Tweet My Giveaway.
    • Follow me on Twitter.

Each additional action will count as a bonus entry.

Contest ends Sunday, December 9th, 2012 at 10:00AM (EST)
The winner will be selected using PunchTab's Giveaway Widget random picker, announced in this post and notified by email. (If entering via email, please ensure your email address is valid - it will not be displayed in the comments, but it's how you will be contacted, should you win). Please note that your comment may not appear immediately; that does not mean it was not received.


This giveaway is open to Canadian* and Continental U.S. residents only. Please see official contest rules here.


A special thanks to Flour Confections for their generous support.


To stay up to date and receive notification of new posts, please consider subscribing to my blog. 


Please note that I am not being compensated for the items featured in this post. This is simply me sharing items I enjoy. If at any point I am in a position where I am being compensated, I will certainly make that transparent.

December 2012 By i sugar coat it! 4 Comments

Piped Lemon Nutmeg Cookies & Sweet Greetings

 Piped Lemon Nutmeg Cookies
December 1, 2012

Santa Claus
North Pole
H0H 0H0

Dearest Santa,

Please find attached, an invoice for damages sustained to our roof, chimney fireplace and floors during your last visit. I hope that this will receive your immediate attention, as I have had your mail returned undeliverable each month for the past eleven months.
Piped Lemon Nutmeg Cookies

It is not that we do not appreciate your hard work and generosity; we, in fact, look forward to your visit each year. This year, however, we'd much prefer you and your reindeer skip our home. Your visits have become too stressful and costly an event - awaking with a start thinking our home is being broken into and finding our fireplace and floors destroyed and shingles displaced, no longer appeals to us. We will find a more reasonable way to fill the space under our tree with gifts.

Piped Lemon Nutmeg Cookies
Should you decide to ignore this note and make an appearance, it would please us immensely if you used the front door. We have installed a brand new, shiny doorbell just for the occasion - when rung, it will unlock the door for you only. You will find that we have left the customary cookies and milk in your honour, as well as a few treats for the rest of the gang.
Piped Lemon Nutmeg Cookies
The mister and I are quite fond of you and regret that it has come to this. We do hope that you will respect our wishes and our home and that this issue will be resolved amicably.
Piped Lemon Nutmeg Cookies
Do give our best to Mrs. Claus, Dasher, Dancer, Prancer, Vixen, Comet, Cupid, Donner, Blitzen, the beloved Rudolph, and all the elves. We recognize that you all have a great deal to do over the next 24 days and hope that this letter does not ruin the holiday mood at your end.
Piped Lemon Nutmeg Cookies
If you're planning a break after the holidays, you and the Mrs. are most welcome to join us at the cottage in our version of 'up North'. It appears a number of your reindeer vacation at the nearby park, so we have no doubt you will both feel at home.

Respectfully,
J
p.s. - In the event you visit, I am certain you will enjoy these cookies. I've shared the recipe below.

Piped Lemon Nutmeg Cookies
Now that I have gotten my little beef with Santa out of the way, I want to share with you an idea for personalized christmas cards.

Each year, I create e-cards to send to family, friends and colleagues using family photos, or other christmas stock photos. As I was developing this post, it occurred to me that a few of the shots I took would translate well into holiday cards - Sweet Greetings, let's say. I think my photographs have improved somewhat from last year, so this year, in addition to e-cards, I'll be printing up a few of these Sweet Greetings to send via snail mail. Each card will include a recipe on back of the treat featured on the cover. And the best part, it's done all from the comfort of my swivel chair, using iPhoto.

So there is only one question you need to ask yourself...have you been nice or naughty?

Print Recipe

Piped Lemon Nutmeg Cookies

Perfect for the holidays, the combination of lemon and nutmeg play nicely on the palate. Just mix, pipe, bake and enjoy!
Course: Dessert
Servings: 3 dozen
Author: I Sugar Coat It

Ingredients

  • Cookies
  • 650 butter soft
  • a pinch of salt
  • 10 g vanilla
  • 400 g icing sugar
  • zest of one lemon
  • 1 tablespoon freshly grated nutmeg
  • 6 eggs
  • 150 ml milk
  • 500 g pastry flour
  • 500 g all-purpose flour
  • Toppings
  • 150 g raspberry jam
  • coating chocolate
  • Chocolate
  • vermicelli

Instructions

  • With the paddle attachment of your stand mixer, cream the butter, salt, vanilla and sugar on the low/medium until light and fluffy. Scrape the sides and bottom of the bowl.
  • Zest the lemon and grated the nutmeg directly onto the batter. Mix.
  • Add the eggs to the above one at a time until incorporated. Scrape bowl.
  • Slowly add the milk and mix until blended.  Scrape the bowl.
  • Sift and add the flours to the above and mix until just incorporated. Remove bowl from mixer and scrape the bowl, ensuring all ingredients are well blended.
  • Prepare a large piping bag with a #6 star tip. Pipe cookies onto lined baking trays. The batter should fill 4 -5 baking trays depending on size. To ensure cookies bake evenly, pipe cookies that are similar in size onto one sheet. Leave enough space between each cookie (approx. 1.5”) for expansion and to allow even heat distribution.
  • Bake at 375ºF for approximately 10 minutes until light brown in color. Let the cookies cool.
  • To decorate cookies:
  • sandwich the smaller cookies together with raspberry jam, dip half the hearts in melted chocolate and sprinkle with vermicelli, or drizzle with chocolate.

Notes

The original recipe called for a combination of 320g shortening and 330g butter. The shortening makes the batter easier to pipe and prevents the cookies from spreading too much while baking. I try to avoid shortening, so opted for all butter. Ensure
the piped batter is chilled prior to baking, to prevent extra spread.

 I-Sugar-Coat-It-Blog-Signature-Green

November 2012 By i sugar coat it! 7 Comments

Vintage Cakes, Modern Methods: A Review

Gilded Filigree Cage Cake
I was recently given the opportunity to review one of the more recent cake decorating courses offered by Craftsy - Vintage Cakes, Modern Methods by Colette Peters.

I watched the videos and thought I would put a little blurb together and be done with it. I started to draft a post and quickly realized that my heart just was not in it. I didn't feel completely comfortable speaking to the techniques, without actually trying them. So I did...and I am extremely pleased with the results.

Gilded Filigree Cage Cake

I have purchased a number of Craftsy.com courses and have no problem recommending them - they are quality courses taught by industry professionals. What I enjoy most is the interactive nature in which they are delivered and the life-time access to purchased courses. And the cost is rather reasonable in my opinion, especially when they go on sale, which seems to be quite often. I mean, when will you ever get to take a course with Jaqueline Butler for less than $40? Her's was the first cake decorating course I purchased, by the way.

Gilded Filigree Cage Cake
This post, however, is about another talented cake decorator, who, I am a bit ashamed to admit, until recently I knew nothing about. Colette Peters is an internationally renowned cake artist and author and owner of Colette's Cakes in New York.

Vintage Cakes, Modern Methods teaches a number of techniques that are not only innovative, but with the instructions provided,  easy to execute. Look what I was able to create with a little royal icing and some lustre dust!!

Gilded Filigree Cage Cake

In addition to the gilded filigree cage, Colette shares her techniques for creating 3-D gum paste flower petals and leaves with an embroidered effect, brush embroidery, hand-sculpted Victorian cameo jewelry and antiquing fondant to name a few. She also offers many tips - all useful in cake design in general. One of my favourite is the use of adding tape, you know the stuff from adding machines, to help create evenly spaced placeholders when adding stripes to a cake.

Gilded Filigree Cage Cake
With over three hours of video instructions, there is no shortage of techniques to help take your cakes up a notch. Colette walks you, step-by-step, through three unique cake projects. At the end, you will be armed with the confidence to produce:
  • A lovely single-tier cake with a brush-embroidery flower design;
  • A conversation piece, three-tier cake complete with three-dimensional peonies and gilded cages; and
  • A stunning three-tier antiqued cake with cameo embellishments.
Ready to give it a try? Thanks to Craftsy.com, I Sugar Coat It! is able to offer Colette's course - Vintage Cakes, Modern Methods at 50% off. Click on the photo or link below to get started. This offer is good until December 31, 2012.
 
50% Off Vintage Cakes, Modern Methods 

Tuxedo Birthday Cake

November 2012 By i sugar coat it! 12 Comments

Chocolate & Vanilla Cake with Raspberry SMBC

 James Bond Tuxedo Birthday Cake
Do you remember your last year as a teenager? The feeling of getting 'old', the uncertainty, the excitement, the dread, the idea of adulthood, the partying, confusion, hopes, dreams, fears, panic... Welcome to the cusp of adulthood - NINETEEN - last of the teens, or as I refer to it, the twilight year.
 James Bond Tuxedo Birthday Cake
My cousin, SP, began his transition to adulthood at 7:35PM on Tuesday, November 20, 2012, approximately 166,550 hours after he entered the world. Although some might argue that transition began at 16 or 18, this is my post, so we're going with 19.
That chubby little piece of cuteness perched on the couch, who, because he couldn't pronounce my name, called me cookie, is now six feet tall and away attending university. He graced us with his presence on over the weekend to celebrate, but I have a sneaking suspicion it had more to do with laundry, a cooked meal and money. No worries, dude, we've all been there. 🙂
I'd also like to think it had a little to do with cake, as well. And since I try not to be in the business of disappointing, I let him eat cake!
James Bond Tuxedo Birthday Cake
I knew the cake had to be chocolate, no question there. In thinking about the look of the cake, I played with the idea of a basketball to represent his love of sports, or a microphone or iPod to represent his love of music, a book for his love of the written word, blah, blah, blah. As I pondered, I surfed and came across Bake-a-Boo's Flickr stream. Oh my word, the gorgeousness is overwhelming! Losing my capacity to blink and bring my lips together, I poured over her album and happened upon this tuxedo cake made by for a 30th birthday. I had my cake!
I sent her a note expressing my admiration for her work and asked to use the design, which she ok'd.
James Bond Tuxedo Birthday Cake
Originally, I intended to use dark chocolate ganache, but for the first time since I've been making the stuff, I ran into an issue with consistency. I've never seen anything like it and hope to never again. All I had on hand at 2:00AM on Saturday morning was white chocolate, so plans changed a little. I whipped up a batch (as seen on my IG stream), let it cool and by 4:00AM I was ganaching.
Upon returning from class on Saturday afternoon, I touched up any rough spots, covered the cake with fondant and decorated it. I made the bow one evening after work, a couple days ahead. The royal icing meant to adhere the bow tie to the cake, had not even dried by the time we had to leave, and fell off as we loaded it in the car. I enlisted the help of a toothpick to lend support for the ride.
James Bond Tuxedo Birthday Cake
Printable template for the bow found on jessicakesblog.com
The cake, as mentioned, was chocolate with a couple layers of vanilla bean cake, coloured teal, and filled with raspberry swiss meringue buttercream. I kept it fairly small by using 7" pans, and built it up to just over 6" tall.  It was moist and flavourful without being overly sweet - in short, it was damn good! Although... it would have been spectacular with dark chocolate ganache. I also wished it wasn't so rushed and that I had time to snap a few shots in day light. Moving on...
 
James Bond Tuxedo Birthday Cake
How a lefty cuts a cake.
SP, I hope that you are blessed with many more birthdays. I value our relationship, and that you look up to me - although that must be difficult, given that height is in your favour. Again, Happy Birthday!
With much love from the 'Godmother' - J. Corleone. 🙂
Tuxedo Birthday Cake
Print Recipe

Raspberry Swiss Meringue Buttercream

Course: Dessert
Servings: 10 cups
Author: I Sugar Coat It

Ingredients

Cake

  • 1 recipe of chocolate espresso cake
  • 1 recipe of vanilla yogurt cake

Buttercream

  • 300 g liquid egg whites
  • 500 g sugar
  • 680 unsalted butter cut into cubes and cool
  • 1 tablespoon raspberry bakery emulsion
  • pinch of salt
  • 1 cup fresh raspberry puree

Instructions

  • Using a clean towel and some lemon juice or vinegar, clean your mixing bowl, whisk attachment to remove any traces of grease.
  • Fill a heavy duty pot about a quarter of the way with water and place on the stove over medium heat to simmer.
  • Add egg whites and sugar to the mixing bowl and place on top of the pot, ensuring the bottom of the bowl is not in contact with the water in the pot. Whisk the sugar egg white mixture constantly, but gently, until temperature reaches 160°F.
  • Once at the correct temperature, remove from heat and transfer mixing bowl to the stand mixer. With the whisk attachment, begin to whip the meringue until it is thick, glossy, and the bottom of the bowl is no longer warm to the touch. Do not begin adding butter while the bowl is still warm.
  • Switch from your whisk to paddle attachment and with mixer on low speed, add butter cubes, one at a time, until incorporated. Continue to mix until it has reached a silky smooth texture.
  • Add emulsion, salt and puree, continuing to beat on low speed until well combined.

  • « Go to Previous Page
  • Page 1
  • Interim pages omitted …
  • Page 44
  • Page 45
  • Page 46
  • Page 47
  • Page 48
  • Interim pages omitted …
  • Page 51
  • Go to Next Page »

Primary Sidebar

Never Miss A Happy Ending...

Previous Sweetness...

Search

Filter by Category

Filter by Date

SWEETEN YOUR INBOX!

All Content Including Images Copyright Jacqueline | I Sugar Coat It© 2026