• Skip to primary navigation
  • Skip to main content
  • Skip to primary sidebar
  • Home
  • About
    • About I Sugar Coat It
    • Features & Press
    • Copyright
    • Disclosure
    • Privacy Policy
  • Recipes
  • How-To
  • Contact
  • sous vide sista

I Sugar Coat It

Home

All Posts

February 2013 By i sugar coat it! 11 Comments

Nuts About You Buttered Pecan Cake

There will be no red or pink here today. Instead, three moist layers of maple syrup cake, mounds of crunchy brown buttered maple pecans and copious amounts of rich, silky, smooth ruffles. A compromise worth making.
Buttered Pecan Cake

Love is a lot of different things to a lot of people, and for me one of those things is fun. Love is all about having fun! Whether you're side by side on the couch catching up on PVR'd episodes of your favourite HBO shows, trying to kick each other's butts on the squash court, curled up in bed reading to each other, or whipping up sweet stuff in the kitchen - from the mundane to the magical moments - they should all be FUN. That's it! My over simplified, uncomplicated definition of love.

And if love were a cake, it would look and taste a lot like this...only in chocolate. 😉

Buttered Pecan Cake
This was not my intended v-day post. If you follow me on Instagram, you probably saw previews of cookies, cupcakes and heart-shaped meringues. In the end, I just wasn't feeling any of them, so I shelved them. Then the Dude, who does more cooking than baking, decided we should make a cake together, and being the healthier of us two, his conditions were no fondant, no food coloring, little sugar, and very little or no buttercream. My response - dude, you're in the wrong kitchen! I don't mind excluding fondant and food color and curbing the sweetness, but no buttercream! I told him he might be more interested in pie. Pecan is his favourite. But I'm not much of a pie girl, so we brought the two together and I negotiated the buttercream back into the deal. It's what I do for a living.

Buttered Pecan Cake
The Dude has really grown quite fond of swiss meringue buttercream,  so I walked him through his first batch, meaning he got to add the butter and the flavour at the end. I wasn't about to risk him messing up the meringue.
Our time together in the kitchen is always fun, we like to pretend we are on a cooking show with lots of drama and over the top antics. Sometimes the disagreements become real and one of us has to leave the set... um, kitchen.

Buttered Pecan CakeButtered Pecan Cake

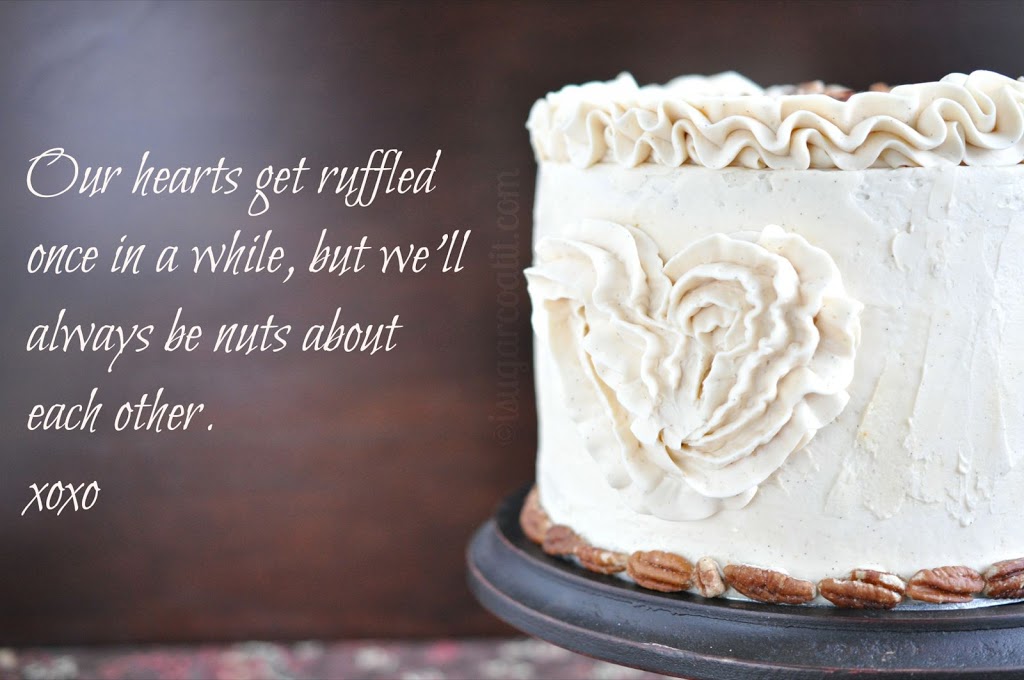
I found a cake over on the TLB Blog and fell in love with the look of it. I absolutely love all of Erin's creations. I used a different cake recipe and flavoured my buttercream differently, but kept close to the overall look of the cake. I really like the borders she piped around the top and bottom of her cake, but he felt we had already added too much buttercream, so he added pecans at the base instead. It was missing something though, something that symbolized Valentine. We agreed on a little piped heart. Perfect!!

The Dude went off to do yoga and I got down to snapping a few shots. In my rush to use as much of the natural evening light as nature would allow, I wasn't careful in securing the tray that I used as a backdrop. A few shots in, the tray came crashing down on the cake - see photo above on left. Sob.

Buttered Pecan Cake

The cake is filled with brown sugar and maple syrup. I browned the pecans in butter and brown sugar and then drizzled with maple syrup. I made a batch of swiss meringue buttercream and flavoured it with crushed vanilla beans, maple syrup and Amarula cream liqueur.

Oh, and look! A little red made it into this post after all.

Wishing you a love-filled day, today and always. Happy Valentine's Day!

Print Recipe

Nuts About You Buttered Pecan Cake

Love baked into three layers of moist maple syrup cake, sprinkled with buttered pecans and wrapped in a perfectly smooth, silky sheet of amarula swiss meringue buttercream.
Cook Time35 minutes mins
Total Time35 minutes mins
Course: Dessert
Servings: 1
Author: I Sugar Coat It

Ingredients

Cake

  • 115 g unsalted butter one stick
  • 100 g brown sugar
  • 2 eggs
  • 280 g all purpose flour
  • 11 g baking powder
  • 2 g salt
  • 1 g cinnamon
  • 230 g pure Maple Syrup
  • 52 g milk

Frosting

  • 300 g liquid egg whites
  • 500 g sugar
  • 680 g unsalted butter
  • 1 tablespoon Tahitian crushed vanilla beans
  • pinch of salt
  • 115 g Amarula Cream Liqueur
  • 42 g pure maple syrup

Buttered Pecans

  • 250 g coarsely chopped pecans
  • 115 g unsalted butter
  • 21 g pure maple syrup

Instructions

  • In the bowl of an electric mixer fitted with the paddle attachment, cream butter and brown sugar. Add eggs, one at a time. Beat well.
  • In a clean bowl combine flour, baking powder, salt and cinnamon. Combine maple syrup and milk in a separate bowl.
  • Alternating the flour and milk mixtures, add each to the creamed mixture, beating well after each addition.
  • Pour batter into three greased and floured 7-inch (23 cm) round pans. Bake at 350°F (180°C) for 35 minutes, or until toothpick inserted in centre of cake comes out clean.  Let cake cool completely before icing.
  • To make the frosting:
  • Using a clean towel and some lemon juice or vinegar, clean your mixing bowl, whisk attachment to remove any traces of grease.
  • Fill a heavy duty pot about a quarter of the way with water and place on the stove over medium heat to simmer.
  • Add egg whites, sugar and salt to the mixing bowl and whisk together lightly with a hand whisk, just until combined. Fit the bowl onto the pot, ensuring the bottom of the bowl is not in contact with the water in the pot. Whisk the sugar egg white mixture constantly, but gently, until temperature reaches 160°F.
  • Once at the correct temperature, remove carefully from heat, wipe the moisture away from the bottom of the bowl and transfer mixing bowl to the stand mixer. With the whisk attachment, begin to whip the meringue until it is thick, glossy, and the bottom of the bowl is no longer warm to the touch.
  • Do not begin adding butter while the bowl is still warm.
  • Switch from your whisk to paddle attachment and with mixer on low speed, add butter cubes, one at a time, until incorporated.  Continue to mix until it has reached a silky smooth texture.
  • Add vanilla beans, syrup and Amarula liqueur, continuing to beat on low speed until well combined.
  • To prepare the pecans:
  • If required, chop the pecans coarsely. Place the butter in a heated saucepan and melt over medium heat. Add the pecans and cook until butter is brown and bubbly. Remove from heat and strain off extra butter. Toss pecans in a bowl with syrup. Divide into three.
  • To assemble:
  • Level cakes, cover with a generous amount of frosting, top with a third of the pecans. Repeat for the next level. Once stacked, cover with frosting, add the remaining pecans to the center top and drizzle with a little maple syrup. Leave as is, or decorate to your liking. I used the Wilton 1M tip to create the ruffles and heart.

I-Sugar-Coat-It-Blog-Signature-Green

February 2013 By i sugar coat it! 11 Comments

I Sugar Coat It In A Skitch!

Happy Friday, friends and welcome back!
I am quite enjoying my newly spiffed up corner of the web and want your visits to be enjoyable as well. I hope you stick around and become serial visitors, so to help you feel more at home I thought I'd show you around. Ready for the tour?

1. I have a logo! He's the little green guy that greets you with cake on each visit. Why an elephant? I have a serious soft spot for the real deal; it's as simple as that! My friend Regina from Specialty Cake Creations suggested I give him a name. I really like that idea! Any suggestions?

2. My rewards program is still in full swing. I have relocated the banner from the bottom of the page to the upper right corner. I've noticed a few people have already redeemed points - SWEET! If you have not already joined, find out how it works here.

3. I am easily bored and crave change, so an image slider is my way of switching things up once in a while. Maybe you'll see something there you missed!

4. New pink social media buttons. Yes, pink! I surprised myself with that colour. Until recently, I was not a fan of pink. I am quickly converting, as I explore my more feminine side.

5. YAY! I now have a more visible navigation bar. My old template had the pages listed off to the side and try as I might, I could not get them to appear at the top. Here you will find links to my recipes, tutorials, about page, contact and my newly introduced Amazon shop, where I feature a number of items I own and use.


6. I have a more prominent post title area, complete with a date tab to give the feel of a page in my sugar diary. The title links to the full post and the author link takes you to my Google+ page.

7. Like the title link, 'take another bite' provides a full serving of the featured treat by linking you to the entire post. Click it to read the full story.

8. The pink comment tab will appear as 'comment' when no comment has been made (which means you get to be the first to do so), or it will show a number when others have commented. Click on it to leave me a comment to let me know you were here. I love hearing from you!

9. Sharing is caring, especially when what you are sharing is sweet! Use these share links at the end of each post to sweeten up someone's day. There's Facebook, Twitter, Pinterest and the 'More' link provides many additional options for sharing.

10. You'll find my blog signature at the end of each post, or just  before the recipe, when there is one included. I am thinking about changing the colour - should I go with green or pink?? Want to create your own post signature? You can do so here - it's free and easy, no download, setup or account required.

11. Last July, I became a ZipList featured partner.  Above each recipe you will find a link to save your recipe to your personal recipe box, generate shopping lists and plan meals. Press the blue button to get started!

12. When a post includes a recipe, this is the general format you'll see, photo and all.


13. Suggestions for past posts are listed below each post. Click the desired link to check it out. To add a similar feature to your blog, try LinkWithin or nRelate, to which I recently switched. They are both free.

14. Here's where you tell me what's on your mind - your hopes, dreams, disappointments - or just a quick note or question about the featured treat. :). Just click in the comment box and you'll be provided various social media options for commenting, or set up a DISQUS profile for future commenting. I'd prefer if the name you choose isn't 'anonymous'. Thanks!

I switched from Blogger comments to DISQUS about a year ago and I often wonder if that was a good move, especially with the recently updated DISQUS 2012. Would love your feedback on this. Do you find it cumbersome to use? Are you less likely to leave a comment using DISQUS? Let me know!


15. My little sugar look-a-like (so not true) links to my About Page, where you will learn all about my hopes, dreams and fears, or at least why I started this blog.

16. More social media links, just in case you missed the set on the left, or just too tired to travel across the page. In addition to the joining me on FB, Twitter and Pinterest, you can subscribe to my blog's RSS feed.

17. Last I checked, I was at 100 email subscribers! That's exciting to me that 100 people care to have my sweets delivered to their inbox. How about you? Ready to take that sweet plunge? Simply enter your email address, press submit, respond to the confirmation email (you may need to check your junkmail), sit back, relax and let the sweets come to you!

18. Posts most viewed in a given week will appear here, click on the link to check them out.


19 -23 need no explanation, but I guess you could also say that about 1-18. I hope I didn't bore you to tears, or worse. It would be extremely helpful if you let me know if you notice something isn't working quite right. Leave me a note below, or send me an email and let me know the browser (Chrome. Firefox, Safari, IE) in which you viewed it.

There you have it, folks! I Sugar Coat It in a Skitch - or 23.

Thank ya'll so much for popping by! Have a wonderful week-end!


Sugar Orchids and Flower Pot Cake

February 2013 By i sugar coat it! 15 Comments

Orchids In Bloom - A Blog Make-Over

Sugar Orchids and Flower Pot Cake
Welcome! You're just in time for the reveal of my newly renovated virtual home!

Right up there with the Ranunculus, the Orchid is one of my favourite flowers. Traditionally the flower of powerful romantic desire, it is also one of the world's most exotic. I received my first from K back when we met and they have been a decor staple in our home since. To say I am obsessed with them would be understated.

So, when I finally decided it was time to freshen up my blog, the very first item to adorn my virtual decor had to be orchids. And being a blog about all things sweet, they had to be of the sugar variety, accompanied by cake, of course. We'll come back to that in bit...
Sugar Orchids and Flower Pot Cake
OK, how cute is my little guy with pink toe nails? We don't have pets now, but if I could I'd have a house full of elephants, great danes and polar bears. And if I was forced to choose just one of the three, elephants would win. While my city's laws and regulations forbid me from having the real deal, nothing stops me from doing so here.
Elephants are extremely intelligent animals with long memory and much like us humans, they express grief, joy and anger. They form deep family bonds and live in tight matriarchal groups. I think I may have been an elephant in a previous life, I really do. Some day I plan to visit an elephant sanctuary and become a part of their group for as long as they would have me. And I'll be sure to share the entire adventure with you.
In the meantime, meet the I Sugar Coat It! elephant - my very first blog logo! He's a little green, but he'll learn the ropes in no time and will always be here to greet you at every visit, a treat in trunk. 🙂
Sugar Orchids and Flower Pot Cake

Back to my sugar orchids and cake!

I received James Roselle's Exotic Sugar Orchids Craftsy course for the holidays and as soon as I got around to watching the videos, I knew right away what I would do with the finished flowers. I set about creating the sugar version of one of my plants.
You may have seen my orchids in the works on my Facebook page a couple weeks ago. Well, this is what became of them shortly after, in case you were wondering. I took things a little beyond what was taught in the class and created leaves, buds, rocks, moss and a pot to hold them all.
I wired the flowers with floral wire and floral tape and then attached the wired ensemble to a wooden cake support/dowel. So that it would not come in contact with my cake, I inserted a bubble straw down the center of the cake and then inserted the wrapped dowel into the straw. James used a similar technique in the course, but added royal icing for additional support.
To make the rocks, I used a mixture of white and dark modelling chocolate, food color and my airbrush to mimic nature. The moss was shredded coconut colored with green food powder and the roots were fondant. The leaves were a fondant/gum paste mixture and were not wired, so were held by the cake.
Sugar Orchids and Flower Pot Cake

Carving the flower pot cake was no huge feat, but it was my first time carving so I was a little worried it would end up a wonky mess. It has two layers of vanilla cake and one of chocolate cake, filled and masked with coconut flavored Swiss Meringue Buttercream. The top was covered in chocolate fondant and the sides were wrapped in white fondant finished with a basket weave texture. The tastiest pot, ever!

So grab a slice and have a look around! The tour will begin as soon as we clean up a few kinks and cracks.

January 2013 By i sugar coat it! 21 Comments

Love Link-up & Give Away!

Strawberry Shortcake
2013 seems intent on leaving me in its dust. January was a blur and we are only a few days away from February. Ahhh... February! The month of love, pink, red, chocolates, roses and strawberries!
Yes, strawberries! I have always associated these little red jewels with all things love-related. Dipped in chocolate, topped with whipped cream, or just piled in a bowl, they're just plain sexy, in my opinion. And this dessert is the perfect union of all of the above, sandwiched between layers of light fluffy cake. A perfectly sweet love affair! Anyone else feeling a little hot and bothered...

I was a little late to my own Valentine's party last year, so I aim to get a head-start this year. And who better to look to for inspiration and to help spread the love than my fellow sweet-fiends!

Which leads us to my very first Linkup - not to be confused with 'hook-up', this isn't that type of page. 😉 Although... you may fall in love with a few blogs along the way and decide to stick with them. That, I encourage!

Strawberry Shortcake

So let's get to it, shall we! Here's how our Linkup works:

  • FUN - let's aim for lots of it!!
  • SHARE - something sweet and valentine-inspired for the rest of us to drool over. Use the inLinkz tool below to add a direct link to the related treat. Links to Blogs, Facebook, Flickr etc. are all welcome. One submission per person please. Add your link and the title of your blog post/dessert.
  • SOCIALIZE - spread the love! You'll be provided options to share on Twitter and Facebook when you add your link. I also encourage you to visit the blogs of other linkup participants and show some love by way of comments. Feel free to leave a comment for me as well. 😉
  • VOTE - for a chance to win a $25 Gift Certificate from Copper Gifts and The Smart Baker! Voting will begin on February 6 and close on February 9. The submission with the most votes at the end of the Linkup wins!
  • LINK RESPONSIBLY -  link only to your work and keep it clean.
If you have any questions or run into any issues linking up, please leave me a comment below. This way, the answers will be available to anyone else with a similar issue. Thx!
A very special thanks to The Smart Baker and Copper Gifts for their generous contributions to this giveaway.

I did not receive compensation, monetary, or otherwise, for this post.


January 2013 By i sugar coat it! 7 Comments

Pâte Sucrée

Pâte Sucrée
Let's start the new year off right, shall we? With lots and lots of fresh, colourful, tasty fruit arranged in concentric circles and sprinkled with almonds to conceal layers of cream and chocolate atop a sweet pastry.
If that's not healthy eating, then send me back to 2012!

And that's exactly where we are headed - back to week 11 of my Baking Arts course. I have since completed the course and moved on to other culinary exploits, so bear with me as I do a little catch up.

Week 11 brought with it four hours of Pâte Sucrée - the French term for a sweet short crust pastry used to make tarts. You may also know it as sweet dough or tart dough, but not to be confused with pie dough. It's made with flour, salt, sugar, egg, and butter using the creaming method and is closely related to pâte brisée (savoury tart crust) and pâte sablée. Prepared correctly, it has the texture similar to that of sable cookies and can taste like shortbread.

Pâte Sucrée
Although fairly easy to make, there are a few tips to keep in mind when making this cookie-like dough:
  • Keep cool and plan ahead. We made our dough the class prior to allow it to chill and not cut into the the time needed for the instructional portion of class. If you are making the same day, allow the dough to rest in the fridge for at least 2 hours after mixing and an additional hour after the dough has been pressed into the tart pan.
  • Warm/hot hands are your enemy. Until this class, we were encouraged to use our hands in the preparation of most of the recipes throughout the course - you have more control and it ensures ingredients are not over-mixed. Because it is important to keep things cool for this type of pastry, a mixer or food processor is recommended, with very little hand contact at the end.
  • Avoid over-mixing. It's the difference between a tough crust and a light, buttery, crumbly texture. Over mixing will cause the gluten to develop, which may be good for bread, but bad for pâte sucrée.
  • Keep it uniformed. A thin, uniformly rolled dough prevents cracks and allows for the pasty to bake and cool evenly.
  • Shrinkage. This brings to mind an episode of Seinfeld that involved George and cold water. 🙂 Allow for shrinkage while the dough is chilling by leaving a bit of an overhang on the edges that will be trimmed before baking.
With the base baked and cooled, the chocolate melted, the cream cooled, and fruits prepared, it was time to bring it all together.
I brushed a thin layer of melted chocolate over the bottom of the shell to prevent it from becoming soggy. Then using a palette knife, I smoothed generous amounts of vanilla cream (custard) over the chocolate before adding the fruit. One was topped with strawberry and the other with a mixture of kiwi, peach and strawberry and then brushed lightly with apricot glaze.
The recipes we use in class yield large quantities, so I would generally cut them down when recreating at home. In the case of this recipe, however, I make the full amount, as the dough can be frozen for up to three months. Just cut into quarters, flatten into disks and wrap in layers of plastic before freezing. It is great to keep some on hand for those impromptu gatherings. Simply defrost in the refrigerator and make tarts or flans of the sweet and savoury variety. It is also perfect for making sable cookies - just roll out the chilled dough and use a cookie cutter in a shape of your choosing.
I'd say this Pâte Sucrée was one of my favourite of the recipes made in class. It is not overly sweet and the combined textures and flavours of the fruit, cream, chocolate and pastry are a perfect complement. You can play around with the basic recipe by adding different flavourings and maybe cocoa powder for a chocolate version.
I'll be sharing weeks 10, 12 and a re-cap with you in the coming weeks. Until then, here is the recipe.
Print Recipe
5 from 1 vote

Pâte Sucrée {Fruit Tart}

A light, buttery, delectable Pâte Sucrée filled with vanilla pastry cream and an array of fresh fruits.
Prep Time25 minutes mins
Cook Time15 minutes mins
Total Time40 minutes mins
Course: Dessert
Servings: 4 tarts
Author: I Sugar Coat It

Ingredients

Pâte Sucrée

  • 300 g sugar
  • 454 g butter soft, but cool
  • 8 g salt
  • 5 g vanilla
  • 100 g eggs 2
  • 120 ml milk
  • 875 g pastry flour
  • 5 g baking powder

Vanilla Pastry Cream

  • 875 ml milk
  • 100 g sugar
  • 100 g cornstarch
  • 125 ml milk
  • 150 g eggs 3
  • 1 vanilla bean
  • salt to taste

Toppings

  • Fresh fruit
  • Melted chocolate
  • Apricot glaze
  • Almonds

Instructions

Pate Sucree

  • Cream butter, sugar, salt and vanilla until light and fluffy.
  • Add eggs one at a time until fully incorporated.
  • Sift together flour and baking powder, add to butter mixture.
  • Add milk and blend until smooth.
  • Work dough on a floured table. Chill until needed - about 2 hours.
  • Roll out chilled dough to about ¼ inch and press evenly into tart tin. Use a fork to punch holes in the bottom of the shell.
  • Place in the refrigerator to chill for an additional hour. Weight the dough with pie weights or beans and blind bake until golden brown - about 15 minutes depending on your oven.

To make the cream:

  • Rinse a saucepan with cold water (this helps to prevent burning).
  • Add milk and vanilla bean to the saucepan and bring to a simmer.
  • Mix sugar and cornstarch in a bowl and whisk eggs into the sugar/cornstarch mixture.
  • Pour some of the warm milk into the egg mixture to temper before adding to the saucepan. Add the egg mixture to the saucepan and bring to a boil, stirring occasionally.
  • Pour the cream into a stainless steel bowl and cover immediately with plastic. Plastic should touch the surface of the cream to prevent a skin from forming. Do not stir while cooling, it will cause the cream to thin. (For a Frenched cream, add whipped cream.)

Assembly:

  • Use a pastry brush to cover the inside bottom of the shell with melted chocolate. This keeps the crust from getting soggy.
  • Whip the cooled pastry cream and smooth onto the layer of chocolate with a pallet knife.
  • Arrange fruit(s) of your choosing to cover the cream.
  • Glaze fruit with heated apricot glaze. You may choose to cover the sides with sliced almonds, or sprinkle onto fruit.

I-Sugar-Coat-It-Blog-Signature-Green

January 2013 By i sugar coat it! 9 Comments

Sweet Memories: Best of 2012!

Happy New Year!!
Is it still safe to say that five days into the year? In any case, I wish you all much love, happiness and success in 2013.
I can't begin to express how much joy blogging has brought me. It has rekindled my passion for creativity and has connected me with so many amazing people from around the world. You know exactly who you are! I look forward to sharing many more sweet moments with you throughout the year.
I thought I'd start the year off by highlighting some of your I Sugar Coat It favourites from 2012 - Sweet Memories: Best of 2012!. Based on my blog statistics, here are your top seven (7 - just because):
#7 - Chocolate Cake With A Kick - this cake was DA BOMB DIGGITY! I have made it a number of times since and it never grows old.

#6 - Crème de Cassis de Dijon - layers of red velvet and vanilla cake cloaked in delicious, silky swiss meringue buttercream frills. Worth every calorie!


#5 - Ruffles & Pearls - this was one of my very first tiered cakes. It tested what little patience I had, but it turned out great. I think you thought so, as well.

#4 - Matcha Cheesecake - if you know me then you know matcha and chai are two of my go-to teas, so baking one into a dessert was a no-brainer. I could not resist adding a little more matcha to top things off in the shape of a feather.
#3 - Key Lime Mojito - this was the summer's people pleaser. After too many burgers, steaks and other grilled goodies, a cool light treat helped to ease some of the guilt.

#2 - My Birthday Cake - birthday and cake!! Need I say more??

#1 - Lavender Rose Macarons - my first try was a disaster, but delicious all the same. I as still so proud about teaching myself the ways of the mighty mac. I take every opportunity to whip up a batch to keep my mac game tight.


There you have it - Sweet Memories: Best of 2012! YOUR faves! The stats don't lie, but a few of my faves are missing. So, did any of yours make the list?


December 2012 By i sugar coat it! 18 Comments

Red Velvet & White Chocolate Gift Cake

Red Velvet & White Chocolate Gift Cake
This is my final post of 2012, which brings my total posts for the year to a nice round 60! So I am wrapping up the year in a sweet, little, edible box complete with a festive sugar bow.

As I've already shared this cake on my Facebook page and Instagram a couple weeks ago, I'll keep it short and hopefully sweet.

Red Velvet & White Chocolate Gift Cake
Before the stencil was applied.

This was a gift... literally. Courtney, who is the colleague of a friend, requested it for her friend's 24th birthday. Courtney sampled the Chocolate Espresso Giraffe cake I made for my friend's birthday back in July and liked it enough to order this cake months later.

Red Velvet & White Chocolate Gift Cake
The cake is three layers of of red velvet, filled with white chocolate swiss meringue buttercream and masked with white chocolate ganache. I covered it with a very thin layer of Choco-Pan white chocolate fondant, then scored a line around the cake to give the impression of a lid. Completed, the cake was a 6x6 cube.
I later added the starburst stencil design, which K thought was 'not such a good idea'. He waited until I added the design to proclaim he liked it better plain. Go figure, huh!
The YouTube video by Lesley from The Royal Bakery was helpful in making the bow.
Colouring gum paste red is a real pain and just plain messy - I know. So instead, I used red fondant mixed with a little tylose to make the bow and tails. The colour appeared a little flat after drying for a couple days, so I airbrushed them using Americolor Amerimist Tulip Red. I used plain fondant to make the bands of red ribbon on the cake, as they are located on parts of the cake that would be eaten.
I used gum paste for the tag and a mini heart cutter to create a cut-out in the tag to insert a red heart, so that it was visible on both sides of the tag. Instead of adding the note myself, I thought it would be more personal if Courtney did, so I included an edible marker with delivery.
I was very pleased to receive this photo from Courtney after it had been cut by the birthday girl, with a note of complete satisfaction.
Courtney thank you for allowing me to play a small, sweet part in your friend's special day!
Red Velvet & White Chocolate Gift Cake
So this is it my friends, post nombre de soixante - 38 more than I did last year!! Thanks for hanging in with me. I appreciate your comments, emails, and interest in my blog. A very special thanks to those of you who are subscribers to my blog - I would love to hear from more of you in the new year.
I hope that you all had a wonderful christmas and wish you the very best for 2013.

December 2012 By i sugar coat it! 2 Comments

My Grown-up Christmas List.

My Grown-Up Christmas List

Do you remember me?
I sat upon your knee, I wrote to you with childhood fantasies.
Well, I'm all grown-up now and still need help somehow. Can you still help somehow?
I'm not a child, but my heart still can dream, so here's my lifelong wish. My grown-up christmas list.
Not for myself, but for a world in need.
No more lives torn apart. That wars would never start, 
and time would heal all hearts, and everyone would have a friend, and right would always win, and love would never end.
This is my grown-up christmas list.

As children we believed the grandest sight to see was something lovely wrapped beneath our tree.
Well, heaven surely knows that packages and bows can never heal a hurting human soul.
No more lives torn apart, that wars would never start, and time would heal all hearts , and everyone would have a friend, and right would always win, and love would never end.
This is my grown-up christmas list.


What is this illusion called the innocence of youth?
Maybe only in our blind belief can we ever find the truth. There'd be no more lives torn apart, that wars would never start, and time would heal all hearts , and everyone would have a friend, and right would always win, and love would never end. Oh this is my grown-up christmas list. This is my grown-up christmas list.

By: Amy Grant
 
 
I hope that we can all take a moment among all the food, family and gifts to truly appreciate our blessings and make some time to give to those without. Let's rekindle the true meaning of the holidays and carry it with us throughout the year.
 
Hope. Peace. Joy.


Red Velvet Cupcakes with Coconut Swiss Meringue Buttercream

December 2012 By i sugar coat it! 8 Comments

Red Velvet Revealed with Coconut SMBC

Red Velvet Cupcakes with Coconut Swiss Meringue Buttercream
Red is the colour of energy, passion and action that exudes a strong and powerful masculine energy. This probably explains my fascination with Red Velvet cake.
I think you already know that I am a chocolate fiend. You may also know that Red Velvet cake is by far one of my favourite cake flavours. Not surprisingly, as it is technically a chocolate cake, only red. Truth be told, as much as I enjoy the taste of this cake, I think my fascination rests mostly with the colour.
Being what seems to be the season of all things red (and green, and silver and gold...) I can't think of a more fitting cake to complement the festive theme.
Red Velvet Cupcakes with Coconut Swiss Meringue Buttercream
According to colour psychology, red is an energizing colour that excites the emotions and motivates us to take action. I guess the people who 'invented' christmas knew exactly what they were doing when they made red its ambassador colour. It certainly excites and motivates many to spend more money on more stuff than is really needed.

Red is also described as a warm and positive colour that is associated with our most physical needs and our will to survive. It awakens our physical life force and has been known to stimulate deeper and more intimate passions, such as love and sex. Valentine's rings a bell, anyone??

Red Velvet cake is essentially coloured Devil's Food Cake. To achieve the red colour, red food colouring is often added, or some use beet juice/root. My preference is the latter, in combination with a quality cocoa powder and I leave the rest to science.

The acid in the vinegar and buttermilk create a chemical reaction that causes the anthocyanin present in cocoa to reveal its true colour. I have recently learned that using a natural unsweetened, non-alkalized cocoa can create a more brilliant, as the natural pigments are more pronounced in the absence of the added alkaline (dutch process). So, I have been thinking about experimenting with various cocoas to come up with a super red colour, without compromising taste.

Red Velvet Cupcakes with Coconut Swiss Meringue Buttercream
Until I have time to carry out such testing, I continue to use E. Guittard Cocoa Rouge and beet juice to make my red velvet cakes - His & Her's Mini Anniversary cakes, Giant RV Cupcake and Avocado Mudslide, to name a few. I love the colour they produce and the taste is phenomenal, in my humble opinion.
Most often, red velvet cake is paired with a cream cheese frosting, I like it with swiss meringue buttercream. Together, they treat the palate to an exquisitely rich, but light, airy dessert that isn't overly sweet. The buttercream atop these little jewels is flavoured with coconut emulsion.
Red Velvet Cupcakes with Coconut Swiss Meringue Buttercream
And here it is - as beautiful naked as it is clothed. Eat up!

Red Velvet Cupcakes with Coconut Swiss Meringue Buttercream
Print Recipe

Red Velvet Cupcakes with Coconut Swiss Meringue Buttercream

An exquisitely rich, but light and airy cake paired with coconut swiss meringue buttercream; a perfect end to any meal.
Prep Time30 minutes mins
Cook Time25 minutes mins
Total Time55 minutes mins
Course: Dessert
Servings: 24 cupcakes
Author: I Sugar Coat It

Ingredients

Cake

  • 1 cup unsalted butter
  • 2 tablespoon water
  • ¾ cup unsweetened cocoa I use E. Guittard Cocoa Rouge
  • 3 eggs
  • 1 cup buttermilk
  • 1 tablespoon white vinegar
  • 2 teaspoon vanilla extract
  • 2 tablespoon beet juice 1 medium beet yields about 4 tbsp
  • 2 ½ cups all-purpose flour
  • ½ cup cornstarch
  • 1 ½ teaspoon baking powder
  • 1 ½ cups superfine sugar

Frosting

  • 150 g liquid egg whites
  • 250 g sugar
  • 340 unsalted butter cut into cubes and cool
  • 1 teaspoon Tahitian crushed vanilla beans
  • 1 tablespoon coconut bakery emulsion
  • pinch of salt

Instructions

  • Preheat oven to 350º F. Line muffin tins with paper cupcake liners.
  • Place the butter, water, and cocoa in a small saucepan and heat gently, without boiling, stirring until melted and smooth. Remove from heat and let cool slightly.
  • Beat together the eggs, buttermilk, vanilla extract, vinegar and beet juice until frothy. Beat in the butter mixture. Sift together the flour, cornstarch and baking powder, then stir into the
  • mixture with the superfine sugar.
  • Pour batter into prepared pans and bake for 25-30 minutes, or until toothpick inserted comes out clean.
  • Cool in pan for about 10 minutes, then place on a wire rack and cool completely before frosting.

For the frosting:

  • Using a clean towel and some lemon juice or vinegar, clean all equipment and utensils to be used for preparing the meringue..
  • Fill a heavy duty pot about a quarter of the way with water and place on the stove over medium heat to simmer.
  • Add egg whites and sugar to the mixing bowl and place on top of the pot, ensuring the bottom of the bowl is not in contact with the water in the pot. Lightly whisk the sugar egg white mixture constantly until temperature reaches 160°F.
  • Once at the correct temperature, remove from heat and transfer mixing bowl to the stand mixer. With the whisk attachment, begin to whip the meringue until it is thick, glossy, and the bottom of the bowl is no longer warm to the touch. Do not begin adding butter while the bowl is still warm.
  • Switch from your whisk to paddle attachment and with mixer on low speed, add butter cubes, one at a time, until incorporated. Continue to mix until it has reached a silky smooth texture.
  • Add emulsion vanilla beans and salt and continuing to beat on low speed until well combined.

I-Sugar-Coat-It-Blog-Signature-Green


  • « Go to Previous Page
  • Page 1
  • Interim pages omitted …
  • Page 43
  • Page 44
  • Page 45
  • Page 46
  • Page 47
  • Interim pages omitted …
  • Page 51
  • Go to Next Page »

Primary Sidebar

Never Miss A Happy Ending...

Previous Sweetness...

Search

Filter by Category

Filter by Date

SWEETEN YOUR INBOX!

All Content Including Images Copyright Jacqueline | I Sugar Coat It© 2026