• Skip to primary navigation
  • Skip to main content
  • Skip to primary sidebar
  • Home
  • About
    • About I Sugar Coat It
    • Features & Press
    • Copyright
    • Disclosure
    • Privacy Policy
  • Recipes
  • How-To
  • Contact
  • sous vide sista

I Sugar Coat It

Home

All Posts

June 2014 By i sugar coat it! Leave a Comment

Blackberry Baileys Mini Creamsicles & Popsicle Round-Up

Blackberry Baileys Mini Creamsicles
Hiya! The warmer weather is finally upon us, so let's get to chilling...
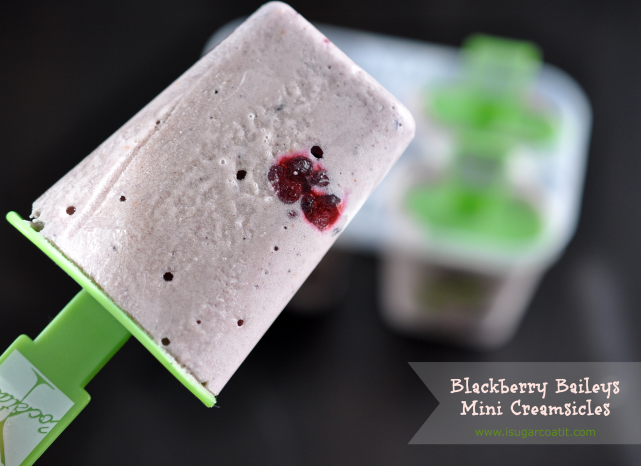
Frozen Fridays will return for its second year starting this coming Friday, June 13! Let's kick things off, unofficially, with a quick look back at last years sweet suckers and our first frozen treat of the season. We'll come back to these boozy Blackberry Baileys Mini Creamsicles in a moment.
Last year we rounded out Frozen Fridays with these Malibu Adult Summer Soothers in frozen bands of Passion Fruit, Pineapple, Mango and Coconut. Enter drool here...
Malibu Summer Soothers Popsicles
Let's not forget these almost embarrassingly easy, straight-from-a-can Peach Bellini Popsicles. Packed with fresh fruit and fizz, these were a definite crowd-pleaser!
These and the pops above were two of my post pinned pops on Pinterest.
 
Peach Bellini Popsicles
And who can forget my Breakfast Smoothie Popsicles. Breakfast on-the-go never looked and tasted so refreshing!
Breakfast Smoothie Popsicles
I personally could not get enough of these Lychee Lime Coconut Popsicles. Although they only appeared on here once, many batches were made over the course of the summer. For a tropics tainted tongue, get on these pronto!
Lychee Lime Coconut Popsicles
We also enjoyed a few of my favourite teas in their frozen and often boozy form; some of which were featured on DavidsTEA Recipe of the Day and Best Friends for Frosting! See the Amarula Chai Latte Creamsicles below, those were featured by the makers of the liqueur. Very cool! (pun intended)
 
Frozen Friday Popsicles
Finally, the pops that started it all! Berry Pistachio Cream Pops for a Summer No-Bake Party hosted by the lovely Regina from Leelalicious. And Boozy Strawberry Creamsicles by Regina for a guest post on my blog. To sum things up...YUM!!
 
Frozen Friday Popsicles
So, back to these Blackberry Bailey's Mini Creamsicles. A perfectly delicious, balanced blend of berries, booze and coconut cream - the unofficial start to another sweet summer of Frozen Fridays!
Are you on Instagram? Join the fun by tagging your summer sweets with #frozenfriday14 on Instagram. Details to follow for a Group Pinterest Board and link party. I hope you will join the fun!
 
Print Recipe

Blackberry Baileys Mini Creamsicles & Popsicle Round-Up

Blackberry Baileys Creamsicles. A cool, delicious blend of berries, booze and coconut cream.
Prep Time6 minutes mins
Total Time6 minutes mins
Course: Dessert
Servings: 4
Author: I Sugar Coat It

Ingredients

  • 120 ml Coconut Cream ½ cup
  • 120 ml Baileys liqueur ½ cup
  • 145 g blackberries 1 cup, frozen
  • 70 g blackberries ½ cup, fresh

Instructions

  • Blend the coconut cream and frozen berries for a few seconds, then add the Baileys and continue to blend until the berries have liquified.
  • Pour into four small popsicle molds. Add a few fresh blackberries to each mold. Insert popsicle stick and freeze for at least four hours.
  • Remove from freezer, place mold under warm running water to loosen popsicles. Popsicles should slide out effortlessly.
  • Chill out and enjoy!

Notes

You will need:
Blender
Popsicle mold

May 2014 By i sugar coat it! Leave a Comment

No-Bake Vanilla Wafer Butter Cups

Easy, four-ingredient, No-Bake Vanilla Wafer Butter Cups, topped with a generous layer of rich, dark chocolate.

No-Bake Vanilla Wafer Butter Cups
Hey, there! Let's shelve the healthy nut butters for a second and turn our tastebuds to Vanilla Wafer Butter...
 
Yes! No-Bake Vanilla Wafer Butter Cups topped with a rich, dark chocolate glaze. I realize that it's not quite warm enough to have already turned my mind to sweet treats of the no-bake variety, but it has been a very long, cold winter. Truth be told, I made these three weeks ago - I shared a process shot on my Instagram feed.
 
Yup, summer has occupied my thoughts for some time.
No-Bake Vanilla Wafer Butter Cups
I like to peruse the sale baskets at Williams-Sonoma after the holidays. OK, who am I kidding, I make weekly visits - gets me up from behind my desk and out of the office. Yeah, fresh downtown air and a little physical activity that starts at WS and sometimes ends at Momofuko Milk Bar really defeats the purpose, wouldn't you say... but I digress.
 
On one such visit to WS, I picked up a few jars of Vanilla Wafer Butter. You know something is addictive when buying just one is never an option. Also, when you find yourself eating it with a spoon from a jar while hiding in dark corners of your home...
 
So, to not be judged too harshly, I molded them into mini cups, topped them with chocolate glaze and enjoyed them as a real dessert, like a normal person. 
No-Bake Vanilla Wafer Butter Cups
Actually, I took most of these No-Bake Vanilla Wafer Butter Cups to work in an effort to prove to a certain someone that I am no addict. I also made a small tart pan version and took that in as well. Move along now, no addiction here.
 
If only I could put an end to the recurring dream of me covered in the stuff in the Oval office and the President walks in covered in chocolate...oops, you're still here!
No-Bake Vanilla Wafer Butter Cups
 Look at them...beckoning me, urmm... you. Go on, make a batch, find a dark corner, a spoon and ENJOY! 🙂 Everything you need is below.
 
More No-Bake Nosh:
Pomegranate Pecan Tofu Mousse Tart
Maple Berry Vegan Cheesecake
Blueberry Chia Breakfast Smoothie


Print Recipe

No-Bake Vanilla Wafer Butter Cups

Easy, four-ingredient, No-Bake Vanilla Wafer Butter Cups, topped with a generous layer of rich, dark chocolate.
Prep Time2 hours hrs
Total Time2 hours hrs
Course: Dessert
Cuisine: American
Keyword: chocolate, peanut butter
Servings: 12
Author: I Sugar Coat It

Ingredients

  • 180 grams graham cracker 2 cups
  • 180 grams vanilla wafer butter 1 cup
  • 98 grams confectioner's sugar ¾ cup
  • 3 grams vanilla bean paste 1tsp
  • 270 grams dark chocolate 1 ½ cups

Instructions

  • Pulse the crackers in a food processor until crumb consistency is reached.
  • Add the wafer butter, confectioner's sugar and vanilla paste. Pulse until combined and smooth.
  • Press into tartlette or tart molds and set aside.
  • Melt chocolate over a double boiler, stirring continually. When completely melted, remove form heat and transfer to a container that makes pouring easy - I used a measuring cup. You can use a microwave for this step, as well, but it is not my preferred way of melting chocolate - higher chance of burning the chocolate from my experience.
  • Pour melted chocolate onto the wafer butter dough in each mold and place in the refrigerator overnight, or until set (about two hours).

{This post contains affiliate links.}

Starbursts Sugar Poppy Cake

May 2014 By i sugar coat it! Leave a Comment

Starbursts and Sugar Poppy 2.0

Starbursts Stencilled Cake and Orange Sugar California Poppy
Happy Victoria Day! Are you ready for some fireworks? Or perhaps, some Starbursts and Poppies of the sugar variety...

Look familiar? Well, that's because this is version 2.0 of my original Starbursts Citrus Cake and my Sugar Poppy from 2012.

The original starburst cake has been one of my most popular posts to date. Partly because it appeared in a post that included a giveaway, but since then it has received many visits on a daily basis and has been pinned a lot. So I felt it was time for a revisit.
Starbursts Stencilled Cake and Orange Sugar California Poppy
 You may remember some progress shots from my Instagram a couple weekends ago. This was made for a friend's birthday - the fire cracker among a small group I hold dear. This cake represents the way I see her - bold, effervescent, bright and fun, wrapped in a sweet little package - and like starbursts, beautiful and rare.
Again, I used the Starburst Cake Side Stencil, however, this time with royal icing. I then used food colour and fine brushes to colour each dot. Way more time-intensive than the original, but so worth it. I quite like how it turned out and so did the birthday girl.
Starbursts Stencilled Cake and Orange Sugar California Poppy
For the poppy, I used the same techniques I showed you in my tutorial from 2012, but with an additional row of petals, black instead of yellow stamens and tinted the edges gold.
I have another post lined up that walks you through my process for covering and decorating this cake and making the flower. For now, I hope you enjoy this little beauty as much I did creating it and the birthday girl had devouring it!

May 2014 By i sugar coat it! Leave a Comment

Watermelon Coconut Cucumber Flamingo Chillers

Watermelon, coconut water, cucumber and rum come together to make a quick and easy, perfectly refreshing summer cocktail.Watermelon, coconut water, cucumber and rum come together to make a quick and easy, perfectly refreshing summer cocktail.
HELLOOOOO...heck it must be Friday! And these Watermelon Coconut Cucumber Flamingo Chillers are the perfect start to the long weekend! Complete with a few tacky toppers...

And speaking of tacky... have you seen my hair lately? Not when I leave for work in the morning and it's all slick and shiny. I'm talking the end of the day after I've walked a few blocks into the chair of a wanna-be-stylist called humidity. By the time she's done with me, I look like a prissy poodle at a dog show. All the rain of late only adds to the bad comedy that is my hair. By the time I arrive home, I feel like someone should hand me a pair of platforms and a sequin jumpsuit and start the floor spinning under a disco ball.

Although I think I would have totally rocked that era, had I been been conceived a little earlier, but in 2014, that's just not my kind of tacky.
Watermelon, coconut water, cucumber and rum come together to make a quick and easy, perfectly refreshing summer cocktail.
Long-legged, wading birds dressed in frilly, pink and scarlet plumage, however... totally my kind of tacky! I first shared these flamingo straw-huggers on my Instagram a few weeks ago, while at home nursing a shoulder injury. The IG photo shows the straws on which these birds were purchased, but I had other plans for them, as soon as I spotted them in the dollar store while scouting cheap summer photo props. (and that's a run-on sentence, if I've ever seen one...)
They will most definitely make another appearance on the blog before the warm weather is through. For now, I rather like the way they look atop my Watermelon Coconut Cucumber Flamingo Chillers. Urm, hold on... is that summer I hear trampling up my driveway?
Watermelon, coconut water, cucumber and rum come together to make a quick and easy, perfectly refreshing summer cocktail.
And speaking of warm weather, it ain't upon us quite yet. Lots of rain, which I don't mind, as it makes everything look so lush and alive - a welcome change after such a stark winter.
Take note, spring - your wet days and cool nights won't stop the polka-dot bikinis from popping up along side these deliciously, refreshing Watermelon Coconut Cucumber Flamingo Chillers.
Blended and shaken or frozen, they make the perfect warm weather treat!
Serve Up Some More Summer With:
Peach Bellini Popsicles
Matcha Mojito Popsicles
Malibu Summer Soothers

Print Recipe

Watermelon Coconut Cucumber Flamingo Chillers

Watermelon, coconut water, cucumber and rum come together to make a quick and easy, perfectly refreshing summer cocktail.
Prep Time10 minutes mins
Total Time10 minutes mins
Course: Drinks
Servings: 4
Author: I Sugar Coat It

Ingredients

  • 1 small watermelon approx. 6 cups, cut into small pieces and chilled
  • 1 large cucumber peeled, sliced and chilled
  • 1 cup coconut water chilled
  • 4 generous shots of coconut rum
  • ice

Instructions

  • Place all ingredients, except the rum, in a large blender and blend until all items are liquefied.
  • If your preference is non-alcoholic, stop here and serve. If you prefer a less chunky drink, pour through a strainer before serving.
  • For the alcoholic variety, add some ice, a cup of the blended drink and a shot of rum to a shaker. Shake vigorously for a couple seconds and then pour through bar strainer into a cup. Repeat for the other three servings.
  • If making popsicles, pour into molds and freeze overnight.
  • Enjoy!


May 2014 By i sugar coat it! Leave a Comment

Mother's Day Berry Beet Smoothtinis

Mother's Day Berry-Beet Smoothtini
Happy Mother's Day! Start the celebration early with these made-for-mom Berry Beet Smoothtinis...
Brunch is few hours away, but why wait to celebrate Mom? Unwrap the blender, unlock the bar and start your Mother's Day off with a couple of these Berry Beet Smoothie elixirs.
This smoothie is packed with all the goodness of beets, berries and kefir with a touch of raspberry liqueur. GOOD MORNING!
Mother's Day Berry-Beet Smoothtini
This combination is berry, berry good and a great addition to any brunch table. You can make it a little more tropical by replacing the liqueur with coconut rum and a splash of pineapple juice. Or, feel free to omit the alcohol, so that the kiddos can enjoy this deliciously filling smoothie.
I made these quite thick, so feel free to adjust the amount of berry to kefir ratio to suit your liking. When left thick, these Berry Beet Smoothtinis are perfect as soft serve ice-cream. Dessert for breakfast - YUM!
Mother's Day Berry-Beet Smoothtini
However you choose to enjoy them, they won't last long, so grab one and lift it with me in a toast to all the wonderful, leading ladies in our lives.  Happy Mother's Day!
Celebrate Mom:
Blueberry Chia Breakfast Smoothie
Monogrammed Chalkboard Cookies
Banana Butterscotch Bombshell
 
Wishing you a wonderful, love-filled day! 

Print Recipe

Mother's Day Berry Beet Smoothtinis

Prep Time5 minutes mins
Total Time5 minutes mins
Course: Drinks
Servings: 2
Author: I Sugar Coat It

Ingredients

  • 1 cup frozen berries strawberries and raspberries
  • ½ cup kefir
  • 2 tablespoon organic beet powder like that found at nuts.com
  • a generous shot of raspberry liqueur I used Chambord Royal
  • fresh berries for garnish

Instructions

  • Add the frozen fruits, kefir and beet powder to a blender and blend until combined. Add the liqueur and blend for a couple seconds.
  • Pour into martini glasses, sprinkle with a little beet powder and top with a fresh berry. Add a straw and enjoy!

May 2014 By i sugar coat it! Leave a Comment

Monogrammed Chalkboard Mother's Day Cookies

How awesome is your mom? Awesome enough to have her own coat of arms? How about personalized Monogrammed Chalkboard Mother's Day Cookies?Monogrammed Chalkboard Mother's Day Cookies

Oh, did I mention they are fully edible AND palatable? The cookies are a fragrant blend of rose and cardamom, inspired by a recent visit to Aveda. Yup, flavour combos flood my mind while shopping for shampoos and the like. In my world, if it smells great together, then that must translate to taste. Right?!

OK, not always, but once I had the flavour down, I enlisted some fancy plaque cutters, a batch of marshmallow fondant, stencils and some royal icing to fully pimp out these fancy plaques.
Monogrammed Chalkboard Mother's Day Cookies
Initially, I intended to keep these Monogrammed Chalkboard Mother's Day Cookies a simple black and white to play up the chalkboard effect that is currently trending. But the floral stencil was just screaming for some colour, then I found myself adding colour to the other designs. I am happy I did! What's your preference - black and white or colour?
Oh, and how about my sugar magnolias and poppy? I plan to blog about them in a future post, but I felt they deserved a spot to shine in the interim. Plus, my photos were starting to look a little halloween-ish, so a pop of colour was in order.
Monogrammed Chalkboard Mother's Day Cookies
With Mother's Day just a few days away, these Monogrammed Chalkboard Mother's Day Cookies would make the perfect gift. Don't have font stencils handy? Try diluting some white edible gel paste or petal dust in clear alcohol and paint her initials. No time to make your own fondant, store-bought black fondant will do the trick.
The cookies above could also double as great teacher gifts, don't you think? With the school year coming to a close, bake up a batch and get the kiddos to write messages to their favourite educators.
Monogrammed Chalkboard Mother's Day Cookies
Whether it's mom or teacher, how perfect are these cookie boxes for gifting your beautifully decorated cookies! The ribbon? I found it in my sewing room and was pleasantly surprised with how well it coordinated with my cookies!
 
Mother's Day Past:
Mother's Day Cookie Bouquet
Banana Chocolate Cake with MOM Topper
Ruffles & Pearls Mother's Day Cake
To make these cookies you will need:
One recipe Cardamom Rose Sugar Cookies
One recipe Marshmallow Fondant (colour with SugarFlair Black Extra)
One recipe Royal Icing
Copper Gifts Large Fancy Square Cutters
Designer Stencils Chic Rose Mini Print, Monogram and Royal Damask #1 Stencils
Wilton Gold Lustre Dust (edible)
SugarFlair Red Gel Paste (edible)
Monogrammed Chalkboard Mother's Day Cookies
Make the marshmallow fondant a day before to allow the colour to set.
Bake cookies and cool completely. To ensure little to no spread, I chill my cut dough in the freezer for 3-5 minutes prior to baking.
Roll out fondant and then run it through the #1 setting on a pasta roller/attachment, if you have one.
Cut out fondant with the same cutters used to shape cookies. Use a pasty brush to add some piping gel to the surface of cookies to adhere the fondant cut-outs.
Use royal icing and stencil to add designs.
Use gel paste or petal dust diluted in clear alcohol to add colour.
Package and gift!
Maple Bacon Cheddar Flax Scones

May 2014 By i sugar coat it! Leave a Comment

Maple Bacon Cheddar Flax Scones

Maple Bacon Cheddar Flax Scones
Good morning! How about a little savoury treat to start your weekend? Maple Bacon Cheddar Flax Scones await your tastebuds...

Sooo... apparently the level of intelligence in pigs may be cause for us humans to stop eating them. At least that's the oink being echoed around the drinking trough these days.

My mister is vegetarian, so I get to hear what a horrible person I am every time I stick a piece of meat in my mouth. I simply smile and remind him of his leather shoes, jacket, belts, wallets.... I could spend the next paragraph dissecting the various points he so poorly argues, but then I'd just bore you. And there is absolutely nothing boring about these savoury Maple Bacon Cheddar Flax Scones.
Maple Bacon Cheddar Flax Scones
Don't get me wrong, I would gladly embrace vegetarianism full-time, but I am chronically anemic. Unfortunately, plant-based sources of iron just aren't enough to aid my condition, so my attempts to fully convert have been short-lived. And, well, the thought of never having bacon is just...unappetizing.
I only have bacon once in a while, but the smell alone puts me in a trance. Even the vegetarian has to leave the kitchen when it's being cooked, it's the one thing that could make him defect.
Maple Bacon Cheddar Flax Scones
These Maple Bacon Cheddar Flax Scones were an irresistible, palate-pleasing blend of spicy, salty and a hint of sweetness baked into wonderfully light and crispy wedges.
I baked two batches, both stuffed with ground flax, sharp cheddar, green onions and one with crispy maple bacon. Once out of the oven, I topped both batches off with a little sea salt and a drizzle of pure maple syrup. YUM!!
Maple Bacon Cheddar Flax Scones
These were delicious, with and without the bacon. So, if you stand on the side of the debate that argues pigs are too smart to be used as food, you can still enjoy these scones, guilt-free.
So go ahead and whip up a batch for brunch this weekend, you most certainly won't regret it.
More Scones:
Chocolate Coffee Chip Scones
Gluten-Free Vanilla Bean Blackberry Scones

Maple Bacon Cheddar Flax Scones
Print Recipe

Maple Bacon Cheddar Flax Scones

Savoury, melt-in-your mouth scones packed with ground flax, maple bacon, old cheddar, scallions and topped with sea salt and maple syrup.
Prep Time10 minutes mins
Cook Time30 minutes mins
Total Time40 minutes mins
Course: Breakfast
Servings: 8
Author: I Sugar Coat It

Ingredients

  • 199 g unbleached all-purpose flour 2 cups
  • 26 g ground flax seeds ¼ cup
  • 7 g baking powder 2tsps
  • 12 g brown sugar 1tbsp
  • 2.5 g salt ½ tsp
  • 4 green onions - stalks and bulbs scallions, chopped
  • 170 g grated sharp cheddar - mix of white and orange 1 ½ cups
  • 5 strips of maple bacon crisped and crumbled
  • 80 g unsalted butter ⅓ cup, cold and cubed
  • 150 g buttermilk ⅔ cup
  • coarse sea salt optional topping
  • pure maple syrup optional topping

Instructions

  • Preheat the oven to 350ºF. Line a cookie sheet with a silpat mat.
  • Fry bacon until crisp and let cool on paper towel.
  • Chop the green onions, grate the cheddar and set aside.
  • In a large bowl, sift together flour, flax, baking powder and salt. Use a hand whisk to add in the sugar.
  • Brake the bacon into pieces and add to the flour mixture along with the
  • green onions and cheese. Fold into flour mixture.
  • Cut the butter into the flour mixture using a pastry cutter or a fork.
  • Make a well in the center of the flour mixture and pour in the buttermilk. Use a spatula to combine.
  • Turn the dough out onto a lightly floured counter and mold into a round disk.
  • Use a sharp knife to cut the dough into eight wedges.
  • Transfer to the silpat lined cookie sheet and bake on the middle rack for 30 minutes, or until the edges and tops appear light brown.
  • Remove from the oven, place sheet on a wire rack and drizzle with maple syrup, then sprinkle tops of scones with a little sea salt.
  • Enjoy while warm!


DIY Easter Eggs

April 2014 By i sugar coat it! Leave a Comment

DIY Easter Eggs

Got eggs? Got napkins? Got ten minutes? Then you have everything you need for this fun little project just in time for Easter!
DIY Napkin Decorated Easter Eggs

Yesterday was grey and damp - perfect for curling up with my iPad and catching up on my favourite blogs. And I had a lot of catching up to do.

After reading Deborah from East of Eden Cooking most recent post, I was inspired to give this Easter egg-making business a try. Her post is filled with eggs in soft hues of green, purple, blue and yellow, some decorated with lace and other with napkins. Yes, napkins!! I immediately knew that I would be making a few of my own.
DIY Napkin Decorated Easter Eggs
The technique is borrowed from La Receta de la Felicidad and is super simple.
I boiled a few eggs that would later be used in a salad, chose floral and polka dot napkins that I recently purchased on a grocery shopping trip to the SuperStore and used a pastry brush and liquid egg whites to adhere them to the eggs. VOILA!!
Not to worry, the shells easily peel off when you are ready to eat them.
DIY Napkin Decorated Easter Eggs
I absolutely enjoyed making these DIY Easter Eggs! Reminded me of making papier-mache masks when I was little, but with way fewer steps and less mess.
Round up the little ones some eggs and a few of your favourite napkins and create some pretty little Easter Eggs for tomorrow's after dinner egg hunt.
Happy Easter!
Bunny Nests Easter Carrot Cupcakes

April 2014 By i sugar coat it! Leave a Comment

Easter Carrot Cupcakes With Bunny Cookie Toppers

Happy Easter (almost)! I have the perfect little after dinner Easter treat for you, complete with little bunnies! Hop on over...
Easter Carrot Cupcakes With Bunny Cookie Toppers

If you were to ask me what Easter is about, my answer would include bunnies, chocolate eggs... the like. Beyond that, I am not too familiar with the religious associations to the holiday. What one has to do with the other is a mystery to me and I'm alright keeping it that way. I'll venture a bet that the bunny/pastels/chocolate version will continue to be more appealing to me.

Easter Carrot Cupcakes With Bunny Cookie Toppers
You may remember my post from last Easter, that walks you through How Easter Bunnies Are Made. It's quite magical and sweet and colourful and I guarantee you, no animal was hurt in the process.
My favourite bunny of all time is Peter Rabbit. He takes offence to being called a bunny, but makes exception for those of us closest to him. I wanted to fashion the bunny toppers in his image, but had no time. Unlike Peter who gets to spend his days smartly dressed in a blue blazer, hopping through neighbours fences and getting into mischief, I have a job.
Easter Carrot Cupcakes With Bunny Cookie Toppers
So, I took a short-cut and simply drew eyes, bushy little tails and a knot ties using edible markers. Perfect little toppers for these delightful Carrot Cupcake bunny nests. They would make a fun Easter project for your little ones.
Speaking of little ones and bunnies, here's another little treat to get them hopping on the bunny trail - The Tale Of Peter Rabbit. An interactive pop-up e-book for your iOS devices. I have this app on my iPad. No, I don't have kids. No, I am not below reading children's books from time-to-time. Yes, I absolutely love the nostalgia they invoke.
Easter Carrot Cupcakes With Bunny Cookie Toppers
I have not made many carrot cakes, but whenever I have, they tend to be void of nuts, raisins, pineapple and all the other unnecessary additions that have long turned me off from carrot cake. This is a slight adaptation of a recipe from Gimme Some Oven and is most definitely a keeper. I used coconut oil instead of vegetable oil, lessened the amount of eggs by one and used vanilla paste instead of extract - it has a more pronounced flavour. Give it a try - it will not disappoint!
Side Note:
I am totally excited to have been included in iVillage's The Ultimate Guide To Easy Delicious Easter Recipes  as part of Food Bloggers of Canada Easter Recipe Round-Up! My Easter Bunny post from last year was chosen to be among the ten featured. Check it out!!
More Bunnylicious Treats:
How Easter Bunnies Are Made 
How Do You Like Your Eggs?
Hope you have a Happy Easter!!
 

Bunny Nests Easter Carrot Cupcakes
Print Recipe

Easter Carrot Cupcakes With Bunny Cookie Toppers

The perfect blend of carrots and spices, smothered with light, fluffy clouds of vanilla bean cream cheese and topped with vanilla bean sugar cookie bunnies.
Prep Time20 minutes mins
Cook Time25 minutes mins
Total Time45 minutes mins
Course: Dessert
Servings: 12
Author: I Sugar Coat It

Ingredients

Cupcakes

  • 458 g freshly shredded/grated carrots 2 cups
  • 471 g unbleached 3 ¼ cups, all-purpose flour
  • 8 g ground cinnamon 1 tbsp
  • 11 g baking soda 2tsp
  • 10 g table salt 2 tsp
  • 5 g baking powder 1 tsp
  • 2 g freshly ground nutmeg ½ tsp
  • a pinch of ground cloves
  • 328 g coconut oil 1 ½ cups
  • 209 g granulated sugar 1 cup
  • 206 g brown sugar 1 cup
  • 4 eggs
  • 20 g vanilla bean paste 1 tbsp

Frosting

  • 241 g cream cheese 1 package
  • 57 g unsalted butter ¼ cup
  • 7 g vanilla bean paste 1 tsp
  • 324 g confectioner's sugar 2 ½ cups

Cookie Toppers:

  • One recipe of
  • Vanilla Bean Sugar Cookie shaped into little bunnies and decorated with your favourite Royal Icing recipe.

Instructions

Cupcakes

  • Preheat the oven to 350ºF.
  • Line a 12-well muffin pan with cupcake liners.
  • Using a food processor, or hand-held grater, shred the carrots and set aside. I used about 10 carrots to get the desired amount, but the quantity may differ for you depending on the size of your carrots.
  • In a large bowl, sift together the flour, cinnamon, baking soda, salt, baking powder, nutmeg and cloves. Set aside.
  • Add the oil, granulated sugar, brown sugar and vanilla bean paste to the bowl of your stand mixer. Using the paddle attachment, mix on medium (I used the #4 setting on my KA) until fully incorporated. I used my 6-quart KA bowl, as the recipe produces a fair amount of batter.
  • Crack your eggs into a bowl with a spout. With the mixer on low (I use the stir setting on my KA), add one at a time to the sugar/oil mixture, blending well after each addition.
  • Stop the mixer and add the flour mixture to the oil/egg mixture in the mixing bowl. Beat on medium speed until until just combined. Stop the mixer, scrape the sides down and beat for a few seconds more.
  • Remove the mixing bowl from the stand and and fold the grated carrots into the batter using a spatula or wooden spoon.
  • Use an ice-cream scooper to fill the cupcake liners about three-quarters full. Reserve the rest of the batter for the round cake tins. (I'll share that post at a later date).
  • Place on the middle rack of the oven and bake for 20-25 minutes. Remove from oven and allow to cool completely on a wire rack.

To make the frosting:

  • Using a stand mixer fitted with the paddle attachment, cream the butter, cream cheese and vanilla bean paste on medium speed until smooth. Lower speed to the stir setting and gradually add the confectioner's sugar. Increase the speed to medium and continue to beat until smooth.
  • Assembly:
  • Using a small, flexible spatula, smear a generous amount of frosting onto each cupcake. Use the spatula to swirl it around the cupcake - it's not meant to look perfect. Place the bunnies on top and enjoy!

  • « Go to Previous Page
  • Page 1
  • Interim pages omitted …
  • Page 33
  • Page 34
  • Page 35
  • Page 36
  • Page 37
  • Interim pages omitted …
  • Page 51
  • Go to Next Page »

Primary Sidebar

Never Miss A Happy Ending...

Previous Sweetness...

Search

Filter by Category

Filter by Date

SWEETEN YOUR INBOX!

All Content Including Images Copyright Jacqueline | I Sugar Coat It© 2026