• Skip to primary navigation
  • Skip to main content
  • Skip to primary sidebar
  • Home
  • About
    • About I Sugar Coat It
    • Features & Press
    • Copyright
    • Disclosure
    • Privacy Policy
  • Recipes
  • How-To
  • Contact
  • sous vide sista

I Sugar Coat It

Home

All Posts

Ginger Beer Rosemary Rye Cooler

December 2014 By i sugar coat it! 6 Comments

Ginger Beer Rosemary Rye Cooler {NYE Cocktail Countdown}

Ginger Beer Rosemary Rye Cooler
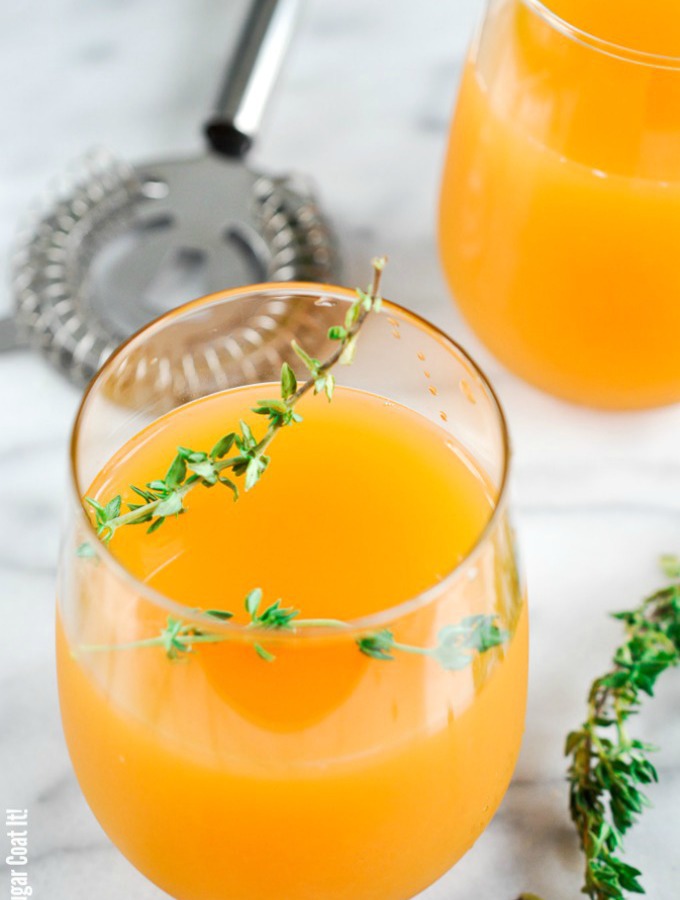
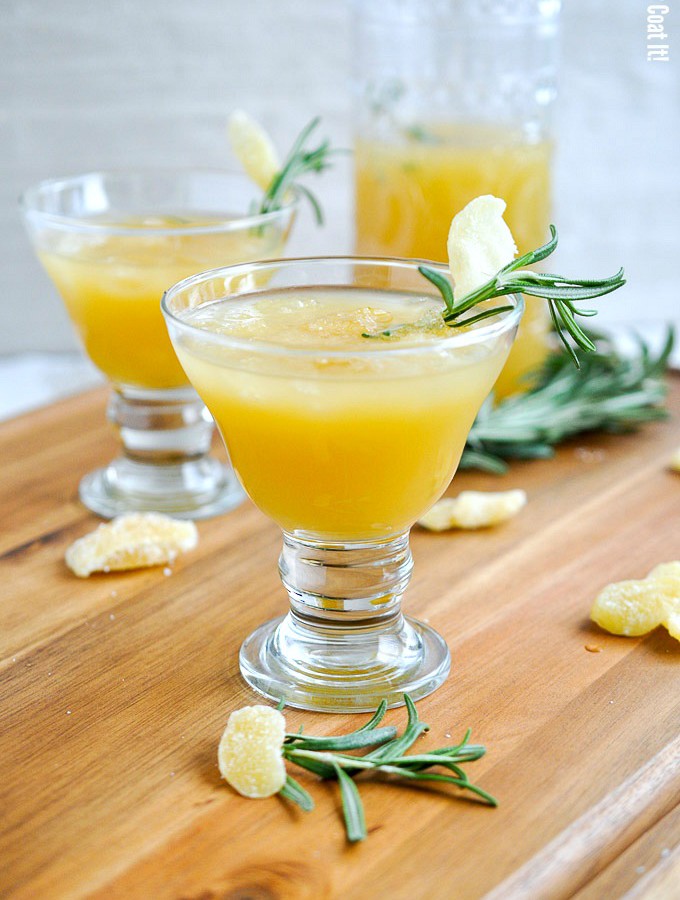
Our second libation working up to the New Year is Ginger Beer Rosemary Rye Cooler. A robust rye complemented by refreshingly aromatic ginger and rosemary.

It's simple, sexy, seriously sensory seducing and totally NYE glass-raising worthy!Ginger Beer Rosemary Rye CoolerThe always incredible aromatic rosemary awakens your senses without overwhelming, setting the stage for a brief, but exhilarating wave of ginger's refreshingly spicy heat, quickly followed by the dark, smooth, enveloping warmth of rye.

The flavour notes play differently with each sip making it one of my favourite concoctions to date.

Ginger Beer Rosemary Rye CoolerGinger Beer, not to be confused with Ginger Ale, is another drink that is popular in the Caribbean. It's origins date back to the 1800's.

Ginger Beer can be found in its original fermented form in liquor stores and usually contain an alcohol content of around 4% (at least the ones with which I am familiar). It's non-alcoholic cousin can be found in the international section of most grocery stores here in Canada.

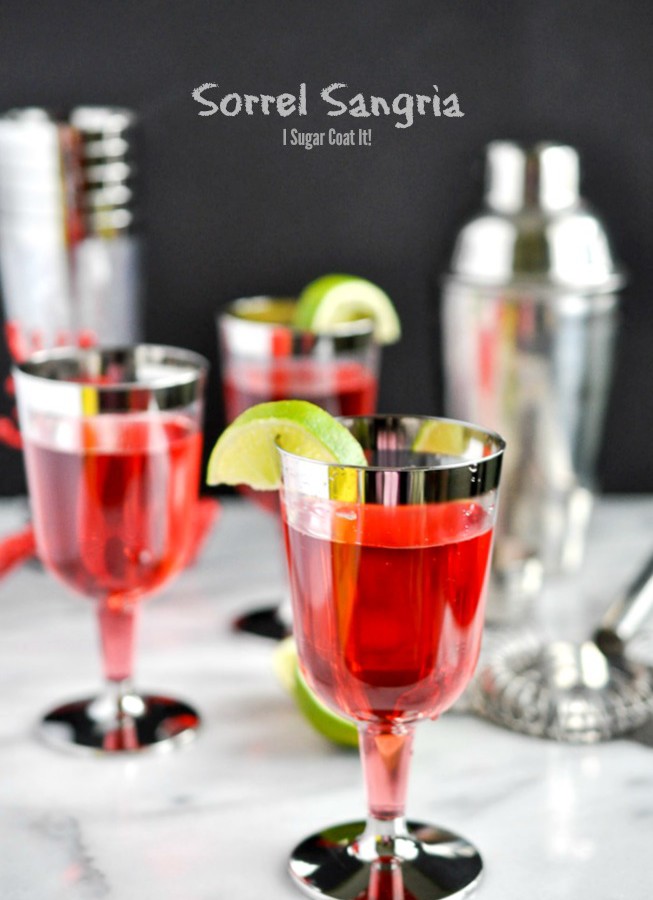
I would normally use the non-alcoholic variety for mixing cocktails like Mules, but I decided to switch things up this time around and use a ginger beer with a darker, cloudy colour with oak and cedar notes. Does all that masculinity not get you stirring just a bit? 😉 Ginger Beer Rosemary Rye CoolerUnlike yesterdays Sorrel Sangria, which was simple but required a bit of patience, this Ginger Beer Rosemary Rye Cooler can be shaken or stirred and enjoyed in a matter of minutes.

I suggest you make the simple syrup ahead and keep on hand to speed things up. While you are at it, whip up a batch of candied ginger for garnishing. I used my go-to recipe from Cook's Illustrated.

Tomorrow we'll tip our glasses to Amarula Truffles! See you then.

Ginger Beer Rosemary Rye Cooler
Print Recipe

Ginger Beer Rosemary Rye Cooler

A refreshingly aromatic blend of rosemary and ginger paired with a robust rye.
Prep Time10 minutes mins
Cook Time15 minutes mins
Total Time25 minutes mins
Course: Drinks
Servings: 6
Author: I Sugar Coat It

Ingredients

  • 1 L ginger beer 4 cups/2 bottles
  • 118 ml freshly squeezed orange juice ½ cup
  • 118 ml rosemary simple syrup ½ cup, see below
  • 118 ml dark rye/whiskey ½ cup, adjust to taste
  • crushed ice
  • candied ginger and fresh rosemary sprigs to garnish

Rosemary-Ginger Simple Syrup

  • 3-5 rosemary sprigs
  • 200 g loosely packed brown sugar 1 cup
  • 236 ml water 1 cup
  • 4-5 slices of fresh ginger optional

Instructions

To make the simple syrup:

  • Place the rosemary, sugar and water in a saucepan and bring to a full boil over medium heat until sugar is completely dissolved. Stir continuously.
  • Remove from heat, add the ginger slices and allow to stand, covered for 15-20 minutes - longer if you want a stronger brew.
  • Pour through a fine mesh sieve to remove the rosemary and ginger. Allow to cool.
  • Once cooled, store in the refrigerator in an airtight container until chilled and ready for use.
  • Mix ginger beer, orange juice and simple syrup in a pitcher. Add rye to taste.
  • Serve over ice and garnish with candied ginger and rosemary sprigs.

Notes

Keep left over syrup stored in refrigerator for up to a month.


Silver-rimmed glasses with jewel red sorrel sangria | I Sugar Coat It

December 2014 By i sugar coat it! 8 Comments

Sorrel Sangria {NYE Cocktail Countdown to 2015}

Sorrel Sangria {NYE Cocktail Countdown To 2015}Twenty-Fifteen! Can you believe we are only four days away?  To get us geared up for the big 2.0.1.5er, I thought I would share some of the liquid treats I have been concocting and consuming on our holiday break. Let's kick off our NYE Cocktail Countdown to 2015 with this red-hot number I call Sorrel Sangria!
Sorrel Sangria-1Sorrel (aka -roselle, bissap, agua de Jamaica, hibiscus) is a holiday staple in most, if not all the Caribbean. Sorrel hails from the family Malvaceae, and is called Hibiscus Sabdariffa, proper.

As a child, I looked forward to a cold glass of this spicy, liquid jewel made by my grandmother or uncle around Christmas time. Of course, us kids drank the non-alcoholic version - or at least that's what I 'd like to believe.

I have a long list of favourite homemade drinks from my childhood, including Mauby, peanut punch and Sarsaparilla, to name a few.

Sorrel Sangria-3Back to this spiced-up, island thirst-quencher I call Sorrel Sangria.  It's tart, sweet, citrusy, spicy and definitely boozy. The virgin version is great served with mounds of crushed ice. You can even enjoy it warm, as tea or you can make a syrup as a bar staple.

To ring in the New Year, I've added white wine. I've also *tested* it with rum, red wine and even champagne for that NYE festive fizz, but I imagine another liquor of your choosing would work just as well.

Sorrel Sangria-18I used fresh sorrel for my Sorrel Sangria and I only let it brew for a little over twelve hours, due to time constraints. For a more pronounced flavour and colour, 24-48 hours brewing is best. If you plan to use the dried packaged version, keep in mind that it will produce a stronger drink than you would get with the fresh sorrel.

Once you have made the basic recipe, experiment with various spices and liquor to suit your palate. You won't regret it!

Tomorrow, we'll raise a toast to the New Year with Ginger and Rosemary.

A longtime Christmas staple, this Sorrel (Hibiscus) Caribbean Christmas Punch is refreshingly tart and spicy, with a slight tang and sweetness that transports me back to childhood with my grandparents.
Print Recipe
3 from 1 vote

Sorrel Sangria

A festive, ruby red, spice-laden popular Caribbean holiday beverage.
Prep Time1 day d
Cook Time30 minutes mins
Total Time1 day d 30 minutes mins
Course: Drinks
Cuisine: Caribbean
Keyword: cocktail, drinks, imbibe, sorrel
Servings: 10
Author: i sugar coat it!

Ingredients

  • 2 litres water 8 cups
  • 2 cups sorrel sepals fresh and cored, or dried
  • 30 grams fresh ginger sliced
  • 2-3 cinnamon quills ceylon cinnamon is my preference
  • 2 grams whole cloves
  • 1 orange or lemon peel juice and peel
  • 64 grams demerara sugar, maple syrup, or honey adjust to your sweetness preference
  • 236 millilitres white wine optional

Instructions

  • Bring the sorrel sepals, ginger, cinnamon, cloves, orange (lemon or lime0 peel and water to a rapid boil in a medium pot. Turn heat down and allow to simmer for 20-30 minutes.
  • Remove from heat, add orange juice (lemon or lime) and allow to cool in the pot for 12-24 hours.
  • Once cooled, strain and refrigerate.
  • Stir in sweetener and wine to taste. Serve chilled, or on ice and garnish with fresh citrus wedges.

Notes

Some other spices to consider: mace, nutmeg, pimento (allspice)
Some other alcohol to consider: champagne, sherry, rum, red wine, brandy

I-Sugar-Coat-It-Blog-Signature-Green

Molded Chocolate Christmas Tree

December 2014 By i sugar coat it! 8 Comments

Mini Chocolate Christmas Trees

Mini Chocolate Christmas TreesMerry, Merry, Merry my fellow sweet fiends! Today's post is short, sweet and comes complete with fully edible Mini Chocolate Christmas Trees!
Mini Chocolate Christmas Tree molded from white chocolate and antique gold cocoa butter.I've included a quick pictorial if you are in the mood to make some last minute edible gifts that can easily double as a table scape when grouped together, or sent home with each guest to enjoy later.

I used rich, creamy, delicious white chocolate to make the trees and the bases on which they stand.  The strips of antique gold are cocoa butter, a huge part of what makes up chocolate, so these are completely edible!  Yes, even the dragees can be eaten!

For these Mini Chocolate Christmas Trees to work, you will need to properly temper your chocolate to achieve that glossy finish and crisp snap. You can also choose to fill the trees with small candies of your choosing to add a little surprise!

Mini Chocolate Christmas Tree molded from white chocolate and antique gold cocoa butter.I wish for you all a love-filled holiday season, whatever and however you choose to celebrate. I hope that all your wishes take form and your blessings are plentiful. Remember to share some of all that love and blessings with the many who are without.

Thank you so very much for allowing me the opportunity to share with you in this little place I call my sweet escape. Let's meet back here in a few days to ring in the New Year!

I-Sugar-Coat-It-Blog-Signature-Green

Almond English Toffee with homemade toffee sandwiched between thin layers of decadent dark chocolate and topped with roasted almonds.

December 2014 By i sugar coat it! 8 Comments

English Toffee {Edible Gifts)

Almond English Toffee with homemade toffee sandwiched between thin layers of decadent dark chocolate and topped with roasted almonds.

Almond English Toffee with homemade toffee sandwiched between thin layers of decadent dark chocolate and topped with roasted almonds.

I am totally envious of that toffee that is sandwiched between those thin, decadent layers of couverture chocolate, littered with roasted almonds. I wonder if toffee is one of the forms in which one can be reincarnated? That would be a pretty sweet life, don't you think? Even sweeter, my name would be Toffee! English Toffee. A bit of a stripper ring to it, don't you think? 😉

Almond English Toffee with homemade toffee sandwiched between thin layers of decadent dark chocolate and topped with roasted almonds.

This stuff is like crack! You know, the need to have another piece that will always be your last piece until you find yourself opening already packaged batches to have that one last piece and then you realize that you'll need to make another batch, or three before the week is over and you start to itch and worry whether your teeth will fall out and... Not that I have personally experienced what crack is like, but this stuff... THIS STUFF!

Almond English Toffee with homemade toffee sandwiched between thin layers of decadent dark chocolate and topped with roasted almonds.

So yeah, my name is J and I am an addict. My drug of choice comes dressed in devilishly, dark couverture, accessorized by roasted gems that reveal slivers of a dreamy, gold inner lining.

Almond English Toffee with homemade toffee sandwiched between thin layers of decadent dark chocolate and topped with roasted almonds.

I got to practice my chocolate crystallization and candy making skills learned at culinary school, while squirrelishly snacking on almonds. An evening well spent in my books, or any book, for that matter.

A batch went to my hips, another to the office and a couple more were packaged in these clear take-out boxes and gifted!

Almond English Toffee with homemade toffee sandwiched between thin layers of decadent dark chocolate and topped with roasted almonds.
Print Recipe

English Toffee

Almond English Toffee with homemade toffee sandwiched between thin layers of decadent dark chocolate and topped with roasted almonds.
Cook Time45 minutes mins
Total Time45 minutes mins
Course: Dessert
Cuisine: Confections
Servings: 12
Author: i sugar coat it!

Ingredients

Almonds

  • 450 g whole almonds 2 ⅔ cups

Toffee

  • 454 g unsalted butter 2 cups
  • 125 ml water ½ cup
  • 60 g corn syrup 2 ¾ tbsp
  • 600 g granulated sugar 3 cups
  • 5 g salt 1 tsp
  • 15 ml vanilla bean paste 1 tbsp, or extract

Chocolate

  • 600 g dark chocolate 3 ⅓ cups

Instructions

Make Almonds

  • Spread almonds out on a baking tray and roast for 8-10 minutes in an oven pre-heated to 350ºF.

Make Toffee

  • Prepare a medium-large baking tray by lining it with parchment paper. Set aside.
  • In a medium pot, melt butter with water and corn syrup.
  • Add sugar and salt and stir briefly to distribute sugar. Do not stir again while mixture caramelizes.
  • Turn heat to medium high and allow the mixture to cook until it caramelizes. It should look dirty blonde in appearance. If using a digital thermometer - caramelization begins at 154ºC. I used the cold water test to determine readiness - drop about a teaspoon of the mixture in a bowl of cold water and shape with fingers. When the mixture holds the shape and cracks cleanly when broken or bitten, it's ready.
  • Swirl in the vanilla.
  • Pour the mixture onto the parchment lined tray in an even later. Allow to cool.
  • Once completely cooled, used paper towel to blot the surface of the toffee to remove any excess oil.
  • Use a knife to lightly scratch the surface of the toffee. This helps the chocolate to adhere.

Make Chocolate

  • Pre-crystallize chocolate (do this while toffee is cooling) and pour half the chocolate onto the scratched surface of the toffee. Use a large offset spatula to evenly spread the chocolate over the toffee. Sprinkle with almonds and allow to set.
  • Once set, turn the toffee over and repeat the process - wipe, scratch, pour and smooth chocolate, add almonds and allow to set.
  • Break into pieces and enjoy!

Notes

Toffee can be stored in an airtight container in a cool, dry place for up to two months.
Adapted from Chocolate course material.

I-Sugar-Coat-It-Blog-Signature-Green

Chocolate Amaretti Cookies

December 2014 By i sugar coat it! 10 Comments

Chocolate Amaretti Cookies

Chocolate Amaretti CookiesOK, so let's talk about the awesomeness that are these Chocolate Amaretti Cookies! Since we're talking, I want to share that I inhaled the first half dozen of these magical melt-in-your-mouth cookies all in the name of quality control. The rest are all yours! Or feel free to package them up as last minute edible gifts.

Chocolate Amaretti CookiesI absolutely adore baked goods made with almonds. Pair said almonds with chocolate and my knees automatically sink to where my feet once were. Before I started baking, I would frequent (some might say stalk) a little Italian bakery that made the most gorgeously, addictive treats. Among them were Amaretti Cookies.

I now make my own, which limits any stalking to my kitchen. They are so easy to whip up and only require a handful of pantry staple ingredients - ground almonds, cocoa powder, icing sugar, salt, cornstarch, plus egg whites and almond or vanilla flavouring.

The Thousand VillagesOn the topic of baking ingredients - I recently received this package of baking goodies from Ten Thousand Villages, a non-profit, fair trade organization whose mission is to 'create opportunities for artisans in developing countries to earn income by bringing their products and stories to our markets through long-term, fair trading relationships.' The beautiful holiday card that arrived with my package was hand-made by vision-impaired artisans in India.

The very first thing I made was hot cocoa, using the organic cocoa powder and cinnamon quills (packaged in hand-made banana leaf fibre boxes). The cinnamon provided a deliciously, intense flavour that filled my home with an appetizingly, earthy aroma. To keep my cinnamon quills, well... cinnamon-y, I store them in the 'Happy' canister made from cinnamon bark. How cool is that!

If you are looking to give differently this holiday season, check out the Ten Thousand Villages link above. I love how each product has a story and introduces us to the artisans behind the beautiful works of art.

Chocolate Amaretti Cookies

So, by way of the organic, fair trade cocoa used in this recipe, these Chocolate Amaretti Cookies now have a story!

Holiday Cookie Love:

Drunken Thumbprint Cookies

Raspberry Coconut Meringue Cookies

Lemon Nutmeg Cookies

Chocolate Amaretti Cookies
Print Recipe
4 from 1 vote

Chocolate Amaretti Cookies

Intensely flavoured, chewy, addictive homemade Chocolate Amaretti Cookies.
Prep Time15 minutes mins
Cook Time7 minutes mins
Total Time17 minutes mins
Course: Dessert
Cuisine: Cookies
Servings: 25 cookies
Author: i sugar coat it!

Ingredients

  • 300 g icing sugar 2 ⅓ cups
  • 25 g unsweetened cocoa powder 4 tbsps
  • 20 g cornstarch 2 tbsps
  • 300 g ground almonds 3 ½ cups
  • 3 g salt ½ tsp
  • 135 g egg whites approximately 4 large eggs, or use liquid egg whites
  • 5 g amaretto 1 tsp, or almond emulsion
  • icing sugar for decorating

Instructions

  • Preheat oven to 350ºF.
  • Line baking tray with silpat or parchment.
  • Use a sieve to sift icing sugar, cocoa powder and cornstarch together into a large bowl.
  • Add the ground almond and salt.
  • Stir in most of the egg whites and amaretto until a thick, firm batter is formed. If the batter is too dry add the remaining egg whites.
  • Dip a small ice cream scoop into the bowl of icing sugar reserved for decorating and then scoop the batter onto the lined baking sheet. This will cover the dough in the sugar to create that snow-capped finish to your cookies. It also helps prevent the batter from sticking to the ice cream scoop!
  • Bake for 7-9 minutes.
  • Remove and allow to cool completely.

I-Sugar-Coat-It-Blog-Signature-Green

Stenciled Brownies Using Icing Sugar {Tutorial Tuesday}

December 2014 By i sugar coat it! 10 Comments

Stenciled Brownies {Tutorial Tuesday}

How To Stencil Brownies Using Icing Sugar {Tutorial Tuesday}Edible gifts are big on my giving list this year. Today I am sharing how to turn decadent brownies into little works of art using icing sugar and stencils. Perfect for gift giving!

Stenciled Brownies Using Icing Sugar {Tutorial Tuesday}

First, I whipped up a batch of these decadent brownies from the book Extreme Brownies. They were AH-MAZING! Feel free to use your go-to recipe, but then you won't know what you are missing... After baking, chill the brownies to make cutting a breeze.

Stenciled Brownies Using Icing Sugar {Tutorial Tuesday}

I used a 9-inch x 13-inch pan that isn't warped and I lined it with foil paper - parchment paper would work as well. This is essential for easy removal in one piece - trust me. The top of the brownie looks amazing, but for this purpose, I flipped it over and used the bottom, as it provided a more levelled and smooth surface on which to decorate.

I used a ruler to score the brownie slab into uniformed squares. You can cut them and decorate each separately depending on the pattern and size of your stencil. I found scoring and not cutting helped to keep things in place. My mind often goes against what's practical, so do what works best for you. My method provided me quarters of six squares which were an almost perfect match for the stencil size.

Stenciled Brownies Using Icing Sugar {Tutorial Tuesday}Now grab a stencil, or stencils, a bowl of icing (confectioners) sugar and an offset spatula. Position the stencil on the brownies and sprinkle or spoon a generous amount of sugar onto the stencil. When I first shared these on my Instagram feed, someone asked if I used special sugar because regular fades. Yes, this is regular icing sugar. I really wanted the pattern to stand out and resemble royal icing.  So, I used that same technique I use for stenciling with icing - I added a little more than I needed and scraped away the excess.

Stenciled Brownies Using Icing Sugar {Tutorial Tuesday}

I used an angled spatula to smooth and remove the sugar from the surface, leaving behind a patterns that resembled royal icing! I then placed the batch back in the fridge for about ten minutes, as the sugar was still doing its icing sugar thing and getting everywhere. I figured a little moisture would help it set, which it did! I then went along the scored lines and finished cutting the squares. And VOILA, Stenciled Brownies!

Stenciled Brownies Using Icing Sugar {Tutorial Tuesday}The white gives a winter wonderland-ish feel to these deep, dark chocolate gems - perfect for the holidays! Just think what Santa may be willing to leave under the tree with a couple of these and a glass of milk (wink-wink) waiting for him. They make great gifts, but I would totally understand if you kept them all to yourself.

Stenciled Brownies Using Icing Sugar {Tutorial Tuesday}More Edible Holiday Treats:

Deck The Halls Red Velvet Christmas Ornaments

Pistachio White Chocolate Bars

CocoNog Christmas Cupcakes

Stenciled Brownies Using Icing Sugar {Tutorial Tuesday}
Print Recipe

Stenciled Brownies {Tutorial Tuesday}

Prep Time15 minutes mins
Cook Time34 minutes mins
Total Time49 minutes mins
Course: Dessert
Cuisine: Brownies
Servings: 12 -24
Author: i sugar coat it!

Ingredients

  • Vegetable shortening for pan I used coconut oil and applied it with a pastry brush
  • 3 sticks/12 ounces unsalted butter 340g
  • 2 cups /12 ounces 60% cacao bittersweet chocolate chips 360g
  • 6 large eggs at room temperature
  • 3 cups /1 pound 5 ounces sugar 575g
  • 1 teaspoon salt 5g
  • 1 tablespoon pure vanilla extract 15g, I used Rodelle vanilla bean paste
  • 1¼ cups /5 ounces cake flour 112g
  • 1 cup and 2 tablespoons/4.2 ounces Dutch-processed unsweetened cocoa powder 119g, I used Rodelle Gourmet Baking Cocoa

Instructions

  • To make the brownies, adjust an oven rack to the middle level of the oven and preheat to 350°F.
  • Prepare a 9 by 13-inch baking pan with heavy-duty aluminum foil. (shown on page xvi). Lightly grease the foil in the pan.
  • Cut the butter sticks into 1-inch slices. In a small, heavy saucepan, melt the butter pieces over the lowest setting; add the bitter-sweet chocolate chips. Stir with a small whisk until combined and the chocolate is melted and smooth. Turn off the heat but leave the saucepan on the burner while proceeding with the recipe.
  • Using a large whisk, lightly beat the eggs in a large mixing bowl. Place the sugar and salt in a separate small mixing bowl, then whisk into the eggs just until incorporated. Briefly whisk the melted chocolate mixture, then gradually whisk into the egg mixture until just combined. Briefly whisk in the vanilla.
  • Place the flour and cocoa powder in the small mixing bowl; whisk together to combine. Sift through a medium strainer directly onto the batter; stir in with a silicone spatula until just combined. Pour the batter into the prepared pan and spread evenly with a small offset spatula. Bake for 34 minutes, until a toothpick inserted in the center, comes out clean.
  • Transfer the pan to a cooling rack and let cool at room temperature for at least 15 minutes, then refrigerate the pan for 7 to 8 hours, or overnight. See page xix for instructions on removing and cutting the slab, and for refrigerated storage (up to 3 weeks) and freezing guidelines.


I-Sugar-Coat-It-Blog-Signature-Green


Apple Cider Thyme Cocktail

December 2014 By i sugar coat it! 12 Comments

Apple Cider Thyme Cocktail

'Tis the season to drink and be merry! After all that shopping, I'd say we definitely deserve one, maybe a few Apple Cider Thyme Cocktails. Cheers!

Apple Cider Thyme Cocktail

I fancy myself a bit of a mixologist. Odd, as I am not much of a drinker, but I love experimenting with the various spirits, liqueurs and the like. Plus, I get to shake, shake, shake and be in control of my guests' alcohol consumption - cause I'm controlling like that. 😉

Each year for the holidays, the Dude's work doles out LCBO gift cards as part of their employee gift packages and I am always shocked at the value. It's like they are being encouraged to become drunks! We usually end up re-gifting most of them and even with a little entertaining here and there, we never use the full amount. I am always laughed at, as we keep a fully stocked bar, but the Dude does not drink and I usually can't get past one. Pathetic...I know.

Apple Cider Thyme Cocktail

It wasn't until I moved here from the good 'ol South that apples became a thing for me. I grew up on an abundance of fresh fruits, some picked straight from our backyard - we practically lived on fruits as kids. Although, I would have an apple from time to time, they weren't regularly on my radar as a child, or teen. Now, when fall blows in, my tastebuds immediately crave crisp, juicy apples and the ever so sweet/tart/tangy apple cider they produce.

I sometimes like to flavour my cider with cinnamon sticks and I've tried rosemary after seeing it in a magazine a while back. We still had a lot of thyme on hand from our garden when the season changed, so some made their way into this cocktail, along with a bit of freshly squeezed OJ, brandy and bitters.  YUMMMMM!  This Apple Cider Thyme Cocktail is perfect for holiday entertaining and is also superb when served warm, accompanied by a fireplace, blanket and great book. Simply omit the brandy and Angostura Bitters and the juniors may partake.

Now let's PAR-TAY!

Don't forget to enter for a chance to win a few baking basics!

More Holiday Cheer:

Berry Beet Smoothtinis 

Watermelon Coconut Cucumber Chillers

Apple Cider Thyme Cocktail
Print Recipe

Apple Cider Thyme Cocktail

Prep Time10 minutes mins
Total Time10 minutes mins
Course: Beverages
Servings: 4
Author: I Sugar Coat It

Ingredients

  • 473 ml of fresh apple cider 2 cups
  • 118 ml brandy ½ cup
  • 59 ml freshly squeezed orange juice ¼ cup
  • dash of Anguostura bitters
  • fresh Thyme sprigs
  • ice

Instructions

  • If not already warm, gently heat the apple cider in a saucepan along with the sprigs of thyme. Remove and allow to cool completely.
  • Add ice, apple cider, brandy, orange juice and bitters to a shaker and shake well.
  • Strain into glasses.
  • Garnish with a sprig of thyme and serve.

Notes

If you feel the thyme hot infusion might be too overwhelming in flavour, try mudding the thyme in the shaker, instead.

I-Sugar-Coat-It-Blog-Signature-Green

I Sugar Coat It! Bakers Bakers Holiday Gift Guide 2014

December 2014 By i sugar coat it! 31 Comments

I Sugar Coat It Bakers Holiday Gift Guide 2014 & Giveaway!

It's the very first I Sugar Coat It Holiday Gift Guide and this one is for the budding baker in your life. The tools are pretty, mostly practical and perfect for gift-giving!

I Sugar Coat It! Bakers Bakers Holiday Gift Guide 2014

...

Read More

Cashew Milk Espresso Smoothie. Smoothie Resolution Round Up 2017

November 2014 By i sugar coat it! 9 Comments

Cashew Milk Espresso Smoothie

Cashew Milk Espresso Smoothie

I am a morning person, but I am also a night owl. This has caused my brain and body much grief and confusion. Lack of sleep (for a number of reasons) has left me a little (who am I kidding) a LOT loopy. I avoided caffeine all through school, yet for years I managed to wake up on some natural high, bight-eyed and bushy-tailed, regardless of how little sleep I had.

Not so much these days and winter seems to worsen my condition. Winter, with its unwelcome frigid fingers, clawing at my face, blurring the line between day and night and robbing me of all desire to leave my house.

Cashew Milk Espresso SmoothieStill, I am up at the crack of dawn each morning (sans bright eyes and bushy tail). Brush teeth - check. Long, steamy, hot shower - double check. Breakfast - CHECK! Without it, I would just crawl back under the covers and stare at the ceiling, wishing for the all elusive sleep to crawl into my bed.

So yeah, back to breakfast. I normally would opt for a warm bowl of oats in these cooler months, but smoothies are super convenient for us on-the-go folk. And to help shake me out of my slumber, I've taken to adding generous amounts of espresso from time to time.

Remember the batch of Cashew Cinnamon Honey Butter I posted last month, where I mentioned that Cashew Milk would follow. Well, Cashew Milk has arrived and she brought along her new BFF, Espresso!! Don't you dare try to break them up, I may just rip your head off. Kidding, kidding! Maybe...

Go on, drink up!


Cashew Milk Espresso Smoothie
Print Recipe

Cashew Milk Espresso Smoothie

Cashew Milk Espresso Smoothie makes a deliciously, rich, smooth liquid breakfast complete with caffeine fix.
Prep Time5 minutes mins
Total Time5 minutes mins
Course: Beverage
Servings: 2
Author: I Sugar Coat It

Ingredients

Cashew Milk:

  • 110 g raw cashews 1 cup
  • 946 g water 4 cups, 2 cups for soaking and 2 cups for blending
  • 21 g agave nectar 1tbsp
  • pinch of salt

Smoothie:

  • 440 g cashew milk 2 cups
  • 14 g instant espresso powder 2 tbsps
  • 1 large frozen banana
  • 1 g cinnamon ½ tsp
  • chocolate shavings to garnish

Instructions

To make the cashew milk:

  • Soak cashews for 3-4 hours.
  • Discard water and rinse thoroughly.
  • To a blender, add the cashews, the other two cups of fresh water, honey and salt.
  • Blend on high until combined and smooth. (approximately 1 minute).
  • Pour into a sealed container and store in the refrigerator.
  • Best consumed within 2-3 days.

To make the smoothie:

  • Place all ingredients, except chocolate shaving, in a blender and blend on high until fully combined.
  • Enjoy immediately!

Notes

Sweet Tips:
Cashews should be unsalted and preferably organic.
Depending on the blender you use, you may need to pour the milk through a strainer to remove any bits and pieces. I use a Vitamix, and have found I don't need to strain.

I-Sugar-Coat-It-Blog-Signature-Green

  • « Go to Previous Page
  • Page 1
  • Interim pages omitted …
  • Page 27
  • Page 28
  • Page 29
  • Page 30
  • Page 31
  • Interim pages omitted …
  • Page 51
  • Go to Next Page »

Primary Sidebar

Never Miss A Happy Ending...

Previous Sweetness...

Search

Filter by Category

Filter by Date

SWEETEN YOUR INBOX!

All Content Including Images Copyright Jacqueline | I Sugar Coat It© 2026