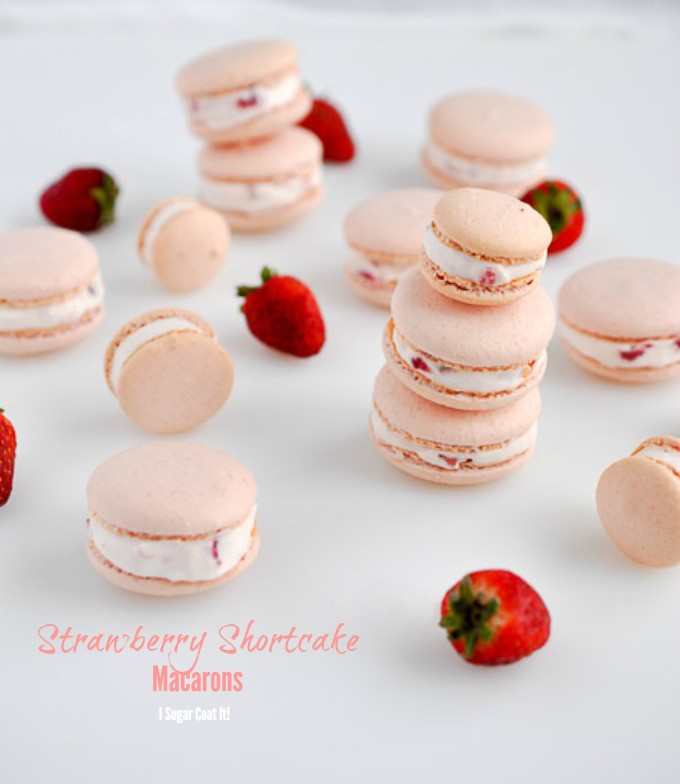
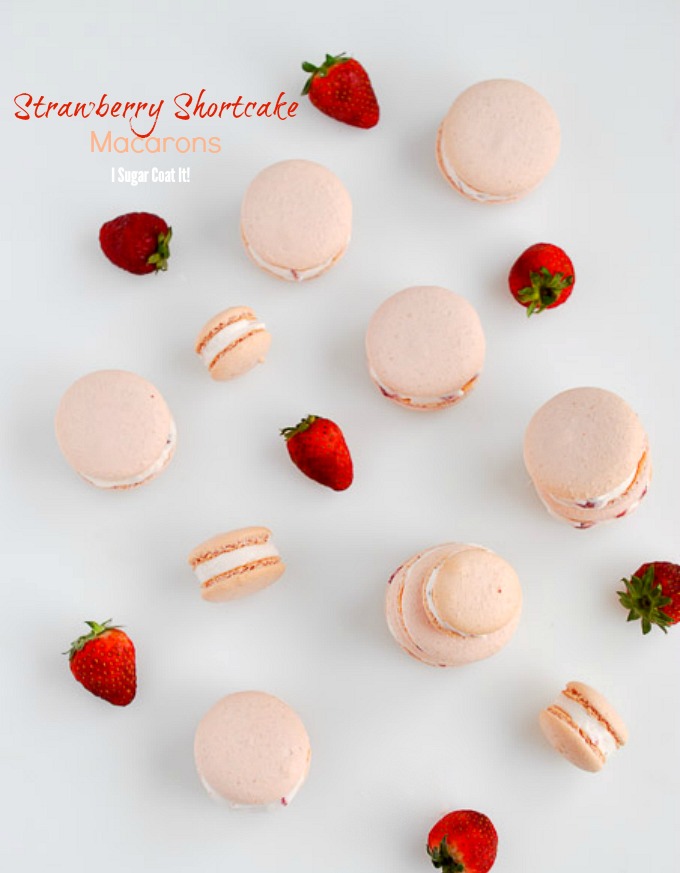
Gluten and dairy-free Strawberry Shortcake Macarons filled with fresh strawberry-laced whipped coconut cream.
 Hiya and happy Friday! With Valentine's a week away, I think it's time I share my Strawberry Shortcake Macarons with you. With almond shells naturally tinted with ground strawberry and filled with fresh strawberry-laced whipped coconut cream, they are deliciously gluten and dairy free!
Before we sink our teeth into these, tell me - has time somehow sped its pace for 2015? I feel as though I have accomplished very little in the last month. This past week, in particular, has been rather hectic and I saw very little of the Dude, social media, friends and my kitchen.
My kitchen. I still surprise myself when I find myself missing my kitchen...any kitchen. It's the place I've avoided most, until I reached my mid-twenties. Even then, I was never fully committed to being in a kitchen. I had no desire to blanch, baste, brûlée, caramelize, dredge, drizzle, flambe, truss, whip and most of all clean pots and pans. Yet, whenever a culinary course wraps up and I have a break before commencing the next, the Dude says I go into withdrawal. What does he know?
 I adore French cuisine. I first experienced authentic French food as a teen when one of my aunts started dating a French chef. He was HOT AS HELL and stole my teenage heart when one morning we woke up to freshly baked croissants for breakfast and ended the day with a delectable duck dish. Many artfully, exquisite meals followed for the duration of their relatively short-lived relationship. Needless to say, I was heart-broken when I learned he was moving back to France.
That same aunt had no desire to be tethered to pots, pans and ovens, so eating out was a norm. She was a 'wild child' who traveled often and lived freely. I spent a great deal of my teen years with her and got to see and learn so much. She has always encouraged me to try new things, to be confident, to see the world, to remain open-minded and to pursue my dreams.
 When I started this blog three years ago, I was just beginning to dabble with baking. My grandmother always baked from scratch, so that is all I knew and that is how I taught myself to bake. Then about a year ago, when I enrolled in courses at a local culinary school and developed a better understanding of ingredients and their purpose, I realized how much I LOVE the process of creating edible works of art - from breads to cakes to pastries and chocolate. I am obsessed!
With a full-time career and other commitments, time has been my biggest obstacle. I am not baking, blogging or taking as many classes as I would like. I still continue to learn and discover and create - these things bring balance and enjoyment to my life. At some point when I outgrow my current career choice, I may very well go down the culinary path. In what capacity? I am not sure. Who knows, you may someday see me on the Food Network! LOL
Until then, I'll continue to work on slowing time's pace, while enjoying the little things along the way. Like these Strawberry Shortcake Macarons, filled with whipped coconut cream and fresh strawberries!
Macaron Mania:
White Chocolate Mango Ganache Macarons
Painted Passion Fruit Macarons

Strawberry Shortcake Macarons
Ingredients
Macaron
- 75 grams almond flour
- 130 grams confectioners sugar
- 3 grams freeze-dried strawberry powder
- 2 large egg whites room temperature
- 48 grams granulated sugar
Filling
- 250 grams coconut cream
- confectioner's sugar to taste
- 76 grams fresh strawberry about ½ cup, chopped
Instructions
Prepare the shells:
- Line two cookie sheet pans with a template (if using one) and cover with Silpat or parchment.
- In a food processor, combine the almond flour, confectioner's sugar and strawberry powder and pulse until combined, about 30 seconds. Sift mixture onto a sheet of parchment paper.
- In the bowl of a stand mixer, whip the egg whites until foamy using the whisk attachment. Ensure the bowl is clean and grease-free.
- Gradually add the granulated sugar to the egg whites, continuing to whip and increasing the speed to high until stiff peaks are formed.
- Remove the bowl from the stand mixer, add one-third of the almond mixture to the meringue, using a spatula to fold into the meringue. Repeat with the other two-thirds. Do not over-mix.
- Transfer batter to a large pastry bag snipped to a half-inch opening, or fitted with a round piping tip.
- Pipe to your preferred size, leaving an inch between each.
- Remove template (if one was used) by sliding it out from under the Silpat or parchment.
- On a levelled surface, tap the pans a few times to remove any peaks and air bubbles.
- Allow the piped macarons to rest for thirty minutes, longer depending on the conditions in your home.
- While the macarons are resting, pre-heat the oven to 325ºF.
- Bake macarons on middle rack of oven for five minutes. Rotate and bake another five minutes.
- Remove from oven and allow to cool completely.
- Store in an airtight container in the refrigerator until ready to use.
Prepare the filling:
- In a chilled bowl, whip the chilled coconut cream, adding confectioner's sugar to taste, until firm peaks form.
- Use a spatula to fold in the berries. Keep chilled until ready to use.
Assembly:
- Pair up the macaron shells so that both are a relatively even size.
- Fill one half with the whipped coconut and sandwich with the other half.
- With this particular filling, these are best enjoyed within a day. Store in an airtight container in the refrigerator.
Notes
Ensure the all equipment and utensils used in preparing the meringue are grease-free by first wiping with lemon juice or vinegar. Rinse and dry thoroughly with a clean towel.
If using parchment to line the pan, dab a little of the macaron batter onto each corner to secure the paper to the pan.
Start whipping the eggs on a low speed and add the sugar gradually while increasing the speed to prevent uneven air pockets.
For best results, ensure the coconut cream, bowl and whisk are well chilled before whipping.


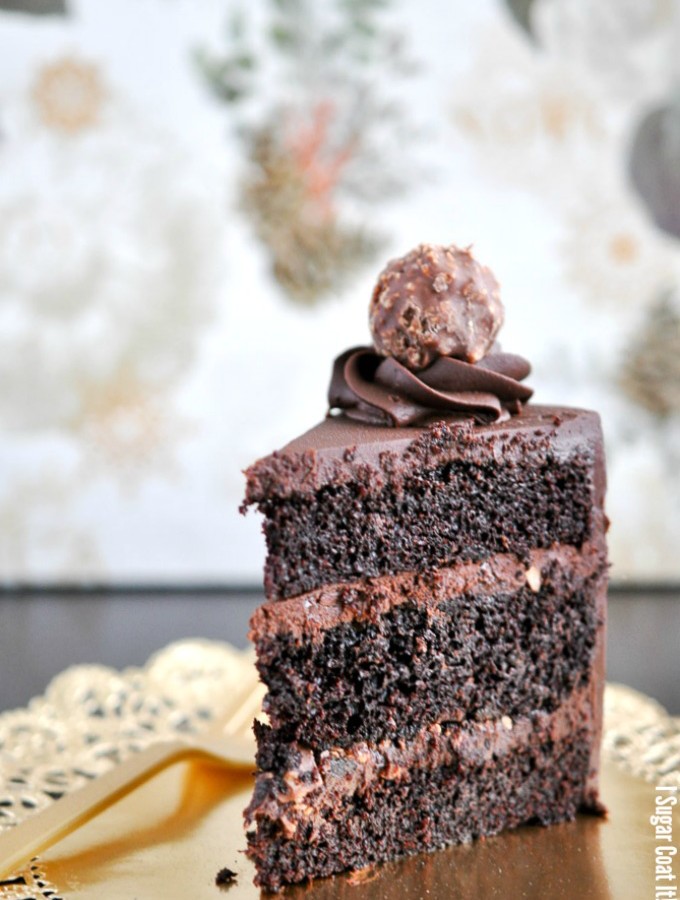


 OK, back to the Dude's b-day cake. I made to my tried and true chocolate cake recipe, adapted from the baking arts course I took just over a year ago. With the holidays almost upon us, we had ample Ferrero Rocher chocolates on hand to lend a little crunch between layers. BTW, how amazingly addictive are Ferrero Rochers? To further play up the hazelnut flavour, I made a Gianduja Ganache that is simply out of this world. I at first thought it might overwhelm the cake, but I tell you this cake is...well...read my first paragraph.


