• Skip to primary navigation
  • Skip to main content
  • Skip to primary sidebar
  • Home
  • About
    • About I Sugar Coat It
    • Features & Press
    • Copyright
    • Disclosure
    • Privacy Policy
  • Recipes
  • How-To
  • Contact
  • sous vide sista

I Sugar Coat It

Home

All Posts

Raspberry Sprinkle Chocolate Bark

May 2015 By i sugar coat it! 8 Comments

Raspberry Sprinkle Chocolate Bark {How To Dehydrate Berries}

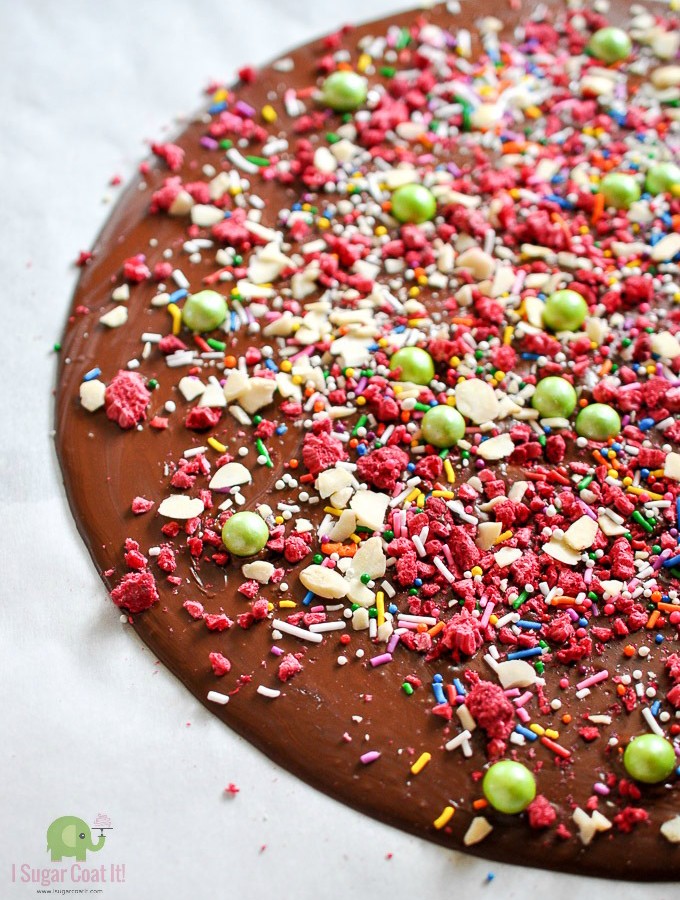
This Raspberry Sprinkle Chocolate Bark is rich, delicious dark chocolate topped with all the pretty thing is a real treat!

Raspberry Sprinkle Chocolate BarkWe have slowly inched our way up to double digit temps and although still chilly, it's a little brighter in the mornings and evenings, with mostly sunny days. That puts a big smile on my face! So does this Raspberry Sprinkle Chocolate Bark!

I used dehydrated raspberries. I like to colour and flavour my desserts as naturally as possible and when ground in a food processor or coffee bean grinder, the resulting food powder makes the most delicious addition to macarons, frosting, cakes, muffins, scones, and cookies. They are also a great addition to smoothies and ice cream.

You may choose to purchase dehydrated, or freeze-dried berries, or if making your own appeals to you, here's how how to dehydrate berries using a dehydrator:

Raspberry Sprinkle Chocolate Bark-17

  1. Rinse the fruits and remove any stems. The best way to wash delicate fruits like raspberries is to place them in a cold water bath for a few seconds, then claw your fingers and scoop them out of the water. This helps prevent bruising and crushing.
  2. Dry thoroughly.  Place on a baking sheet lined with a clean towel and allow to dry top down, so that any trapped water will drain.
  3. Place in dehydrator. Arrange on the trays of your food dehydrator with enough room between, so that they aren't touching. I find a light spritzing of little lemon juice at this stage helps to keep them from discolouring.
  4. Dehydrate for 10 - 18 hours. Rotate the trays for even drying about halfway through. I start out at a high temperature, around 150ºF and then bring it down to about 135º/140ºF after a couple hours. Be sure to check your manufacturer's instructions for use.
  5. Store. Mason jars and freezer bags work well. If you make a large volume and plan to store them a while, I highly recommend vacuum sealing.

If you don't have a dehydrator, an oven works, but not for high water content fruits and vegetables, or fruits with skin.

Raspberry Sprinkle Chocolate Bark

The raspberry adds an unexpected sweet/tart flavour and additional texture, but chocolate is the real star in this Raspberry Sprinkle Chocolate Bark, so it's important to use a quality chocolate, especially if making it with your mom in mind.

It's the perfect no-bake, no-fuss, last minute Mother's Day treat!

Follow isugarcoatit on Instagram and share the recipes made from my blog using #isugarcoatit!

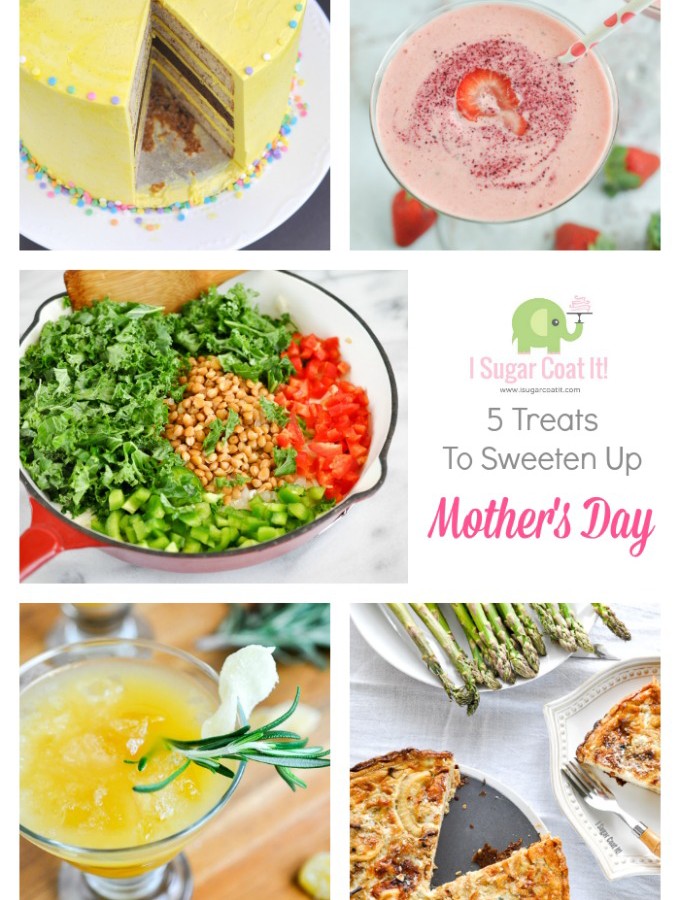
More Ways To Sweeten Up Mother's Day:

Fruit & Nut Funfetti Bark

English Toffee

Hazel Nut Rocher

Raspberry Sprinkle Chocolate Bark
Print Recipe

Raspberry Sprinkle Chocolate Bark

Dark chocolate sprinkled with free-dried raspberry, sixlets, blanched almonds and sprinkles.
Prep Time1 hour hr
Total Time1 hour hr
Course: Dessert
Servings: 6 -8
Author: I Sugar Coat It

Ingredients

  • 200 g pre-crystallized bitter-sweet chocolate approx. 1 cup
  • 35 g dehydrated or freeze-dried raspberry ¼ cup, made or purchased
  • slivered almonds sixlets and mixed sprinkles to your heart's desire

Instructions

  • Pre-crystallize the chocolate by melting to 45ºC. Seed and stir to a working temperature of 31º - 32ºC.
  • Line a clean, flat surface with a sheet of parchment paper.
  • Position the bowl of chocolate over the center of the parchment and pour the chocolate, keeping the bowl in that centred position. This way the liquid will spread naturally outwards into a circle shape.
  • Once the edges show first signs of setting, sprinkle the toppings over the surface of the chocolate.
  • Allow to set at room temperature. (this was very thin and set within 30-60 minutes)
  • Break into pieces and enjoy!!

I-Sugar-Coat-It-Blog-Signature-Green

5 Treats To Sweeten Up Mother's Day

May 2015 By i sugar coat it! 6 Comments

5 Treats To Sweeten Up Mother's Day

5 Treats To Sweeten Up Mother's DayMother's Day is just a week away, so I thought it would be fun to pull together 5 Treats To Sweeten Up Mother's Day from breakfast to dessert, in honour of all my superwomen readers.

Berry Beet Smoothtini

It's your day and you deserve to get it started with a cocktail! Yes? This Berry Beet Smooth-tini is a cocktail posing as a smoothie and a great way to start your special day. Guaranteed to keep a smile plastered on your face through all the dysfunctional display of love.

Too bold a move? How about a Green Superfood Smoothie to get you started? Or, if your preference sways more to the crunchy side, this Biscoff Banana Granola Bowl topped with fresh fruits will do the trick.

Onion-Gorgonzola-Tart-31Dust off the patio furniture, head outside and enjoy this Onion Gorgonzola Tart for brunch. With a super thin pastry crust, this savoury tart is all about what's on the inside. You know, like the stuff you instilled in us when we were little. Well, it applies to food too! #motherknowsbest 😉

You may also want to heat things up with these Cheddar Chive Chili Scones, or get cheesy with a piece of this Caraway Cheddar Roll.

Kale and Lentil Salad Spoons - I Sugar Coat It!Go light on dinner to save room for drinks and dessert with these Kale and Lentil Salad Spoons. Not keen on this vegetarian version? Add some ground or barbecued meat or fish to fill your cups and tummy and grab a cool drink to wash it all down.

Ginger Beer Rosemary Rye CoolerLike this Ginger Beer Rosemary Rye Cooler. It’s simple, sexy and seriously sensory seducing... much like you!! You've got three hundred and sixty four days before before it's all about you again, so don't be shy. Drink up!

Mother's Day Banana Butterscotch BombshellSure, drinks will get the conversations going, but it ain't a party without cake. And this Banana Butterscotch Bombshell has your name written all over it - strung across it, if you need to get technical. Oh, it's filled with bananas and since bananas are technically a herb and fruit (say what now?), I'll take a leap and call this cake a food group...RIGHT?!?

So now that you've settled on a menu, the only thing left to decide is who will prepare it...

I-Sugar-Coat-It-Blog-Signature-Green

Double Chocolate Chunk Gianduja Biscotti

April 2015 By i sugar coat it! 11 Comments

Double Chocolate Chunk Gianduja Biscotti

Double Chocolate Chunk Gianduja BiscottiIf you find Ferrero Rocher mind-blowing, then prepare your mind and tastebuds for this Double Chocolate Chunk Gianduja Biscotti stuffed full of Valrhona dark and milk chocolates, roasted hazelnuts and dipped in Gianduja. BOOM!

You're so very welcome!

Double Chocolate Chunk Gianduja BiscottiI made biscotti for the first time last year, using a recipe from one of my culinary courses. It's a solid recipe that I continue to use as the base for all my biscotti baking. They went over so well, I decided to include them as part of my edible gifts for friends and some colleagues over the holidays and went on a bit biscotti baking spree. I shared some here,  here, here and here.

Biscotti, or twice-baked cookies, are such a treat with a hot drink. They are ridiculously easy to make, so there really isn't any good reason to continue purchasing their suboptimal store-bought counterparts. Once you have made a batch, you will quickly reach this conclusion.

I remember trying my first biscotti while on vacation years ago. I didn't really know what to expect and complained that it was stale after my first bite. My friend nicely told me that they're meant to be that way and I was adamant they weren't. So me, being my super picky self, would not accept it and asked for my money back. Yeah, I am that person. Days later when we tried the biscotti at a different establishment, I quickly realized that I was wrong and she was correct and that I'd pretty much embarrassed us both. She has never let me forget that.

To this day, however, I am not a huge fan of the extra, extra baked biscotti. I like them baked to a crisp, but not to the point that they are rendered flavourless, crumbly, over-baked bricks.

Double Chocolate Chunk Gianduja Biscotti

These Double Chocolate Chunk Gianduja Biscotti are baked to perfection and then baked just a little longer for that crisp texture with a little chew. Exactly as I prefer them. If your preference is super crunchy through and through, then just lengthen the time on your second bake to dry them out a little more. Dipping them in the gianduja, which is a mix of chocolate (dark or milk) and hazelnut paste, really adds that Ferrero Rocher element.

As I mentioned earlier, they are a breeze to make. The flavour combinations are as vast as your imagination and the flours may be substituted with a GF blend and almond meal combo, if you are following a gluten-free diet. They keep for a few weeks when stored in an airtight container at room temperature and are actually tastier a day or two after being baked, which makes them perfect to keep on hand to serve with tea or coffee to your guests.

So tell me, how do you like your biscotti? Super crunchy or with a little chew? Plain or dipped and sprinkled? Straight up or dunked in a hot beverage? Pressing questions, friends. Don't leave me hanging...

Follow @isugarcoatit on Instagram and share the recipes made from my blog using #isugarcoatit!

More Cookie Love:

Mascarpone Double Chocolate Chunk Cookies

Chocolate Amaretti Cookies

Lemon Lavender Bites

Double Chocolate Chunk Gianduja Biscotti
Print Recipe

Double Chocolate Chunk Gianduja Biscotti

Double baked cookies stuffed with dark and milk chocolates, roasted hazelnuts and dipped in a Gianduja.
Prep Time15 minutes mins
Cook Time45 minutes mins
Total Time1 hour hr
Course: Dessert
Servings: 30 -40
Author: I Sugar Coat It

Ingredients

Biscotti

  • 325 g bread flour approx. 2 ⅔ cups
  • 325 g pastry flour approx. 3 cups
  • 500 g brown sugar 2 2/2 cups
  • 25 g baking powder 2 ¼ tbsps
  • 300 g butter approx. 1 ⅓ cups
  • 250 g dark chocolate 1 ¼ cups, roughly chopped
  • 250 g milk chocolate 1 ¼ cups, roughly chopped
  • 100 g hazelnuts ½ cup, roasted and skinned
  • 5 eggs
  • 15 g vanilla bean paste 1 tbsp

Chocolate Dip

  • 100 g Gianduja
  • 20 g dark chocolate

Instructions

  • Preheat oven to 350ºF. Line a large baking tray with parchment paper and set aside.
  • Bake hazelnuts on a small baking tray until golden and fragrant, about 5-8 minutes. Allow to cool a bit, then place in a clean towel and rub the skins off. Set aside.
  • Add the bread flour, pastry flour, brown sugar and baking powder to the bowl of a stand mixer and combine using the paddle attachment.
  • Cut the butter into cubes and add to the flour mixture. Continue to mix to a crumbly texture.
  • Mix in the dark chocolate, milk chocolate and hazelnuts.
  • In a separate bowl, lightly whisk together the eggs and vanilla bean paste to break up the eggs.
  • Add the egg mixture to the flour mixture and mix just until dough has formed.
  • Divide the dough into two pieces and shape into 24-inch logs on a parchment-lined baking tray. (see it here)
  • Bake for 20-30 minutes and remove from oven. Lower oven temperature to 300ºF.
  • Allow the biscotti to cool, then slice at an angle about ¾ inch thick with a large serrated knife.
  • Return to the oven and allow them to dry for 15 minutes - a little longer if you like a really dry biscotti.
  • Remove and allow to cool completely before dipping in the dark chocolate.

To make the dip:

  • Place gianduja in a metal bowl over a pot of simmering water and melt to 45º.
  • Remove from heat and stir in the dark chocolate until a working temperature of 29º - 30º is reached.
  • Dip the biscotti and place on a parchment covered baking tray to set.

Notes

The flavour is more pronounced a day or two later, so baking them a couple days ahead is my preference.
Store at room temperature in an airtight container.

I-Sugar-Coat-It-Blog-Signature-Green


FoodSaver Vacuum Sealer

April 2015 By i sugar coat it! 9 Comments

Product Review: FoodSaver Vacuum Sealing System

FoodSaver Vacuum Sealer
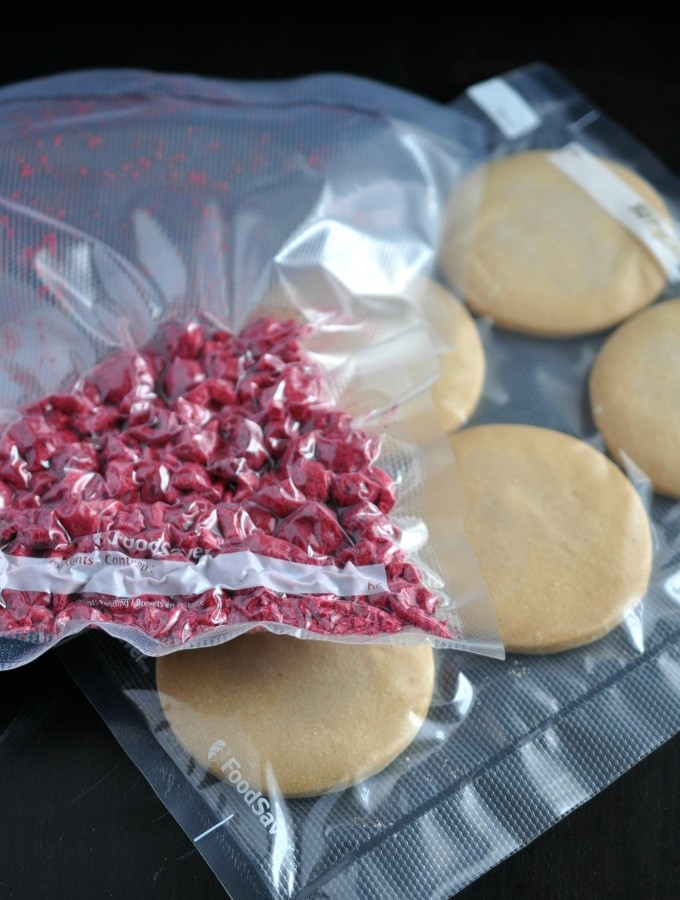
I received the FoodSaver 2 in 1 Vacuum Sealing System 4400 a few weeks ago with the intent to review. I've spent the last few weeks vacuum sealing everything in sight and I want to tell you all about it!

Firstly, I love that it arrived fully assembled and ready-to-use, complete with a sample variety pack of constructed bags, as well as a FoodSaver roll to make custom-sized bags. The machine is compact, with the electrical cord tucked neatly away at the bottom. I generally like a clear, uncluttered counter and FoodSaver's design is modest enough to keep it stored on the counter for easy access.

Secondly, I found it very user-friendly. Once out of the box, I plugged it in, turned it on and for once enjoyed vacuuming. 😉 I think it would make a wonderful Mother's Day gift! Or just a gift in general.

FoodSaver Vacuum SealerI also think it's the perfect little sidekick for anyone who bakes. I like to think of it as Spanx for cookie dough - everything sucked in nice, tight and compact. Not only did it help to free up freezer space, it kept freezer burn away and preserved the freshness of its contents.

I even stored baked cookies and two weeks later that freshly baked aroma from the day they were made, wafted through the air upon cutting the bag open. The taste was equally as fresh. I left another batch deep in the freezer and will revisit after a couple months to test against those stored in a regular freezer bag, just to serve my curiosity.

If you ship or sell your goodies, think of how handy this would be!

FoodSaver Vacuum SealerThirdly, if you're like me and purchase meat in the family pack size and don't have a family, this is the thing for you.:) The Dude is vegetarian, so I am the meat-eater in our household. We both have pretty hectic schedules, so I like to marinate and portion my meat for easy preparation during the week. I would normally store them in regular freezer bags, which worked fine if I stuck to my plans. But we eat out quite a bit - with so many amazing restaurants in the city, it's hard not to. Any meat left over a week, usually ended up in the green bin followed by a self-imposed, guilt-ridden tongue lashing about being wasteful.

These breasts were stuffed with veggies and cheese and marinated to perfection, so there would be no waste on my watch. After placing them into a prepared bag, I started the vacuuming process and realized that some of my delicious marinade was being sucked out. I panicked and went to hit the power button, but pressed the seal button in error and quickly learned that I can control the amount of vacuuming! By pressing the button, it stopped the vacuuming early and skipped to sealing the package. So yeah, I guess I would have known this, had I read the instructions, but hey, I like to live perched on that jagged, dangerous edge.

Oh and by the way, the excess liquids are channelled into a discreet little tray that is easily removed and cleaned. So if your aim is to have all the liquids removed from the item being sealed, press the button and watch in awe of the FoodSaver's sucking power.

FoodSaver Vacuum SealerThirdly, fruits! Long, frigid winters here usually mean a shortage of locally grown, in-season berries - and I love me some berries. We use them in smoothies daily and I like to dehydrate them to make powders for a boost of natural flavour and colour in my baking, like I did with my Strawberry Shortcake and White Chocolate Ganache Mango Macarons. Because they are free of moisture, I also love using them in chocolate. Storing them this way is a great way to keep locally grown goodies that are out-of-season, on hand.

These raspberries made their way into some deliciousness that I'll soon share with you.

FoodSaver Vacuum SealerFinally, the FoodSaver is very simple to use. I love that I was able to make my own custom-sized bags and it was super. Maybe because the step-by-step photos were staring at me from the flipped up inner lid. 🙂 It even has its own built-in cutter. You will need to remember to leave a four-inch clearance on each side of the plastic before cutting. This provides enough of a lip for the machine to create that seal.

It also has a handheld vacuum feature (see that bottle tucked into the side?). I haven't had a reason to use it yet, so nothing to share on that front at this time.

FoodSaver Vacuum SealerThoughts: I was a little startled at the grunting sound the machine made when it began vacuuming the bag, but I got over it quickly. Additionally, the bags were sturdy and according to the FoodSaver site, BPA-free. I didn't see any mention of the bags being recyclable, which would be a big disappointment if they aren't.

All in all, I really liked FoodSaver Vacuum Sealing System and will continue to use it regularly. It is said to keep food fresh up to five times longer, with thousands of dollars in savings.


{Disclosure: This post was sponsored by FoodSaver®. I received this product with the intent to review. All opinions are my own}

I-Sugar-Coat-It-Blog-Signature-Green

Dulcey Ganache Cups with Chocolate Transfer

April 2015 By i sugar coat it! 17 Comments

Dulcey Ganache Chocolate Bonbons

Dulcey Ganache Bonbons are dark chocolate shells filled with a rich, creamy Dulcey ganache and decorated in a tropical print chocolate transfer.

Dulcey Ganache Chocolate Bonbons Last week I wrote three exams and in the process ate twice my weight in chocolate. I am pretty darn certain I am on my way to my very first cavity. YIKES! That hasn't deterred me from indulging in these Dulcey Ganache Chocolate Bonbons, though.

These little pods of decadence are a shell of fine dark chocolate, stuffed with ganache and finished with a tropical print chocolate transfer. This sample batch of fifteen was finished in a flash and the feedback from my mini army of taste testers was fantastic.

With Mother's Day a few weeks away, a box of homemade bonbons may very well seal that much sought after 'favourite child' title. 😉

Dulcey Ganache Chocolate Bonbons I used a professional magnetic chocolate mold to create these Dulcey Ganache Chocolate Bonbons , but if one isn't readily available, a similar effect can easily be achieved with disposable foil cups. I used foil cups to make my Cashew Butter Cups . The process is a little more time-intensive, but the result is just as tasty. To add the chocolate transfer using the cup method, you could cut the sheets into smaller pieces and attach to the top of the individual bonbons. You can also spread a thin layer of chocolate over the printed side of the transfer sheet and use a cookie cutter to shape little discs, which can then be attached to the top of the bonbons.

The images produced from chocolate transfer sheets are fully edible. It's basically coloured cocoa butter on an acetate sheet. You can make your own, but you likely won't achieve the sharp details of those available for purchase. Google 'chocolate transfer sheets' to find where you might purchase them locally.

You can get creative with ganache flavours by infusing teas, adding liqueur, fruit puree etc. I am pretty much addicted to Biscoff and used it to create these Chocolate Easter Eggs. For these, I used my newest addiction, Valrhona Blond Dulcey. I have such a crush on this chocolate, I get a little flustered just speaking its name. You may remember me professing my love for the stuff in my Mascarpone Double Chocolate Chunk Cookie post. I just can't get enough!

Dulcey Ganache Chocolate Bonbons A little while ago, I shared a trick I learned in one of my culinary courses for creating perfectly smooth ganache. In its most basic form, ganache is an emulsion of cream and chocolate, liquid and fat, respectively. Adding glucose, or another invert sugar, serves several purposes:

    • It helps the ganache maintain a smooth, creamy texture by preventing recrystallization of sugar crystals;
    • It stabilizes the emulsion by lowering the water activity from the cream;
    • As a result of the above two points, it extends shelf life.

So basically, the less moisture and more chocolate a ganache contains, the longer the shelf life. As a rule of thumb, 10% to 40% of the cream may be replaced by glucose. I could pull out my class notes and go into great detail on this, but I may bore you to pieces, if I haven't already.

So now that you have a perfectly creamy, delicious ganache, I dare you to pipe it into these Dulcey Ganache Chocolate Bonbons without piping it directly into your mouth, or all over your body for that matter. It's darn near impossible. A certain someone, whom I shall not name and shame, cut the piping bag open and licked it clean before discarding.

See how I filled these Dulcey Ganache Chocolate Bonbons  here. While you're there, follow me on Instagram for more behind-the-scenes snapshots of recipes in the works, as well as tips and tricks!

More Chocolate Love:

Cashew Butter Cup Chocolate Hearts

Biscoff Chocolate Easter Eggs

Vanilla Wafer Butter Cups

Dulcey Ganache Cups with Chocolate Transfer
Print Recipe
3.86 from 14 votes

Dulcey Ganache Chocolate Bonbons

Dulcey Ganache Bonbons are dark chocolate shells filled with a rich, creamy Dulcey ganache and decorated in a tropical print chocolate transfer.
Prep Time30 minutes mins
Cook Time12 minutes mins
Total Time30 minutes mins
Course: Dessert
Cuisine: Chocolate
Keyword: bonbons, caramelzed white chocolate, chocolate
Servings: 15
Author: i sugar coat it!

Ingredients

For the shells:

  • mold
  • chocolate transfer sheet
  • 200 grams dark chocolate

For the filling:

  • 16 grams invert sugar
  • 100 grams 35% whipping cream
  • 202 grams caramelized white chocolate like Dulcey 32%
  • 0.5 vanilla bean scraped

Instructions

Make the shells:

  • Clean and buff your mold. Cut a transfer sheet to fit the mold and lay the sheet over the metal place of the mold, print side up.
  • Temper the chocolate and pour into the mold cavities, when it reaches working temperature. Tap the mold to remove any air bubbles, then carefully invert the mold to drain the excess chocolate. Scrape away remaining chocolate and place in a cool area to set.

Make the filling:

  • Place the chocolate in a small bowl and place over a pot of simmering water. Do not allow the bottom of the bowl to touch the water. Melt the chocolate and set aside.
  • Scale the invert sugar and cream into a small saucepan and bring to a simmer over medium heat. Remove from heat and slowly add to the chocolate, stirring with a whisk or spatula to create an emulsion. Finish with an immersion blender and allow to cool at room temperature.

Fill and cap:

  • Transfer the ganache to a piping bag and snip a small opening at the tip. Fill the shells to just below the edge, leaving enough room for capping. Allow to crystallize, overnight is best. Temper the remaining chocolate used for the shells to close the bonbons. 

Notes

Adapted from Valrhona

I-Sugar-Coat-It-Blog-Signature-Green

Mascarpone Double Chocolate Chunk Cookies

April 2015 By i sugar coat it! 9 Comments

Mascarpone Double Chocolate Chunk Cookies

Mascarpone Double Chocolate Chunk CookiesIt seems like forever and a day since I've shared cookies with you. I want to remedy that today with these Mascarpone Double Chocolate Chunk Cookies, packed with mascarpone cheese and generous chunks of Valrhona Dark and Blond chocolate discs.

Now I have never had cheese in a cookie, but while I was preparing for last week's post for Tre Stelle®, I came across their Mascarpone Toblerone Cookies and my interest was instantly piqued. So, I used the mascarpone left over from my Mascarpone Clouds Carrot Cake to whip up a batch.

Mascarpone Double Chocolate Chunk CookiesI didn't have any Toblerone on hand, so I added some roughly chopped Valrhona chocolate discs instead. The addition of the Dark Bittersweet Caraibe (66%) along with the Blond Dulcey (32%) brought these cookies to a whole other level.

My preference is always dark, bittersweet chocolate - there is just no comparison. Valrhona's Dulcey though...HOLY EFF! Every time I buy a bag, I have to enlist every last ounce of self-control to not eat them all straight from the bag. They aren't nearly as sweet as white chocolate and impart a buttery smooth mouth-feel.

Mascarpone Double Chocolate Chunk CookiesAs sour cream or mayonnaise lends prolonged moistness to cakes, so I imagined the mascarpone would to these cookies. The recipe makes about thirty cookies, which is a huge batch for my household, so I still had a few on hand a week later to test that theory. Kept in an airtight container, they retained their initial melt-in-your-mouth deliciousness beyond a week. YUM!

The overall texture of these Mascarpone Double Chocolate Chunk Cookies is akin to that of shortbread. And shortbread, in all its sexy simplicity, is pretty darn close to cookiedom holy grail in my books! GO, make some!

Crush On These Cookies:

Chocolate Amaretti Cookies

Breakfast Cookies

Piped Lemon Nutmeg Cookies

Mascarpone Double Chocolate Chunk Cookies
Print Recipe
3.75 from 4 votes

Mascarpone Double Chocolate Chunk Cookies

Mascarpone Double Chocolate Chunk Cookies packed with mascarpone cheese and Valrhona Dark and Dulcey chocolate chunks.
Prep Time30 minutes mins
Cook Time10 minutes mins
Total Time40 minutes mins
Author: I Sugar Coat It

Ingredients

  • 113 g butter ½ cup, I use Stirling Creamery, unsalted
  • 75 g Tre Stelle® Mascarpone ⅓ cup
  • 12 g vanilla bean paste 2 tsp
  • 150 g <a href="http://www.amazon.ca/gp/product/B00KNLSQT8?ie=UTF8&creativeASIN=B00KNLSQT8&linkCode=xm2&tag=isucoit-20" rel="nofollow" data-mce-href="http://www.amazon.ca/gp/product/B00KNLSQT8?ie=UTF8&creativeASIN=B00KNLSQT8&linkCode=xm2&tag=isucoit-20">organic coconut blossom sugar</a> ¾ cup
  • 50 g granulated sugar ¼ cup
  • 1 large egg
  • 224 g cups unbleached 2¼, all-purpose flour
  • 6 g cornstarch 2 tsp
  • 4 g baking soda 1 tsp
  • 500 g roughly chopped Valrhona dark and Dulcey 2 cups, 250g each

Instructions

  • Combine the butter, vanilla bean paste, Mascarpone and sugars in the bowl of a stand mixer fitted with the paddle attachment. Blend until smooth.
  • Add the egg and continue to blend on medium-high until light and fluffy, stopping to scrape the sides of bowl, as needed.
  • Add flour, cornstarch and baking soda, mix until just combined.
  • Stir in chocolate pieces and combine until incorporated.
  • Use a small ice cream scoop to place the dough equally apart on a large cookie sheet; flatten slightly.
  • Cover cookie sheet with plastic wrap and freeze for 15 minutes and remove from freezer 5 minutes prior to baking.
  • While the cookies rest from the freezer, preheat oven to 350ºF (180ºC).
  • Bake on the middle rack for 10-12 minutes.
  • Allow to cool on baking sheet for 5 minutes prior to transferring to wire rack to continue cooling.

Notes

Adapted from Tre Stelle® Mascarpone Toblerone® Cookies.


Mini Carrot Cake with Mascarpone Clouds

April 2015 By i sugar coat it! 10 Comments

Mascarpone Clouds Mini Carrot Cake

Mascarpone Clouds Mini Carrot CakeI love carrot cake, sans raisins, nuts and all the other non-necessities. Yet, I make it only once or twice each year and usually around Easter. Like most people, I pair it with a cream cheese frosting and it's been just great that way. Until this happened - Mascarpone Clouds Mini Carrot Cake!

I normally reserve my Mascarpone cheese for chubby, coffee soaked, drunken lady fingers, also known as Tiramisu. It's one of my all-time favourite desserts, but I can never get it to taste like the one my cousin's nona makes, so I haven't bothered to share it here. Soooo, back to these fluffy, decadent clouds...

Mascarpone Clouds Mini Carrot CakeThese mascarpone clouds are a one bowl, four ingredients delicious break from the normal butter-laden frosting. Please don't get me wrong, I like butter. Just have a look around! With the warmer weather in the wings, I opt for quick, easy and just as tasty toppings to minimize my time in the kitchen. Think Chocolate Whipped Cream, or Champagne Whipped Cream, or Pumpkin Spice Whipped Cream, or one of my favourite, Coconut Milk Whipped Cream to name a few. This is along the same lines, but with the silky, smooth addition of Tre Stelle® Mascarpone cheese.

Instead of whipped cream, I used coconut milk, but only because I didn't have whipping cream on hand and was curious to see how it would pair with the Mascarpone cheese. It was an absolute winner in my books and wonderful complement to the carrot cake. An instant hit!

Mascarpone Clouds Mini Carrot CakeThese Mascarpone Clouds Mini Carrot Cake use the same recipe as last year's Easter Carrot Cupcakes with Cookie Toppers. This time I baked them in two 7-inch square pans and cut out eight 3-inch circles that were just under 3-inches tall. They were just the perfect size for two, or one, if you're anything like me.

Hope you all have a Happy Easter!

{Disclosure: This post is sponsored by TreStelle®. All opinions expressed are my own.} 

More Mini Cakes & Bakes:

Mini Vintage Wedding Cakes

Lemon Myrtle Creme Chantilly Mini Cakes

How Do You Like Your Eggs Mini Cakes

Mini Carrot Cake with Mascarpone Clouds
Print Recipe
5 from 2 votes

Mascarpone Clouds Mini Carrot Cake

Moist, tender and delicious carrot cake topped with clouds of whipped Mascarpone cheese.
Prep Time10 minutes mins
Total Time10 minutes mins
Servings: 6
Author: i sugar coat it!

Ingredients

Mascarpone Clouds

  • 227 g TreStelle® Mascarpone cheese
  • 175 g full fat coconut milk 35% whipping cream works great, as well
  • 12 g superfine sugar
  • 7 g pure vanilla extract
  • 1 envelope Whipped Cream Stabilizer optional

Instructions

  • Chill a can of coconut milk in the refrigerator overnight. When ready to use, turn can upside-down and open without shaking. Drain of the separated liquids (do not discard, keep for smoothies).
  • Chill the bowl and whisk of a stand mixer, by placing them in the freezer for three to five minutes.
  • Add all the ingredients to the chilled bowl and whip on medium-high until firm peaks form.
  • Fit a piping bag with a plain round tip and transfer the whipped Mascarpone to the bag.
  • Pipe little balls all around the cake, starting at the edge and tapering off towards the centre. Pipe a second row, staggered from the first in the same manner as the first.
  • Fill the centre with sprinkles and a Sixlet, or a mini rose.

I-Sugar-Coat-It-Blog-Signature-Green

Fruit and Nut Funfetti Easter Bark

March 2015 By i sugar coat it! 8 Comments

Fruit and Nut Funfetti Bark

Fruit and Nut Funfetti Bark

It's Funday in the I Sugar Coat It, household! And so it should be. Yesterday afternoon was spent sampling chocolates from around the world at my first chocolate potluck. Given my love of all things dark and bittersweet in the chocolate world, it's puzzling that this would be my first such venture.

The tasting potluck was actually part of the Chocolate Theory class I am taking towards my Chocolatier certification. My favourite of the bunch was a deep, dark smooth Grenada 100%. Also, I am not generally a chip person, but the handmade, dark chocolate dipped potato chips... AWESOME!! I was so wired at the end of the day, I was lucky to get an hour's sleep. As I continue to bounce off the walls and ceiling, I am already plotting the when and how of an encore.

Fruit and Nut Funfetti BarkLeftover chocolate never goes to waste on my watch. That's just sacrilege in my books. Any leftover tempered chocolate is poured onto a sheet of parchment paper and wrapped airtight for use in hot chocolate, drizzled over desserts, snacking, or quickie crowd-pleasers, like this bark.

When poured onto the parchment, the chocolate will naturally take the shape of a disk (at least that has been my experience, thus far). While still viscous, sprinkle with your favourite toppings. For this mini bark, I used coarsely chopped pecans, crystallized papaya and pineapple and a mix of sprinkles.

Fruit and Nut Funfetti BarkThis Fruit and Nut Funfetti Bark is quick, easy, colourful and so very delicious. You can really play up the easter theme by adding some candy Easter eggs and bunnies. If you're not into eating all the chocolate (not sure why...), pack them up and gift them. Giving is always good, but I'll venture a bet that the act will be quickly followed by regret. Lucky for you, another batch is as close as thirty minutes in the making!

Chocolate, Chocolate, Chocolate:

Hazelnut Rocher

English Toffee

Cashew Butter Cups

Fruit and Nut Funfetti Easter Bark
Print Recipe

Fruit and Nut Funfetti Bark

Fruit and Nut Funfetti Bark - dark chocolate topped with pecans, papaya, pineapple and funfetti.
Prep Time1 hour hr
Total Time1 hour hr
Course: Dessert
Servings: 4 -6
Author: I Sugar Coat It

Ingredients

  • 200 g tempered chocolate approx. 1 cup
  • 35 g pecans or your favourite nuts ¼ cup, coarsely chopped
  • a handful of crystallized papaya and pineapple cut into small chunks
  • as much or as little sprinkles your heart and eyes desire

Instructions

  • Line a clean, flat surface with with a sheet of parchment paper
  • Position the bowl of chocolate over the center of the parchment and pour the chocolate, keeping the bowl in that centred position. This way the liquid will spread naturally outwards in a circle.
  • Once the edges show first signs of setting, sprinkle the toppings over the surface of the chocolate.
  • Allow to set at room temperature. (this was very thin and set within 30-60 minutes)
  • Break into pieces and enjoy!!

I-Sugar-Coat-It-Blog-Signature-Green

Green Super Smoothie with kiwi, spinach, avocado, grapefruit and spirulina. Smoothie Resolution Round Up 2017.

March 2015 By i sugar coat it! 7 Comments

Green Superfood Smoothie

Green Superfood Smoothie with kiwi, spinach, avocado, grapefruit and spirulina.IT'S SPRING!!! So let's ring her in with my Green Superfood Smoothie, packed with kiwi, spinach, avocado, grapefruit, mango and spirulina!

For me, spring signifies rebirth - a fresh, clean start. It's customary for most to reset when the new year rings in on January 1. I tend to do so at the start of spring. It just feels more organic. Everything that laid barren and stark for months will soon come alive with colour, foliage, flowers and fruits. What better opportunity to recalibrate, reenergize and rejuvenate!

Green Superfood Smoothie with kiwi, spinach, avocado, grapefruit and spirulina.I've been feeling a little ragged and worn and it's affecting my sleep, which is affecting my concentration, which affects my mood. And when I am in a bad mood, my hair transforms to venomous snakes and my stares turn even the innocent to stone. Throw that *time of month* into the mix and you are looking at Medusa, in the flesh.

The Dude jokingly refers to me as Hulk during these spells. Sadly, I'm not in a position to dispute it. Sleep deprivation messes with my ability to not give a f**k and all that is trivial take on a life or death, sky is falling, world imploding urgency. Common sense and calm dessert me. Just this past week, all five feet four inches of me decided to go a full round with a moving streetcar, gloves off, arms and legs flailing in protest as it pulled away... WITHOUT ME. My more rational self would shrug in such instances, wait for another to arrive, or walk until one approaches. My Medusa Hulk hybrid self ran along side a large moving vehicle, screaming, punching and kicking.

So yeah, I have not been myself lately.

Green Superfood Smoothie with kiwi, spinach, avocado, grapefruit and spirulina.

So, in addition to a much needed vacation, I've put some strategies in place to help me get back to being me. I am starting by reclaiming my bed for rest and well... you know. This means no laptop, tablet or phone under the covers. If I can get more than three hours sleep, I'll be golden. Eight hours would be ideal, but baby steps. I am deathly anemic, which has led to a host of other issues, so I am always looking for ways, other than red meat, to pump up my iron.

We're big fans of smoothies for breakfast and make them almost every morning. They are a great way to get those fruits and veggies on-the-go and bring a bit of balance to all the sweetness that I share here. I thought it would be fun to join in on the 30 Day Green Smoothie Challenge hosted by Simple Green Smoothies. We normally just throw in whatever fruits and veggies are on hand, without much rhyme or reason. I am hoping this challenge will help bring some balance and structure to my smoothie game and my life.

The challenge starts on April 1 and I will be charting my progress daily on Instagram. But before we get all structured and serious, I'm embracing my inner Hulk with this Green Superfood Smoothie. Maybe you will too.

Warning: it's been known to pop a few buttons and seams.


Satiating Smoothies:

Cashew Milk Espresso Smoothie

Mangosteen Passion Fruit Smoothie

Blueberry Chia Seed Smoothie

Green Super Smoothie with kiwi, spinach, avocado, grapefruit and spirulina.
Print Recipe

Green Superfood Smoothie

Green Superfood Smoothie with kiwi, spinach, avocado, grapefruit and spirulina.
Prep Time10 minutes mins
Total Time10 minutes mins
Servings: 2
Author: I Sugar Coat It

Ingredients

  • ½ cup water
  • 1 ½ cups freshly squeezed grapefruit juice
  • 2 cups spinach
  • 1 teaspoon spirulina
  • 2 kiwis
  • 1 avocado
  • ½ cup frozen mango chunks

Instructions

  • Place all ingredients in the blender.
  • Blend on high until smooth.
  • It will be very thick. Add more juice or some water to thin the mixture if that's your preference.

I-Sugar-Coat-It-Blog-Signature-Green

  • « Go to Previous Page
  • Page 1
  • Interim pages omitted …
  • Page 24
  • Page 25
  • Page 26
  • Page 27
  • Page 28
  • Interim pages omitted …
  • Page 51
  • Go to Next Page »

Primary Sidebar

Never Miss A Happy Ending...

Previous Sweetness...

Search

Filter by Category

Filter by Date

SWEETEN YOUR INBOX!

All Content Including Images Copyright Jacqueline | I Sugar Coat It© 2026