• Skip to primary navigation
  • Skip to main content
  • Skip to primary sidebar
  • Home
  • About
    • About I Sugar Coat It
    • Features & Press
    • Copyright
    • Disclosure
    • Privacy Policy
  • Recipes
  • How-To
  • Contact
  • sous vide sista

I Sugar Coat It

Home

All Posts

Peanut Butter Popsicles

August 2015 By i sugar coat it! 6 Comments

Peanut Butter Popsicles

Peanut Butter PopsiclesOnce upon a time, Peanut Butter and Chocolate. The End!

Really, what else is there? OK, coconut milk, Milo, dates and caramelized nuts. But peanut butter and chocolate can most definitely hold their own. Am I right?!? They certainly prove it as the stars of these mini popsicles.

Peanut Butter PopsiclesDid you ever have Milo (or Ovaltine) as a kid? I have fond memories of my grandmother making us kids big mugs of the rich, warm drink just before bedtime. Apparently it was formulated for athletes and busy adults. Why my grandmother saw fit to feed it to us overactive kids just before bed is a mystery. Although, I have since seen ads for the drink geared toward active kids, but certainly not as a sleep aid.

For those not familiar,  Milo is a blend of malt barley, cocoa, milk powder, sugar, plus eight vitamins and minerals. It was developed in the 1930s by an Aussie, Thomas Mayne and was named after the mythical Greek character MILO, who was known for his strength. (source)

I no longer drink it as a pre-bedtime beverage, but I continue to enjoy it occasionally in my smoothies and even in baking. It doesn't taste as it did when I was a child, but that could be for any number of reasons, including where it was produced. Still, it reminds me of my childhood, so I thought I would see how it would work in popsicles.

Peanut Butter PopsiclesThis is a small batch of pops, so I only needed a couple spoonful of Milo to achieve that malted flavour I was after, without having it compete with the star ingredient - Peanut Butter!

These Peanut Butter Popsicles are super rich and creamy and oh so dreamy. Don't let summer slip by without whipping up a batch!

Peanut Butter Popsicles
Print Recipe

Peanut Butter Popsicles

Peanut Butter Popsicles made with creamy peanut butter, coconut milk, Milo and topped with dark chocolate and caramelized nuts!
Prep Time6 hours hrs
Total Time6 hours hrs
Course: Dessert
Servings: 4
Author: I Sugar Coat It

Ingredients

You will need:

  • small popsicle mold I used clear plastic shooter cups
  • popsicle sticks

Popsicle

  • 90 g creamy peanut butter ½ cup, homemade or store-bought
  • 14 g Milo 2 tbsp
  • 175 ml coconut milk ¾ cup, full-fat
  • 45 g date paste or maple syrup 2 tpsps

Topping

  • 180 g dark chocolate discs 1 cup, or chopped if using a bar
  • 30 g grapeseed oil 2 tbsp, or coconut oil
  • praline caramelized nuts

Instructions

Popsicle

  • Blend peanut butter, Milo, coconut milk and date paste in a blender, until well combined.
  • Pour into popsicle cups or molds, sprinkle with praline and insert popsicle sticks.
  • Freeze for six hours, or overnight.

Topping

  • Place the chocolate in a microwave safe dish.
  • Melt chocolate in microwave in 30-second intervals, stirring every 30 seconds.
  • Once melted and smooth, add the oil and stir until smooth. Let cool slightly.

Assembly

  • Remove the popsicles from the freeze and unmold. One at a time, quickly dip popsicles into the chocolate mixture, or use a spoon to drizzle the chocolate over the popsicles.
  • Immediately garnish with praline.
  • Place the chocolate covered popsicles on a plate, cover with plastic wrap and return to the freezer until ready to eat.

I-Sugar-Coat-It-Blog-Signature-Green


Peanut Butter Banana Blizzard

August 2015 By i sugar coat it! 16 Comments

Whipped Coconut Peanut Butter Banana Blizzard

Whipped Coconut Peanut Butter Banana Blizzard
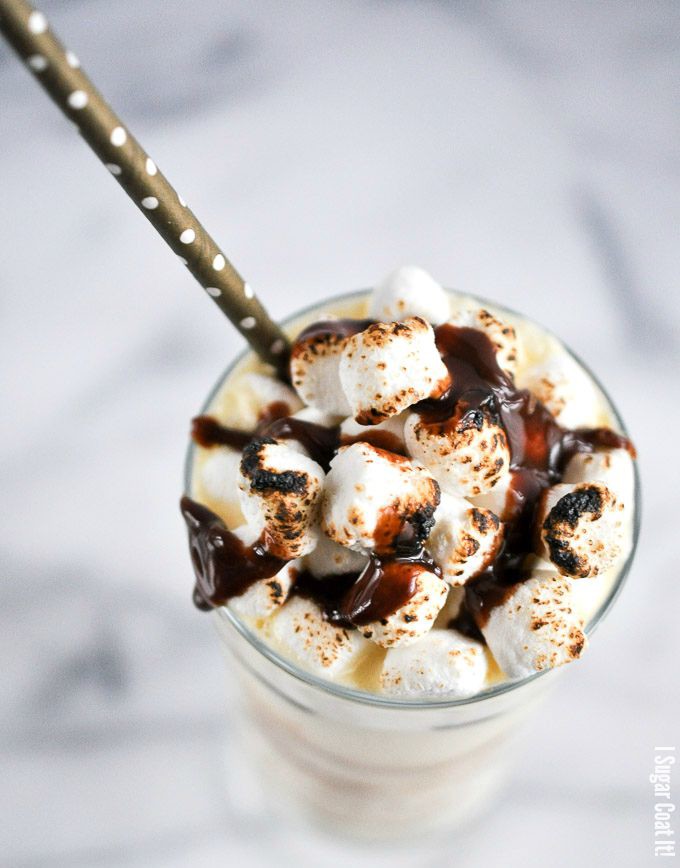
Happy Friday, friends!! This Whipped Coconut Peanut Butter Banana Blizzard is not for the faint of heart. It's a thick, rich, indulgent and dairy-free blend of whipped coconut, 1-ingredient banana ice cream and peanut butter, topped with bruleed marshmallows and melted dark chocolate! Yeah, just go right ahead and drool here.

I whipped up this decadent frozen treat during a marathon re-watch of The Wire with friends a few months ago and shared it on my Instagram feed. I was initially going to serve a batch of the ubiquitous 1-ingredient banana ice cream, topped with a little fruit, but the topic of Dairy Queen arose somehow and I was being shamed because I had never indulged in a DQ blizzard, or anything for that matter.

Whipped Coconut Peanut Butter Banana BlizzardWell, did I ever show them by turning that plain, but delish, ice cream into what I initially called the Boozy Bunk Blizzard, after Detective William 'Bunk' Moreland, one of the characters on the The Wire. I don't know why, really. Perhaps it was because he appeared in the last scene of the episode we watched before we came up for air and, well, it had a ring to it. Baileys was added to the first batch, but omitted from the second. I've included it as an option in the recipe below. I thought it would be fun to roast the marshmallow, because any opportunity I get to use my cute little torch, I take.

This was such an indulgent treat! If you whip up a batch, I'd love to hear about it. Share a photo on Instagram and tag isugarcoatit.

More Coconut + Banana Treats:

No-Bake Maple Berry Vegan Cheesecake with Whipped Coconut Topping

Banana Hazelnut Espresso Ice Cream Bars

Chocolate Vanilla Swiss Roll with Whipped Coconut Filling

Peanut Butter Banana Blizzard
Print Recipe
5 from 2 votes

Whipped Coconut Peanut Butter Banana Blizzard

Whipped Coconut Peanut Butter Banana Blizzard is a delicious blend of coconut cream, banana ice cream and peanut butter, topped with bruleed marshmallows and melted chocolate!
Prep Time15 minutes mins
Total Time15 minutes mins
Course: Dessert
Servings: 2
Author: I Sugar Coat It

Ingredients

  • 260 g banana ice cream 2 cups, about 4 medium bananas
  • 250 ml coconut milk 1 cup
  • 60 g peanut butter ⅓ cup, or your favourite nut butter, smooth or crunchy
  • 15 ml pure vanilla extract 1 tbsp
  • baileys to taste optional
  • mini marshmallows
  • melted dark chocolate or softened peanut butter

Instructions

Banana Ice Cream

  • Slice bananas and freeze overnight in an airtight container. (we always have a batch of bananas in the freezer for on the fly ice cream)
  • Remove from freezer and add to a high-powered food processor, or blender.
  • Use the pulse to break up the pieces and then allow the processor to run, stopping to scrape down the sides once in a while.
  • Use a spatula to transfer the mixture to an airtight container and return to the freezer until ready to use.

Coconut Cream

  • Place a can of coconut milk in the refrigerator overnight. This allows the milk solids and liquids to separate. DO NOT shake the can when you remove it from the fridge.
  • Open the can, drain the liquid into a cup and scoop out the cream into the chilled bowl of a stand mixer.
  • Whip on high, using the whisk attachment, until soft, firm peaks form. Place in the freezer for 15 minutes.

Blizzard

  • Melt some chocolate and drizzle randomly on the inside of the glasses to be used. Set aside in the fridge.
  • Remove the ice cream and whipped coconut from the freezer and place in a blender along with the peanut butter and vanilla (and baileys, if using).
  • Blend on a low speed at first and gradually increase to high until incorporated. It will be thick. If you have a less powerful mixer, you can add a little coconut milk to help the mixture along.
  • Add to chocolate drizzled glasses top with mini marshmallows and use a kitchen torch to brulee the marshmallow.
  • Drizzle with melted chocolate or peanut butter, or both. Add roasted, chopped peanuts for a little crunch.
  • Enjoy!

Notes

The prep time of 15 minutes is based on having already made the ice cream the previous night.
When using store-bought coconut cream, chilling yields the best results. However, I've used it un-chilled before with a chilled bowl and whisk, which produced good results.

I-Sugar-Coat-It-Blog-Signature-Green


Fruity Funfetti Chocolate Gems

August 2015 By i sugar coat it! 6 Comments

Fruity Funfetti Chocolate Gems

Fruity Funfetti Chocolate Gems - raspberry, strawberry and passion fruit flavoured white chocolate!If you're like me and your day, no year, ok life could use a little perking up these days, then I've got just the thing. Fruity Funfetti Chocolate Gems!! A melt-in-your-mouth blend of quality white chocolate, organic fruit powders and copious amounts of sprinkles, for good measure.

I made these fruity little gems for last Valentine's Day and never got around to sharing them, beyond my Instagram feed. Why am I sharing them now, you ask? Well, the Dude and I have been living out of hotel rooms for the last little while and as I am without a kitchen, I've been looking through my unpublished photos and recipes for sweet treats to share with you. My unpublished file has plumped up way far more than I care to admit, dating as far back as two years - a combination of procrastination, busy work/home life and waned interest in a particular recipe.

It could be another couple weeks, or months before we are back in our kitchen. In the meantime, I'll attempt to revive a few hidden gems for us to enjoy here. Starting with these Fruity Funfetti Chocolate Gems!
Fruity Funfetti Chocolate Gems - raspberry, strawberry and passion fruit flavoured white chocolate!I didn't always like white chocolate. I've found that choosing one that contains 33-35%, or at the very least the required minimum 20% cocoa butter and not the various hydrogenated oil fillers that are sometimes substituted, makes for a more enjoyable tasting experience.

I used my favourite white chocolate, coloured and flavoured portions with raspberry, strawberry, and passion fruit powder and littered the latter with a few sprinkles before molding them into bite-sized gems. Quick, easy, delicious and they make pretty impressive gifts for Mother's Day, Valentine's Day, or any other day you feel compelled to gift something sweet.

If you have been here a while, you already know how much I enjoy using fruit and vegetable powders to flavour and colour my desserts - from smoothies to macarons (see links below). I'm not turning my back on food colour, nor am I espousing any health advice (I don't pretend to have the expertise/credentils to do so). I do, however, try to use ingredients with little to no additive, whenever possible. Plus, fruit and chocolate just work so deliciously together!
Fruity Funfetti Chocolate Gems - raspberry, strawberry and passion fruit flavoured white chocolate!

More Ways To Use Fruit Powder:

Raspberry Chocolate Meringue Kisses

Mango White Chocolate Ganache Macarons

Strawberry Shortcake Macarons

Berry Beet Smoothinis

Fruity Funfetti Chocolate Gems
Print Recipe
5 from 1 vote

Fruity Funfetti Chocolate Gems

Organic raspberry, strawberry and passion fruit powder are blended with quality white chocolate to create these Fruity Funfetti Chocolate Gems!
Prep Time1 hour hr
Cook Time15 minutes mins
Total Time1 hour hr 15 minutes mins
Course: Dessert
Author: I Sugar Coat It

Ingredients

  • 1000 g white chocolate 4 cups, plus 15-20% for seeding, tempered
  • 25 g each of organic 2 tbsp, I used raspberry, strawberry and passion fruit, raw fruit powder
  • sprinkles
  • chocolate molds of your choosing

Instructions

  • Melt chocolate to 45ºC.
  • and separate equally into three bowls.
  • Use a sieve to add fruit powder into each and stir to combined until working temperature of 28-29ºC is achieved. Add sprinkles.
  • Pour into molds, scrape away excess and leave to set at room temperature, then place in the refrigerator for another 15 minutes.
  • Once set, flip mold to remove chocolate.
  • Enjoy!!

Notes

You can make your own fruit powder, or purchase them online at Amazon or Nuts.com.

I-Sugar-Coat-It-Blog-Signature-Green

Lemongrass Apricot Malt Granitas

July 2015 By i sugar coat it! Leave a Comment

Lemongrass Apricot and Malt Granitas

Lemongrass Apricot Malt Granitas
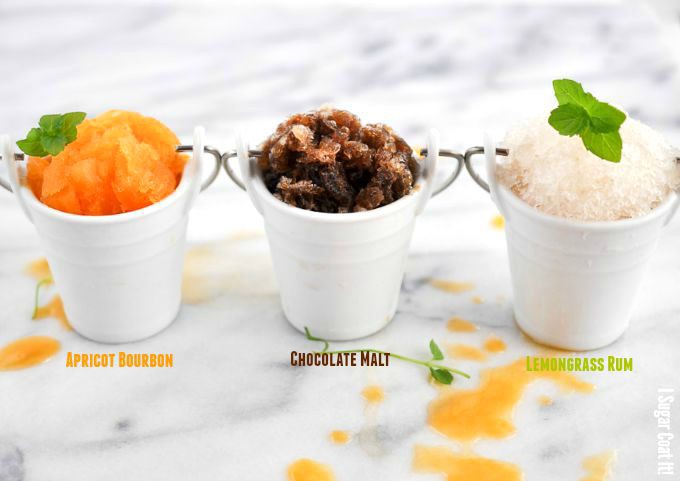
I think I can confidently proclaim my adulthood. I marked the occasion by putting childish tastes aside (snow cones/sno cones); replacing them with a more adult palate (granitas). Three to be exact - Apricot Bourbon, Chocolate Malt and Lemongrass Rum.

Who am I kidding? I could never give up my childhood loves - copious amounts of popsicles and resulting brain freeze, unnaturally coloured snow cones that transform my lips and tongue into psychedelic rainbows, abandoning all layers of clothing to cartwheel through the sprinklers of strangers' lawns (maybe not so much these days...).

Lemongrass Apricot Malt GranitasWhen we were little, a snow cone cart would come around in the summers at my grandparents and we would run out in the sweltering heat wearing superhero or day-of-the-week undies and less often a matching tank top. Always in a race, loose change slipping through our tiny fingers, screaming for the flamboyantly dressed cart pusher to come to a halt. The excitement was just...BEYOND! Oddly, I have never felt this way about ice cream trucks... I am totally creeped out by them, for so many irrational reasons. Anyone else feel this way?

So, GRANITA (said with a rolling tongue)! I've only made it a couple times before, using red wine. You know me, in the realm of frozen desserts, I fancy myself more a popsicle lover (a sucker, if you will). 🙂 What I love about granita is the ease with which they can be made and in a pretty vast variety of flavours. It is basically a semi-frozen mixture of sugar, water and flavouring that is agitated (shaved or scraped) to create the delicious, refreshing little flavoured ice crystals.

Lemongrass Apricot Malt Granitas

The Apricot Bourbon started out as ice cubes and then pulsed briefly in a blender. The Chocolate Malt was frozen in a shallow dish and intermittently agitated (scraped with a fork) throughout the freezing time. The Lemongrass Rum was fully frozen in a shallow dish before being scraped. Each technique yielded varied results - smooth flaky-ish crystals, coarse irregular crystals, smooth uniformed crystals, respectively. They were all very tasty, with the Chocolate Malt yielding the preferred texture.

It really does not get any simpler - a container, a fork, a freezer and  your favourite fresh fruit, juice or drink - to bring a little chill to these sweltering summer days. You can also put the freeze on summer with some of my other Frozen Desserts.

Until next time...CHILL!

Lemongrass Apricot Malt Granitas
Print Recipe

Lemongrass Apricot and Malt Granitas

Three refreshing granita recipes to cool down your summer - Lemongrass Rum, Apricot Bourbon and Chocolate Malt.
Prep Time3 hours hrs
Total Time3 hours hrs
Course: Dessert
Servings: 4
Author: I Sugar Coat It

Ingredients

Lemongrass Rum

  • 250 ml carbonated water 1 cup
  • 180 ml homemade lemongrass syrup ¾ cup
  • 30 ml white rum 2 tbsps

Apricot Bourbon

  • 250 ml water 1 cup
  • 195 ml apricot nectar ¾ cup
  • 30 ml bourbon 2 tbsps

Chocolate Malt

  • semi-sweet chocolate melted
  • 350 ml bottle of malt beverage I used Tiger malt

Instructions

Lemongrass Rum

  • Stir all ingredients together in a shallow metal or plastic dish.
  • Cover and freeze for 3 hours.
  • Use a fork to scrape the mixture.
  • Scoop into a small cup or bowl and top with fresh mint or candied ginger.

Apricot Bourbon

  • Stir all ingredients together in a shallow metal or plastic dish.
  • Pour into ice-cube trays and freeze for 3-5 hours.
  • Remove from freezer and tray and pulse in a food high-powered processor or blender.
  • Scoop into bowl and top with fresh mint.

Chocolate Malt

  • Place chocolate in a microwave-safe dish and melt in 20-second intervals.
  • Allow to cool, but not harden.
  • Add room temperature malt to the chocolate and stir with a whisk until combined.
  • Stir all ingredients together in a shallow metal or plastic dish.
  • Cover and freeze.
  • Use a fork to scrape the mixture after the first hour and then again every thirty minutes.
  • Scoop into a small cup or bowl and enjoy!

I-Sugar-Coat-It-Blog-Signature-Green

Chocolate Vanilla Swiss Roll with Whipped Coconut Cream

July 2015 By i sugar coat it! 15 Comments

Chocolate Vanilla Swiss Roll With Coconut Whipped Cream

Chocolate Vanilla Swiss Roll with Whipped Coconut Cream
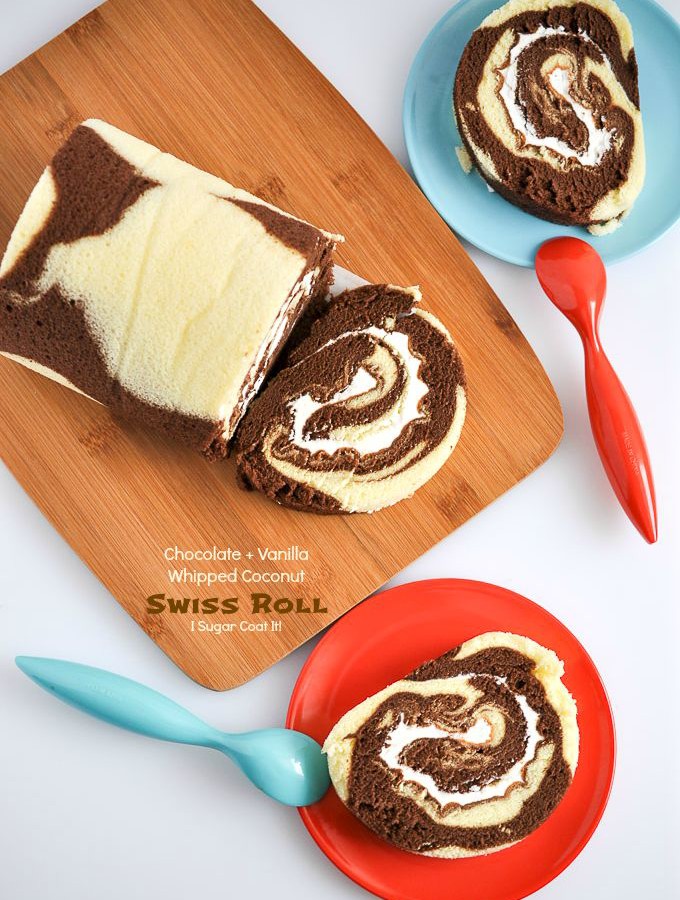
Cocoa, vanilla and coconut cream, all the things that make this Chocolate Vanilla Swiss Roll with Coconut Whipped Cream a treat supreme. My rhyming skills could use a little work, but my rolling skills are pretty tight. Right!

I love sponge cake, but I haven't always liked swiss rolls - too much fluffy and creamy going on. I generally don't go for desserts or food that lack contrasting textures. Then a few years ago I made my own in a Baking Arts class and I realized that it wasn't so much the dessert itself that I found unappealing, but the store-bought stuff.

Raspberry and Cream Swiss Roll

This is one of the raspberry and cream rolls I made in class, the other I shared on Instagram many moons ago. The jam (which I normally wouldn't enjoy unless it accompanied peanut butter) and the the almonds added that much needed texture.

I remember we had to work rather quickly on this recipe and quickly learned why. In working with sponge batters, any delay causes cell structure to collapse, resulting in loss of volume (at least that's what I remember being said...). Clean, grease-free utensils and quick baking turn-around were also stressed.

A little trick we learned to achieve a perfectly rolled roll, involved parchment paper and a two by four (see bottom-right photo in collage below) - because baking/caking and the hardware store go hand-in-hand. It worked like a charm then and now.
Chocolate Vanilla Swiss Roll with Whipped Coconut Cream

For this Chocolate Vanilla Swiss Roll With Coconut Whipped Cream, I went the ebony/ivory route with the addition of a little Rodelle Baking Cocoa. I've also included their lemon and vanilla extracts. I am a big fan of their products, so was quite excited when they approached me about becoming a Brand Ambassador. We did a test run with these Brown Butter Chocolate Raspberry Madeleines and now I am a bona fide Ambassador. Has a ring of importance, doesn't it! 😉 I've linked to the various products used in the recipe app below.

Thanks to Rodelle for lending a little ebony to this otherwise ivory cake and to coconuts all around the world for allowing us lactose-intolerant types to indulge in a little (ok, A LOT) whipped cream from time to time (like errrday).

Chocolate Vanilla Swiss Roll with Whipped Coconut Cream
Print Recipe
3.80 from 5 votes

Marbled Swiss Roll With Coconut Whipped Cream

This recipe for Chocolate Vanilla With Coconut Whipped Cream is a delicious vanilla and chocolate sponge cake filled with whipped coconut cream.
Prep Time20 minutes mins
Cook Time10 minutes mins
Total Time25 minutes mins
Course: Dessert
Cuisine: Cake
Servings: 6
Author: i sugar coat it!

Ingredients

Sponge Cake:

  • 8 large eggs
  • 150 g granulated sugar ¾ cup
  • pinch of salt
  • 1 g Rodelle lemon extract ¼ tsp
  • 5 g Rodelle organics pure vanilla extract 1 tsp
  • 135 g bread flour 1 ⅓ cup, sifted
  • 28 g Rodelle gourmet baking cocoa ¼ cup, sifted

Coconut Whipped Cream:

  • 1 can full fat coconut milk or 35% whipping cream
  • 22 g pure maple syrup 1 tbsp, or confectioner's sugar to taste
  • 3 g Rodelle organics pure vanilla extract ½ tsp
  • 9 g cornstarch or 1 packet of Whip It stabilizer 1 tbsp, optional

Instructions

Sponge Cake:

  • Preheat oven to 450ºF.
  • Using a stand mixer, whip eggs, sugar and extracts on high for about 10-12 minutes.
  • Lower to medium speed and whip for another 2 minutes until mixture is light and somewhat viscous.
  • Fold sifted flour by hand into the egg mixture until incorporated.
  • Divide batter in half and fold the cocoa powder into one until incorporated.
  • Alternate pouring the two batters onto a paper-lined or silicone pan and use an offset spatula to spread evenly.
  • Bake immediately on the centre rack at 450-degree for 8-10 minutes.

To make the filling:

  • Chill the coconut milk overnight. This will allow the milk solids and liquids to separate. DO NOT shake the can when you remove it from the fridge.
  • Open the can, drain off the liquids and scoop the solids only into the bowl of a stand mixer.
  • Whip on high until soft peaks form. Add the maple syrup and vanilla extract and whip for a couple seconds to incorporate. Use a sieve to add the corn starch. Continue to whip until full, creamy, firm peaks form.
  • Keep chilled until ready to use.

Assembly:

  • Trim the edges of the cake if needed and lay flat, bottom side up, on a piece of parchment.
  • Use the parchment to roll the cake up loosely and allow to rest for about 10-15 minutes. This allows for easier rolling once filled.
    How to roll swiss rolls
  • Unroll cake and use an offset spatula to spread the chilled, whipped coconut cream evenly over the surface of the cake. You can add chopped, fresh fruits of your choosing at this point.
  • Use the parchment to roll the filled cake, peeling back the parchment with each roll.
  • Once fully rolled, fold parchment over and use a straight, sturdy edge to push lightly against the roll, as you pull the parchment.
    How to roll swiss rolls
  • Enjoy as is, or decorate with additional whipped cream, nuts, shaved chocolate etc.

Notes

Sweet Tip: I always chill my bowl and whisk in the freezer for 5-10 minutes prior to making whipped cream.
For a more stable whipped cream, I sometimes add Whip It, cornstarch, gelatin or agar agar.

I-Sugar-Coat-It-Blog-Signature-Green

Minty Lemongrass Limenade

July 2015 By i sugar coat it! 11 Comments

Ginger Lemongrass Limeade

Ginger Lemongrass Limeade
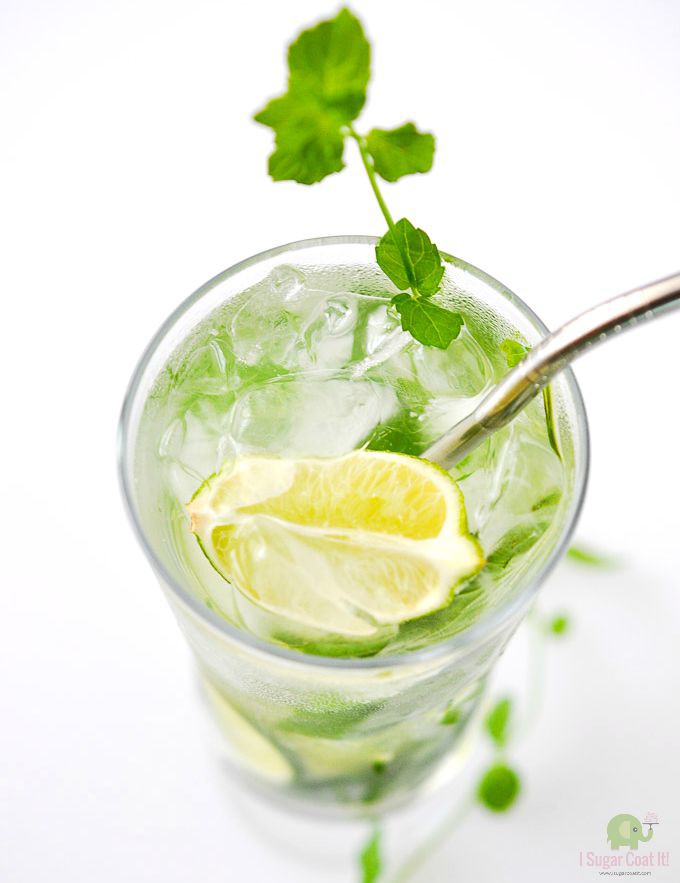
This refreshingly delicious Ginger Lemongrass Limeade is a flavourful explosion of lemongrass, ginger, mint, lime and a dash of bitters. The perfect remedy for hot, sticky summer days.

My very first spa experience included sipping on tall, slender glasses of cool citrus and lemongrass-infused water, while wrapped in plush, white robes and slipper-clad feet. I was immediately reminded of my childhood and a similar concoction we drank to ease tummy aches. One of my grandmother's remedies that I continue to use and enjoy warm as a tummy-ache tamer, and cold, with a touch of alcohol, as a summer refresher.

Ginger Lemongrass Limeade

My childhood love of lemongrass, ginger (and tamarind, mmmm tamarind), led to my love affair with Thai food - pad thai, khao neeo, tom kha gai, yum neua - I'll stop before I eat my laptop. I L.O.V.E Thai food.   Not some of the crap they make here using ketchup and who knows what else, but authentic mounds of noodles purchased at a street vendor from whom I would otherwise think twice about eating. But I digress...

This tall refreshing glass of goodness has gone from serving medicinal* purposes to being the life of the party. Grandma would be so very proud!! I have yet to master her lemonade, but I thought I would enhance the natural flavour profile of lemongrass by adding a little ginger, mint and lime to get me somewhere in the ballpark and a few drops of bitters to knock it out of said park.

The syrup was made using my sous vide immersion cooker. Are you familiar with the sous vide way of cooking? Do you own a sous vide? I'll tell you more about it in a future post. I imagine most people haven't, so the recipe below is the traditional pot method, to keep things simple and accessible.

Ginger Lemongrass Limeade

If you have not used lemongrass, then you most definite should. They can be found at Asian markets and some of the more forward bigger chains. The look resembles that of green onion (at least to me), but lighter in colour with more compact stalks. It imparts a beautiful fragrance and taste that works well in anything from hot and cold drinks, to curries, to baked goods to soup - Tom Yam and Tom Kha Kai being two of my faves. I've even used lemongrass in ganache (watch for that post). We use it whole, sliced, grated or pounded to a paste depending on what we are making. It's so versatile and so very tasty and tasty. I can't believe I've waited this long to blog about it!

Thinking back on all the fruits, vegetables and flavours I  got to experience as a child makes me now realize how much I have taken for granted. I'm realizing more and more that a lot of what some people consider exotic and new in the food world were quite commonplace in our household. I moved to the U.S. at a very young age, but my grandparents always supplied us with our favourite goodies on every visit. I also appreciate the city in which I now live. The blend of cultures and cuisines make shopping and eating a never-ending adventure. Pssst... you can still catch Summerlicious 2015.

Ginger Lemongrass Limeade

*In case you missed this post, my grandmother used to add bitters to her lemonade - yes, we were lush kids. Bitters are believed to have restorative properties (you can Google or check Wikipedia). In addition to being the secret ingredient in my grandmother's lemonade, I fondly remember it as the stuff that cured our hiccoughs.

Craving some more citrus? Try these recipes:

Lemon Myrtle Creme Chantilly Mini Cakes

Easy Lemon Lavender Cookies

Key lime Mojito Mousse Cake

Minty Lemongrass Limenade
Print Recipe

Ginger Lemongrass Limeade

Ginger Lemongrass Limeade is a refreshing blend of fresh lemongrass, lime, mint, ginger and a dash of bitters.
Prep Time2 hours hrs
Cook Time10 minutes mins
Total Time2 hours hrs 10 minutes mins
Course: Drinks
Servings: 4
Author: I Sugar Coat It

Ingredients

Lemongrass Simple Syrup

  • core of two lemongrass cut into pieces
  • 190 g granulated sugar 1 cup, coconut or brown sugar work, but produce a darker syrup
  • 250 ml water 1 cup
  • 2.5 cm fresh ginger 1 inch, the ginger adds a nice kick, but is optional, peeled and pounded or sliced

Limeade

  • 1000 ml water 4 cups
  • 2 limes juiced
  • 250 ml lemongrass simple syrup 1 cup
  • fresh mint sprigs
  • 2-3 scant drops of bitters
  • ice

Garnish

  • lime wedges
  • fresh mint leaves
  • lemongrass

Instructions

Lemongrass Simple Syrup

  • Bring the lemongrass, sugar, water and ginger to a simmer.
  • Remove from heat, cover and allow to cool completely, about 1-2 hours.
  • Strain into a container, secure with a lid and store in the refrigerator until ready to use.

Limeade

  • Pour four cups cold water into a jug.
  • Stir in the lemongrass syrup. If you prefer a sweeter mixture, add some sugar to taste.
  • Add a few dashes of bitters to taste.
  • Keep chilled.
  • To serve, muddle fresh mint and lime in tall glasses, add crushed ice and fill with limeade.
  • Garnish to your liking.

I-Sugar-Coat-It-Blog-Signature-Green

Chocolate Dipped Champagne Cherries

July 2015 By i sugar coat it! 16 Comments

Chocolate Dipped Champagne Cherries

Chocolate Dipped Champagne Cherries
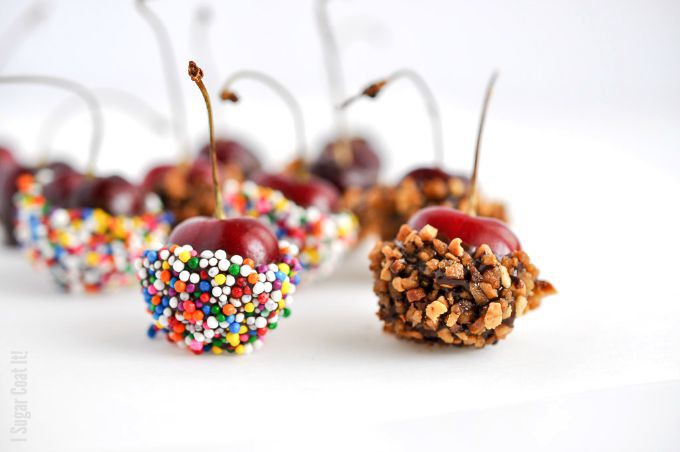
We're poppin' cherries, yo! Chocolate-Dipped Champagne Cherries. Perfect for warm weather entertaining on the fly, managing miserable Mondays (good morning!), or for a little boudoir time flanked in fine linens with a manservant on hand to pop them into your eager lips. Whatever the scenario, these drunken little gems dipped in chocolate may very well awaken your inner Isis or Cleopatra.

Sadly, my inner goddess has been asleep, a coma I suspect, for some time. Her curls are dull and matted, her eyelash-less lids are swollen, her under-eyes are dark and sunken, she is simultaneously puffy and gaunt and her diva stance is anything but, these days. Nothing a little spa time, or an extended vacation won't fix, I suppose.
Chocolate Dipped Champagne CherriesThis year I didn't get around to picking cherries or strawberries, but I'm hoping to get in on the raspberry and blueberry action. We're just past the peak of local cherry season, so we have started to pit and freeze some of our fresh haul for the off-season. I am not a fan of baked/cooked fruits, but I love a smoothie or ice cream packed with frozen cherries. I am also thinking of dehydrating a few to make some more cherry powder for baking. I love using powdered fruit to colour and flavour baked goods, especially macarons. YUM!
Chocolate Dipped Champagne CherriesWhile we are still in the hot, humid, oven-free phase of summer, enjoying the local bounty just as they are is most definitely the way to go. Can you think of an easier dessert? Wash, pit, dip, decorate and enjoy!

Chocolate Dipped Champagne Cherries
Print Recipe
5 from 3 votes

Chocolate Dipped Champagne Cherries

Prep Time15 minutes mins
Total Time15 minutes mins
Course: Dessert
Servings: 24
Author: I Sugar Coat It

Ingredients

  • 1 cup champagne or other alcoholic beverage of your choice
  • 2 dozen fresh cherries pitted, stem intact
  • 1 cup pre-crystallized dark chocolate milk or white works
  • sprinkles praline, jimmies to decorate

Instructions

  • Pit cherries and leave stems intact.
  • Add to bowl of champagne and allow to soak for 30 minutes.
  • Remove from champagne and place on a rack to allow excess fluids to drip off.
  • Dip cherries into chocolate and set aside to dry on a sheet of parchment paper.
  • If adding sprinkles etc. dip immediately after coating with chocolate.
  • Allow chocolate to set.
  • Enjoy!

I-Sugar-Coat-It-Blog-Signature-Green

Pear Raspberry Chardonnay Ice Cream Bars + Yonanas Review

July 2015 By i sugar coat it! 8 Comments

Pear Raspberry Chardonnay Ice Cream Bars + Yonanas® Review

Pear Raspberry Chardonnay Ice Cream Bars + Yonanas Review
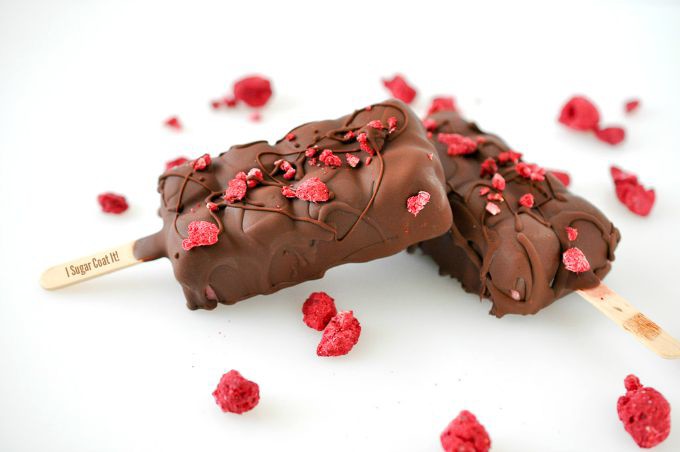
It's summer, so naturally I reach for frozen treats more often than an actual meal. It's the child in me, I suppose. That child likes all things fruity, chilled and covered in chocolate. These Pear Raspberry Chardonnay Ice Cream Bars are not only ridiculously easy to make, they are just as ridiculously tasty.

By now, you have heard all about banana ice cream - 1 frozen banana, a few minutes in a food processor and BOOM! I love the stuff! So, when I was contacted about reviewing the Yonanas® Classic Dessert Maker, name aside, I was super curious to see how it would stack up.

Basically, it churns frozen fruit into soft-serve *ice cream* without the dairy. This set my lactose-intolerant gut all aflutter.

Yonanas Classic Dessert Maker

Image courtesy of Yonanas®

The uint itself is fairly compact and resembles a basic juicer. It is easy to use - slightly thawed, frozen fruit is placed in the chute in an alternating fashion and comes out the other end with the help of a plunger. (ok, let's not go there...) The end result is a bowl of delicious fruit that resembles soft-serve ice cream (when bananas are used), or sorbet (when only fruit) in texture. All without an ice cream maker and no added sugar, saturated fat or cholesterol. YUM! It also comes with recipe booklet to get you started on your way to a delicious summer.

On the flip-side... the machine is noisy. Probably equal to that of my food processor and blender, but for its size, I was not expecting that level of noise. Also, when making this type of fruit ice cream in my food processor, I can immediately use the frozen fruit from my freezer. With the Yonanas®, the fruits need to thaw slightly before you can run them through the machine. I didn't bother to follow this one little step the first time around and although the end product was tasty, the texture was disappointing. When I allowed the fruit to thaw at room temperature for about ten minutes, it produced a much better texture.

Finally, once disassembled, there was a lot of fruit left in the machine (see photo below). Fortunately, it was surprisingly easy to scoop off, making clean-up and reassembly a cinch.

Pear Raspberry Chardonnay Ice Cream Bars + Yonanas Review

I decided to make ice cream bars using one of my favourite molds to see how the ice cream would hold up in comparison to my Banana Hazelnut Espresso Ice Cream Pops. This one wasn't as melty during the chocolate application which made working with it much easier and less rushed. Still, I am a little hesitant to recommend one over the other as the same variables were not applied.

Which brings me to whether I would purchase this myself. I own an ice cream maker attachment for my KA, a good quality food processor and an even better quality blender (eeek! just thinking about them makes me want to purge...), so I really couldn't justify this purchase.

Were I not already in possession of those items, I would likely get one. It does what it says and fairly well at that, with very little effort. It would be a great addition to summer parties and barbeques - imagine setting out a plethora of fruits and having guests make their very own customized frozen treats. I imagine it might be a fun addition to kids' parties, as well. Heck, I've whipped up a batch for breakfast (sans alcohol, of course)! Ice cream for breakfast, people!!!
Pear Raspberry Chardonnay Ice Cream Bars + Yonanas ReviewIf you are interested in picking up a Yonanas® to help bring a little sweet chill to your summer, its available for purchase from Canadian Tire, Walmart and Loblaws in Canada. You can also find it on Amazon.


{Disclaimer: This post is sponsored by Yonanas®, however, all opinions and content are my own, unless otherwise stated. This post also contains affiliate links.}

Pear Raspberry Chardonnay Ice Cream Bars + Yonanas Review
Print Recipe

Pear Raspberry Chardonnay Ice Cream Bars

Course: Dessert
Author: I Sugar Coat It (adapted from Yonanas)

Ingredients

  • 2 frozen ripe bananas
  • ¾ cup frozen pear sliced
  • ¼ cup frozen raspberries
  • 2 frozen cubes of chardonnay freeze leftover wine in ice-cube trays

Instructions

  • Remove frozen fruit from freezer and allow to sit at room temperature for a few minutes.
  • Insert 1 frozen banana.
  • Add ½ cup frozen pear.
  • Add all the raspberries.
  • Add the 2 cubes of chardonnay.
  • Insert remaining banana.
  • Add remaining frozen pear.
  • Stir in bowl until evenly combined.
  • Enjoy immediately, or store in freezer.
  • To make the ice-cream bars, place in a mold of your choosing and freeze for at least four hours.
  • Coat with melted chocolate.

I-Sugar-Coat-It-Blog-Signature-Green

Coconut Cherry Kamut Smoothie Bowl. Smoothie Resolution Round Up 2017.

July 2015 By i sugar coat it! 12 Comments

Coconut Cherry Kamut Smoothie Bowl

Coconut Cherry Kamut Smoothie Bowl is an easy, delicious, filling blend of Kamut, coconut milk, spinach and dark sweet cherries.

Coconut Kefir Cherry Kamut Smoothie BowlI have been on an extended medical leave and it has been the longest couple months of my life. I feel like I have aged way beyond my years and I am officially completely eyelash-less. If peeling off my skin wasn't so much work and such a painful undertaking I would do that to escape what has been my life of late. That said, I am constantly reminded that things could be much worse.

I am alive after all and grateful for our medical system, paid work leave, family, friends and a Dude who loves me fiercely and unconditionally AND has kept me well-fed (at least when I am able to keep my food down).

Speaking of food... it feels like forever and a day since I have been in my kitchen for anything more than boiling water for tea. Probably a good thing, because my sleep pattern has been much like that of a newborn and we all know newborns have no place around kitchen appliances, especially a gas range/oven.

Blogging has been equally challenging - I basically fall asleep after a few sentences, deleting a post or two in error along the way. Until now, I hadn't written a post, or done much else for that matter, since May.

In short, I have never felt so fricking icky, tired and useless!

Coconut Kefir Cherry Kamut Smoothie BowlBut back to the stuff that has sustained me over the last little while...

I am not sure why someone felt the need to strip my mason jar of its contents to fill a bowl, but I am generally open to change. Heck, I sometimes enjoy my breakfast frozen and on a stick, so the transition from cup to bowl isn't exactly earth-shattering. Delicious? Yes!

This Coconut Cherry Kamut Smoothie Bowl concoction has been one of my faves to date (here's another). What this lacked in colour (think cement), it delivered in taste. I mean, come on people... CHEEERRIES!!

Dark, sweet, delicious cherries and some other great ingredients like coconut milk, spinach and Kamut. We were out of oats, so Khorasan Wheat, known as Kamut®, was used instead. Kamut imparts a nutty flavour, is easily digestible and is described as a 'high energy wheat' because of its high lipids content. It is also said to be higher in protein (12-18%) and many minerals, selenium in particular. source

Coconut Kefir Cherry Kamut Smoothie BowlWe started using Kamut® to replace some protein in the Dude's vegetarian lifestyle. A couple months ago, I experimented with Kamut in a number of ways, including baking and will share those recipes over the coming months.

In the meantime, give our Coconut Cherry Kamut Smoothie Bowl a try. If you can't find Kamut®, oats will work just fine and coconut milk can be substituted for kefir. Either way, I think you will find this, a satisfying bowl of deliciousness.

Click for more delicious Breakfast & Brunch  ideas.

Coconut Cherry Kamut Smoothie Bowl. Smoothie Resolution Round Up 2017.
Print Recipe

Coconut Cherry Kamut Smoothie Bowl

Coconut Cherry Kamut Smoothie Bowl is an easy, delicious, filling blend of Kamut, coconut milk, spinach and dark sweet cherries.
Prep Time20 minutes mins
Total Time20 minutes mins
Course: Breakfast
Servings: 2
Author: I Sugar Coat It

Ingredients

  • 500 ml coconut milk 2 cups, or kefir
  • 130 g organic Kamut® flakes 1 ¼ cups, or oats
  • Handful of organic baby spinach
  • A generous handful of fresh cherries about a cup, pitted and chilled
  • Date paste for sweetening optional
  • Mix of favourite fruits and chia seeds for topping

Instructions

  • Place the coconut milk and kamut flakes in a bowl and allow to soak for 10-15 minutes.
  • Add to blender along with the spinach, cherries and sweetener (if using) and blend until smooth.
  • Pour into bowls and top with fresh fruits of choice. I like a little crunch, so I usually enjoy mine topped with a little bit of kamut flakes or granola along with some fresh fruits and chia seeds.

I-Sugar-Coat-It-Blog-Signature-Green

  • « Go to Previous Page
  • Page 1
  • Interim pages omitted …
  • Page 22
  • Page 23
  • Page 24
  • Page 25
  • Page 26
  • Interim pages omitted …
  • Page 51
  • Go to Next Page »

Primary Sidebar

Never Miss A Happy Ending...

Previous Sweetness...

Search

Filter by Category

Filter by Date

SWEETEN YOUR INBOX!

All Content Including Images Copyright Jacqueline | I Sugar Coat It© 2026