• Skip to primary navigation
  • Skip to main content
  • Skip to primary sidebar
  • Home
  • About
    • About I Sugar Coat It
    • Features & Press
    • Copyright
    • Disclosure
    • Privacy Policy
  • Recipes
  • How-To
  • Contact
  • sous vide sista

I Sugar Coat It

Home

All Posts

Pumpkin Loaf with Pecan Pumpkin Spice Glaze

October 2015 By i sugar coat it! 19 Comments

Pumpkin Loaf With Pecan Pumpkin Spice Glaze

Pumpkin Loaf With Pecan Pumpkin Spice Glaze
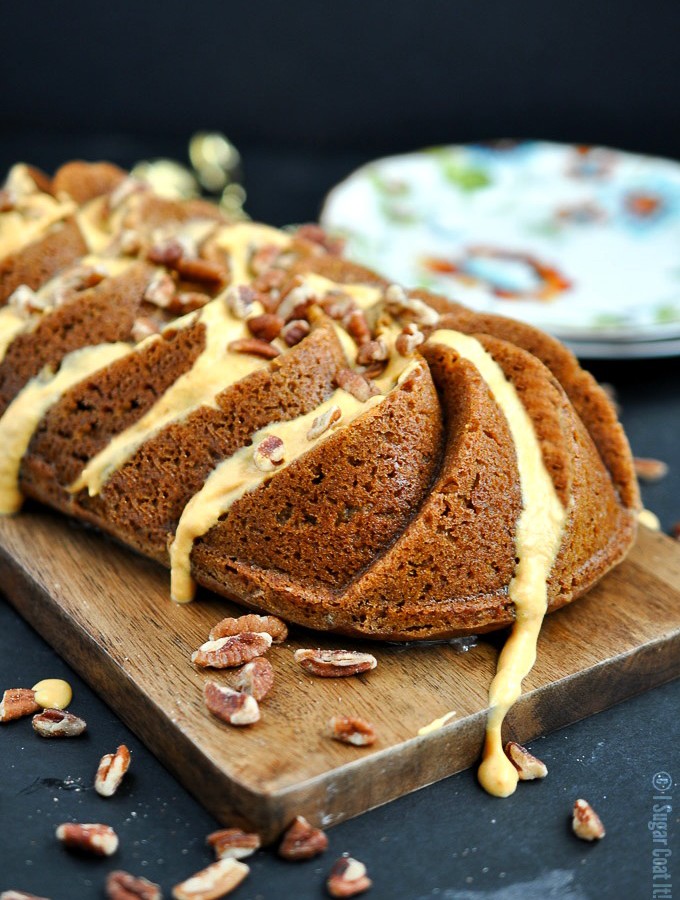
I adore Fall with all her earthy tones and hypnotic aromas, but this year it has taken me a while to embrace the season. A generous slice of this swirly Pumpkin Loaf With Pecan Pumpkin Spice Glaze, bursting with the flavours and spices synonymous with the season, helped to ease me into the here and now.

...

Read More

Roasted Spiralized Potatoes

October 2015 By i sugar coat it! 5 Comments

Roasted Spiralized Potatoes

Roasted Spiralized Potatoes
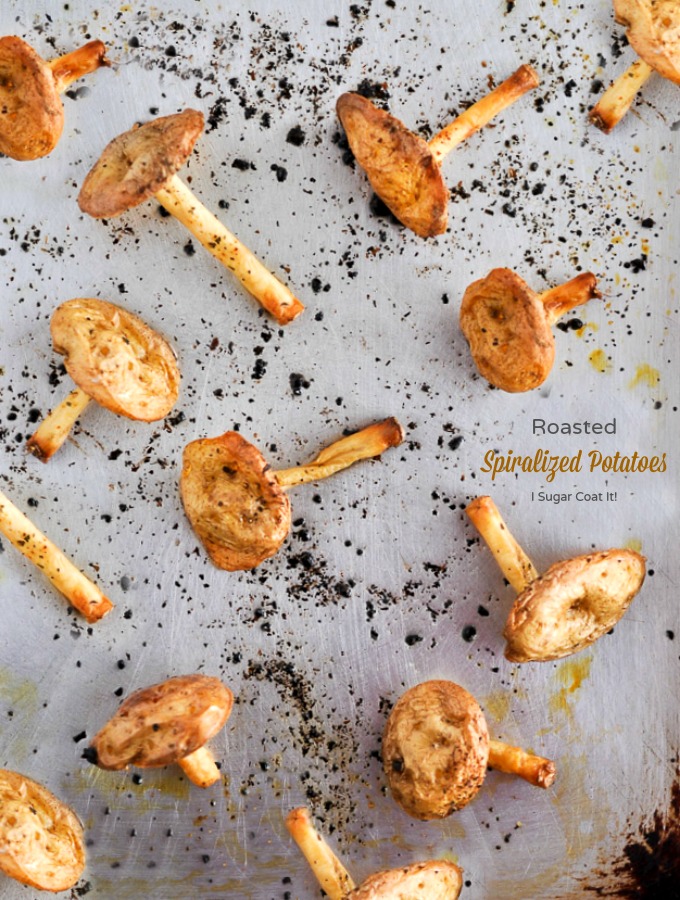
Roasted Spiralized Potatoes are the mushroom-shaped leftover pieces of spiralized potatoes. Dusted with oil and parmesan and roasted to crispy perfection, they make the perfect Meatless Monday side.

We have been enjoying our spiralizer for about a year now. I wasn't on board when the Dude made the purchase, but that changed quickly. The summer saw lots of spiralizer-inspired meals and now that the cooler months are upon us, I see many spiralized comfort food creations in the wings.

Roasted Spiralized PotatoesThe very first time we spiralized sweet potatoes, we were left with pieces at the end that resembled mushrooms. I was immediately intrigued. So I baked the four pieces them along with the spiralized batch and liked how they turned out. Crispy on the outside and sweet and tender inside. I thought I would Instagram them, but we got to eating dinner and that was that.

About a week later, we spiralized a bag of potatoes to feed a few mouths and again we were left with the mushroom-looking ends, only lots more. I sprayed them with a little truffle oil, sprinkled them with freshly grated parmesan and popped them in the oven. These were even better than the sweet potato version. With the skin still attached to the cap, they roasted up even crispier, but still deliciously tender inside. Again, I meant to post them on Instagram, but they were gobbled up immediately.

Roasted Spiralized PotatoesWe made them from time to time, but I never thought to share here, until the Dude asked whether I had. So, I checked on the interwebs and was quite surprised to not find anything similar. I happen to think they are super fun, so felt it was time I shared them with you!!

Next time you spiralize potatoes, or any other vegetable that produces these caps, save the ends and roast them up into these fun conversation pieces. Get creative and flavour them any way you fancy - rosemary or thyme pair nicely, or you top then with a little garlic aioli, or stick to basics and dip into ketchup.

We enjoyed them as a side for our mostly vegetarian Thanksgiving dinner and again today for Meatless Monday. Now that's comfort food!

Roasted Spiralized PotatoesMore Meatless Monday Munchies:

Avocado Asiago Portobello Burger

Maple Roasted Squash Blender Soup

Kale and Lentil Salad Spoons

Roasted Spiralized Potatoes
Print Recipe
5 from 1 vote

Roasted Spiralized Potatoes

Roasted Spiralized Potatoes are the mushroom-shaped byproduct of spiralized potatoes, dusted with oil and parmesan and roasted to crispy perfection.
Prep Time15 minutes mins
Cook Time20 minutes mins
Total Time35 minutes mins
Course: Main
Servings: 2
Author: I Sugar Coat It

Ingredients

  • organic potato ends from spiralizing I used Russets, washed thoroughly, with skin on
  • oil
  • parmesan cheese

Instructions

  • Once you have spiralized the potatoes, save the ends. If not using right away, place in a bowl, cover with cold water and store in the refrigerator. You may also add a little vinegar, or lemon juice to slow oxidation (browning).
  • When ready to use (dry thoroughly), place on a baking sheet, spray with oil and sprinkle with parmessan.
  • Bake at 400ºF for 15 to 20 minutes (depending on your oven).
  • Sprinkle with a little more cheese and oil while still hot and enjoy!

I-Sugar-Coat-It-Blog-Signature-Green


Spiked Chai Latte Mini Bundt Cakes

October 2015 By i sugar coat it! 22 Comments

Amarula Chai Latte Mini Bundt Cakes

Amarula Chai Latte Mini Bundt Cakes #BundtBakers
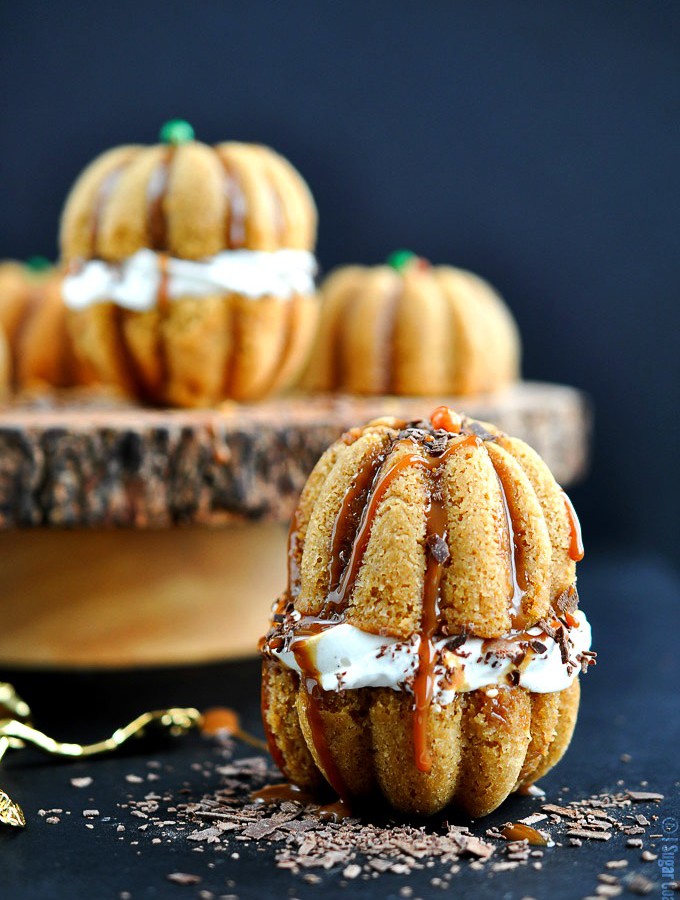
Take one of my favourite hot beverages, add one of my best liked cream liqueurs bake them into little pumpkin-shaped Bundts and you get Amarula Chai Latte Mini Bundt Cakes. Packed with all the flavour of their beverage namesake, delivered in baked mouthfuls.

Amarula Chai Latte Mini Bundt Cakes #BundtBakers

This is my very first contribution to Bundt Bakers - a group of bakers who bake a common-themed Bundt each month. I am a closet Bundt pan hoarder. I just love all the shapes and designs and the interest they add to a dessert in the absence of frostings and the like. I first heard about this group from Olivia at Liv For Cake (see link below), who suggested I join and start putting my mountain of pans to use. I was excited about the last theme, Creative S'mores, but was not able to meet the deadline.

This month's theme is Beverages. When I saw the theme, I wasn't about to pass on the opportunity to turn a favourite beverage into a baked treat.

Amarula Chai Latte Mini Bundt Cakes #BundtBakersThese  Amarula Chai Latte Mini Bundt Cakes are a decadent take on my Amarula Chai Latte Creamsicle, Amarula Truffle Cocktail and Mocha Latte Chip Cake. These single serve mini treats are the perfect combination of creamy, spicy and sweet. I filled them with whipped coconut cream flavoured with chai spice, Amarula liqueur and Rodelle Vanilla Bean Paste. I topped them with dark chocolate shavings and drizzled with a dreamy, homemade caramel (will share recipe in a future post).

These Amarula Chai Latte Mini Bundt Cakes are great enjoyed on their own, but a real treat when assembled like I have done here and comes pretty darn close to its beverage counterpart.

Amarula Chai Latte Mini Bundt Cakes #BundtBakersIt's been a while since I used my Nordic Ware Pumpkin Patch to make these Spicy Pumpkin Bundt Minis. How did four years fly by so quickly?? Well, the plan is to dust off a few of my pans and join in on the Bundt fun each month, so stay tuned!

Spiked Chai Latte Mini Bundt Cakes
Print Recipe
5 from 2 votes

Amarula Chai Latte Mini Bundt Cakes #BundtBakers

A favourite hot beverage spiked with a cream liqueur, baked into decadent mini pumpkins and filled with chai spiced whipped coconut cream.
Prep Time20 minutes mins
Cook Time35 minutes mins
Total Time55 minutes mins
Course: Dessert
Servings: 12
Author: I Sugar Coat It

Ingredients

Cake

  • 250 grams coconut milk 1 cup
  • 8 grams chai loose leaf tea 2 tablespoons
  • 55 grams Amarula cream liqueur ¼ cup
  • 340 grams all-purpose flour 3 cups
  • 8 grams chai spice 1 tablespoon
  • 7 grams baking powder 2 teaspoons
  • 2 grams salt ½ teaspoon
  • 229 grams coconut oil 1 cup, room temperature
  • 3 large eggs room temperature
  • 20 grams Rodelle vanilla bean paste 1 tablespoon
  • 400 grams brown sugar 2 cups, loosely packed

Whipped Cream:

  • 250 grams coconut milk 1 cup, chilled and liquids drained
  • 9 grams Amarula cream liqueur 2 teaspoons, chilled
  • 2.5 grams chai spice 1 teaspoon
  • 12 g super fine sugar 1 tbsp
  • 1 packet whipped cream stabilizer I use WhipIt

Toppings:

  • Caramel chocolate shavings and dragees

Instructions

To make the cake:

  • Preheat oven to 350º F. Prepare Bundt pans and place on a cookie sheet.
  • Bring the coconut milk and loose leaves to a simmer. Remove from heat, add the Amarula and set aside to cool.
  • In a large bowl, sift together the flour, chai spice, baking powder and salt.
  • In a separate bowl, lightly whisk together the oil, eggs and vanilla bean paste. Add the brown sugar and continue to whisk until combined and free of any lumps. Add the coconut milk mixture by pouring through a sieve or strainer.
  • Add the flour mixture to the wet ingredients and stir with a whisk until combined.
  • Use an ice cream scoop to add even amounts of batter to the Bundt molds. Fill to about three quarters of the way.
  • Bake on cookie sheet for 30-35 minutes on the middle rack of the oven.
  • Remove from oven and allow to cool in pan on a on a wire rack for 10 minutes. Turn cakes out onto wire rack and allow to cool completely.

To make whipped cream:

  • Chill a can of coconut milk overnight.
  • Remove from fridge and flip the can over, but do not shake.
  • Open can and scoop the solid contents into a metal bowl. (For best results, chill the mixing bowl along with the whisk attachment of a stand mixer or hand mixer, by placing them in the freezer for 5 -10 minutes before use). Add the Amarula.
  • Sift in the chai spice and add the sugar and stabilizer. Whisk until stiff peaks form.

To assemble:

  • Pair up the completely cooled cakes, using one for the base of the pumpkin and the other for the top.
  • Pipe the whipped coconut cream around the border of the bottom piece, pour some caramel in the centre and sprinkle with chocolate shavings.
  • Place the other half of the pumpkin on top and press lightly to secure.
  • Drizzle with additional caramel and chocolate and top with a colourful dragee.

I-Sugar-Coat-It-Blog-Signature-Green

{This post may contain affiliate links. Purchasing from these links supports the ongoing sweet exploits of I Sugar Coat It!)
Banana Flour Pancakes with Berry Coconut Yogurt

October 2015 By i sugar coat it! 16 Comments

Banana Flour Pancakes + Berry Coconut Yogurt

Banana Flour Pancakes with Berry Coconut Yogurt
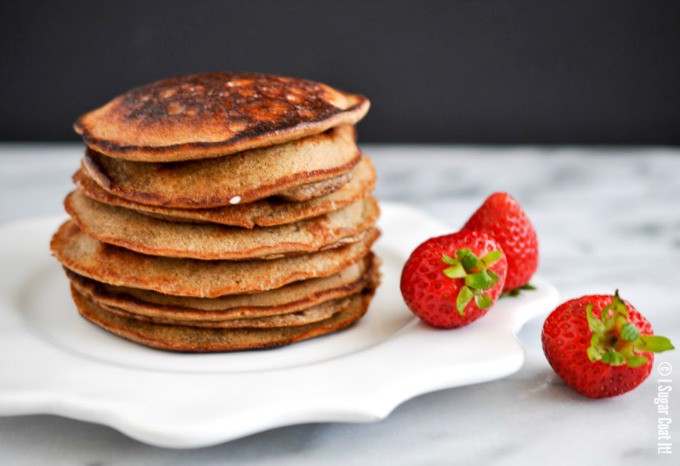
Hey ya'll!! It's been a while since I've shared breakfast with you, so today I am inviting myself into your dining room, kitchen or onto your couch (I don't judge), armed with a stack of fluffy Banana Flour Pancakes Berry Coconut Yogurt!

I imagine by now you've likely heard of the ever popular 2-ingredient banana pancakes. As tasty as they are, this ain't them. Instead, I made these pancakes using banana flour.

Banana flour is said to be packed with fibre, minerals and, of course, potassium and is gluten-free. It is also a great source of a pre-biotic known as resistant starch (RS2), that feeds the good bacteria in the gut. It has been found to aid digestion and boost the immune system without negatively affecting blood sugar levels.* (I don't pretend to be a health expert, so I've included some resources below, for anyone interested in learning more about resistant starch.)
Banana Flour Pancakes with Berry Coconut YogurtIn addition to banana flour, I used homemade date syrup as a sweetener along with creamy, homemade cashew milk, a generous amount of Rodelle organic pure vanilla extract and a little apple cider vinegar to play nice with the baking soda for that extra fluff and puff. The real star of these Banana Flour Pancakes Berry Coconut Yogurt though, is the banana flour.

I do love me some maple syrup on my pancakes and waffles, but more often, I top them with yogurt. Some people find it gross and it can sometimes come across that way in photos, so I tend to stick to syrup for photos. Not this time though. Heck, I sometimes dip my fries in yogurt - that I promise you won't want to see. If your preference is maple syrup, pour away.

Because green bananas are used in the banana flour production process, the end product imparts very little, if any, banana flavour or texture, making it a perfect flour substitute for baked goods and other culinary applications. I've also been loving it in my smoothies. I am still tweaking how I use it in baking/cooking and will share some recipes with you in the near future.

In the meantime, I think this stack of light, fluffy, super deliciousness Banana Flour Pancakes + Berry Coconut Yogurt will definitely hit the breakfast or brunch spot.

Banana Flour Pancakes with Berry Coconut YogurtBefore I go, let me just say sing... 🎶 This ish is bananas B.A.N.A.N.A.S! 🎶 You had to have seen that coming! No way I'd pass up the opportunity to bust out my Gwen Stefani. You can thank me below for getting this song stuck in your head...

*Learn more about the health benefits of Resistant Starch (RS2).

Banana Flour Pancakes with Berry Coconut Yogurt
Print Recipe
4.17 from 6 votes

Banana Flour Pancakes + Berry Coconut Yogurt

Delicious, fluffy banana flour pancakes topped with coconut yogurt and berries.
Prep Time5 minutes mins
Cook Time10 minutes mins
Total Time15 minutes mins
Course: Breakfast
Servings: 2
Author: I Sugar Coat It

Ingredients

Pancakes:

  • 80 g banana flour ½ cup, I use WEDO
  • 3 eggs free run, organic
  • 6 g baking powder 1 ½ tsp
  • 20 g Rodelle organic pure vanilla extract 1 tbsp
  • 30 g date syrup 1 tbsp
  • 123 g cashew milk ½ cup
  • 6 g apple cider vinegar ½ tsp
  • pinch of salt

Toppings:

  • coconut yogurt homemade or store-bought
  • fresh berries

Instructions

To make pancakes:

  • Whisk or blend all the ingredients until smooth.
  • Allow the batter to sit for 3-5 minutes.
  • Prepare a skillet with coconut oil and heat on medium-high heat.
  • Cook each side for about a minute, or until golden brown.

To make topping:

  • Roughly chop some berries and add to a bowl of yogurt.
  • Fold the berries into the yogurt, or use a hand blender and pulse the mixture a few times to incorporate.
  • Top pancakes and enjoy!

Notes

Recipe inspired by the recipe on the WEDO flour packaging.

Plan to make this recipe? I'd love to see it! Snap a shot and share on Instagram using #isugarcoatit, or share on my  Facebook page to spread the sweets! 

I-Sugar-Coat-It-Blog-Signature-Green

Peanut Butter Chocolate Palmiers

September 2015 By i sugar coat it! 6 Comments

Peanut Butter Chocolate Palmiers

These Peanut Butter Chocolate Palmiers are puff pastry cookies layered with Reese's Peanut Butter Chocolate spread, rolled and baked to a delicate crisp. They are ridiculously easy to make and near impossible to stop eating.

Peanut Butter Chocolate Palmiers
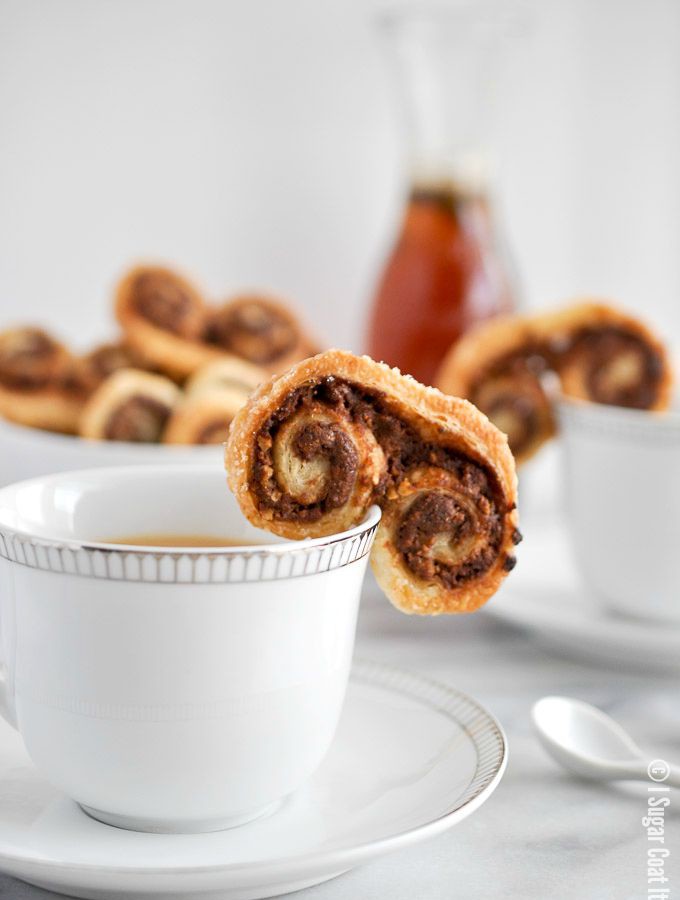
Palmiers - also known as elephant ears, French hearts, butterflies, palm leaves, among others - are delicate, buttery, flaky, cookies made from puff pastry. Homemade puff pastry, although only requiring as little as two ingredients, is a laborious and precise undertaking. I've made it before and the taste is unmatched when compared to some more readily available store-bought varieties. As much as I love making things from scratch, this is one of those times it just makes more sense to go the store-bought route.

Peanut Butter Chocolate PalmiersFor best taste, purchase a good brand. For best results, work with chilled dough - this may mean returning the dough to the fridge to chill a few times as you work. I find this necessary after I've rolled the dough in sugar, as sugar acts as a tenderizer in baked goods, the dough immediately becomes softer when in contact with the sugar.

If you saw the process shot I shared on Instagram, then you can see what not working quickly, coupled with distractions may yield. The first log suffered, so that I could share photos with you, wash my hands, take more photos, wash my hands and so on. The second log received my full attention and was perfection in every way. 🙂

Peanut Butter Chocolate PalmiersThe steps pictured above for these Peanut Butter Chocolate Palmiers are straightforward. For smaller palmiers, roll the dough from the long sides. This, of course, will yield more cookies. For less, but larger cookies, roll the dough from the short sides. I also added some finely chopped, roasted peanuts for added crunch.

Starting with the base ingredients of puff pastry and sugar, you can make endless flavour variations, including savoury cookies like these Asiago Palmiers I shared on Instagram. The one I make most often and all through my starving student days, is rolled in copious amounts of cinnamon and vanilla sugar. They are like miniature cinnamon buns, but only a million times better! They were one of the few things I made back in the day and they were quite popular.

Peanut Butter Chocolate PalmiersWhen I first applied for the opportunity to work with Reese on the #DoYouSpoon campaign, I listed this recipe as one of my initial ideas. As I experimented with the spread, my taste-testers and I felt that my Peanut Butter Chocolate Whipped Coconut Cannoli were the way to go. Although I am not being paid for this second post, I wanted to share with you these deliciously addictive Peanut Butter Chocolate Palmiers to simply spread some sweet elephant ear love. (see what I did there... 🙂 )

Peanut Butter Chocolate Palmiers
Print Recipe
5 from 2 votes

Peanut Butter Chocolate Palmiers

Peanut Butter Chocolate Palmiers are puff pastry cookies layered with Reese's Peanut Butter Chocolate spread, rolled and baked to a delicate crisp.
Prep Time10 minutes mins
Cook Time10 minutes mins
Total Time20 minutes mins
Course: Dessert
Servings: 36 -50
Author: I Sugar Coat It

Ingredients

  • 2 sheets frozen puff pastry dough
  • 65 g sugar of your choosing ⅓ cup, granulated, coconut, demerara
  • 90 g Reese's Peanut Butter Chocolate ½ cup, or another spread of your choosing
  • 40 g peanuts ¼ cup, chopped and roasted

Instructions

  • Follow instructions on the pastry package for thawing. I allow mine to thaw overnight in the fridge, or for an hour at room temperature, if in a hurry. You want the dough to be cool, but workable, to avoid cracking while rolling.
  • Generously sprinkle a non-stick mat with sugar and unroll the dough onto the sugar. Use a rolling pin to lightly press the dough into the sugar. At this point, the dough will begin to soften and may be difficult to roll. Place the mat with the dough on a cookie sheet and chill in the freezer for five minutes before continuing to the next step.
  • Remove from freezer and use an off-set spatula to spread a thin (or generous) layer of the peanut butter chocolate spread across the surface of the dough. Try not to go over board, it will only create a huge mess while baking.
  • Sprinkle roasted peanuts over spread.
  • Tightly roll the dough from each end until they meet in the middle. For more cookies that are smaller, roll from the long edge of the dough. For a smaller amount of larger cookies, roll from the short edge of the dough.
  • Place in the fridge for 30 minutes, or freezer for 10 minutes. Remove and use a sharp knife to cut into ½-inch slices. Place in the fridge for another 30-60 minutes until ready to bake.
  • Preheat oven to 400º F. Remove from fridge and sprinkle with sugar.
  • Bake for approximately 6 minutes. Pull tray out, flip the cookies over and allow to bake for an additional 3-5 minutes, until golden in colour.
  • Remove from oven and allow to cool completely on wore rack.

Notes

Work on one sheet of dough at a time and keep the second dough chilled until ready to use. I like to start working on the second sheet while the prepared cookie roll is in its last chill phase before baking. That way the second tray will be ready to bake right after the first has finished.

Plan to make this recipe? I'd love to see it! Snap a shot and share on Instagram using the hashtag #isugarcoatit, or share on my  Facebook page to spread the sweets! 

I-Sugar-Coat-It-Blog-Signature-Green


Avocado Asiago Portobello Burger

September 2015 By i sugar coat it! 7 Comments

Avocado Asiago Portobello Burger

Avocado Asiago Portobello Burger
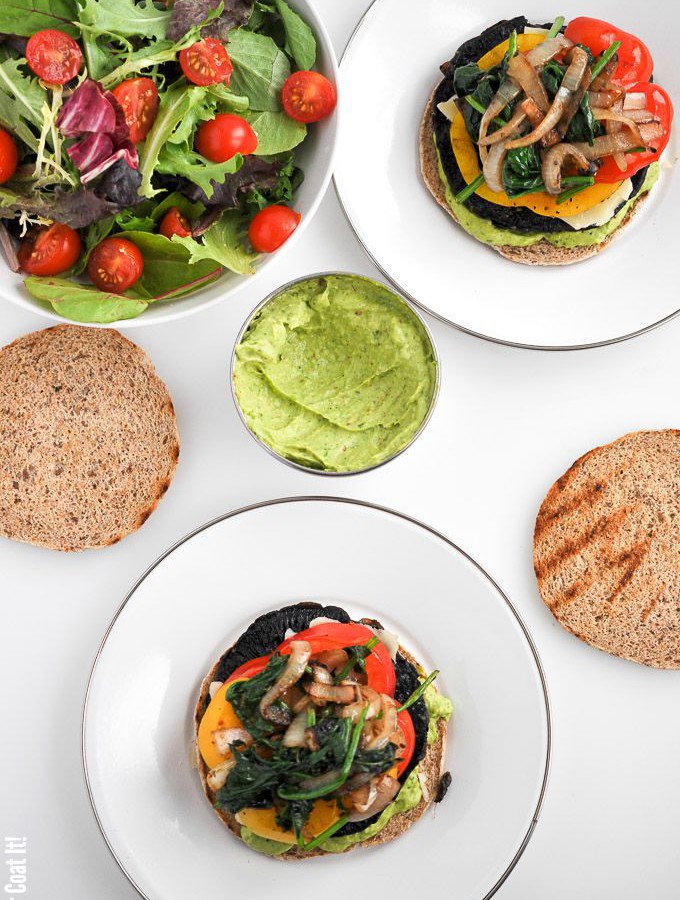
Summer may be over, but the grill is always going and today we're flipping Avocado Asiago Portobello Burger. Crisp, juicy, grilled vegetables piled atop a portobello mushroom cap between layers of irresistible asiago cheese and avocado.

It's my first Meatless Monday post! The one day a week I acquiesce and stand in short-term solidarity with the Dude. I would like to add that he was not always a vegetarian - that lifestyle change came after an extended stay at an ashram, while pursuing his yogi status a few years back. No lie...he is an actual yogi! Not his full-time gig, but a yogi just the same.

With that status came a number of changes for which I was not prepared, nor have I fully accepted. In fact, I sometimes feel duped. You know, like the guy who thinks he snagged a Beyonce, only to find himself unenthusiastically entangled with an Olive Oyl. It's not that Ms. Oyl is lacking or inferior, it's just not what was presented to him at the outset.

In some such cases, one adjusts and embraces and soon come to realize that the Oyl isn't inferior to the Bey.

Avocado Asiago Portobello Burger

Adjust and embrace, I have. I even look forward to that day each week when we whip up a meal that rivals those that are accompanied by meat. This is Avocado Asiago Portobello Burger is one such meal.

The texture of the mushroom mimics that of meat, which is enhanced further by grilling it. The crisp peppers add a little crunch to offset the wilted spinach and caramelized onions. Mustard and ketchup need not apply, the avocado asiago chutney has the condiment job covered. Sandwich between multi-grain flatbread, add a side of salad and a cool beverage and you'll have your tastebud believing it's still summer.

I think this Avocado Asiago Portobello Burger is a keeper... and so is the Dude.

Avocado Asiago Portobello Burger

Before I leave you I want to tell you about a foodie site I am a little embarrassed to admit I've only recently begun using:

yummly

It's like a virtual Recipe Box, which reminds of my ZipList days. Not only will you find an endless supply of delicious meal ideas, you can save them to your personal recipe box! Answering a few questions while setting up your profile will ensure you see recipes that are well-suited to your level of expertise and palate. You can also organize recipes by creating collections for drinks, sides, desserts, breakfast, etc.

To YUM a recipe, here and on your other favourite food blogs, simply click on the YUM social share button. You will find mine at the opening and closing of each post among the other social share buttons. It looks like this:Screen Shot 2015-09-27 at 11.10.17 PM

While you are at it, head on over to the I Sugar Coat It! Yummly page and start YUMMING!!

More Meatless Moments:

Maple Roasted Squash Blender Soup

Kale and Lentil Salad Spoons

Onion Gorgonzola Tart

Avocado Asiago Portobello Burger
Print Recipe

Avocado Asiago Portabello Burger

Prep Time15 minutes mins
Cook Time15 minutes mins
Total Time30 minutes mins
Course: Main
Servings: 6
Author: I Sugar Coat It

Ingredients

Avocado Asiago Chutney

  • 3 ripe avocados peeled, pitted and sliced
  • 1 bunch of garlic scapes washed and chopped
  • ¼ cup fresh cilantro
  • 1-2 tablespoon olive oil
  • aged asiago cheese to taste about ¼ cup
  • chili flakes to taste
  • sea salt to taste

Burger

  • 2 yellow onions sliced and caramelized
  • 2 fists full of baby spinach
  • 6 portobello mushrooms washed and stemmed
  • 2 sweet peppers 1 each of yellow and red, washed, seeded and sliced
  • aged asiago cheese large crumbles
  • 6 multi-grain flat-bread burger buns

Instructions

Chutney

  • Blend all ingredients in a blender until combined. For a chunkier chutney, pulse mixture in a food processor.

Burger

  • Caramelize the onions and mix in the spinach at the end to wilt.
  • Sprinkle mushroom caps with a little olive oil and grill 3-4 minutes on each side.
  • Briefly grill the peppers and buns.
  • Assemble and enjoy!

Notes

This is not a traditional chutney - I use the term chutney loosely here.
Garlic scapes have a very short season, usually around June/July. I buy a lot when they are in season and freeze them. You can also find them in the frozen section of most Asian supermarkets.

I-Sugar-Coat-It-Blog-Signature-Green

Whipped Coconut Chocolate Peanut Butter Cannoli

September 2015 By i sugar coat it! 10 Comments

Peanut Butter Chocolate Whipped Coconut Cannoli {#DoYouSpoon}

This post is sponsored by Hershey's Canada.

Peanut Butter Chocolate Whipped Coconut Cannoli 
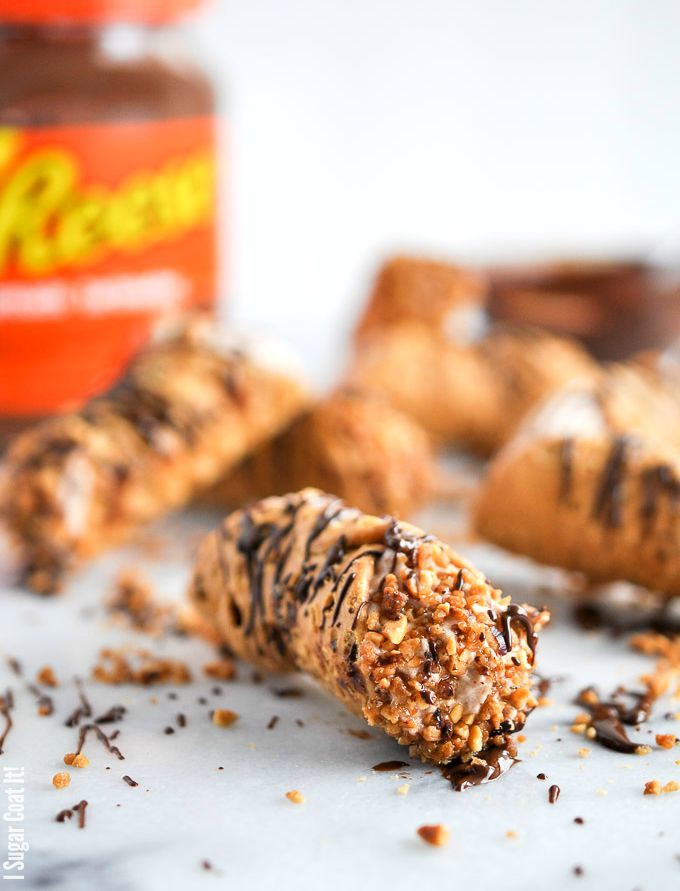
These Peanut Butter Chocolate Whipped Coconut Cannoli are mini bites of homemade cannoli shells stuffed with clouds of whipped peanut butter chocolate coconut cream and topped with peanut praline and dark chocolate drizzle. Go ahead and take a moment...

Chocolate and Peanut Butter! A power couple that can outshine the likes of Brangelina, BeyZ and Kermiggy any day. You simply can't go wrong with this flavour combination. It has been one of my absolute favourite duos since my teens and I love pairing the two in recipes  ranging from cakes to smoothies.


Peanut Butter Chocolate Whipped Coconut Cannoli #DoYouSpoon

Well friends, Reese has packed that undeniably delicious combo into a creamy spread that will have you eating it straight from the jar. And that is exactly what I found myself doing upon delivery of these two jars. I was in the middle of an unplanned home reno, which left me without a kitchen for weeks. It was hotel rooms and toaster ovens for about a month. Argh!

All the while I was dreaming up wonderfully delicious ways in which to incorporate the spread - milkshakes, muffins, buttercream, cookies, macarons, bonbons, mousse, cake, Tiramisu - the list was extensive. I've checked off a few, but in the end, decided to share two of my initial thoughts - Palmiers, which I will share in a separate post, if I can manage to keep them around long enough to photograph (there is another batch resting in the freezer as I type) and these Peanut Butter Chocolate Whipped Coconut Cannoli!

Peanut Butter Chocolate Whipped Coconut CannoliIn the sphere of Italian desserts, Cannoli is high on my list (next to Tiramisu). I love making them the traditional way while playing around with flavour and texture add-ins. For this batch, however, I had something special in mind. I incorporated some of the Reese Peanut Butter Chocolate spread into a shell made with a combination of oat and all-purpose flours. The shells were then paired with a dreamy coconut cream peanut butter chocolate whipped filling. A dark chocolate drizzle and a sprinkling of peanut praline and BOOM! Peanut Butter Chocolate Whipped Coconut Cannoli!!

All that was left to do was share with the usual taste-testing suspects for a yea or nay. All two-dozen of these mini Peanut Butter Chocolate Whipped Coconut Cannoli were promptly devoured with the lip-smacking sounds of approval.

Peanut Butter Chocolate Whipped Coconut CannoliYou can enjoy these mini treats right away, but I prefer to allow them to rest overnight. This allows the flavour from the filling to connect and become one in culinary matrimony with the shells. If for some crazy reason you think they'll stick around for more than a couple days, paint a thin coat of chocolate or cocoa butter on the inside of the shells while still warm. This will help to keep them crisp.

Now go get your hands on a jar, or ten, of this deliciously addictive Reese's Peanut Butter Chocolate spread and whip up a batch of my Peanut Butter Chocolate Whipped Coconut Cannoli, or simply grab a spoon and dig in!

Peanut Butter Chocolate Whipped Coconut Cannoli #DoYouSpoon

Whipped Coconut Chocolate Peanut Butter Cannoli
Print Recipe
5 from 3 votes

Peanut Butter Chocolate Whipped Coconut Cannoli

Homemade cannoli stuffed with decadent clouds of chocolate peanut butter whipped coconut cream and topped with dark chocolate and praline.
Prep Time2 hours hrs 30 minutes mins
Cook Time10 minutes mins
Total Time2 hours hrs 40 minutes mins
Course: Dessert
Servings: 24
Author: I Sugar Coat It

Ingredients

Chocolate Peanut Butter Whipped Coconut Cream Filling

  • 400 ml coconut milk 1 can, reserve the drained liquid, chilled and drained
  • 60 g Reese's Peanut Butter Chocolate Spread ⅓ cup
  • 9 g cornstarch 1 tbsp, WhipIt stabilizer works great, as well

Cannoli Shells

  • 450 g 50/50 blend of oat flour and unbleached all-purpose flour 2 cups, sifted
  • 1 g vanilla powder ⅓ tsp
  • 25 g coconut sugar 2 tbsp
  • 11 g Reese Peanut Butter Chocolate spread 1 tbsp
  • 30 g butter 2 tbsp, or vegetable shortening
  • 60 g cooking wine ¼ cup
  • 1 egg slightly beaten
  • coconut milk for brushing use the reserved liquid from the can of milk
  • oil for cooking

Instructions

To make the filling:

  • Chill the coconut milk overnight. This will allow the milk solids and liquids to separate. DO NOT shake the can when you remove it from the fridge.
  • Turn the can over, so that the end that was down in the fridge is now the top. Open the can, drain off the liquids and scoop the creamy remains into a chilled bowl.
  • Sift the cornstarch and vanilla powder over the coconut and whip on high until soft peaks form.
  • Add the Reese Peanut Butter Chocolate and continue to whip until full, creamy, firm peaks form.
  • Cover and keep chilled until ready to use.

To make the cannoli shells:

  • Add the the flour, sugar and vanilla powder to a large bowl.
  • Cut the butter and peanut butter spread into the flour mixture until it resembles coarse crumbs.
  • Gradually add the cooking wine and then the egg.
  • Mix with your hands until the dough holds together. If still crumbly, add a few more drops of wine.
  • Form the dough into a ball, wrap in plastic and refrigerate for 2 hours.
  • Divide the dough into four pieces, so that you can work with smaller portions.
  • Roll out each piece onto a clean, floured surface to about ⅛-inch and use a round pastry/cookie cutter to cut out 24 circles, 3-inches in size.
  • Loosely wrap each circle around cannoli forms and secure the edges with a dab of coconut milk.
  • Heat a skillet with about 2-inches of vegetable oil to 400-degrees.
  • Fry the dough on the form for approximately 2 minutes, or until golden brown.
  • Remove and place on paper towel to absorb excess oil. Allow to cool briefly before removing from form.
  • If painting the insides with chocolate, this is where you will do so.
  • Allow to cool completely before filling.

Assembly:

  • Using a large french pastry tip, pipe the filling into the shells at both ends.
  • Sprinkle nuts on one, or both ends and drizzle with dark chocolate.

Notes

Leftover shells can be kept in an airtight container for up to two months.

Disclosure: This post was sponsored by Hershey's Canada. I was provided both monetary and product compensation for the purpose of developing a recipe as part of  the #DoYouSpoon campaign. All opinions and content are my own.

I-Sugar-Coat-It-Blog-Signature-Green


Biscoff Chocolate Drip Cake

September 2015 By i sugar coat it! 7 Comments

Biscoff Cookie Butter Chocolate Drip Cake + Video

Biscoff Cookie Butter Chocolate Drip Cake is filled with the awesomeness that is cookie butter cake, swiss meringue buttercream and silky dark chocolate ganache!

Biscoff Chocolate Drip Cake
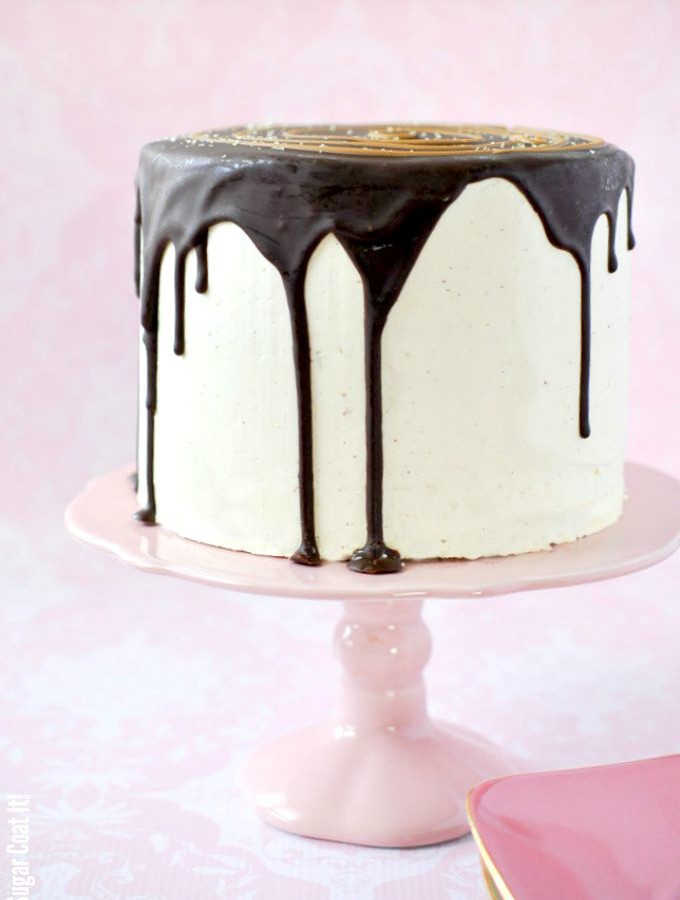
It seems like forever and a day since I made, or shared a cake here on the blog. So today I bring you Biscoff Cookie Butter Chocolate Drip Cake - three delicious layers of Biscoff-laden cake, filled and frosted with a silky smooth vanilla bean swiss meringue buttercream, topped with decadent, dark chocolate ganache!

OK, so this may look familiar to those of you who follow me on Instagram and have committed to memory, everything I have shared to date. Like forty-five weeks ago when I posted this very cake with the hashtag #comingtotheblogsoon! Remember? No?? You are not alone and I clearly have a very distorted concept of time.

Biscoff Chocolate Drip CakeI am what they call an impatient procrastinator (who 'they' are is still unclear). I love my instant gratification in unhealthy doses and I want those doses yesterday, but I'll put it off for weeks at a time if the cost outweighs the benefit.

It's not that I don't want to do the thing - far from it. I just don't want to do it if it takes me away from the other more interesting, fun things. I love learning new things and I'm told a great deal of things come naturally to me, but if I no longer feel challenged or excited by that thing, I will generally move on.

How the Dude has managed to keep my interest for as long as he has, is beyond us both. 🙂

Biscoff Chocolate Drip CakeThere is such a thing as structured procrastination, which seems to allow me to loop back around to the things I've abandoned/paused that I deem worthy of a revisit. This Biscoff Chocolate Drip Cake is one such thing.

Have you ever had cookie butter? I am fully addicted - see here, here, here and here. You need to go grab yourself a jar or ten and be sure to bake up this cake!

Here is a video of the making of said cake. Enjoy!

Biscoff Chocolate Drip Cake
Print Recipe

Biscoff Chocolate Drip Cake

Biscoff Chocolate Drip Cake is three layers of delicious Biscoff cake, filled with frosted with swiss meringue buttercream and topped with dark chocolate.
Prep Time30 minutes mins
Cook Time30 minutes mins
Total Time1 hour hr
Course: Dessert
Servings: 8 -10
Author: I Sugar Coat It

Ingredients

Cake

  • 280 g unbleached all-purpose flour 2 ¼ cup
  • 7 g baking powder 2 tsp
  • 4 g baking soda 1 tsp
  • 2.5 g salt ½ tsp
  • 110 g coconut oil ½ cup
  • 135 g Biscoff spread ¾ cup
  • 95 g granulated sugar ½ cup
  • 100 g brown sugar ½ cup
  • 3 eggs
  • 8 g vanilla bean paste ½ tbsp, or vanilla extract
  • 240 g coconut milk 1 cup, full fat

Buttercream

  • 147 g liquid egg whites ⅔ cup
  • 192 g granulated sugar 1 cup
  • pinch of salt
  • 230 g unsalted butter 1 cup, at room temperature
  • 26 g vanilla bean paste 2 tbsp

Ganache

  • 90 g dark chocolate disks or chips ½ cup
  • 116 g coconut milk ½ cup
  • 14 g glucose 2 tsp

Instructions

  • Preheat oven to 350ºF. Prepare three 6-inch pans and place on a cookie sheet.
  • Sift the flour, baking powder, baking soda and salt into a small bowl, or onto a sheet of parchment. Set aside.
  • Add the oil, Biscoff spread, granulated and brown sugar and vanilla extract to the bowl of a stand mixer. Using the paddle attachment, beat until combined. Scape sides, if needed.
  • Add the flour mixture and continue to beat. Scrape down sides.
  • Gradually add the milk and beat until batter is smooth.
  • Divide the batter evenly among the three pans for uniformed cake layers.
  • Place the baking tray with the pans on the middle rack of a pre-heated oven and bake for 30 minutes. Check for doneness before removing.
  • Remove from oven and place the three pans on a cooling rack and allow to cool for 10-15 minutes before removing from pan.
  • Allow to cool completely on a wire cooling rack.

To make the buttercream:

  • Using a clean towel and some lemon juice or vinegar, clean your mixing bowl, whisk attachment and any utensils to remove any traces of grease. Rinse and dry thoroughly.
  • Fill a heavy duty pot about a quarter of the way with water and place on the stove over medium heat to simmer.
  • Add egg whites, sugar and salt to the mixing bowl and place over the pot, ensuring the bottom of the bowl is not in contact with the water in the pot. Insert a thermometer into the egg white mixture and whisk continuously and gently, until temperature reaches 160°F.
  • Once at the correct temperature, remove from heat and transfer mixing bowl to the stand mixer. With the whisk attachment, begin to whip the egg mixture until it becomes a thick, glossy, meringue and the bottom of the bowl is no longer warm to the touch. Do not begin adding butter while the bowl is still warm.
  • Switch from your whisk to paddle attachment and with mixer on low speed, add butter cubes, one at a time, until incorporated. Continue to mix until it has reached a silky smooth texture.
  • Add vanilla bean paste, continuing to beat on low speed until well combined.

Ganache

  • Place chocolate in a bowl and set aside.
  • Add the glucose and cream to a small saucepan and bring to a light boil.
  • Pour the hot cream mixture over the chocolate and allow to sit for about 2-3 minutes.
  • use a hand whisk to gently stir the mixture until fully combined.
  • Allow to cool to room temperature then pour over cake, using an offset spatula to move the ganache to the edges and level the surface, as needed.
  • Soften about a tablespoon of Biscoff and drizzle over the ganache.

Assembly

  • See video above

I-Sugar-Coat-It-Blog-Signature-Green

Lemongrass Moscow Mules

September 2015 By i sugar coat it! 6 Comments

Lemongrass Moscow Mules

Lemongrass Moscow Mules
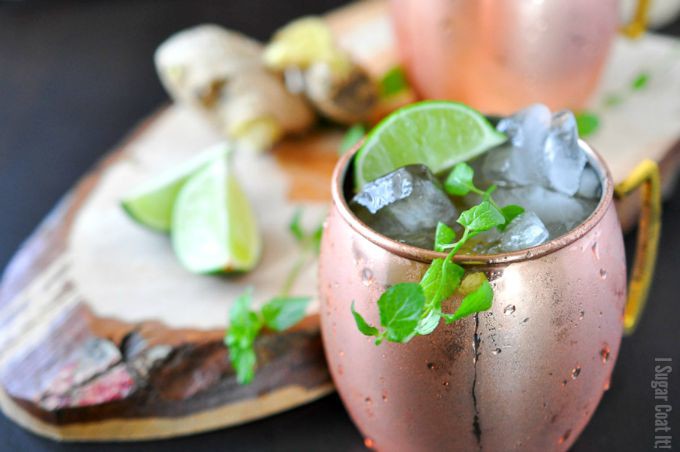
Beat the heat and wrap up the long weekend with these frosty, thirst-quenching Lemongrass Moscow Mules! Your standard Moscow Mule kicked up a notch with refreshing, aromatic lemongrass. Also perfectly delicious frozen into popsicle.

Is your thirst not yet quenched?!?

Lemongrass Moscow MulesI keep hearing dirty little rumours about summer leaving town. WHAAAAT?? I haven't had many opportunities to get out and truly enjoy it, so for me it is only just beginning. On the days that I feel well enough and can summon enough energy, I'll be out soaking up all the warm, healing vitamin-D the season has to offer. Is there a more natural mood-enhancer than smile-inducing sun rays warming your face, shoulders and heart?

I love that deep bronze tint my skin gets after only a few minutes in the sun. How the soft, brilliant morning light floods our bedroom, nudging me awake with warm, gentle kisses on my neck, cheeks and tummy. Oh, maybe that's the Dude... 😉

Don't go summer. DON'T GO!! The very thought of the frigid winter months ahead makes me shudder. Brrrr... shake that thought and let's continue sipping on a few more of these Lemongrass Moscow Mules.

Lemongrass Moscow MulesI'll have to take the virgin route for the next few rounds, however. 🙁 But please don't let my predicament stop you from splashing this drink with as much vodka as your palate desires. I certainly did in this batch I shared on Instagram back in May.

Cheers!

More Long Weekend Libations:

Ginger Lemongrass Limeade

Whipped Coconut Peanut Butter Banana Blizzard

Ginger Beer Rosemary Rye Cooler

Lemongrass Moscow Mules
Print Recipe

Lemongrass Moscow Mules

This recipe for Lemongrass Moscow Mules is a refreshing blend of ginger beer, lime, vodka with a splash of lemongrass!
Prep Time5 minutes mins
Total Time5 minutes mins
Course: Drinks
Servings: 2
Author: I Sugar Coat It! {adapted from Moscow Mule packaging)

Ingredients

  • 2 - 16 oz . Moscow Mule Mugs
  • fresh mint sprigs about a fistful
  • ice crushed or cubes
  • 2 oz .Lemongrass Syrup adjust to your liking
  • 8 oz . ginger beer
  • 4 oz . vodka
  • juice of 1 lime
  • lime wedges mint sprigs or lemongrass stalks to garnish

Instructions

  • Muddle mint sprigs in the bottom of two chilled mug
  • Fill mugs halfway with ice.
  • Split the lemongrass syrup among the two mugs and stir in the ginger beer, vodka and lime juice.
  • Garnish with mint sprigs and lime wedges or lemongrass stalks.
  • Enjoy!

Notes

Sweet Tips:
Make the lemongrass syrup ahead and keep refrigerated.

I-Sugar-Coat-It-Blog-Signature-Green


  • « Go to Previous Page
  • Page 1
  • Interim pages omitted …
  • Page 21
  • Page 22
  • Page 23
  • Page 24
  • Page 25
  • Interim pages omitted …
  • Page 51
  • Go to Next Page »

Primary Sidebar

Never Miss A Happy Ending...

Previous Sweetness...

Search

Filter by Category

Filter by Date

SWEETEN YOUR INBOX!

All Content Including Images Copyright Jacqueline | I Sugar Coat It© 2026